background image


MFT1x_seitliche_Tastatur_Kurzübersicht_MFT1x_side_keyboard_Brief_Overview_V1.01_de_en 

21 / 47


5.2.8  Erklärungen und Beispiele zur Tabelle Tastencodes 

Zeile 31: Wird 

bei der Taste „1“ der Code „001e“ hinterlegt, wird das Zeichen „1“ ausgegeben. Mit aktiver 

Umschalttaste wird das Zeichen „!“ ausgegeben.  

Zeile: 59: 

Der Taste „F1“ ist in der Ebene 0 (grüne und rote LED aus) der Wert „003a“ hinterlegt, in der 

Ebene 1 

(grüne LED) wird der Wert „0004“ hinterlegt. Es wird somit das Zeichen „a“/„A“ ausgegeben. In der 

Ebene 2 

(rote LED) wird „F13“ mit dem Wert „0068“ ausgegeben. 

5.2.8.1  Beispiele 

Für eine Tastenprogrammierung sind folgende Schritte durchzuführen 

 
Beispiel 1: Taste S1 programmieren


Die Tastennummer laut Abbildung 19 suchen. Die Taste S1 ist laut Übersicht in der Abbildung 19 die Taste 
Nr. 14. 

Auslesen der Taste Nr. 14


'GET 0 14'   liefert den Code der Taste 14 in der Ebene 0 (PAGE00).


'GET 1 14'   liefert den Code der Taste 14 in der Ebene 1 (PAGE01).


'GET 2 14'   liefert den Code der Taste 14 in der Ebene 2 (PAGE02).


Die Taste S1 (Taste Nr. 14) 

soll in der Ebene 0 den Wert „CTRL + C“ (kopieren) liefern


„CTRL “ in der Tastencodetabelle suchen     

„e0“ 

„C“ in der Tastencodetabelle suchen  


„06“ 

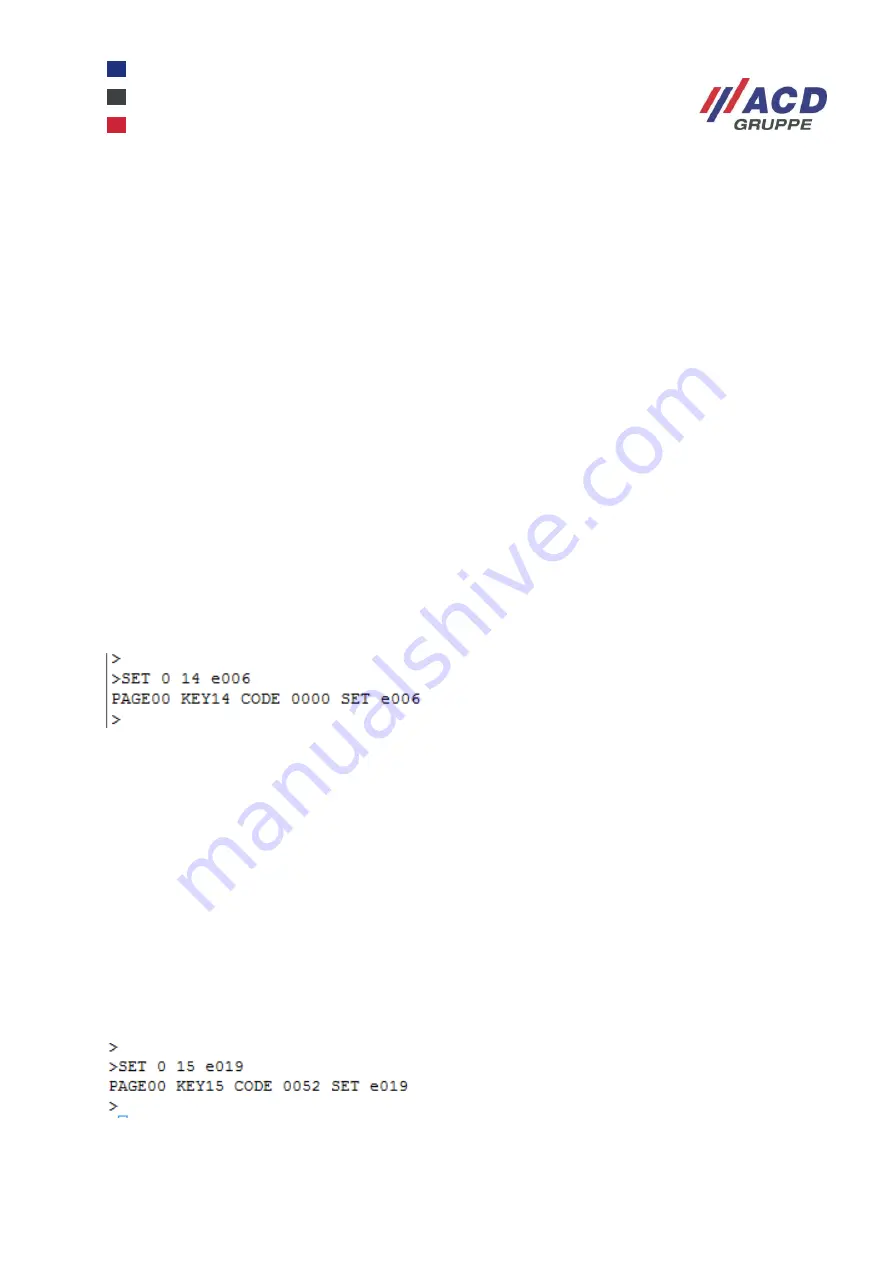
Also muss der Taste Nr. 14 (S1) der Wert „e006“ zugewiesen werden. 
 
Programmieren der Taste Nr. 14: 


'SET 0 14 e006' 


Rückmeldung: PAGE 00 KEY14 CODE 000 SET e006 


Abbildung 25: Beispielhaftes Programmieren der Taste Nr. 14 S1 

 
Nach dem Programmieren kann mit dem Befehl GET 0 14 eine Kontrolle durchgeführt werden. 
Rückmeldung nach 'GET 0 14':      KEY 14 e006 


Beispiel 2: Taste S2 programmieren


Die Taste S2 ist laut Übersicht in Abbildung 19 die Taste Nr. 15. 

 
Auslesen der Taste Nr. 15


'GET 0 15'   liefert den Code der Taste 15 in der Ebene 0 (PAGE00).


Die Taste S2 (Taste Nr. 15) soll in der 

Ebene 0 den Wert „CTRL + V“ (einfügen) liefern


„CTRL “ in der Tastencodetabelle suchen     

„e0“ 

„V“ in der Tastencodetabelle suchen  


„19“ 

Also muss der Taste Nr. 15 (S2) der Wert „e019“ zugewiesen werden. 
Programmieren der Taste Nr. 15: 


'SET 0 15 e019' 


Abbildung 26: Beispielhaftes Programmieren der Taste Nr. 15 S2 

Nach dem Programmieren kann mit dem Befehl GET 0 15 eine Kontrolle durchgeführt werden. 
Rückmeldung nach 'GET 0 15':      KEY 15 e019 


Summary of Contents for MFT1x

Page 1: ...rz bersicht Brief Overview MFT1x seitliche Tastatur MFT1x side keyboard Version 1 01 Copyright ACD Gruppe Dieses Dokument darf ohne Zustimmung weder vervielf ltigt noch Dritten zug nglich gemacht werd...

Page 2: ...programm Putty 10 5 2 1 Download Terminalprogramm Putty 10 5 2 2 Installation Terminalprogramm Putty 10 5 2 3 Tastatur im Ger temanager 12 5 2 4 Konfiguration des Terminalprogramm Putty 12 5 2 5 Progr...

Page 3: ...ading the Putty terminal program 32 15 2 2 Installing the Putty terminal program 32 15 2 3 Keyboard in Device Manager 34 15 2 4 Configuration of the Putty terminal program 34 15 2 5 Programming instru...

Page 4: ...res Hauses 2 Bestimmungsgem e Verwendung Die MFT1x seitliche Tastatur ist eine USB Industrietastatur und dient zur seitlichen Befestigung an einem ACD Fahrzeugterminal der MFT1x Serie links oder recht...

Page 5: ...eitliche Tastatur kann mittels des Montagekits ber VESA 75 an einem MFT1x befestigt werden Weiterhin ist die Befestigung der MFT1x seitlichen Tastatur mittels verschiedener RAM Mount Halterungen m gli...

Page 6: ...Betriebssystemen kompatibel Windows Embedded Standard 7 Windows 10 IoT Enterprise 2016 Android TM 6 0 1 Abbildung 4 Anschluss der Tastatur per USB Nach korrekter Installation bzw nach Anschluss leuch...

Page 7: ...Befestigung rechts werden die seitlichen Schnittstellen des MFT1x verdeckt diese sind somit nicht mehr zug nglich Die MFT1x seitliche Tastatur ist optional mit einem zus tzlichen auf der R ckseite ang...

Page 8: ...mgeschaltet werden die R ckmeldung erfolgt durch eine rote bzw gr ne Status LED Tasten die unabh ngig von der Auswahl einer Ebene bedient werden k nnen Enter Page Up Page Down Vier Richtungspfeile Tas...

Page 9: ...ichen ALT STRG F13 bis F24 Reset Sondertasten S3 und S4 Field Exit 5 Programmierung der MFT1x seitlichen Tastatur 5 1 Programmiermodus Der Programmiermodus wird ber das gleichzeitige Dr cken der Taste...

Page 10: ...lprogramm Putty Das Terminalprogramm Putty kann ber den nachstehenden Link kostenfrei heruntergeladen werden https www putty org 5 2 2 Installation Terminalprogramm Putty Das Installationsprogramm des...

Page 11: ...erview_V1 01_de_en 11 47 Den Aufforderungen in der Installation folgen die Taste Next dr cken Abbildung 11 Installation des Terminalprogramms Putty 2 3 Nach erfolgreicher Installation die Taste Finish...

Page 12: ...us ist im Ger temanager unter COM LPT als USB Tastatur angezeigt hier als COM8 Diese COM Schnittstelle ist im Terminalprogramm Putty in der Konfiguration einzugeben 5 2 4 Konfiguration des Terminalpro...

Page 13: ...onnection type Serial w hlen und die entsprechende COM Schnittstelle unter Serial line eintragen Als Konfiguration abspeichern Mit Open das Terminalprogramm Putty ffnen Im Anschluss erscheint ein Term...

Page 14: ...e 2 der ausgew hlte Taste 14 d h programmierbaren Schalter S3 zur ck 6 Der Befehl SET 0 14 4 w rde die aktuelle Einstellung der Schalter von 0000 auf 0004 ndern Im Tastaturmodus w rde die Taste S1 nun...

Page 15: ...t 39 Tasten auf drei Ebenen Ebene 0 Wei e Beschriftung Gr ne und rote LED sind aus Ebene 1 Gr ne Beschriftung Gr ne LED ist an rote LED ist aus Ebene 2 Rote Beschriftung Gr ne LED ist aus rote LED ist...

Page 16: ...ge der Tastaturcodes im Terminalprogramm Putty Im Terminalprogramm Putty werden mit dem Befehl GET 0 alle Tastencodes der drei Ebenen angezeigt PAGE00 entspricht Ebene 0 PAGE01 entspricht Ebene 1 PAGE...

Page 17: ...12 Keyboard o and O 16 1 20 13 Keyboard p and P 25 1 21 14 Keyboard q and Q 26 1 22 15 Keyboard r and R 27 1 23 16 Keyboard s and S 29 1 24 17 Keyboard t and T 30 1 25 18 Keyboard u and U 31 1 26 19...

Page 18: ...2 81 50 Keyboard LeftArrow 20 0 1 2 82 51 Keyboard DownArrow 23 0 1 2 83 52 Keyboard UpArrow 18 0 1 2 84 53 Keypad Num Lock and Clear 85 54 Keypad 26 2 86 55 Keypad 25 2 87 56 Keypad 30 2 88 57 Keypad...

Page 19: ...Keyboard INT6 142 8d Keyboard INT7 143 8e Keyboard INT8 144 8f Keyboard INT9 145 90 Keyboard LANG1 146 91 Keyboard LANG2 147 92 Keyboard LANG3 148 93 Keyboard LANG4 149 94 Keyboard LANG5 150 95 Keybo...

Page 20: ...pace 207 ce Keypad 208 cf Keypad 209 d0 Keypad Memory Store 210 d1 Keypad Memory Recall 211 d2 Keypad Memory Clear 212 d3 Keypad Memory Add 213 d4 Keypad Memory Subtract 214 d5 Keypad Memory Multiply...

Page 21: ...14 in der Ebene 2 PAGE02 Die Taste S1 Taste Nr 14 soll in der Ebene 0 den Wert CTRL C kopieren liefern CTRL in der Tastencodetabelle suchen e0 C in der Tastencodetabelle suchen 06 Also muss der Taste...

Page 22: ..._V1 01_de_en 22 47 5 2 9 Beenden des Programmiermodus Der Programmiermodus wird durch Ausstecken der USB Verbindung beendet 5 3 Tastaturton Der Tastaturton kann durch die Tastenkombination 1 2 und 3 e...

Page 23: ...r die Tastaturebenen Einfache Programmierung 24 programmierbare Funktionstasten Variante mit zus tzlichem USB Hub verf gbar Anschlussart USB 2 0 Typ A Akustisches Feedback Ja Haptisches Feedback Ja Ge...

Page 24: ...ihrer Lebensdauer zum Recycling an die ACD Elektronik GmbH zur ckgesandt werden WEEE 53473276 9 EU Konformit tserkl rung Verwenden Sie zur Reinigung keine tzenden Chemikalien Reinigungsl sungen oder s...

Page 25: ...ms Putty 2 3 11 Abbildung 12 Installation des Terminalprogramms Putty 3 3 11 Abbildung 13 USB Tastatur im Ger te Manager 12 Abbildung 14 Konfiguration Terminalprogramm Putty 1 2 12 Abbildung 15 Konfig...

Page 26: ...onsible department in your company immediately 12 Intended use The MFT1x side keyboard is a USB industrial keyboard and is used for side mounting to an ACD MFT1x series vehicle terminal left or right...

Page 27: ...7 13 2 Mounting brackets The MFT1x side keyboard can be attached to an MFT1x using the assembly kit via VESA 75 The MFT1x side keyboard can also be attached via various RAM mounting brackets Figure 30...

Page 28: ...the following operating systems Windows Embedded Standard 7 Windows 10 IoT Enterprise 2016 Android TM 6 0 1 Figure 31 Connecting the keyboard via USB After correct installation or after connection the...

Page 29: ...additional UBS hub When mounting on the right the side interfaces of the MFT1x are hidden so they are no longer accessible The MFT1x side keyboard is optionally available with an additional rear moun...

Page 30: ...e Red and Green keys the feedback is indicated by a red or green status LED Keys that can be operated independently of a level selection Enter Page Up Page Down Four directional arrows Keys active in...

Page 31: ...l characters ALT CTRL F13 to F24 Reset Special keys S3 and S4 Field Exit 15 Programming the MFT1x side keyboard 15 1 Programming mode You can enter programming mode by simultaneously pressing the 4 5...

Page 32: ...Putty terminal program The Putty terminal program can be downloaded free of charge from the following link https www putty org 15 2 2 Installing the Putty terminal program Start the installation prog...

Page 33: ...oard_Brief_Overview_V1 01_de_en 33 47 Follow the prompts in the installation press the Next key Figure 38 Installing the Putty terminal program 2 3 When installation is complete press the Finish butto...

Page 34: ...d is displayed in Device Manager under COM LPT as a USB keyboard here shown as COM8 This COM interface must be entered in the Putty terminal program in the configuration 15 2 4 Configuration of the Pu...

Page 35: ...Session area under Connection type select Serial and enter the relevant COM interface under Serial line Save as configuration Open the Putty terminal program with Open A terminal window now appears Fi...

Page 36: ...ET 2 14 returns the assignment page 2 of the selected key 14 i e programmable switch S3 6 The command SET 0 14 4 would change the current setting of the switches from 0000 to 0004 In keyboard mode the...

Page 37: ...MFT1x side keyboard has 39 keys on three levels Level 0 White letters Green and red LEDs are off Level 1 Green letters Green LED is on red LED is off Level 2 Red letters Green LED is off red LED is o...

Page 38: ...lay of the keyboard codes in the Putty terminal program In the Putty terminal program all key codes of the three levels are displayed with the command GET 0 PAGE00 corresponds to level 0 PAGE01 corres...

Page 39: ...20 13 Keyboard p and P 25 1 21 14 Keyboard q and Q 26 1 22 15 Keyboard r and R 27 1 23 16 Keyboard s and S 29 1 24 17 Keyboard t and T 30 1 25 18 Keyboard u and U 31 1 26 19 Keyboard v and V 33 1 27...

Page 40: ...d LeftArrow 20 0 1 2 82 51 Keyboard DownArrow 23 0 1 2 83 52 Keyboard UpArrow 18 0 1 2 84 53 Keyboard Num Lock and Clear 85 54 Keyboard 26 2 86 55 Keyboard 25 2 87 56 Keyboard 30 2 88 57 Keyboard 29 2...

Page 41: ...d INT6 142 8d Keyboard INT7 143 8e Keyboard INT8 144 8f Keyboard INT9 145 90 Keyboard LANG1 146 91 Keyboard LANG2 147 92 Keyboard LANG3 148 93 Keyboard LANG4 149 94 Keyboard LANG5 150 95 Keyboard LANG...

Page 42: ...eyboard Space 207 ce Keyboard 208 cf Keyboard 209 d0 Keyboard Memory Store 210 d1 Keyboard Memory Recall 211 d2 Keyboard Memory Clear 212 d3 Keyboard Memory Add 213 d4 Keyboard Memory Subtract 214 d5...

Page 43: ...ET 2 14 provides the code of key 14 in level 2 PAGE02 The S1 key key no 14 should deliver the value CTRL C copy in level 0 Search CTRL in the keycode table e0 Search C in the keycode table 06 So key n...

Page 44: ...Brief_Overview_V1 01_de_en 44 47 15 2 9 Ending programming mode You can end programming mode by unplugging the USB connection 15 3 Keyboard sound The keyboard sound can be toggled on and off by the ke...

Page 45: ...yboard levels Simple programming 24 programmable function keys Variant with additional USB hub available Connection type USB 2 0 Type A Acoustic feedback Yes Tactile feedback Yes Weight 0 8 kg IP prot...

Page 46: ...ust be returned to ACD for recycling at the end of their service lives WEEE 53473276 19 EU Declaration of Conformity Do not use any corrosive chemicals cleaning solutions or strong cleaning agents in...

Page 47: ...alling the Putty terminal program 2 3 33 Figure 39 Installing the Putty terminal program 3 3 33 Figure 40 USB keyboard in Device Manager 34 Figure 41 Configuring the Putty terminal program 1 2 34 Figu...

Reviews: