


Chapter 5
AT7-MAX2
5-4
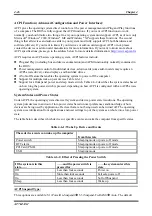
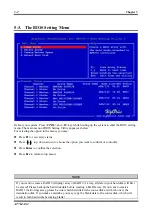
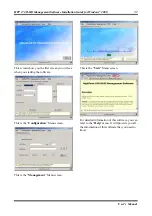
JBOD (Volume):
This item is recommended for high capacity without redundancy or performance features usage.
Requires at least 2 disks.
Array Name:
You can give a name of your array here.
Select Disk Drives:
This item allows you to select the disk drives to be used with the RAID array.
Block Size:
There are eight options available: 16K, 32K, 64K, 128K, 256K, 512K, 1M and 2M. This item allows you
to select the block size of the RAID array.
Start Creation Process:
After you have made your selection, choose this item and press <
Enter
> to start creation.
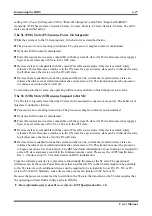
4-3-2. OPTION 2: Delete Array
This item allows you to remove a RAID Array on this onboard IDE RAID controller.
Note:
After you have made and confirmed this selection, all the data stored in the hard disk will be lost.
(The entire partition configuration will be deleted too.)
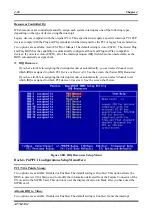
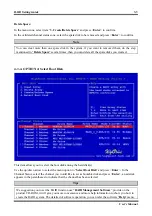
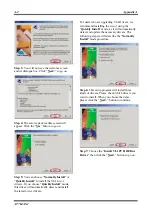
4-3-3. OPTION 3: Create/Delete Spare
Create Spare:
In the menu zone, select item “
3. Create/Delete Spare
” and press <
Enter
> to confirm.
If you are not creating the RAID system yet, screen will show you the warning message, tell you the
current system do not create the RAID system. If you choose create the RAID system, then you can select
the spare disk you want to creat.
In the validated channel status zone, select the spare disk to be added and press <
Enter
> to confirm.
Summary of Contents for AB-AT7-MAX2
Page 2: ......
Page 34: ...Chapter 2 AT7 MAX2 2 6 ...
Page 54: ...Chapter 3 AT7 MAX2 3 20 ...
Page 94: ...Chapter 5 AT7 MAX2 5 6 ...
Page 98: ...Chapter 6 AT7 MAX2 6 4 ...
Page 102: ...7 4 Chapter 7 AT7 MAX2 ...
Page 106: ...A 4 Appendix A AT7 MAX2 ...
Page 110: ...Appendix B AT7 MAX2 B 4 ...
Page 118: ...Appendix D AT7 MAX2 D 4 ...
Page 122: ...Appendix E AT7 MAX2 E 4 ...
Page 136: ...H 4 Appendix H AT7 MAX2 ...