
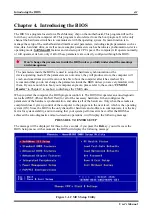

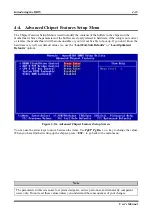

Introducing the BIOS
User’s Manual
4-5
Solution in case of booting problem due to invalid clock setup:
Normally, if the CPU clock setup is wrong, you will not be able to boot. In this case, turn the system off
then on again. The CPU will automatically use its standard parameters to boot. You can then enter the
BIOS Setup again and set up the CPU clock. If you can’t enter the BIOS setup, you must try turning the
system on a few times (3 ~ 4 times) or press “
INSERT
” key when turning on and the system will
automatically use its standard parameters to boot. You can then enter BIOS SETUP again and set up the
new parameters.
When you change your CPU:
This motherboard has been designed in such a way that you can turn the system on after having inserted a
CPU in the socket without having to configure any jumpers or DIP switches. But if you change your CPU,
normally you just have to turn off the power supply (mechanical off), change the CPU and then, set up the
CPU parameters through
SOFT MENU
™
III
. However, if the new CPU is slower than the old one (and is
same brand and type), we offer you two methods to successfully complete the CPU change operation.
Method 1:
Setup up the CPU for the lowest speed for its brand. Turn the power supply off (mechanical
off) and change the CPU. Then turn the system on again, and set up the CPU parameters
through
SOFT MENU
™
III
.
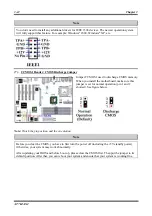
Method 2:
Since you have to open the computer case when you change the CPU, it could be a good idea
to use the CCMOS jumper to erase the parameters of the original CPU and to enter BIOS
Setup to set up CPU parameters again.
Attention
After setting up the parameters and leaving the BIOS SETUP, and having verified that the system can
be booted, do not press the Reset button or turn off the power supply. Otherwise the BIOS will not
read correctly, the parameters will fail and you must enter
SOFT MENU
™
III
again to set up the
parameters all over again.
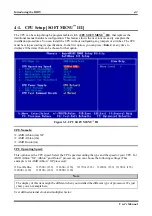
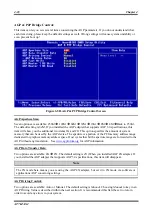
CPU Power Supply:
This option allows you to switch between Default and User Define voltages.
®
CPU Default:
The system will detect the CPU type and select the proper voltage automatically. When
it is enabled, the option “
Vcore Voltage
” will show the current voltage setting that is
defined by the CPU and this will not be changeable. We recommend using this CPU
default setting and not changing it unless the current CPU type and voltage setting can
not be detected or is not correct.
®
User Define:
This option lets the user select the voltage manually. You can change values of the
“
Core Voltage
” and “
DDR Voltage
” option lists by using the arrow up and arrow
down keys.
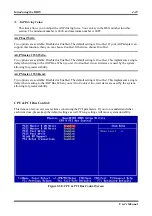
CPU Fast Command Decode:
Two options are available: at Normal
to Fast or at Fast
to Normal. This will depends which state
you choose. If you set this item from “
at Fast
” to “
to Normal
”, when you reboot the system and finish
the POST process, the state will change to your new setting (Here’s
to Normal
). After that, if you go to
view the BIOS menu again, you will see this item shows “
at Normal
”, if you press the <
Enter
> key,
you’ll see the two options: at Normal
to Fast, and the default setting is
at Normal
. If you set this item
from “
at Normal
” to “
to Fast
”, and go through the same process we mentioned before, you will see this
item shows “
at Fast
”, if you press the <
Enter
> key, you’ll see the two options: at Fast
to Normal, and
Summary of Contents for AB-AT7-MAX2
Page 2: ......
Page 34: ...Chapter 2 AT7 MAX2 2 6 ...
Page 54: ...Chapter 3 AT7 MAX2 3 20 ...
Page 94: ...Chapter 5 AT7 MAX2 5 6 ...
Page 98: ...Chapter 6 AT7 MAX2 6 4 ...
Page 102: ...7 4 Chapter 7 AT7 MAX2 ...
Page 106: ...A 4 Appendix A AT7 MAX2 ...
Page 110: ...Appendix B AT7 MAX2 B 4 ...
Page 118: ...Appendix D AT7 MAX2 D 4 ...
Page 122: ...Appendix E AT7 MAX2 E 4 ...
Page 136: ...H 4 Appendix H AT7 MAX2 ...