Utilizzare la dima per segnare i punti di fissaggio alla parete. In base al
tipo di alimentazione disponibile, alimentare la scheda considerando,
in caso di alimentazione 12/24Vdc, il morsetto “COM” come morsetto
dove collegare il “meno”. Nel MICRO-TRAFFIC è presente un morsetto a tre poli:
2 poli per il collegamento indipendente della luce verde e rossa.
Use the template to mark the fixing points on the wall. Based on the
available power, power the board considering, in case of 12/24Vdc
power the “COM” clamp as the clamp where you connect the “negative”.
In the MICRO-TRAFFIC is present a 3-pole terminal: one pole is shared, the other
2 are used for the independent connection of the green and red lights.
Utilisez le gabarit pour marquer les points de fixation sur le mur. En
fonction de la puissance disponible, alimenter la carte en tenant compte,
dans le cas d'alimentation 12/24Vdc, la pince "COM" comme la pince où
vous connectez le "négatif".Dans le MICRO-TRAFFIC, il y a une borne à 3 pôles: un
commun et 2 pôles pour la connexion autonome de la lumière verte et rouge.
Verwenden Sie die Schablone, um die Befestigungspunkte an der Wand
zu markieren. Abhängig von der Art der Stromversorgung, speisen Sie
die Karte, wobei Sie im Falle einer 12/24Vdc Stromversorgung die
"COM" Klemme als eine Klemme betrachten, an der der negative Pol angeschlos-
sen werden soll. In der MICRO-TRAFFIC gibt es eine 3-polige Klemme: gemein-
sam + 2 Pole zum unabhängigen Anschluss von grünem und rotem Licht.
Usa el escantillón para marcar los puntos de fijación en la pared. De
acuerdo con el tipo de fuente de alimentación disponible, alimente la
placa teniendo en cuenta, en el caso de la fuente de alimentación de
12/24 V CC, la terminal "COM" como un terminal donde conectar el "menos". En el
MICRO-TRAFFIC está presente un terminal tripolar: un polo es compartido, los
otros dos se utilizan para la conexión Independiente de las luces verdes y rojas.
MADE
IN
ITALY
cod. MICRO-00024
rev.0 - 10/2022
Istruzioni di montaggio e utilizzo
Assembly and use instructions
Instructions de montage et d'utilisation
Montage- und Gebrauchsanweisung
Instrucciones de montaje y uso
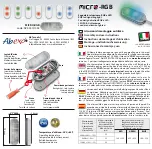
Guarnizione posteriore
Back gasket - Joint arrière
Hintere dichtung
Junto posterior
Cacciavite Compreso
Screwdriver Included
Tournevis inclus dans la boîte
Schraubenziehe enthalten
Destornillador oncluido
Grano
Grub screw
Vis sans tête
Gewindestift
Tornillo sin cabeza
70 mm
27 mm
16 mm
-RGB
RED
GREEN
BLUE
Alimentazione
Power supply
Alimentation
Versorgung
Alimentación
MAX assorbimento
MAX absorption
Absorption MAXI
Max. Leistungsbedarf
MAX absorción
(mA)
Luminosità min÷max (mcd)
Brightness min÷max (mcd)
Luminosité min÷max (mcd)
Helligkeit min÷max (mcd)
Brillo min÷max (mcd)
55
35
25
180 ÷ 350
450 ÷ 850
180 ÷ 350
24Vac +20% / -10%
24Vdc +/-20%
12Vdc +10% / -5%
code: APE-550/1038
MICRO-RGB
Guarnizione di tenuta
Impermeable gasket
Joint d'étanchéité
Dichtung
Junta impermeable
Lente diffusiva
Diffusive lens
Lentille de diffusion satinée
Mattierter kunststoff
Lente difundida
Base
AB Tecno Srl
Via Cicogna 95 - 40068 San Lazzaro di Savena (BO)
Tel: +39 051 6259580 - fax: +39 051 6259600
[email protected] - www.abtecno.com
Segnalatore luminoso RGB a LED
RGB led signalling light
Feu de signalisation RGB à LED
LED-RGB-Lichtanzeige
Luz de señalización rgb led
5
ANNI -YEARS
ANS - AÑOS
GARAN
ZIA
**
**
W
A
RR
AN
T***
* G
ARA
NT
IE
**
**
G
A
R
A
N
TÍ
A *
***
IP65
degree of
protection
Temperatura d’utilizzo: -20°C, +60°C
Operating temperature
Température de fonctionnement
Betriebstemperatur
Temperatura de uso


