background image

OPERATING PROCEDURES

OPERATIONAL FUNCTIONS
4 - 22


COMMUNICATION FORMAT

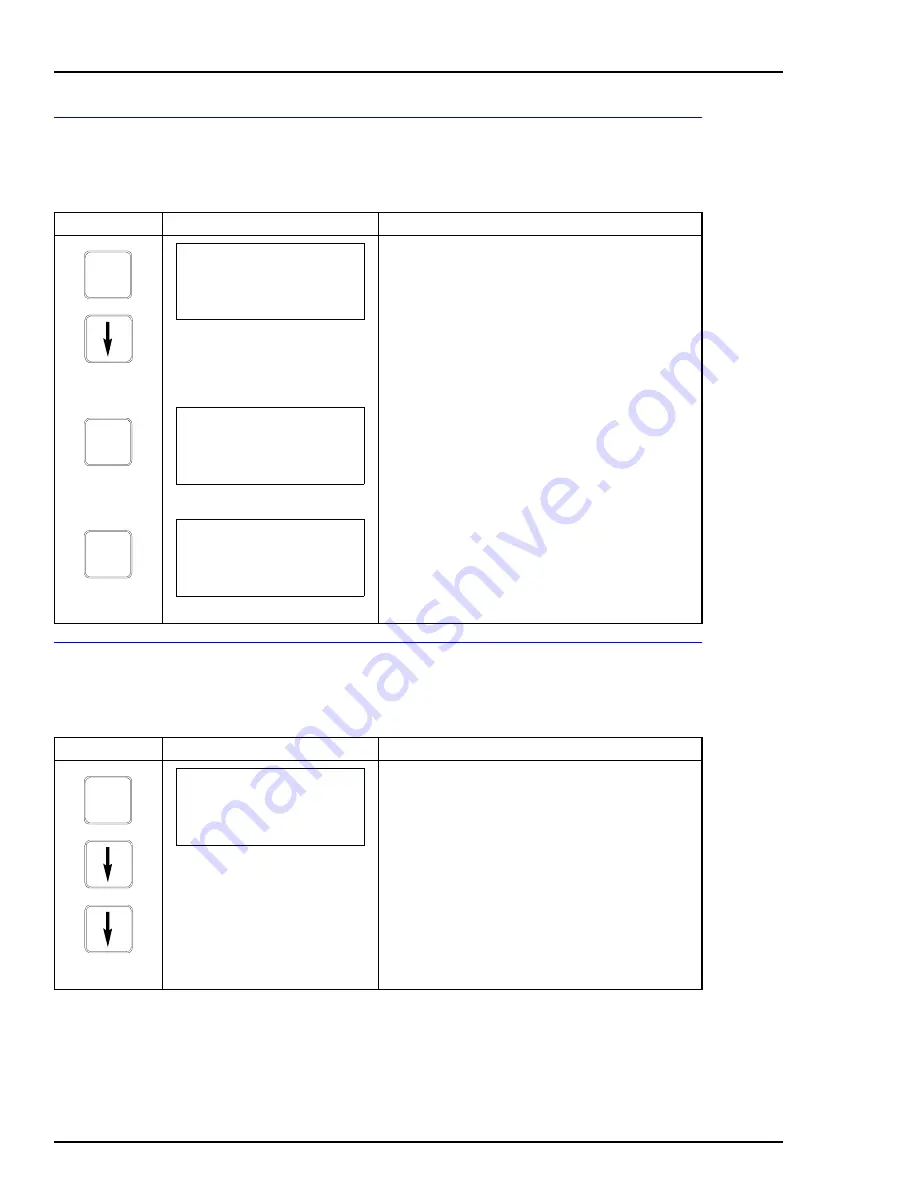
Use this function to change the communications format of the STT04
terminal.

BATTERY

Use this function to see the approximate amount of charge left in the
batteries.

Key

Display

Comments

Select 

COMMUN. FORMAT

.

Select the desired communication format using the 
up and down arrow keys. After selecting communica-
tions, the terminal scans for devices of the selected 
format. Select the correct communication format.

O P T IO N S

STT04 OPTIONS:

LANGUAGE

COMMUN. FORMAT
BATTERY

E N T E R

COMMUNICATION FORMAT:

ABB FSK
HART

E N T E R

ID TAGNAME

READY

Key

Display

Comments

Select 

BATTERY

.

O P T IO N S

STT04 OPTIONS:

LANGUAGE
COMMUN. FORMAT

BATTERY

Summary of Contents for STT04

Page 1: ...INSTRUCTION MANUAL Smart Transmitter Terminal STT04 PN25054 ...

Page 2: ...duct while it is in the system may upset the process being controlled Some process upsets may cause injury or damage NOTICE The information contained in this document is subject to change without notice ABB Inc its affiliates employees and agents and the authors of and contributors to this publication specifi cally disclaim all liabilities and warranties express and implied including warranties of...

Page 3: ...eys that are documented in the Product Instruction This addendum also provides supplemental 600TEN Transmitter information which is not contained in the existing STT04 Product Instruction Refer to the STT04 Product Instruction for specific operating details OPERATOR INTERFACE CONTROLS The illustrations below show the comparison between the old and new STT04 keypads Old Keypad New Keypad STT04EB_ S...

Page 4: ...ls through menus and selects functions Inputs values into the terminal Includes digits 0 through 9 ASCII characters A through Z signs and punctuation Completes an input or a selection 1 Inputs a new configuration into the STT04 internal memory 2 Modifies an existing configuration 3 Erases an existing configuration from the terminal memory Retrieves views and optionally saves the configuration of t...

Page 5: ...rt Positioner refer to Appendix A Escapes the current function and returns the display to the READY condition Selects and changes working configurations and field devices if connected Steps through the selections of the working configuration Views a configura tion but does not allow modifications to be made 1 Sets the language of the display screens 2 Sets the communication format 3 Displays the a...

Page 6: ...mation on the following functions CREATE MODIFY CONFIGURATION A configuration can be created off line without a connected field device Refer to Figure 1 for an overview of the configuration function The following table details the configuration process Send configurations Select configurations Get configurations Erase configurations View configurations Operational functions Figure 1 Configuration ...

Page 7: ...ontinue to press the key until the desired character appears Use the right arrow key to move to the next charac ter Use the left arrow key to go back to the previous character Select ANALOG NOTE The DIGITAL selection should only be made when using an IMFBS01 field bus I O module A CHANNEL prompt appears when DIGITAL is selected CONFIG ENTER CONFIGURATION NEW MODIFY ERASE ENTER DEVICE TYPE BAILEY F...

Page 8: ...ight arrow key to move to the next character Use the left arrow key to go back to the previous character Enter a day and press Enter a month and press Enter a year and press This date can represent the creation date of the con figuration the date the device or element was installed or some other significant date Select 600T EN Select LINEAR NOTE Other output type selections are SQUARE ROOT SQR x 3...

Page 9: ...the number keys then press Input the upper range value then press Select the 600T EN TEMPERATURE UNITS Use arrow key to select option then press Select YES Key Display Comments ENTER ENGINEERING UNIT iH20 20c iHg 0O c ftH2O 20c mmH20 20c ENTER LOWER RANGE VAL nn nn UNITS UPPER RANGE VAL nn nn UNITS ENTER ENTER ENTER TEMPERATURE UNITS C F R K ENTER ENTER STORE THIS CONFIGURATION NO YES ENTER ID TAG...

Page 10: ...transmitter calibration functions using an STT04 terminal There are four types of calibration functions Sensor Trim D to A adjust Analog Mode only PV Bias Set Output Refer to Figure 2 for an overview of the calibration functions Figure 2 Calibration Flowchart 600T EN ...

Page 11: ...o the appropriate section Press when done Select FULL TRIM Enter the low calibration pressure value using the number keys and press Similarly enter the high calibration pressure value then press Apply the low calibration pressure to the input of transmitter as specified earlier Apply the high calibration pressure to the input of transmitter as specified earlier CALI BRATE ENTER OUTPUT WILL BE AFFE...

Page 12: ... refer to the appropriate section Press when done Select ZERO TRIM Apply the pressure equal to the zero value of the instrument and press The instrument reads the pressure applied and dis plays its value Press CALI BRATE ENTER OUTPUT WILL BE AFFECTED PROCEED NO YES ENTER SENSOR TRIM D TO A ADJUST PV BIAS SET OUTPUT ENTER ENTER FULL TRIM ZERO TRIM FACTORY TRIM STATIC TRIM ENTER APPLY 0 INPUT TO SEN...

Page 13: ... input Be sure the control loop is in manual Select YES Select SENSOR TRIM or select calibration option with down arrow key and refer to the appropriate section Press when done Select FACTORY TRIM CALI BRATE ENTER OUTPUT WILL BE AFFECTED PROCEED NO YES ENTER SENSOR TRIM D TO A ADJUST PV BIAS SET OUTPUT ENTER ENTER FULL TRIM ZERO TRIM FACTORY TRIM STATIC TRIM ENTER ID TAGNAME READY ...

Page 14: ...own arrow key and refer to the appropriate section Press when done Select STATIC TRIM Display shows the value of the pressure measured by the 600T EN transmitter Enter the value of the actual static pressure using the number keys CALI BRATE ENTER OUTPUT WILL BE AFFECTED PROCEED NO YES ENTER SENSOR TRIM D TO A ADJUST PV BIAS SET OUTPUT ENTER 3 TIMES ENTER FULL TRIM ZERO TRIM FACTORY TRIM STATIC TRI...

Page 15: ...input Be sure the control loop is in manual Select YES Select D TO A ADJUST Select UPDOWN ARROW KEYS Use the arrow keys to adjust the 4 mA signal NOTE When increasing or decreasing the mA sig nal the increments of change increase with succes sive depressions until the maximum level of change is reached By changing direction you will return to the smallest increment of change This adjustment techni...

Page 16: ...play Comments This operation will cause a change in output not cor responding to the input Be sure the control loop is in manual Select YES Select D TO A ADJUST Select METER VALUE ENTRY Key Display Comments ENTER ADJUST TO 20 mA THEN HIT ENTER ENTER ID TAGNAME READY CALI BRATE ENTER OUTPUT WILL BE AFFECTED PROCEED NO YES ENTER CALIBRATION SENSOR TRIM D TO A ADJUST PV BIAS SET OUTPUT ENTER D A CAL ...

Page 17: ...e offset or biasand apply it to the 600T EN SET PV VAL Use the number keys to enter the current meter reading Use the number keys to enter the current meter reading Key Display Comments This operation will cause a change in output not cor responding to the input Be sure the control loop is in manual Select YES Key Display Comments ENTER 4 mA CALIBRATION ENTER METER VALUE n nnnn ENTER 20 mA CALIBRA...

Page 18: ...ERO the pro cedure for SET PV VAL is similar Apply the desired zero pressure value to the trans mitter Scroll to SET PV ZERO using the down arrow key and press Pressing calibrates the PV ZERO value SET PV ZERO is complete Key Display Comments ENTER CALIBRATION SENSOR TRIM D TO A ADJUST PV BIAS SET OUTPUT ENTER PV BIAS RESET SET PV ZERO SET PV VAL ENTER PV BIAS RESET SET PV ZERO SET PV VAL ENTER EN...

Page 19: ... TO A ADJUST selection will not appear Select LOW and press Procedure for HIGH selection is identical Display indicates present data Enter LOW value CALI BRATE ENTER OUTPUT WILL BE AFFECTED PROCEED NO YES 3 TIMES ENTER CALIBRATION SENSOR TRIM D TO A ADJUST PV BIAS SET OUTPUT ENTER SET OUTPUT LOW HIGH ENTER ENTER OP nnn nn PV VAL value units Hit ENTER to set OP ENTER ENTER NEW VALUE value ENTER ENT...

Page 20: ...al Computer 3 4 Installing DownLink Software 3 4 DownLink Software Practices 3 4 SECTION 4 OPERATING PROCEDURES 4 1 INTRODUCTION 4 1 HOW TO USE THE PROCEDURE TABLES 4 1 OPERATOR INTERFACE CONTROLS 4 1 INITIAL START UP 4 3 SELECTING CHARACTERS FROM THE KEYPAD 4 4 VIEW AND SELECT CONFIGURATION 4 6 SEND CONFIGURATION 4 7 GET CONFIGURATION 4 8 ERASE CONFIGURATION 4 10 OPERATIONAL FUNCTIONS 4 11 Specia...

Page 21: ...OADING AN UPGRADE TO THE STT04 TERMINAL 6 5 RECOMMENDED SPARE PARTS 6 6 SECTION 7 MAINTENANCE 7 1 INTRODUCTION 7 1 CLEANING 7 1 SECTION 8 SUPPORT SERVICES 8 1 INTRODUCTION 8 1 REPLACEMENT PARTS 8 1 SPARE PARTS LISTS 8 1 TRAINING 8 1 TECHNICAL DOCUMENTATION 8 1 APPENDIX A SMART POSITIONER A 1 INTRODUCTION A 1 CREATE MODIFY CONFIGURATION A 1 CALIBRATION A 5 Output D to A Calibration A 6 Input A to D...

Page 22: ...IX D PTH PRESSURE TRANSMITTER D 1 INTRODUCTION D 1 CREATE MODIFY CONFIGURATION D 1 CALIBRATION D 5 Bench Calibration D 6 Rezero D 8 D to A Adjust D 8 ARROW KEY ADJUSTMENT D 9 METER VALUE ADJUSTMENT D 10 APPENDIX E PTS PRESSURE TRANSMITTER E 1 INTRODUCTION E 1 CREATE MODIFY CONFIGURATION E 1 CALIBRATION E 4 Bench Calibration E 4 Rezero E 7 D to A Adjust E 8 APPENDIX F HART UNIVERSAL F 1 INTRODUCTIO...

Page 23: ...SS TEMPERATURE J 7 Editing the Calibration Constants J 8 EDIT CONDUCTIVITY J 8 EDIT TEMPERATURE J 9 Reset to Factory Configuration J 11 APPENDIX K TBN580 TRANSMITTER K 1 INTRODUCTION K 1 CREATE MODIFY CONFIGURATION K 1 CALIBRATION K 5 Process Calibration K 6 Bench Calibration pH K 7 Bench Calibration Temperature K 10 D to A Adjust K 11 APPENDIX L TBN581 ORP pION TRANSMITTER L 1 INTRODUCTION L 1 CR...

Page 24: ... 11 SPECIAL FEATURE N 12 Sensor Data N 12 HART Special Feature N 13 Sensor Setup N 13 Master Reset N 14 Number of Response Preambles N 15 Reset Configuration Change Flag N 16 PROBLEM AND ERROR CODES TB82 N 16 APPENDIX O STT04 DOWNLINK SOFTWARE O 1 INTRODUCTION O 1 SECURITY O 1 Starting the Password Program O 1 Adding a User O 1 Deleting a User O 3 Bypass O 4 Disable Password Security O 4 Enable Pa...

Page 25: ...RATION 1 17 Sensor Trim 1 18 FULL TRIM 1 18 ZERO TRIM 1 19 FACTORY TRIM 1 20 STATIC TRIM 1 21 D to A Adjust 1 22 ARROW KEY ADJUSTMENT 1 22 METER VALUE ADJUSTMENT 1 23 PV Bias 1 24 Set Output 1 26 List of Figures No Title Page 1 1 STT04 Smart Transmitter Terminal 1 1 2 1 Analog Point to Point Communications Wiring 2 2 2 2 ABB Digital Field Bus and HART Wiring 2 2 3 1 Receptacle Locations 3 2 3 2 An...

Page 26: ...ZID AZH M 5 N 1 Configuration Flowchart TB82 N 1 N 2 Calibration Flowchart TB82 N 4 O 1 Password Key Screen O 2 O 2 Add User Dialog Box O 2 O 3 DownLink Software Screen O 6 O 4 Summary of STT04 Configurations O 9 O 5 Replace Configuration File Dialog O 10 P 1 Configuration Flowchart AS800 P 1 P 2 Calibration Flowchart AS800 P 5 List of Tables No Title Page 1 1 STT04 Terminal Device Support 1 2 1 2...

Page 27: ... must be free of any hazardous materials acids alkalis solvents etc A Material Safety Data Sheet MSDS for all process liquids must accompany returned equipment Contact the factory for authorization prior to returning equipment Read these instructions before starting installation save these instructions for future reference Contacting the Factory Should assistance be required with any of the compan...

Page 28: ... of an LCD display key pad 32 keys and an RS 232 C port for personal computer com munications The terminal comes with a clip lead cable battery charger and an optional carrying case The STT04 terminal can operate for approximately six days before needing a charge Each terminal includes a battery charger The STT04 terminal supports HART devices and ABB Digital FSK devices Refer to Table 1 1 for a l...

Page 29: ...guring and calibrat ing a field device 4 Each device has a configuration worksheet located at the back of this instruction Use the worksheets to keep a hard copy record of the device configuration This document uses the following text conventions Bold Italic Text Refers to specific section names through out this instruction Display Item Shows display items as they appear on the STT04 terminal Show...

Page 30: ...t Pressure Transmitter PTSD I E21 50 2 Platinum Standard Series Smart Level Transmitter PTSDL PN25053 Platinum Standard Series Smart Pressure Transmitter PTSP PN25051 Platinum Standard Series HART Pressure Transmitter PTHD I E21 54 2 Platinum Standard Series HART Level Transmitter PTHDL PN25052 Platinum Standard Series HART Pressure Transmitter PTHP I E51 79 Smart Temperature Transmitter EQN I E51...

Page 31: ...length 1 8 m 5 ft 10 in Temperature limits Operating Storage 10 to 60 C 14 to 140 F 20 to 70 C 4 to 158 F Humidity limits 95 noncondensing Batteries Type Run time Charging time AA NiCd rechargeable 6 days approximately 2 8 hours Weight 635 g 22 4 oz Dimensions HxWxD 200 x 108 x 44 mm 7 875 x 4 25 x 1 75 in Case material Plastic polycarbonate Lexan 940 or equivalent Agency certifications1 Factory M...

Page 32: ...rm with a zero DC aver age It has no effect on the transmitter output This communications method provides exceptional noise immunity ABB FSK High speed 9 600 baud frequency shift keying is a form of frequency modulation used for digital communication The communication sig nal is a high frequency AC signal with a DC average of zero There fore digital communication and process variable output can oc...

Page 33: ...MMUNICATIONS ARE NOT POSSIBLE ON THIS SIDE OF 250 RESISTOR Ω COM MUNICATIONS ARE POSSIBLE ON THIS SIDE OF 250 RESISTOR Ω SIGNAL W IRES FIELD DEVICE UP TO 1 MI 1 6 KM SYSTEM POW ER SUPPLY PW R OUTPUT CONTROLLER RECORDER OR CONTROL SYSTEM 250 Ω T01324B STT SIGNAL W IRES TERMINATION UNIT FIELD BUS I O MODULE MFP MFC FIELD DEVICE 1 FIELD DEVICE 8 PW R OUTPUT PW R OUTPUT ...

Page 34: ...smitter Terminal Clip leads cable DownLink Software CD STT04 firmware or later STT04 carrying case optional NOTE If STT04 firmware is A 0 DownLink Software is not included with the firmware Contact the nearest ABB sales office for software availability Examine the exterior of the STT04 terminal for physical defects If storing the terminal prior to operation pack in the original container if possib...

Page 35: ...n the STT04 terminal Fig 3 1 2 Plug the charger into a 120 VAC 50 60 Hz outlet Contact your local ABB sales office for international plug configurations 3 Allow the terminal to charge at least one hour before operating A full charge takes approximately 2 8 hours The terminal can operate while recharging is in progress Clip Leads Cable Installation The STT04 terminal communicates with a field devic...

Page 36: ...res 3 2 and 3 3 To remove the clip leads cable 1 Fully depress and hold in the button on the top of the clip leads cable connector 2 Firmly but carefully pull the connector from the receptacle Figure 3 2 Analog Point to Point Wiring Figure 3 3 Digital Field Bus and HART Wiring T01323B STT COM MUNICATIONS ARE NOT POSSIBLE ON THIS SIDE OF 250 RESISTOR Ω COM M UNICATIONS ARE POSSIBLE ON THIS SIDE O F...

Page 37: ... install the DownLink Software on a personal computer be sure the PC has at least the minimum requirements listed in Table 3 1 Installing DownLink Software 1 Insert the CD 2 Click Start and select Run 3 Click in Open and type CD Drive letter setup and click OK 4 Follow the installation prompts as they appear DownLink Software Practices Table 3 1 System Requirements System Attribute Requirements Mi...

Page 38: ... of configurations and calibrations are device specific and therefore are covered in the device specific appendices of this instruction HOW TO USE THE PROCEDURE TABLES Procedures for each of the functions are presented in tables having three columns Key Display and Comments The tables read from left to right When the key shown is pressed the screen shown directly to the right in the display column...

Page 39: ...difies an existing configuration 3 Erases an existing configuration from the terminal memory Retrieves views and optionally saves the configuration of the selected field device Sends a configuration from the STT04 terminal to a selected field device Steps through various calibration procedures dependent on the selected field device Monitors primary input or output secondary output ambient temperat...

Page 40: ...lay to the READY condition Selects and changes working configurations and field devices if connected Steps through the selections of the working configuration Views a configura tion but does not allow modifications to be made 1 Sets the language of the display screens 2 Sets the communication format 3 Displays the amount of charge left on the battery pack 4 Displays the STT04 name Returns to a pre...

Page 41: ...s for configurations in its internal memory If configurations are present a list of ID tag names appears Only appears if HART is selected for communication format and no analog field devices are connected Choose YES to poll for digital devices A configuration can be created Refer to the appendi ces at the back of this instruction for configuration procedures for all supported devices Key Display C...

Page 42: ...s in the first character place The cursor is in the second character position Press the 1 key and the number 1 appears in the second character position Press and abort this configuration Key Display Comments ENTER STT04 CONFIGURATION _ PREVIOUS NEXT V W X 2 STT04 CONFIGURATION 2 PREVIOUS NEXT V W X 2 STT04 CONFIGURATION V PREVIOUS NEXT V W X 2 STT04 CONFIGURATION W PREVIOUS NEXT STT04 CONFIGURATIO...

Page 43: ...configuration The brackets indicate the selected configuration NOTE To more quickly scroll through configurations three at a time press the left arrow key to scroll down or the right arrow key to scroll up Press continuously while reviewing the parameters until the READY screen appears NOTE To select a configuration without reviewing all the parameters press after selecting the configuration The n...

Page 44: ...e existing configurations use the arrow keys to scroll through the list NOTE To more quickly scroll through configurations three at a time press the left arrow key to scroll down or the right arrow key to scroll up Displays the ID tag name of the selected transmitter Configuration was sent successfully SEND CON FIG STT04 CONFIGURATION 1 CONFIGNAME 2 CONFIGNAME2 3 CONFIGNAME3 ENTER SELECT TRANSMITT...

Page 45: ...on is stored exit the function by pressing NOTE A maximum of 100 configurations can be stored in the STT04 terminal The device ID tag name and manufacturer is dis played for HART transmitters only Displays the 14 character ID tag name of the con nected device The TYPE field displays the device type If ANALOG mode the CHANNEL field will not show Indicator points to the configured output type NOTE U...

Page 46: ...mperature alarm values are shown as configured This display appears when configuring HART trans mitters only A message of up to 32 characters can be entered This display appears when configuring HART trans mitters only A descriptor of up to 16 characters can be entered Key Display Comments ENTER DAMPING 0 32 SEC 6 00 SEC ENTER LOWER RANGE VAL nn nn UNITS UPPER RANGE VAL nn nn UNITS ENTER INITIALIZ...

Page 47: ... nn MONTH nn YEAR nn ENTER ID TAGNAME READY Key Display Comments Select ERASE Displays the stored configurations Use the scroll keys to select a stored configuration to view The ID tag name that is bracketed indicates it is selected for deletion NOTE To more quickly scroll through configurations three at a time press the left arrow key to scroll down or the right arrow key to scroll up To erase th...

Page 48: ...ion ERASING CONFIGS COMPLETE 4 Turn the STT04 OFF and then ON again to access a READY screen OPERATIONAL FUNCTIONS The operational functions of the STT04 terminal apply to all transmit ter types The following functions are covered in this section Special feature key Monitor key Status key Rerange Option key NOTE A series of n s in the display portion of the function proce dures indicate that an al...

Page 49: ...ions For details refer to Appendix A FIX OUTPUT CANCEL FIX OUTPUT The fix output function allows the output to be held at a specific fix percentage value of output This can be used for diagnostic purposes The output of the field device does not change until cancel fix output is performed The following procedure steps through the fix and can cel fix output procedure Key Display Comments Select FIX ...

Page 50: ... available Key Display Comments Use the arrow keys to select LCD SETUP NOTE Menu selections will vary depending on device type Specify the LCD display variable The selected parameters will be displayed locally on the device LCD NOTE An additional selection for LCD setup can exist called ID TAG This option allows non HART devices to display the ID tag name locally on the device LCD SPECIAL FEATURE ...

Page 51: ...ess to reset the transmitter name in brack ets back to the standard configuration or press to abort the reset function Select YES Use to select a tag as the working configuration SPECIAL FEATURE FIX OUTPUT CANCEL FIX OUT LCD SETUP STANDARD CONFG RST CFG CHANGED FLG ENTER RESET TO STD CONFIGURATION PRESS ENTER ENTER CLEAR ENTER OUTPUT WILL BE AFFECTED PROCEED NO YES ENTER SENDING STANDARD CONFIG CH...

Page 52: ...or EBTH a change flag is set When a change flag is set and a device status is retrieved the message CONFIG CHANGED appears When reset the status of the device is OK Key Display Comments Use the arrow keys to select RST CFG CHANGED FLG Clears the configuration changed flag of the HART device SPECIAL FEATURE FIX OUTPUT CANCEL FIX OUT LCD SETUP STANDARD CONFG RST CFG CHANGED FLG ENTER CHOOSE A TAG RE...

Page 53: ...nctions in Appendix A 2 A device must be connected to the terminal in order to use the monitor key functions MONITOR PRIMARY OUTPUT This function allows output monitoring of the field device The output is displayed in percentage of the calibrated range Key Display Comments Select PRIMARY OUTPUT The output is displayed in percentage of the cali brated range The display is updated every second Press...

Page 54: ...eering units Key Display Comments Select PRIMARY INPUT using the down arrow key The input is displayed in primary engineering units The display is updated every second To exit the monitor input function press M ONITO R PRIMARY OUTPUT PRIMARY INPUT SECONDARY UNITS TEMPERATURE ENTER ID TAGNAME PRIMARY INPUT nnn nn UNITS GOOD STATUS CLEAR CLEAR ID TAGNAME READY ...

Page 55: ...temperature in degrees Celsius Key Display Comments Select SECONDARY UNITS using the down arrow key The output is displayed in secondary units M ONITO R PRIMARY OUTPUT PRIMARY INPUT SECONDARY UNITS TEMPERATURE ENTER ID TAGNAME SECONDARY UNITS nnn nn UNITS GOOD STATUS CLEAR ID TAGNAME READY Key Display Comments Select TEMPERATURE using the down arrow key M ONITO R PRIMARY OUTPUT PRIMARY INPUT SECON...

Page 56: ...yed refer to Section 5 for trou bleshooting information Rerange Key Function Use the rerange key to change the Upper and lower range values of the field device Upper and lower temperature alarm values of the field device where available Upper and lower secondary units Damping time NOTE Field device output is based on the values entered in this procedure The terminal will not reject invalid ranges ...

Page 57: ...TS PTH EQS or EBTH transmit ter 50 00 and 120 00 C are the default values Enter different values or accept the default values by pressing Input the desired value using the numeric keypad Press The rerange key will update the field device configu ration not the STT04 terminal internal configuration To update the internal STT04 terminal configuration use the get configuration key to view and save th...

Page 58: ...ot code revision numbers LANGUAGE Use this function to select the language of the STT04 display screens Key Display Comments Select LANGUAGE Select the language using the up and down arrow keys The last language selection made is main tained for the next power up The STT04 terminal will display screens in the selected language OPTIO NS STT04 OPTIONS LANGUAGE COMMUN FORMAT BATTERY ENTER ENGLISH FRA...

Page 59: ...splay Comments Select COMMUN FORMAT Select the desired communication format using the up and down arrow keys After selecting communica tions the terminal scans for devices of the selected format Select the correct communication format OPTIO NS STT04 OPTIONS LANGUAGE COMMUN FORMAT BATTERY ENTER COMMUNICATION FORMAT ABB FSK HART ENTER ID TAGNAME READY Key Display Comments Select BATTERY OPTIO NS STT...

Page 60: ... on the batteries as a percentage Recharge the battery when the available charge is below 25 percent Key Display Comments ENTER AVAILABLE BATTERY CHARGE nn ENTER ID TAGNAME READY Key Display Comments Select STT04 NAME Shows the name of the STT04 terminal as specified in the DownLink software application OPTIO NS STT04 OPTIONS COMMUN FORMAT BATTERY STT04 NAME ENTER STT04 NAME ABB STT04 ENTER ID TAG...

Page 61: ...n to view the firmware and boot code revisions of the STT04 terminal Key Display Comments Select STT04 REV Shows the firmware and boot code revisions of the STT04 terminal OPTIO NS STT04 OPTIONS BATTERY STT04 NAME STT04 REV ENTER FIRMWARE nn n BOOTCODE nn n ENTER ID TAGNAME READY ...

Page 62: ...e personal com puter 2 Connect the male end of the RS 232 C cable to the STT04 termi nal 3 If the personal computer is not on turn it on and allow it to boot 4 Turn off the STT04 terminal 5 Put the STT04 terminal into the remote mode by pressing one of the following key sequences based on the language of the STT04 ter minal Table 4 2 The STT04 terminal screen displays the following NOTE The first ...

Page 63: ...lick Transfer Configuration and select Upload from STT04 b Select a configuration and click Ok Download to STT04 from PC a Click Transfer Configuration and select Download to STT04 b Select a configuration and click Ok 8 When the download process is complete turn off the STT04 ter minal and disconnect the RS 232 C cable from the STT04 and PC ...

Page 64: ...us key is pressed if a problem exits an error message is displayed The errors are based on an internal priority structure where the most critical error takes priority over less critical errors ABB digital FSK devices only show one error message at a time If more than one error message is present the one holding the highest priority must be corrected before other lower priority messages can be view...

Page 65: ...justment CAL OFFSET WARNING TB82 Large positive sensor off set 180 mV or large negative sensor offset 180 mV Clean sensor and perform buffer and pro cess calibration Inspect sensor and calibrating for shorts Remove all potential shorts to ground con duit or metals CAL OFFSET WARNING continued TB82 Large positive sensor off set 180 mV or large negative sensor offset 180 mV If sensor is functioning ...

Page 66: ...OP MODE All HART Device is in digital mode Command cannot be performed Configure device for analog mode point to point FIXED OUTPUT MODE All HART STT terminal turned off while the 4 to 20 mA out put was being calibrated Power down the transmitter and power up the transmitter Transmitter cannot exe cute command because of fix output Take transmitter out of fix output Refer to FIX OUTPUT CANCEL FIX ...

Page 67: ...rence junction CJC failed Replace the amplifier assembly SHORTED SENSOR EBTH Temperature transducer failure Replace temperature transducer Field wiring shorted Find and correct the wiring problem SPAN ZERO KEY ERROR PTH Misoperation of EZ CAL option Try again Damaged EZ CAL option Replace EZ CAL option Refer to the repair replacement of the appropriate PTS product instruction Damaged amplifier ass...

Page 68: ...ice Refer to the calibration section of the appropriate EQS temperature transmitter instruction CANNOT SAVE CONFIGURATION TOO LARGE STT Transmitter type not sup ported by STT terminal revision level Consult ABB to obtain latest STT terminal revision CELL CHARACTERIZATION BOARD EEPROM FAILURE PTS Damage to cell characterization board Turn the STT terminal off and then on If error still exists repla...

Page 69: ...Hardware failure of on board temperature sensor Replace amplifier assembly Refer to repair replacement section of the appro priate product instruction ELECTRONIC TEMPERATURE OUT OF RANGE PTS Electronics temperature is outside the factory speci fied limit Remove the source of the temperature extreme EMPTY PIPE XM SM XE The flowmeter is empty Allow process to fill flow tube ERROR ATTEMPT TO CONFIGUR...

Page 70: ...terminal that is known to be operational FIELD DEVICE CAN T EXECUTE COMMAND LOCKOUT ENGAGED All FSK Unable to configure or cal ibrate Hardware lock active Refer to the device product instruction for details about the configuration lockout jumper FIELD DEVICE CAN T EXECUTE DATA OUT OF RANGE All FSK Transmitter sent data that is out of acceptable range Press to verify the parameters of the configura...

Page 71: ...REFERENCE FAILURE AVS BCN EQN EQS XM SM XE Reference problem on circuit board Check connections Replace electronics assembly Refer to repair replacement section of the appropriate field device instruction PTS Reference problem on circuit board Replace amplifier assembly If problem still exists replace cell and characteriza tion board Refer to the repair replace ment section of the appropriate PTS ...

Page 72: ...tronics assembly PTS Replace amplifier assembly refer to repair replacement section of the appro priate product instruction for replacement procedures FIELD DEVICE NOT SUPPORTED BY STT All FSK Field device type not sup ported by the release of STT terminal Contact an ABB sales office for upgrade information FIELD DEVICE OPEN SENSOR EQS Field device temperature transducer failure Replace the temper...

Page 73: ... SM XE Coil excitation has stopped Check wiring of excitation signal and ref erence signal If both are OK call service LOW PROCESS ALARM XM SM XE Process value over under alarm limit Correct process problem Change alarm value Refer to CREATE MODIFY CONFIGURATION in Appendix I MAIN POWER WAS LOST XM SM XE Power was lost to device Check for loose wiring Restore totalizers to known values if lost NO ...

Page 74: ...rom device was possibly corrupted Try again or check data If message persists verify that electronic noise on line is within specifications using an oscilloscope SYSTEM ERROR STT Unexpected interrupt request on STT Turn STT off and on again If error per sists upgrade the STT firmware TAG ID LENGTH NOT SUPPORTED BY FIELD DEVICE BCN EQN Attempting to send an ID tag name that uses too many characters...

Page 75: ...sitioner Valve has not moved for over two minutes Check valve Check 4 to 20 mA input OPTION NOT INSTALLED XM SM XE The current configuration is calling to use the empty pipe detector which requires an optional board Add empty pipe detector option or turn empty pipe detection off in the configuration Table 5 2 STT04 Error Messages for ABB FSK Devices continued Message Affected Device Probable Cause...

Page 76: ...nly under the following conditions a When at a static free work station or when the bag is grounded at the field site b After neutralizing the conductive area of the container c Only after firm contact with an antistatic mat and or firmly gripped by a grounded individual 3 Personnel handling assemblies with MOS devices should be neu tralized to a static free work station by a grounding wrist strap...

Page 77: ...he board are facing up Fig 6 1 6 Carefully disconnect the keypad connector strip from the PC board This will allow the PC board to lie flat next to the upper case assembly 7 Locate the battery pack connector on the circuit board Fig 6 1 8 Squeeze the end of the connector tab and pull the connector from the circuit board 9 Remove the screw securing the battery pack Fig 6 1 10 Place thumbs on the cl...

Page 78: ...while maintain ing pressure on the cases 20 Insert the four screws into the back of the lower case and tighten until heads are flush with case UPGRADES When firmware upgrades are issued for the STT04 terminal they are obtained via the Internet by connecting to the ABB home page For information about upgrades contact your ABB sales representative To download firmware upgrades 1 Connect to the Inter...

Page 79: ...ogram group to connect via your Internet service provider 2 Start your Internet browser 3 Type the following to connect to the ABB home page http www abb com 4 Type stt 04 in the Search field on the right side of the screen as shown below make certain to include a space between the last t and the 0 as shown 5 The search will yield the following results ...

Page 80: ...ERMINAL Use the following steps to download an STT04 firmware upgrade 1 Check the amount of battery charge left on the STT04 terminal If it is below 50 percent charge the STT04 terminal before performing this procedure To check the charge see BATTERY in Section 4 2 Connect the female end of the RS 232 C customer supplied cable to a vacant RS 232 C port serial port on the personal com puter 3 Conne...

Page 81: ...rt number to order components from your ABB sales representative Table 6 1 Upgrade Languages Language STT04 Key Sequence English Hold down and and press French Hold down and and press Spanish Hold down and and press German Hold down and and press 1 On 2 On 3 On 4 On Table 6 2 List of Spare Parts Part Number Description Clip Leads cable Part number 1948517 4 STT04 communication cable Battery Pack P...

Page 82: ...nd disconnect it from the com munication wires or loop Make sure the battery charger is also dis connected Wipe the unit down using a soft cloth dampened with a nonabrasive mild detergent Do so as often as the installation envi ronment requires WARNING System maintenance must be performed only by qualified per sonnel and only after securing equipment controlled by the cir cuit Altering or removing...

Page 83: ...licable 3 ABB instruction manual number page number and reference fig ure that identifies the part When ordering standard parts from ABB use the part numbers and descriptions from the spare parts lists Order parts without commer cial descriptions from the nearest ABB sales office SPARE PARTS LISTS For available spare parts refer to RECOMMENDED SPARE PARTS in Section 6 TRAINING ABB has modern train...

Page 84: ...on The following table details the configuration process Send configurations Select configurations Get configurations Erase configurations View configurations Operational functions Figure A 1 Configuration Flowchart AVS T01615A SELECT DEVICE TYPE SELECT MODE SELECT INPUT CHARACTERIZATION ENTER CONFIGURATION ID TAG ENTER DERIVATIVE VALUE ENTER LOW HIGH LIMIT SIGNALS SELECT INPUT SIGNAL LOW FLOW SHU...

Page 85: ...nue to press the key until the desired character appears Use the right arrow key to move to the next character Use the left arrow key to go back to the previous charac ter Select DIGITAL Use the up and down arrow keys to select mode NOTE The DIGITAL selection should only be made when using an IMFBS01 field bus I O module Select ANALOG for all other cases This screen only appears in the DIGITAL mod...

Page 86: ...oved for over two minutes with a change in the input signal NOTE Review product instruction for details Select PSI units Proportional tuning constant Use numbers between 1 and 0 for small drives and numbers greater than 1 for large drives NOTE Review product instruction for details Integral tuning constant This number will usually range from 1 to 40 NOTE Review product instruction for details Deri...

Page 87: ...activated Sets the minimum input value in of span that the control element will go to 0 Select a DO3 action with the arrow keys Reference Positioner instruction for details NOTE Scroll with the up and down arrow keys to view other selections Select YES using arrow keys Key Display Comments ENTER INPUT SIGNAL NORMAL ACT REVERSE ACT ENTER DAMPING 0 5 sec n SECS ENTER DEVIATION ALARM n n ENTER LOW PR...

Page 88: ... OPEN console After selecting a field device the READY screen appears All calibra tion functions can be performed on the selected device Refer to Fig ure A 2 for an overview of the calibration functions Configuration ID tag name just configured will be in the upper left corner if the configuration is saved It becomes the working configuration Key Display Comments ENTER ID TAGNAME READY Figure A 2 ...

Page 89: ...ing or decreasing the mA signal the increments of change increase with successive depressions until the maximum level of change is reached By changing direction you will return to the smallest increment of change This adjustment tech nique speeds up the adjustment process without affecting fine adjustment Use the up and down arrow keys to adjust the 20 mA signal NOTE Refer to Positioner instructio...

Page 90: ...e control loop is in manual Select YES Select INPUT A D CAL Make the proper adjustments and press NOTE Refer to Positioner instruction for details on the calibrations Make the proper adjustments and press NOTE Refer to Positioner instruction for details on the calibrations CALI BRATE OUTPUT WILL BE AFFECTED PROCEED NO YES ENTER OUTPUT D A CAL INPUT A D CAL MAN POSITION CAL AUTO POSITION CAL ENTER ...

Page 91: ...control loop is in manual Select YES Select MAN POSITION CAL Make the proper adjustments and press NOTE Refer to Positioner instruction for details on the calibrations Make the proper adjustments and press NOTE Refer to Positioner instruction for details on the calibrations CALI BRATE OUTPUT WILL BE AFFECTED PROCEED NO YES ENTER OUTPUT D A CAL INPUT A D CAL MAN POSITION CAL AUTO POSITION CAL ENTER...

Page 92: ...e input Be sure the control loop is in manual Select YES Select AUTO POSITION CAL Limit stops are required for the AUTO POS CAL selection Select YES NOTE Refer to Positioner instruction for details on the calibrations The positioner is being automatically calibrated The positioner is calibrated CALI BRATE OUTPUT WILL BE AFFECTED PROCEED NO YES ENTER OUTPUT D A CAL INPUT A D CAL MAN POSITION CAL AU...

Page 93: ...and set point at a user specified value This set point value is maintained by the positioner until it is canceled using CANCEL FIX SET Key Display Comments CLEAR ID TAGNAME READY Key Display Comments Select FIX SET POINT If CANCEL FIX SET is selected press and the fix set point is canceled and the READY screen appears Use the number key pad to input the desired fix set point value The set point re...

Page 94: ...t Key Display Comments Select PID PARAMETERS Use the number key pad to enter the desired gain value Gain value range 0 01 to 10 Use the number key pad to enter the desired gain value Gain value range 1 to 40 Use the number key pad to enter the desired gain value Gain value range 2 to 70 The PID parameters are sent to the positioner SPECIAL FEATURE FIX SET POINT CANCEL FIX SET PID PARAMETERS STANDA...

Page 95: ... of span The total number of movements is used to help determine when maintenance is performed on final control elements The reset totals function sets the travel counter to zero Key Display Comments Select RESET TOTALS The travel counter is set to zero To check the travel counter refer to Status Check in Section 4 SPECIAL FEATURE FIX SET POINT CANCEL FIX SET PID PARAMETERS STANDARD CONFIG RESET T...

Page 96: ...e Input air supply Digital input Output air supply O1 Key Display Comments Select a monitoring attribute using the down arrow key and press Additional monitor selections are Input air supply Output air O1 port Output air O2 port Air pres Travel Reverse Digital input Shows a real time value for the selected variable M ONITO R POSITION SET POINT DEVIATION TEMPERATURE ENTER ENTER ID TAGNAME MON VARIA...

Page 97: ...s View configurations Operational functions Figure B 1 Configuration Flowchart EBTH T 01 612 A S ELE C T D E VIC E TY P E S ELE C T S EN S O R TY P E N UM B ER O F E LEM E NTS S ELE C T RT D TY P E N UM B ER O F W IR ES N UM BER O F W IRES E N GIN EE R IN G U NITS N UM BER O F E LEM E N TS C H A NN E L CO N NEC T ION C H A NN E L CO NN EC T ION E N TE R M E SS AGE TE X T E N TE R DATE E N TE R D E...

Page 98: ...d can be used to note anything of impor tance to the device or installation To select a character press the key that has the desired character Continue to press the key until the desired character appears Use the right arrow key to move to the next character Use the left arrow key to go back to the previous character Type a descriptor string using up to 16 characters This field can be used for not...

Page 99: ... specify 19 input and output points between 0 and 100 Refer to the Platinum Standard Series Smart Tem perature Transmitter EBTH instruction for descrip tion Enter a value between 0 and 100 Refer to the Plati num Standard Series Smart Temperature Trans mitter EBTH instruction for description Key Display Comments ENTER ENTER DATE DAY nn MONTH nn YEAR nnnn ENTER ENTER ENTER ENTER SENSOR TYPE T C RTD ...

Page 100: ...press the key that has the desired character Continue to press the key until the desired character appears Use the right arrow key to move to the next character Use the left arrow key to go back to the previous character Input the lower range value and press Input the upper range value Input the lower temperature alarm value and press Input the upper temperature alarm value and press Key Display C...

Page 101: ...f the calibration functions Select YES Configuration ID tag name just configured will be in the upper left corner if the configuration is saved It becomes the working configuration Key Display Comments ENTER STORE THIS CONFIGURATION NO YES ENTER ID TAGNAME READY Figure B 2 Calibration Flowchart EBTH APPLY 0 m V SOURCE ADJUST HIG H CALIBRATIO N RESISTANCE BENCH CALIBRATIO N ADJUST LOW CALIBRATIO N ...

Page 102: ...Select BENCH CALIB with the down arrow key Enter the low and high calibration voltages Enter the low and high calibration resistances Apply 0 00 mV to the transmitter A message appears that indicates a stabilization time NOTE Refer to the EBTH instruction for detailed wir ing diagrams of this procedure CALI BRATE OUTPUT WILL BE AFFECTED PROCEED NO YES ENTER CALIBRATION D TO A ADJUST BENCH CALIB EN...

Page 103: ...detailed wir ing diagrams of this procedure Apply 0 Ω to the transmitter A message appears that indicates a stabilization time NOTE Refer to the EBTH instruction for detailed wir ing diagrams of this procedure Apply 250 Ω to the transmitter A message appears that indicates a stabilization time NOTE Refer to the EBTH instruction for detailed wir ing diagrams of this procedure Key Display Comments E...

Page 104: ...l NOTE When increasing or decreasing the mA sig nal the increments of change increase with succes sive depressions until the maximum level of change is reached By changing direction you will return to the smallest increment of change This adjustment technique speeds up the adjustment process without affecting fine adjustment Use the arrow keys to adjust the 20 mA signal CALI BRATE OUTPUT WILL BE A...

Page 105: ...not cor responding to the input Be sure the control loop is in manual Select YES Select D TO A ADJUST Select METER VALUE ENTRY Use the number keys to enter the current meter reading Use the number keys to enter the current meter reading CALI BRATE OUTPUT WILL BE AFFECTED PROCEED NO YES ENTER CALIBRATION D TO A ADJUST BENCH CALIB ENTER D A CAL USING UPDOWN ARROW KEYS METER VALUE ENTRY ENTER 4 mA CA...

Page 106: ...on function The following table details the configuration process Send configurations Select configurations Get configurations Erase configurations View configurations Operational functions Figure C 1 Configuration Flowchart EQS T01617A SELECT DEVICE TYPE SELECT MODE SELECT SENSOR TYPE NUMBER OF ELEMENTS SELECT OHMS SELECT mV SELECT RTD TYPE NUMBER OF WIRES NUMBER OF WIRES ENGINEERING UNITS NUMBER...

Page 107: ... a character press the key that has the desired character Continue to press the key until the desired character appears Use the right arrow key to move to the next character Use the left arrow key to go back to the previous character For this example select ANALOG For this example select T C Select N type Choose the desired temperature unit CONFIG CONFIGURATION NEW MODIFY ERASE ENTER DEVICE TYPE A...

Page 108: ...ys Refer to the Platinum Standard Series Smart Tem perature Transmitter EQS instruction for descrip tion Enter up to 6 characters Use familiar units to describe the output To select a character press the key that has the desired character Continue to press the key until the desired character appears Use the right arrow key to move to the next character Use the left arrow key to go back to the prev...

Page 109: ...the INFI 90 OPEN console Refer to Figure C 2 for an overview of the calibration functions Bench Calibration This procedure applies to EQS Transmitters configured for either ANALOG or DIGITAL Any differences between the two are noted in the Comments column Input the lower and upper temperature alarm values and press Lower and upper temperature alarms are user con figured The temperature is based on...

Page 110: ...ALIBRATIO N RESISTANCE BENCH CALIBRATIO N ADJUST LOW CALIBRATIO N CALIBRATIO N CO MPLETE ADJUST HIG H CALIBRATIO N APPLY 0 Ω APPLY 250 Ω ADJUST LOW CALIBRATIO N RESISTANCE T01910A APPLY 100 m V SOURCE C A L I B R A T E D TO A CAL M ETHOD ARROW KEYS METER VALUE ENTRY ADJUST OU TPU T TO 4 mA ADJUST OU TPU T TO 20 m A 4 m A CALIBRATIO N ENTER M ETER VALUE 4 000 20 m A CALIBRATIO N ENTER M ETER VALUE ...

Page 111: ...he increments of change increase with succes sive depressions until the maximum level of change is reached By changing direction you will return to the smallest increment of change This adjustment technique speeds up the adjustment process without affecting fine adjustment Use the arrow keys to adjust the 20 mA signal Key Display Comments ENTER APPLY 0 00 mV AT 3 4 THEN HIT ENTER ENTER APPLY 100 0...

Page 112: ...S Select D TO ADJUST Use the arrow keys to adjust the 4 mA signal NOTE When increasing or decreasing the mA sig nal the increments of change increase with succes sive depressions until the maximum level of change is reached By changing direction you will return to the smallest increment of change This adjustment technique speeds up the adjustment process without affecting fine adjustment Use the a...

Page 113: ...nfiguration function The following table details the configuration process Send configurations Select configurations Get configurations Erase configurations View configurations Operational functions Figure D 1 Configuration Flowchart PTH T01341B SELECT DEVICE TYPE SELECT MODE SELECT OU TPU T TYPE SELECT OU TPU T ACTIO N ENTER CO NFIGURATIO N ID TAG ENTER DAM PING VALUE ENTER SECO NDARY UNITS SELEC...

Page 114: ...e a descriptive message using up to 32 charac ters This field can be used to note anything of impor tance to the device or installation To select a character press the key that has the desired character Continue to press the key until the desired character appears Use the right arrow key to move to the next character Use the left arrow key to go back to the previous character Type a descriptor str...

Page 115: ...ut type selections not shown here include LINEAR SQUARE ROOT VOL SPHERE and VOL CYLINDER Use to return to a previous configuration screen from any screen in the configuration process Select an output action Enter a value between 0 and 32 seconds Select an engineering unit best suited for the application Input lower range value using the arrow keys then press Input the upper range value Key Display...

Page 116: ...ues using the number keypad The UNITS displayed will be those designated in the previous screen After entering value press Lower and upper temperature alarms are user con figurable alarms The temperature is based on the cell The default alarms setting are shown here The defaults are also the lower and upper limits of the alarm NOTE Use to return to a previous configura tion screen from any screen ...

Page 117: ...r to Figure D 2 for an overview of the calibration functions Figure D 2 Calibration Flowchart PTH T01340A DIGITAL ANALO G CALIBRATIO N CO MPLETE BENCH REZERO ENTER LOW CALIBRATION PRESSURE D TO A CAL M ETHOD CAL M ETHOD ARROW KEYS ARROW KEYS M ETER VALUE ENTRY M ETER VALUE ENTRY ADJUST OU TPU T TO 4 mA ADJUST OU TPU T TO 4 mA ADJUST OU TPU T TO 20 m A ADJUST OU TPU T TO 20 m A 4 m A CALIBRATIO N E...

Page 118: ...ured for digital operation the D TO A ADJUST selection would not appear Enter the low calibration pressure value and press Enter the high calibration pressure value Apply the low calibration pressure to the input of transmitter as specified earlier Apply the high calibration pressure to the input of transmitter as specified earlier CALI BRATE OUTPUT WILL BE AFFECTED PROCEED NO YES ENTER CALIBRATIO...

Page 119: ...A sig nal the increments of change increase with succes sive depressions until the maximum level of change is reached By changing direction the smallest incre ment of change returns This technique speeds up the adjustment process without affecting fine adjustment Adjust the transmitter output using the up and down arrow keys Key Display Comments ENTER D A CAL USING UPDOWN ARROW KEYS METER VALUE EN...

Page 120: ... 20 milliampere output Arrow key Meter value entry for HART devices Key Display Comments This operation will cause a change in output not cor responding to the input Be sure the control loop is in manual Select YES Select REZERO If digitally configured the D TO A ADJUST selection will not appear Apply zero value to the transmitter Rezero is complete CALI BRATE OUTPUT WILL BE AFFECTED PROCEED NO YE...

Page 121: ...NOTE When increasing or decreasing the mA sig nal the increments of change increase with succes sive depressions until the maximum level of change is reached By changing direction you will return to the smallest increment of change This adjustment technique speeds up the adjustment process without affecting fine adjustment Use the arrow keys to adjust the 20 mA signal CALI BRATE OUTPUT WILL BE AFF...

Page 122: ...sponding to the input Be sure the control loop is in manual Select YES Select D TO A ADJUST Select METER VALUE ENTRY Use the number keys to enter the current meter reading Use the number keys to enter the current meter reading CALI BRATE OUTPUT WILL BE AFFECTED PROCEED NO YES ENTER CALIBRATION D TO A ADJUST BENCH CALIB ENTER D A CAL USING UPDOWN ARROW KEYS METER VALUE ENTRY ENTER 4 mA CALIBRATION ...

Page 123: ...ield device Refer to Figure E 1 for an overview of the configuration function The following table details the configuration process Send configurations Select configurations Get configurations Erase configurations View configurations Operational functions Figure E 1 Configuration Flowchart PTS T01341A ENTER DAMPING CONSTANT ID TAG SELECT MODE ENTER CHANNEL NUMBER SAVE CONFIGURATION DIGITAL ANALOG ...

Page 124: ...he next character Use the left arrow key to go back to the previous charac ter Select ANALOG NOTE The DIGITAL selection should only be made when using an IMFBS01 field bus I O module A CHANNEL prompt appears when DIGITAL is selected Select LINEAR For a function generator example refer to Appendix G Use to return to a previous configuration screen from any screen in the configuration process Use th...

Page 125: ... the previous character Press when finished Specify values using the number keypad The UNITS displayed will be those designated in the previous screen After entering value press Lower and upper temperature alarms are user con figured The temperature is based on the cell The default alarms setting are shown here The defaults are also the lower and upper limits of the alarm NOTE Use to return to a p...

Page 126: ... To change calibration or configuration parameters of a field device that is connected to an IMFBS01 module the transmitter must be taken off line This is done at the INFI 90 OPEN console Refer to Figure E 2 for an overview of the calibration functions Bench Calibration This procedure applies to PTS pressure transmitters configured for either ANALOG or DIGITAL Any difference between the two are no...

Page 127: ...ESSURE D TO A CAL M ETHOD CAL M ETHOD ARROW KEYS ARROW KEYS M ETER VALUE ENTRY M ETER VALUE ENTRY ADJUST OU TPU T TO 4 mA ADJUST OU TPU T TO 4 mA ADJUST OU TPU T TO 20 m A ADJUST OU TPU T TO 20 m A 4 m A CALIBRATIO N ENTER M ETER VALUE 4 000 4 m A CALIBRATIO N ENTER M ETER VALUE 4 000 20 m A CALIBRATIO N ENTER M ETER VALUE 20 000 20 m A CALIBRATIO N ENTER M ETER VALUE 20 000 EQUALIZE PRESSURE ENTE...

Page 128: ...ng or decreasing the mA sig nal the increments of change increase with succes sive depressions until the maximum level of change is reached By changing direction the smallest incre ment of change returns This technique speeds up the adjustment process without affecting fine adjustment Adjust the transmitter output using the up and down arrow keys Key Display Comments ENTER LOW CALIB PRESSURE nn nn...

Page 129: ...e a change in output not cor responding to the input Be sure the control loop is in manual Select YES Select REZERO If digitally configured the D TO A ADJUST selection will not appear Apply zero value to the transmitter Rezero is complete CALI BRATE OUTPUT WILL BE AFFECTED PROCEED NO YES ENTER CALIBRATION D TO A ADJUST BENCH CALIB REZERO ENTER APPLY PRESSURE OF nn nn UNITS THEN HIT ENTER ENTER ID ...

Page 130: ...ct D TO A ADJUST Use the arrow keys to adjust the 4 mA signal NOTE When increasing or decreasing the mA sig nal the increments of change increase with succes sive depressions until the maximum level of change is reached By changing direction you will return to the smallest increment of change This adjustment technique speeds up the adjustment process without affecting fine adjustment Use the arrow...

Page 131: ...r to Figure F 1 for an overview of the HART configuration function The table that follows details the configuration process Figure F 1 Configuration Flowchart HART Key Display Comments Select HART T01614B SELECT DEVICE TYPE ENTER DESCRIPTOR ENTER CONFIGURATION NAM E DAMPING SAVE CONFIGURATION ENTER MESSAGE ENTER LOW ER AND UPPER RANGE VALUE SELECT TRANSMITTER TYPE ENTER DATE SELECT MODE ENTER CHAN...

Page 132: ...hat has the desired character Continue to press the key until the desired character appears Use the right arrow key to move to the next character Use the left arrow key to go back to the previous character Type a descriptor string using up to 16 characters This field can be used for notations about the device or process To select a character press the key that has the desired character Continue to...

Page 133: ...t engineering units This appears only for pres sure and temperature transmitters Enter the lower range temperature value and press Input the upper range value Select YES Configuration ID tag name just configured will be in the upper left corner if the configuration is saved It becomes the working configuration Key Display Comments ENTER DATE DAY nn MONTH nn YEAR nnnn ENTER ENTER ENTER ENTER DAMPIN...

Page 134: ...ld device Figure G 1 provides and overview of the configuration process The follow ing table details the configuration process Send configurations Select configurations Get configurations Erase configurations View configurations Operational functions Figure G 1 Configuration Flowchart BCN T01616A SELECT DEVICE TYPE SELECT MODE SELECT OUTPUT TYPE SELECT OUTPUT ACTION ENTER CONFIGURATION ID TAG ENTE...

Page 135: ...arrow key to move to the next character Use the left arrow key to go back to the previous character Select DIGITAL device in this mode defaults to below 4 mA independent of input Use the up and down arrow keys to select mode NOTE The DIGITAL selection should only be made when using an IMFBS01 field bus I O module Select ANALOG for all other cases If ANALOG is selected ENTER CHANNEL screen will not...

Page 136: ...ber keys to enter values and press to advance to the next value Continue until all 5 pairs of points have been entered Move the indicator to your selection Refer to the Smart Pressure Transmitter BCN instruction for an explanation of terms Enter a value between 0 and 32 seconds Select an engineering unit Key Display Comments ENTER OUTPUT TYPE 3 2 FLOW MODE 5 2 FLOW MODE FUNC GEN ENTER POINT 1 INP ...

Page 137: ... the right arrow key to move to the next character Use the left arrow key to go back to the previous character Press when finished Specify secondary values using the number keys The UNITS displayed will be those designated in the previous screen After entering a value press Make a selection using the arrow keys The Configuration ID tag name just configured will be in the upper left corner if the c...

Page 138: ...rview of the calibration functions NOTE When calibrating a field device must be connected to the STT04 terminal Bench Calibration This procedure details the bench calibration process Figure G 2 Calibration Flowchart BCN T01330A DIGITAL AN ALO G APPLY LOW CALIBRATIO N PRESSURE BENC H D TO A REZERO ENTER AM BIENT TEMPERATURE ADJUST OU TPU T TO 4 mA ADJUST OU TPU T TO 20 mA EQUALIZE PRESSURE ENTER CO...

Page 139: ...should match the tag located in the electronics side of the transmitter In certain cases zero shift is entered as a percentage value at 25 C and 85 C NOTE After a value for C is entered D and E are dis played and after E is entered a checksum value is requested There are also 5 sets of data A through E for span shift Press to advance to the next set of data In certain cases span shift is entered a...

Page 140: ...rrow keys NOTE When increasing or decreasing the mA sig nal the increments of change increase with succes sive depressions until the maximum level of change is reached By changing direction the smallest incre ment of change returns This technique speeds up the process without affecting fine adjustment Adjust the transmitter output using up and down arrow keys Key Display Comments ENTER LOW CALIB P...

Page 141: ...ause a change in output not cor responding to the input Be sure the control loop is in manual Select YES Select REZERO If digitally configured the D TO A ADJUST selection will not appear Apply zero value to the transmitter Rezero is complete CALI BRATE OUTPUT WILL BE AFFECTED PROCEED NO YES ENTER CALIBRATION D TO A ADJUST BENCH CALIB REZERO ENTER APPLY PRESSURE OF nn nn THEN HIT ENTER ENTER ID TAG...

Page 142: ...O A ADJUST Use the arrow keys to adjust the 4 mA signal NOTE When increasing or decreasing the mA sig nal the increments of change increase with succes sive depressions until the maximum level of change is reached By changing direction you will return to the smallest increment of change This adjustment technique speeds up the adjustment process without affecting fine adjustment Use the up and down...

Page 143: ...ng table details the configuration process Send configurations Select configurations Get configurations Erase configurations View configurations Operational functions Figure H 1 Configuration Flowchart EQN T01618A SELECT DEVICE TYPE SELECT MODE SELECT SENSOR TYPE SELECT OHMS SELECT mV SELECT RTD TYPE SELECT NUMBER OF ELEMENTS SELECT ENGINEERING UNITS SELECT NUMBER OF ELEMENTS SELECT THERMOCOUPLE T...

Page 144: ...figuration ID tag using up to 14 ASCII characters To select a character press the key that has the desired character Continue to press the key until the desired character appears Use the right arrow key to move to the next character Use the left arrow key to go back to the previous charac ter For this example select ANALOG For this example select RTD CONFIG CONFIGURATION NEW MODIFY ERASE ENTER DEV...

Page 145: ...ctronic Temperature Transmitter EQN instruc tion for description Enter the lower range temperature value and press Input the upper range value Refer to the Smart Electronic Temperature Trans mitter EQN instruction for description Key Display Comments ENTER RTD TYPE 100Ω Pt 385 100Ω Pt 392 ENTER NUMBER OF ELEMENTS 2 WIRE 3 WIRE DUAL ENTER ENGINEERING UNITS C F K ENTER OUTPUT TYPE LINEAR FUNC GENERA...

Page 146: ...or description Enter up to 6 characters Use familiar units to describe the output To select a character press the key that has the desired character Continue to press the key until the desired character appears Use the right arrow key to move to the next character Use the left arrow key to go back to the previous character Press when finished Input the lower range value and press Input the upper r...

Page 147: ...MOCO UPLE D TO A APPLY 0 mV SIGNAL ADJUST OU TPU T TO 4 mA ADJUST OU TPU T TO 20 m A ADJUST OU TPU T TO 20 mA APPLY 25 m V SIGNAL ENTER HIGH CALIBRATIO N UNITS ENTER LOW CALIBRATIO N UNITS BENCH RTD m V APPLY LOW CALIBRATIO N UNITS ADJUST OU TPU T TO 4 m A C A L I B R A T E APPLY HIG H CALIBRATIO N UNITS DIGITAL ANALOG Key Display Comments This operation will cause a change in output not cor respo...

Page 148: ...e used for this tem perature value Adjust the transmitter output using the up and down arrow keys Adjust the transmitter output using the up and down arrow keys Bench calibration is complete Key Display Comments ENTER APPLY 0 mV SIGNAL THEN HIT ENTER ENTER APPLY 25 mV SIGNAL THEN HIT ENTER ENTER ENTER TRANSMITTER AMBIENT TEMP nn nn C ENTER ADJUST TO 4 mA THEN HIT ENTER ENTER ADJUST TO 20 mA THEN H...

Page 149: ... Select D TO A ADJUST Use the arrow keys to adjust the 4 mA signal NOTE When increasing or decreasing the mA sig nal the increments of change increase with succes sive depressions until the maximum level of change is reached By changing direction you will return to the smallest increment of change This adjustment technique speeds up the adjustment process without affecting fine adjustment Use the ...

Page 150: ...lowing table details the configuration process Send configurations Select configurations Get configurations Erase configurations View configurations Operational functions Figure I 1 Configuration Flowchart XM SM XE Mag Flow T01343A SELECT RESPONSE TIM E ENTER DAMPING CONSTANT ENTER LOW FLO W CUTO FF SAVE CO NFIG URATION SELECT ENGINEERING UNITS SELECT DIG ITAL FILTER ID TAG SELECT FAIL M O DE SELE...

Page 151: ...4 ASCII characters To select a character press the key that has the desired character Continue to press the key until the desired character appears Use the right arrow key to move to the next character Use the left arrow key to go back to the previous charac ter Select ANALOG Move the indicator to your selection Refer to the Magnetic Flowmeter XM SM XE instruc tion for an explanation of terms CONF...

Page 152: ...eer ing unit If the engineering unit is not mass related skip the next screen Enter the density factor for the user defined engi neering unit Input range value 1 using the number keys then press Input range value 2 The UNITS displayed will be those designated in the previous screens Key Display Comments ENTER DAMPING 0 32 SEC _nn nn SEC ENTER SELECT PV EU I s l m User Defined ENTER EU DESCRIPTOR n...

Page 153: ...speed electronic devices a pulse width of 0 05 ms is common Enter a value between 0 and 10 of full scale This parameter causes the input to drop to a zero state when the flow drops below the set value Make a selection using the arrow keys Make a selection using the arrow keys Key Display Comments ENTER RANGE DN n nnn UNITS ENTER FAIL MODE LOW HIGH ENTER SELECT TOT EU l m3 User Defined ENTER PULSE ...

Page 154: ...IMFBS01 module the transmitter must be taken off line This is done at the INFI 90 OPEN console Refer to Figure I 2 for an overview of the calibration functions Make a selection using the arrow keys Make a selection using the arrow keys Specify values using the number keys The UNITS displayed will be those designated in a previous screen After entering a value press Make a selection using the arrow...

Page 155: ... Display Comments This operation will cause a change in output not cor responding to the input Be sure the control loop is in manual Select YES Select EMPTY PIPE DET If configured digitally the D TO A ADJUST selection will not appear Use the arrow keys to adjust the frequency as described in the Mag Flow product instruction The frequency value will be updated between key presses during which a wai...

Page 156: ...re the control loop is in manual Select YES Select D TO A ADJUST Use the arrow keys to adjust the 4 mA signal NOTE When increasing or decreasing the mA sig nal the increments of change increase with succes sive depressions until the maximum level of change is reached By changing direction you will return to the smallest increment of change This adjustment technique speeds up the adjustment process...

Page 157: ...vice Refer to Figure J 1 for an overview of the configuration function The following table details the configuration process Send configurations Select configurations Get configurations Erase configurations View configurations Operational functions Figure J 1 Configuration Flowchart TBN480 T01339A CH OO SE A RAN GE JUM PER SELECT SEN SOR G ROU P ID TAG SELECT M OD E DIG ITA L AN ALO G ENTER CHAN N...

Page 158: ... the configuration ID tag using up to 14 ASCII characters To select a character press the key that has the desired character Continue to press the key until the desired character appears Use the right arrow key to move to the next character Use the left arrow key to go back to the previous charac ter Select ANALOG Select analyzer type CONFIG CONFIGURATION NEW MODIFY ERASE ENTER DEVICE TYPE ABB FSK...

Page 159: ...uction for description Select a temperature compensation effect Use the down arrow key to view more selections Refer to Smart Conductivity Transmitter Series TBN480 instruction for description Enter a value between 0 and 32 Refer to the Smart Conductivity Transmitter Series TBN480 instruc tion for description Key Display Comments ENTER SENSOR GROUP A B C ENTER RANGE JUMPER HIGH MEDIUM LOW ENTER AN...

Page 160: ...00 high or 0 low During continual diagnostics if the microcomputer detects a fatal problem the transmitter output will go to 0 low 100 high or the last value before the error In analog mode a pulse can be sent on the 4 to 20 mA output to indicate a detected sensor fault This pulse can be adjusted from 0 to 100 of the loop current 0 to 16 mA Select YES to store the configuration Key Display Comment...

Page 161: ...off line This is done at the INFI 90 OPEN console Refer to Figure J 1 for an overview of the calibration functions Process Calibration This procedure applies to TBN480 Transmitters configured for either ANALOG or DIGITAL Any differences between the two are noted in the Comments column Figure J 2 Calibration Flowchart TBN480 T01338A ADJUST TO DESIRED CON DUCTIVITY CALIBRATION COM PLETE PROCESS EDIT...

Page 162: ...ess temperature before proceed ing Refer to Process Calibration in this section This displays the actual live reading When the read ing is stable press The value displayed is captured for the next process calibration screen Use the numeric keys to correct the captured value to the desired value CALI BRATE OUTPUT WILL BE AFFECTED PROCEED NO YES ENTER CALIBRATION PROCESS CAL EDIT CAL RESET CAL ENTER...

Page 163: ...mments CALIBRATION COMPLETE ENTER ID TAGNAME READY Key Display Comments This operation will cause a change in output not cor responding to the input Be sure the control loop is in manual Select YES Select PROCESS CAL Select TEMPERATURE CALI BRATE OUTPUT WILL BE AFFECTED PROCEED NO YES ENTER CALIBRATION PROCESS CAL EDIT CAL RESET CAL ENTER PROCESS CAL CONDUCTIVITY TEMPERATURE ...

Page 164: ...ugh the modification of the conductivity Use the numeric keys to enter the process temperature Key Display Comments ENTER CHANGE TEMP FOR CALI BRATION nn nn C ENTER WORKING CALIBRATION COMPLETE ENTER ID TAGNAME READY Key Display Comments This operation will cause a change in output not cor responding to the input Be sure the control loop is in manual Select YES CALI BRATE OUTPUT WILL BE AFFECTED P...

Page 165: ...alues press twice To change the slope enter the correct number and press To change the offset enter the correct number and press Key Display Comments ENTER CALIBRATION PROCESS CAL EDIT CAL RESET CAL ENTER EDIT CAL DATA CONDUCTIVITY TEMPERATURE ENTER CONDUCTIVITY PROCESS CAL SLP n nnnn OFF n nnnn ENTER ENTER ENTER ENTER WORKING CALIBRATION COMPLETE ENTER ID TAGNAME READY ...

Page 166: ... To view values press twice To change the slope enter the correct number and press To change the offset enter the correct number and press Calibration complete CALI BRATE OUTPUT WILL BE AFFECTED PROCEED NO YES ENTER CALIBRATION PROCESS CAL EDIT CAL RESET CAL ENTER EDIT CAL DATA CONDUCTIVITY TEMPERATURE ENTER TEMPERATURE PROCESS CAL SLP n nnnn OFF n nnnn ENTER ENTER ENTER ENTER WORKING CALIBRATION ...

Page 167: ...oduct instruction for information on the factory settings Key Display Comments This operation will cause a change in output not cor responding to the input Be sure the control loop is in manual Select YES Select RESET CAL CALI BRATE OUTPUT WILL BE AFFECTED PROCEED NO YES ENTER CALIBRATION PROCESS CAL EDIT CAL RESET CAL ENTER WORKING CALIBRATION COMPLETE ID TAGNAME READY ...

Page 168: ...on func tion of the TBN580 pH transmitter The following table details the con figuration process Send configurations Select configurations Get configurations Erase configurations View configurations Operational functions Figure K 1 Configuration Flowchart TBN580 T01337A SELECT TEM PERATURE CO MPENSATIO N TYPE SELECT M OD E ENTER CHANNEL NUM BER SELECT FAIL M ODE DIGITAL ANALO G SELECT TRANSM ITTER...

Page 169: ...ue to press the key until the desired character appears Use the right arrow key to move to the next character Use the left arrow key to go back to the previous charac ter Select ANALOG For this example select STANDARD STANDARD thermo isopotential 7 0 pH slope 59 15 mV at 25 C ANTIMONY isopotential 1 5 pH slope 51 mV at 25 C NOTE If after selecting ANTIMONY the STT04 ter minal branches to a TEMPERA...

Page 170: ...e temperature display units Select NO If YES is selected enter 5 input and output points Values must be between 0 and 100 Refer to the Smart Specific Ion Transmitter Series TBN580 instruction for description Enter a value between 0 and 32 Refer to the Smart Specific Ion Transmitter Series TBN580 instruction for description Key Display Comments ENTER TEMP COMP INPUT 3 01 K BALCO NONE ENTER TEMP COM...

Page 171: ...00 high or the last value before the error Enter up to 6 characters Use familiar units to describe the output Input the lower range value and press Input the upper range value To store the configuration select YES Key Display Comments ENTER LOWER RANGE VAL _nn nn pH UPPER RANGE VAL nn nn pH ENTER ENTER INITIALIZE MODE LOW HIGH ENTER FAIL MODE LOW HIGH LAST ENTER ENTER SECONDARY UNITS _nnnnnn ENTER...

Page 172: ...aken off line This is done at the INFI 90 OPEN console Refer to Figure K 2 for an overview of the calibration functions Figure K 2 Calibration Flowchart TBN580 T01336A ENTER pH OF PRO CESS APPLY LOW HIG H pH VALUES ENTER LOW HIG H pH VALUES CALIBRATIO N CO MPLETE PRO CESS BENCH pH BENCH TEM P NEW SENSO R INPUT SOURCE ENTER FIXED PRO CESS TEM PERATURE TEM PERATURE CO MPENSATIO N TYPE SAM E OR NEW S...

Page 173: ... TEMP COMP TYPE selected in configuration If TEMP COMP TYPE is MANUAL or NONE as selected in configuration this screen will appear otherwise the next screen CHANGE TEMP OF PROCESS will appear Default is 25 C The value displayed is the temperature of the pro cess interior of sensor NOTE If the new temperature value is entered this change will affect the calibration of temperature CALI BRATE OUTPUT ...

Page 174: ... PH value is displayed Enter the desired PH value This value is recalculated during each calibration This value shows the offset change over time for a particular sensor Value resets to 0 00 pH if installing a new sensor Key Display Comments ENTER CHANGE EFFICIENCY nn nn HIT ENTER ENTER CURRENT READING nn nn pH ENTER DESIRED nn nn pH ENTER CALCULATED EFFICIENCY nnn nn HIT ENTER ENTER CALCULATED SE...

Page 175: ...w mV value When applied the value shown on the smart terminal from the input source will not match the specified value Press when the applied value stabilizes Negative mV cal value specified on the prior screen will be displayed Apply high mV value When applied the value shown on the smart terminal from the input source will not match the specified value Press when the applied value stabilizes Whe...

Page 176: ...gh pH calibration value and the uncali brated pH value as determined from the input source Value from the last calibration If NEW SENSOR effi ciency will be 98 This value is recalculated during each calibration This value shows the offset change over time for a particular sensor Value resets to 0 00 pH if installing a new sensor Key Display Comments ENTER CHANGE pH CAL TEMPERATURE nnn UNITS ENTER ...

Page 177: ... MANUAL or NONE is selected during configuration this screen will not appear otherwise the next screen CHANGE TEMP OF PROCESS appears Default is 25 C The value displayed is the temperature of the pro cess interior of sensor NOTE If a new temperature value is entered this change will affect the calibration of temperature CALI BRATE OUTPUT WILL BE AFFECTED PROCEED NO YES ENTER CALIBRATION PROCESS CA...

Page 178: ...t D TO A ADJUST Use the arrow keys to adjust the 4 mA signal NOTE When increasing or decreasing the mA sig nal the increments of change increase with succes sive depressions until the maximum level of change is reached By changing direction you will return to the smallest increment of change This adjustment technique speeds up the adjustment process without affecting fine adjustment Use the arrow ...

Page 179: ...TBN580 TRANSMITTER CALIBRATION K 12 Key Display Comments ENTER ID TAGNAME READY ...

Page 180: ...be created off line without a connected field device Refer to Figure L 1 for an overview of the configuration function The following table details the configuration process Send configurations Select configurations Get configurations Erase configurations View configurations Operational functions Figure L 1 Configuration Flowchart TBN581 T01335A ENTER DAMPING CO NSTANT ENTER LOW ER RANGE VALUE ID T...

Page 181: ...ORP Enter a name for the configuration ID tag using up to 14 ASCII characters To select a character press the key that has the desired character Continue to press the key until the desired character appears Use the right arrow key to move to the next character Use the left arrow key to go back to the previous charac ter Select ANALOG CONFIG CONFIGURATION NEW MODIFY ERASE ENTER DEVICE TYPE ABB FSK ...

Page 182: ...lower range temperature value and press Input the upper range value Low default value 1000 mV High default value 1000 mV Refer to the Smart ORP pION Transmitter Series TBN581 instruction for description Refer to the Smart ORP pION Transmitter Series TBN581 instruction for description Key Display Comments ENTER TRANSMITTER TYPE cond TBN pH TBN ORP pION ENTER OUTPUT FUNC GEN NO YES ENTER OUTPUT ACTI...

Page 183: ... line This is done at the INFI 90 OPEN console Refer to Figure L 2 for an overview of the calibration functions Enter up to 6 characters Use familiar units to describe the output Input the lower range value and press Input the upper range value Select YES to store the configuration The Configuration ID tag name just configured will be in the upper left corner if the configuration is saved It becom...

Page 184: ...E S EN TER LOW HIG H mV VALUE S CA LIBR ATIO N CO M PLE TE C A L I B R A T E CALC ULATED SEN SOR O FFSET APP LY LOW HIG H m V VALUES APP LY LOW HIG H mV VALUE S Key Display Comments This operation will cause a change in output not cor responding to the input Be sure the control loop is in manual Select YES Select PROCESS CAL If configured digitally the D TO A ADJUST selection would not appear Sele...

Page 185: ...recalculated during each calibration This value shows the offset change over time for a particular sensor Value resets to 0 00 pH if installing a new sensor Key Display Comments ENTER CHANGE EFFICIENCY nn nn HIT ENTER ENTER CURRENT READING nn nn mV ENTER DESIRED nn nn mV ENTER CALCULATED SENSOR OFFSET nnn nn pH HIT ENTER ENTER CUMULATIVE OFFSET CHANGE n nn pH HIT ENTER ENTER ID TAGNAME READY Key D...

Page 186: ...ration value and the uncali brated mV values determined from the input source Displays high mV calibration value and the uncali brated mV values determined from the input source Value from last calibration If new sensor efficiency will be 98 This value is recalculated during each calibration Key Display Comments ENTER CALIBRATION PROCESS CAL BENCH CAL D TO A ADJUST ENTER INPUT SOURCE SAME SENSOR N...

Page 187: ...nts ENTER CUMULATIVE OFFSET CHANGE nnn pH HIT ENTER ENTER ID TAGNAME READY Key Display Comments This operation will cause a change in output not cor responding to the input Be sure the control loop is in manual Select YES Select BENCH CAL Select mV SOURCE Low default value 1000 mV High default value 1000 mV Enter low mV value and press Enter high mV value CALI BRATE OUTPUT WILL BE AFFECTED PROCEED...

Page 188: ...TABLE ENTER APPLY nn nn mV nn nn mV HIT ENTER WHEN STABLE ENTER ID TAGNAME READY Key Display Comments This operation will cause a change in output not cor responding to the input Be sure the control loop is in manual Select YES Select D TO A ADJUST Use the arrow keys to adjust the 4 mA signal NOTE When increasing or decreasing the mA sig nal the increments of change increase with succes sive depre...

Page 189: ...TBN581 ORP pION TRANSMITTER CALIBRATION L 10 Use the arrow keys to adjust the 20 mA signal Key Display Comments ENTER ADJUST TO 20 mA THEN HIT ENTER ENTER ID TAGNAME READY ...

Page 190: ... function The following table details the configuration process Send configurations Select configurations Get configurations Erase configurations View configurations Operational functions Figure M 1 Configuration Flowchart TZID AZH T02395A DEVICE TYPE ENTER DESCRIPTOR CHARACTERISTIC CURVE ADJUST TIM E UP AND DOW N CONFIGURATION NAM E ENTER DATE ENTER DEADBAND VALUE SAVE CONFIGURATION TAG NUM BER E...

Page 191: ...ed character Continue to press the key until the desired character appears Use the right arrow key to move to the next character Use the left arrow key to go back to the previous charac ter Select ANALOG NOTE The DIGITAL selection should only be made when using the device in multidrop mode A CHAN NEL prompt appears when DIGITAL is selected Enter up to 32 characters ASCII of descriptive text in thi...

Page 192: ...e high set point Additional selections include EQUAL 25 1 and EQUAL 50 1 and USER DEFINED USER DEFINED is present only if a characteristic curve had been previously defined Refer to SPE CIAL FEATURE in this section for details about defining a characteristic curve Represents the relationship between input current and movement of the valve Defines the accuracy with which the valve position is corre...

Page 193: ...s electronic damping of the valve stroke movement and limits stroke speed to the specified value Low and high alarm limits are user configurable alarms NOTE Use to return to a previous configura tion screen from any screen in the configuration pro cess Select YES Key Display Comments ENTER MIN STROKE RANGE 0 00 MAX STROKE RANGE 100 00 ENTER SHUT OFF VALUE 0 20 nn nn ENTER DEADBAND TIME LIMIT 0 200...

Page 194: ... Calibration Flowchart TZID AZH T02427A M ANUAL RANGE ADJUSTMENT AUTOSTROKE CALIBRATION LEVEL ZERO POSITION SPRING ACTION ACTUATOR MINIMUM RANGE VALUE SAVE CHANGES SAVE CHANGES CALIBRATION COMPLETE ENTER LEVER RANGE DIRECTION OF ROTATION SAVE CHANGES DIRECTION OF ROTATION SAVE CHANGES SELECT AUTOSTROKE TYPE MAXIM UM RANGE VALUE C A L I B R A T E Key Display Comments Select AUTOSTROKE Run autostrok...

Page 195: ...ve Select YES NOTE This screen does not appear when CON TROL PARAM ONLY autostroke is selected Limit stops are not required for this selection Autostroke takes between 2 and 5 minutes to com plete A message appears indicating the status of autostroke When autostroke is successful the READY screen appears If an error is detected the autostroke error number is displayed on the screen Refer to the TZ...

Page 196: ...o the open device cover Enter a minimum valve range and press Enter a maximum valve range Select YES to make the changes permanent Manual range adjust is complete Key Display Comments ENTER ENTER VALVE RANGE AS LEVER RANGE VALVE RANGE MUST NOT BE LESS THAN 10 MIN VALVE RANGE nnn nn MAX VALVE RANGE nnn nn ENTER ENTER MAKE CHANGES PERMANENT NO YES ENTER ID TAGNAME READY Key Display Comments Select L...

Page 197: ...sition is complete Key Display Comments ENTER LEVER SHAFT STOP TURNING CLOCKWISE COUNTER CLOCKWISE ENTER MAKE CHANGES PERMANENT NO YES ENTER ID TAGNAME READY Key Display Comments Select SPRING ACTION ACTUA Select the appropriate direction NOTE Direction of rotation is looking into the open cover of the positioner Select YES to make the changes permanent CALI BRATE AUTOSTROKE MANUAL RANGE ADJUST LE...

Page 198: ...ows the maximum range of rotation of the lever arm on the positioner Shows the serial number of the positioner as speci fied at the factory Shows the I P MODULE setting of the positioner Options include single acting and double acting Shows the fail safe position of the positioner Options include fail freeze and fail safe SPECIAL FEATURE DEVICE INFORMATION CONTROL PARAMETERS CHARACTERIST CURVE OPE...

Page 199: ...R ID TAGNAME READY Key Display Comments Select CONTROL PARAMETERS Shows measured stroke time for up and down posi tioning directions Edit Kp value Represents the gain of the PD controller and influ ences the speed and stability of control A high Kp proportional gain value increases control speed Edit the Tv value Represents the deviation action of the PD controller Tv influences the control speed ...

Page 200: ... interference indi cator If the noise is big the measuring accuracy and control reaction is affected Normally an acceptable ADC noise band value is between 0 03 and 0 05 Select the I P MODULE setting This defines the triggering or safe position to the built in I P module The setting must be the same as the existing I P module in the TZID AZH positioner Select YES if changes were made to the parame...

Page 201: ... point 22 are fixed at 0 and 100 respectively Enter an input point and press Enter an out put point Specify input and output values for points 2 through 21 Each set of reference points must be greater than the previous set of points Select YES to send the values to the positioner SPECIAL FEATURE DEVICE INFORMATION CONTROL PARAMETERS CHARACTERIST CURVE OPERATING MODE ENTER CHARACTERIST CURVE NEW MO...

Page 202: ...RATING MODE Use this screen to select the operating mode Select AUTO for automatic adaptation of the control parameters Select FIXED for fixed control parameters Select MANUAL for manual actuation of control ele ment Select LOCAL to switch over the device from an externally selected operating mode to the internally selected mode Select YES to change modes SPECIAL FEATURE DEVICE INFORMATION CONTROL...

Page 203: ... a self test and report status of the posi tioner Key Display Comments ENTER ID TAGNAME READY Key Display Comments Select DEVICE SELF TEST If errors exist the message will display SPECIAL FEATURE CONTROL PARAMETERS CHARACTERIST CURVE OPERATING MODE DEVICE SELF TEST ENTER ID TAGNAME READY ...

Page 204: ...to return the positioner to factory settings Key Display Comments Select MASTER RESET This resets the positioner Select YES to reset the positioner SPECIAL FEATURE CHARACTERIST CURVE OPERATING MODE DEVICE SELF TEST ENTER MAKE CHANGES PERMANENT NO YES ENTER ID TAGNAME READY ...

Page 205: ...ICE ERROR Internal data error Reset positioner If problem persists load standard configuration DEADBAND TOO SMALL Deadband percentage value too small Increase deadband percentage value DEADBAND TOO LARGE Deadband percentage too large Decrease deadband percentage value DIST METR LIMT EXCD Limit of distance meter exceeded Start valve and positioner diagnosis steps according to maintenance practices ...

Page 206: ...enance prac tices VALUE SHOULD NOT BE LESS THAN PREVIOUS VALUE User defined characteristic curve entry error Make sure the value last entered is not less than the previous entry WATCHDOG DEFECTIVE Watchdog defect possible due to EMI Eliminate EMI source in the near vicinity Table M 1 Error Messages for TZID AZH Positioner Message Description Corrective Action ...

Page 207: ...r an overview of the configuration function The following table details the configuration process This procedure covers pH transmitters Any differences between other TBI devices will be noted in the Comments column Send configurations Select configurations Get configurations Erase configurations View configurations Operational functions Figure N 1 Configuration Flowchart TB82 T02394A ID TAG ENTER ...

Page 208: ...evious charac ter Select ANALOG NOTE The DIGITAL selection should only be made when using the device in multidrop mode A CHAN NEL prompt appears when DIGITAL is selected Type a descriptive message using up to 32 charac ters Use this field to note important information about the device or installation Type a descriptor string using up to 16 characters This field can be used for notations about the ...

Page 209: ... is 0 5 seconds The DAMPING screen does not appear when the transmitter type is TB82 CONC Input lower range value 4 mA using the arrow keys then press Input the upper range value 20 mA The range values screen does not appear when the transmitter type is TB82 CONC Select a temperature compensation type This screen appears for TB82 pH NOTE AUTO SOL ADV is only available for TB82 transmitters operati...

Page 210: ...DY Figure N 2 Calibration Flowchart TB82 T02428A CALIBRATION COMPLETE VIEW CALIBRATION WARNINGS IF ANY VIEW CALCULATED O FFSET RELEASE OUTPUT HOLD 2 POINT O NLY OUTPUT CALIBRATION EDIT CALIBRATION TEMPERATURE CALIBRATION RESET CALIBRATION CALIBRATION METHOD pH CALIBRATIO N ENTER PROCESS SLOPE ENTER TEMPERATURE ARROW KEYS METER VALUE ENTRY ADJUST OUTPUT TO 4 mA 1 POINT CALIBRATIO N ENTER PRO CESS O...

Page 211: ...ghout this procedure the variable nnnn repre sents one of the following device types pH ORP PION CONC Select 1 POINT CAL Use this calibration method when the sensor is in its final location Displays the current input value Enter the desired value The terminal displays the calculated efficiency in per centage CALI BRATE OUTPUT WILL BE AFFECTED PROCEED NO YES ENTER nnnn CAL TEMP CAL EDIT CAL RESET C...

Page 212: ...t them Key Display Comments ENTER CALCULATED SENSOR OFFSET nnn n mV PRESS ENTER ENTER ID TAGNAME READY Key Display Comments This operation will cause a change in output not cor responding to the input Selecting YES will hold the output during calibration Select YES Select a calibration type Throughout this procedure the variable nnnn repre sents one of the following device types pH ORP PION CONC S...

Page 213: ... per centage The terminal displays the calculated sensor offset in millivolts Select YES to release output hold Screen appears at the end of two point calibration when device is in the analog mode If any warnings or messages exist pertaining to this device the terminal will list them Key Display Comments ENTER ENTER PROCESS TEMPERATURE nn nn O C ENTER LOW CALIB nn UNITS HIGH CALIB nn UNITS ENTER E...

Page 214: ...peration will cause a change in output not cor responding to the input Selecting YES will hold the output during calibration Select YES Select TEMP CAL Enter the temperature Default temperature is 25 C CALI BRATE OUTPUT WILL BE AFFECTED PROCEED NO YES ENTER nnnn CAL TEMP CAL EDIT CAL RESET CAL ENTER ENTER TEMPERATURE nn nn O C ENTER ID TAGNAME READY ...

Page 215: ...id values are 40 to 150 Enter a sensor offset value Valid values are 1 000 to 1 000 mV Enter a temperature slope value and press Valid range is 0 2 to 1 5 Enter a temperature offset value Valid range is 40 to 40 C If any warnings or messages exist pertaining to this device the terminal will list them CALI BRATE OUTPUT WILL BE AFFECTED PROCEED NO YES ENTER nnnn CAL TEMP CAL EDIT CAL RESET CAL ENTER...

Page 216: ...t during calibration Select YES Select RESET CAL This function sets all process sensor and tempera ture sensor calibration data to the default settings The following are the factor settings Sensor slope 100 Sensor offset 0 mV Temperature slope 1 Temperature offset 0 C Select YES to reset the calibration CALI BRATE OUTPUT WILL BE AFFECTED PROCEED NO YES ENTER nnnn CAL TEMP CAL EDIT CAL RESET CAL EN...

Page 217: ...WN ARROW KEYS Use the arrow keys to adjust the output to a value other than 4 or 20 mA Use the METER VALUE ENTRY to adjust the output to 4 and 20 mA Refer to Appendix B for details about meter value entry Use the arrow keys to adjust output to 4 mA NOTE When increasing or decreasing the mA sig nal the increments of change increase with succes sive depressions until the maximum level of change is r...

Page 218: ... TO 20 mA THEN HIT ENTER ENTER ID TAGNAME READY Key Display Comments Select SENSOR DATA View slope and offset of the process Valid slope values are 40 to 150 Valid offset val ues are 1 000 to 1 000 mV View slope and offset of the temperature Valid range for slope is 0 2 to 1 5 Valid range for off set is 40 to 40 C SPECIAL FEATURE FIX CANCEL OUTPUT SENSOR DATA HART SP FEATURE ENTER PROCESS SLOPE nn...

Page 219: ...sensor Key Display Comments Select HART SP FEATURE Refer to FIX OUTPUT CANCEL FIX OUTPUT in Section 4 for details about fix and cancel fix output Select SENSOR SETUP View the sensor upper and lower limits View the sensor minimum span View the sensor serial number SPECIAL FEATURE FIX CANCEL OUTPUT SENSOR DATA HART SP FEATURE ENTER SENSOR SETUP MASTER RESET RESP PREAMBLES RST CFG CHANGED ENTER SENSO...

Page 220: ... list the message Key Display Comments ENTER FINAL ASSEMBLY nnnnnnnn ENTER ID TAGNAME READY Key Display Comments Select HART SP FEATURE Select MASTER RESET This function performs a soft reset of the TB82 Select YES to perform a master reset SPECIAL FEATURE FIX CANCEL OUTPUT SENSOR DATA HART SP FEATURE ENTER SENSOR SETUP MASTER RESET RESP PREAMBLES RST CFG CHANGED ENTER OUTPUT WILL BE AFFECTED PROC...

Page 221: ...e the terminal will list the message Key Display Comments ENTER ID TAGNAME READY Key Display Comments Select HART SP FEATURE Select RESP PREAMBLES Enter a number between 5 and 20 The communica tion device requires a certain value The default value is 5 response preambles SPECIAL FEATURE FIX CANCEL OUTPUT SENSOR DATA HART SP FEATURE ENTER SENSOR DATA MASTER RESET RESP PREAMBLES RST CFG CHANGED ENTE...

Page 222: ...ppear on the STT04 terminal Problem codes result from fault conditions that affect the performance of the device Table N 2 lists the TB82 transmitter error codes that can appear on the STT04 terminal Error codes result from fault conditions that ren der the device inoperable All codes are listed in alphabetical order Key Display Comments Select HART SP FEATURE Select RST CFG CHANGED FLG to reset t...

Page 223: ... any exposed wire from nicks etc If it does repair if possible or replace Remove any liquids oils scales or corrosion from transmitter ter minal block or extension cable junction box terminals Verify sensor responds to pH buffers Replace sensor and or sensor extension cable if present if sensor does not respond Electronically test sensor refer to the product instruction Replace if it does not meet...

Page 224: ...n configured output range If PV is outside configured range increase output range Verify sensor wiring connections Remove any liquids oils scales or corrosion from transmitter ter minal block or extension cable junction box terminals Clean sensor and perform a buffer and process calibration Conduct a temperature calibration If not using temperature sen sor verify configuration for TMP SNS is NONE ...

Page 225: ...High reference electrode impedance Verify sensor wiring connections Verify reference is clean Remove any foreign material Clean sensor and verify it responds to pH buffer Replace sensor if it does not respond Change configuration to increase reference impedance limit if sensor is functioning properly in buffers and is in final installed location HI RZ AD Reference impedance above transmitter A D r...

Page 226: ...able diagnostic signal below transmitter A D range Input PCB assembly diagnostic circuit failure exists Disable diagnostics and order replacement input PCB assembly Existing input PCB assembly should properly function until new assembly is received LO EFF Low sensor efficiency 60 Verify proper buffer values were used for calibration and repeat buffer calibration Clean sensor and repeat buffer cali...

Page 227: ...ctronically test the sensor and temperature compensator refer to the product instruction Replace sensor if it does not meet requirements LO PV PV below transmitter range Verify process conditions are within transmitter range PV must be within transmitter range Verify sensor wiring connections Verify sensor does not have any exposed wire from nicks etc If it does repair if possible or replace Remov...

Page 228: ...inals Clean sensor and perform a buffer and process calibration Conduct a temperature calibration If not using temperature sen sor verify configuration for TMP SNS is NONE Electronically test sensor and temperature compensator refer to the product instruction Replace sensor if it does not meet requirements NO F CAL Missing factory calibration and functional SEEPROM Contact ABB for factory calibrat...

Page 229: ...iring Contact ABB PV F CAL Out of range or missing factory calibration for PV Contact ABB for factory calibration procedure Calibrate sensor for short term usage until factory calibration can be performed ROM EMI Unverifiable EEPROM ROM bus read operation Cycle transmitter power Contact ABB ROM SUM Incorrect EPROM checksum Cycle transmitter power Contact ABB RZ F CAL Out of range or missing factor...

Page 230: ...software The administrator can choose to bypass the password feature of DownLink software User names and passwords are assigned with the Password program Access to the Password pro gram requires the Password Key disk Only personnel at the highest security level should have access to the Password Key disk in order to ensure security Starting the Password Program After installing the software the pa...

Page 231: ... Click in Enter your Password and type a unique password of at least three and up to 24 characters The characters typed show as asterisks for security reasons 7 Click in Enter your Password Again and type the password again 8 Select a security level by clicking the appropriate level Refer to Table O 1 for level descriptions TC00654B Figure O 1 Password Key Screen TC00655B Figure O 2 Add User Dialo...

Page 232: ...rd Key disk Deleting a User Use this function to delete a user name 1 Start the Password program Refer to Starting the Password Program 2 Insert the Password Key disk into the appropriate floppy disk drive 3 Click Key and type the appropriate floppy disk drive letter i e A and click Verify The screen shown in Figure O 1 appears 4 Click Password and select Delete A list of user names appears 5 Sele...

Page 233: ...i e A and click Verify The screen shown in Figure O 1 appears 4 Click Password and select Bypass A message appears warning of the significance of bypassing security 5 Click Yes to bypass security Enable Password Security 1 Start the Password program Refer to Starting the Password Program 2 Insert the Password Key disk into the appropriate floppy disk drive 3 Click Key and type the appropriate flop...

Page 234: ... an existing database folder and it becomes the current data base Exit Closes the application View Configurations Connected STT04 Shows a list of configurations in the connected STT04 Database files Shows a list of configuration files in the current database Transfer Configurations Upload from STT04 Transfers configuration files from a connected STT04 to a database file folder on the PC Download t...

Page 235: ...e first time the software is started by clicking Special Advanced and selecting Set COM Port Database Each database relates to a file folder on the computer The following subsections describe the menu items of the Database selection NEW Use this function to create a database folder on the personal com puter for configuration storage New databases are normally saved under the following path C Progr...

Page 236: ...that the database was opened 4 Click OK EXIT Use this function to close the application Click Database and select Exit or Click the X on the top right corner of the main application window View Configurations The following subsections describe the menu items of the View Con figurations selection CONNECTED STT04 Use this function to view the configurations that are stored in a con nected STT04 term...

Page 237: ...ownLink software Refer to Start located in this sec tion 2 Select a database a Click Database and select Open b Select the desired database name and click Select A mes sage box appears indicating that the database was opened c Click OK 3 Click View Configurations and select Database files A list of con figurations appears 4 Click Cancel after viewing NOTE Configuration files i e config01 CFG may b...

Page 238: ... the RS 232 C cable to the STT04 terminal 2 Start the DownLink software Refer to Start located in this sec tion 3 Place the STT04 terminal into the remote mode Refer to UPLOADING AND DOWNLOADING CONFIGURATIONS in Section 4 for details 4 Click Transfer Configurations and select Upload from STT04 A summary of configurations appears Fig O 4 5 Highlight the desired configurations from the STT04 termin...

Page 239: ...refer to OPEN located in this section 8 Click Save Fig O 4 The selected configurations will be saved to the database on the personal computer DOWNLOAD TO STT04 Use this function to download configurations from the personal com puter to the STT04 terminal 1 Connect the STT04 terminal to the personal computer a Connect the female end of the RS 232 C customer supplied cable to a vacant RS 232 C port ...

Page 240: ...ation and indicates if it has changed in the field Fig O 5 6 Click the arrow key to identify the configuration s for transfer Fig O 4 NOTE The select box in the center of the screen holds the config urations that will be transferred to the STT04 terminal 7 Click Transfer The selected configurations are downloaded to the STT04 terminal Utilities The following subsections describe the menu items of ...

Page 241: ...at least 50 percent battery charge remaining If it does not connect and plug in the battery charger CHANGE STT04 NAME The STT04 terminal is shipped from the factory with the following name ABB STT04 It is good practice to change the name of an STT04 terminal when multiple terminals are in use that have different configurations Renaming helps to prevent overwriting the configura tions of another te...

Page 242: ...sec tion 3 Click Special Advanced and select Report Diagnostics This func tion returns the COM port being used sector status and available sector status of the STT04 terminal UPGRADE FIRMWARE Refer to UPGRADES in Section 6 UPGRADE BOOT CODE This function is seldom needed and should only be performed when instructed to do so by ABB technical support SET COM PORT Use this function to change the comm...

Page 243: ... module the device must be taken off line This is done at the INFI 90 OPEN console CREATE MODIFY CONFIGURATION A configuration can be created off line without a connected field device Refer to Figure P 1 for an overview of the configuration function The following table details the configuration process The STT04 does not suppport configuration of the AS800 transfer function or controller function ...

Page 244: ...lect a character press the key that has the desired character Continue to press the key until the desired character appears Use the right arrow key to move to the next charac ter Use the left arrow key to go back to the previous character Select ANALOG NOTE The DIGITAL selection should only be made when using an IMFBS01 field bus I O module A CHANNEL prompt appears when DIGITAL is selected CONFIG ...

Page 245: ...nter a year and press This date can represent the creation date of the con figuration the date the device or element was installed or some other significant date Select LINEAR NOTE Other output type selections are SQUARE ROOT FUNC GENERATOR and 3 2 FLOW MODE NOTE IBIS software is needed to configure FUNC GENERATOR breakpoints Use to return to a previous configuration screen from any screen in the ...

Page 246: ...proceed to the METER VALUE selection Select LCD meter display variable Use down arrow key to select then press Select the AS800 TEMPERATURE UNITS Use arrow key to select option then press Select YES Key Display Comments ENTER FAIL MODE LOW HIGH ENTER METER TYPE ALPHANUMERIC ANALOG NONE ENTER METER VALUE PRIMARY E U OUTPUT PV and EU TV PV CURRRENT TEMPERATURE 3 1 2 DIGIT ENTER ENTER TEMPERATURE UNI...

Page 247: ...adjust Analog Mode only Zero Trim Temperature NOTES 1 When calibrating a field device must be connected to the STT04 terminal 2 To change calibration or configuration parameters of a field device that is connected to an IMFBS01 module the transmitter must be taken off line This is done at the INFI 90 OPEN console Refer to Figure P 2 for an overview of the calibration functions Figure P 2 Calibrati...

Page 248: ...tion with down arrow key Press when done Enter the low calibration pressure value and press Enter the high calibration pressure value then press Apply the low calibration pressure to the input of transmitter as specified earlier Apply the high calibration pressure to the input of transmitter as specified earlier CALI BRATE OUTPUT WILL BE AFFECTED PROCEED NO YES ENTER INPUT A D CAL D TO A ADJUST ZE...

Page 249: ... responding to the input Be sure the control loop is in manual Select YES Select D TO A ADJUST Select UPDOWN ARROW KEYS Use the arrow keys to adjust the 4 mA signal NOTE When increasing or decreasing the mA sig nal the increments of change increase with succes sive depressions until the maximum level of change is reached By changing direction you will return to the smallest increment of change Thi...

Page 250: ...ys to adjust the 20 mA signal Key Display Comments ENTER ADJUST TO 20 mA THEN HIT ENTER ENTER ID TAGNAME READY Key Display Comments This operation will cause a change in output not cor responding to the input Be sure the control loop is in manual Select YES Select D TO A ADJUST Select METER VALUE ENTRY CALI BRATE OUTPUT WILL BE AFFECTED PROCEED NO YES ENTER CALIBRATION D TO A ADJUST BENCH CALIB EN...

Page 251: ...r reading Key Display Comments ENTER 4 mA CALIBRATION ENTER METER VALUE THEN HIT ENTER ENTER 20 mA CALIBRATION ENTER METER VALUE THEN HIT ENTER ENTER ID TAGNAME READY Key Display Comments This operation will cause a change in output not cor responding to the input Be sure the control loop is in manual Select YES Select ZERO TRIM If digitally configured the D TO A ADJUST selection will not appear C...

Page 252: ...NAME READY Key Display Comments This operation will cause a change in output not cor responding to the input Be sure the control loop is in manual Select YES Select TEMP CAL If digitally configured the D TO A ADJUST selection will not appear Enter TEMPERATURE value CALI BRATE OUTPUT WILL BE AFFECTED PROCEED NO YES ENTER INPUT A D CAL D TO A ADJUST ZERO TRIM TEMP CAL ENTER ENTER SENSOR TEMPERATURE ...

Page 253: ...AS800 PRESSURE TRANSMITTER CALIBRATION P 11 TEMPERATURE CALIBRATION is complete ENTER ID TAGNAME READY ...

Page 254: ...information on the following functions CREATE MODIFY CONFIGURATION A configuration can be created off line without a connected field device Refer to Figure Q 1 for an overview of the configuration function The following table details the configuration process Send configurations Select configurations Get configurations Erase configurations View configurations Operational functions Figure Q 1 Confi...

Page 255: ... Select ANALOG NOTE The DIGITAL selection should only be made when using an IMFBS01 field bus I O module A CHANNEL prompt appears when DIGITAL is selected Type a descriptive message using up to 32 charac ters This field can be used to note anything of impor tance to the device or installation To select a character press the key that has the desired character Continue to press the key until the des...

Page 256: ...ment was installed or some other significant date Select 600T EN Select LINEAR NOTE Other output type selections are SQUARE ROOT SQR x 3 SQR x 5 5th ORDER POLYNOMIAL DOUBLE POLYN Use to return to a previous configuration screen from any screen in the configuration process Enter a value between 0 and 16 seconds Select an engineering unit best suited for the application Other units not shown include...

Page 257: ...s Input the upper range value then press Select the 600T EN TEMPERATURE UNITS Use arrow key to select option then press Select YES Key Display Comments ENTER LOWER RANGE VAL nn nn UNITS UPPER RANGE VAL nn nn UNITS ENTER ENTER ENTER TEMPERATURE UNITS C F R K ENTER ENTER STORE THIS CONFIGURATION NO YES ENTER ID TAGNAME READY ...

Page 258: ...600T EN pressure transmitter calibration func tions using an STT04 terminal There are four types of calibration functions Sensor Trim D to A adjust Analog Mode only PV Bias Set Output Refer to Figure Q 2 for an overview of the calibration functions Figure Q 2 Calibration Flowchart 600T EN ...

Page 259: ...rrow key and refer to the appropriate section Press when done Select FULL TRIM Enter the low calibration pressure value using the number keys and press Similarly enter the high calibration pressure value then press Apply the low calibration pressure to the input of transmitter as specified earlier Apply the high calibration pressure to the input of transmitter as specified earlier CALI BRATE ENTER...

Page 260: ...h down arrow key and refer to the appropriate section Press when done Select ZERO TRIM Apply the pressure equal to the zero value of the instrument and press The instrument reads the pressure applied and dis plays its value Press CALI BRATE ENTER OUTPUT WILL BE AFFECTED PROCEED NO YES ENTER SENSOR TRIM D TO A ADJUST PV BIAS SET OUTPUT ENTER ENTER FULL TRIM ZERO TRIM FACTORY TRIM STATIC TRIM ENTER ...

Page 261: ...r responding to the input Be sure the control loop is in manual Select YES Select SENSOR TRIM or select calibration option with down arrow key and refer to the appropriate section Press when done Select FACTORY TRIM CALI BRATE ENTER OUTPUT WILL BE AFFECTED PROCEED NO YES ENTER SENSOR TRIM D TO A ADJUST PV BIAS SET OUTPUT ENTER ENTER FULL TRIM ZERO TRIM FACTORY TRIM STATIC TRIM ENTER ID TAGNAME REA...

Page 262: ...ration option with down arrow key and refer to the appropriate section Press when done Select STATIC TRIM Display shows the value of the pressure measured by the 600T EN transmitter Enter the value of the actual static pressure using the number keys CALI BRATE ENTER OUTPUT WILL BE AFFECTED PROCEED NO YES ENTER SENSOR TRIM D TO A ADJUST PV BIAS SET OUTPUT ENTER 3 TIMES ENTER FULL TRIM ZERO TRIM FAC...

Page 263: ...t not cor responding to the input Be sure the control loop is in manual Select YES Select D TO A ADJUST Select UPDOWN ARROW KEYS Use the arrow keys to adjust the 4 mA signal NOTE When increasing or decreasing the mA sig nal the increments of change increase with succes sive depressions until the maximum level of change is reached By changing direction you will return to the smallest increment of c...

Page 264: ...ust the 20 mA signal Key Display Comments ENTER ADJUST TO 20 mA THEN HIT ENTER ENTER ID TAGNAME READY Key Display Comments This operation will cause a change in output not cor responding to the input Be sure the control loop is in manual Select YES Select D TO A ADJUST Select METER VALUE ENTRY CALI BRATE ENTER OUTPUT WILL BE AFFECTED PROCEED NO YES ENTER CALIBRATION SENSOR TRIM D TO A ADJUST PV BI...

Page 265: ...om zero calculate the offset or biasand apply it to the 600T EN SET PV VAL Use the number keys to enter the current meter reading Use the number keys to enter the current meter reading Key Display Comments ENTER 4 mA CALIBRATION ENTER METER VALUE n nnnn ENTER 20 mA CALIBRATION ENTER METER VALUE nn nnnn ENTER ID TAGNAME READY Key Display Comments This operation will cause a change in output not cor...

Page 266: ...offset for SET PV ZERO the pro cedure for SET PV VAL is similar Apply the desired zero pressure value to the trans mitter Scroll to SET PV ZERO using the down arrow key and press Pressing calibrates the PV ZERO value SET PV ZERO is complete Key Display Comments ENTER CALIBRATION SENSOR TRIM D TO A ADJUST PV BIAS SET OUTPUT ENTER PV BIAS RESET SET PV ZERO SET PV VAL ENTER PV BIAS RESET SET PV ZERO ...

Page 267: ...ly configured the D TO A ADJUST selection will not appear Select LOW and press Procedure for HIGH selection is identical Display indicates present data Enter LOW value CALI BRATE ENTER OUTPUT WILL BE AFFECTED PROCEED NO YES 3 TIMES ENTER CALIBRATION SENSOR TRIM D TO A ADJUST PV BIAS SET OUTPUT ENTER SET OUTPUT LOW HIGH ENTER ENTER OP nnn nn PV VAL value units Hit ENTER to set OP ENTER ENTER NEW VA...

Page 268: ..._ _______ _______ _______ _______ _______ _______ _______ _______ _______ _______ Point 0 Point 1 Point 2 Point 3 Point 4 Point 5 Point 6 Point 7 Point 8 Point 9 Point 10 LOWER RANGE VALUE _______ Specified LRV _______ LRV UPPER RANGE VALUE _______ Specified URV _______ URV VALVE STUCK ALARM Yes No PRESSURE UNITS psi bars PID PARAMETERS Kp Ki Kd INPUT SIGNAL Normal act Reverse act DAMPING ______ s...

Page 269: ...5 Output _______ _______ _______ _______ _______ _______ Point 0 Point 1 Point 2 Point 3 Point 4 Point 5 OUTPUT ACTION Normal1 Reverse DAMPING _______ sec 0 001 to 32 00 sec ENGINEERING UNITS iH2O1 mmHG cmH2O psi MPA kPa BARS mBARS kg cm2 LOWER RANGE VALUE _______ Specified LRV UPPER RANGE VALUE _______ Specified URV INITIALIZE MODE2 Low High FAIL MODE2 Low High Last SECONDARY UNITS _______ Second...

Page 270: ...oint 13 Point 14 Point 15 _____ _____ _____ _____ _____ Point 16 Point 17 Point 18 Point 19 Point 20 Output _____ _____ _____ _____ _____ Point 1 Point 2 Point 3 Point 4 Point 5 _____ _____ _____ _____ _____ Point 6 Point 7 Point 8 Point 9 Point 10 _____ _____ _____ _____ _____ Point 11 Point 12 Point 13 Point 14 Point 15 _____ _____ _____ _____ _____ Point 16 Point 17 Point 18 Point 19 Point 20 O...

Page 271: ... Point 1 Point 2 Point 3 Point 4 Point 5 Output _______ _______ _______ _______ _______ Point 1 Point 2 Point 3 Point 4 Point 5 OUTPUT ACTION Normal1 Reverse DAMPING _______ sec 0 001 to 32 00 sec ENGINEERING UNITS2 Celsius Fahrenheit Kelvin LOWER RANGE VALUE _______ Specified LRV _______ LRV UPPER RANGE VALUE _______ Specified URV _______ URV INITIALIZE MODE3 Low High FAIL MODE3 Low High Last NOT...

Page 272: ..._ _______ _______ _______ _______ Point 1 Point 2 Point 3 Point 4 Point 5 Output _______ _______ _______ _______ _______ Point 1 Point 2 Point 3 Point 4 Point 5 OUTPUT ACTION Normal Reverse DAMPING _______ sec 0 00 to 32 00 sec LOWER RANGE VALUE _______ Specified LRV _______ LRV UPPER RANGE VALUE _______ Specified URV _______ URV INITIALIZE MODE2 Low High FAIL MODE2 Low High Last SECONDARY UNITS _...

Page 273: ... Point 5 Output _______ _______ _______ _______ _______ _______ Point 0 Point 1 Point 2 Point 3 Point 4 Point 5 OUTPUT ACTION Normal1 Reverse DAMPING _______ sec 0 001 to 32 00 sec ENGINEERING UNITS iH2O1 mmH2O mmHg psi BARS mBARS kg cm2 kPa LOWER RANGE VALUE _______ Specified LRV UPPER RANGE VALUE _______ Specified URV INITIALIZE MODE2 Low High FAIL MODE2 Low High Last SECONDARY UNITS _______ Sec...

Page 274: ..._ _______ _______ _______ _______ Point 0 Point 1 Point 2 Point 3 Point 4 Point 5 OUTPUT ACTION Normal1 Reverse DAMPING _______ sec 0 001 to 32 00 sec ENGINEERING UNITS iH2O1 mmHg cmH2O psi MPA kPa BARS mBARS kg cm2 LOWER RANGE VALUE _______ Specified LRV UPPER RANGE VALUE _______ Specified URV INITIALIZE MODE2 Low High FAIL MODE2 Low High Last SECONDARY UNITS _______ Secondary LRV _______ Seconda...

Page 275: ...Low ANALYZER RANGE 0 99 9 µS cm 0 9 99 µS cm TEMP COMP INPUT Manual 3 01k Balco DAMPING _______ sec 0 001 to 32 00 sec LOWER RANGE VALUE _______ Specified LRV _______ LRV UPPER RANGE VALUE _______ Specified URV _______ URV INITIALIZE MODE2 Low High FAIL MODE2 Low High Last DIAG SPIKE OUTPUT No Yes NOTES 1 Default parameters 2 Select to maintain safe operation during start up and diagnostically det...

Page 276: ...oint 3 Point 4 Point 5 Output _______ _______ _______ _______ _______ Point 1 Point 2 Point 3 Point 4 Point 5 OUTPUT ACTION Normal1 Reverse DAMPING _______ sec 0 001 to 32 00 sec LOWER RANGE VALUE _______ Specified LRV _______ LRV UPPER RANGE VALUE _______ Specified URV _______ URV INITIALIZE MODE2 Low High FAIL MODE2 Low High Last SECONDARY UNITS _______ Secondary LRV _______ Secondary URV NOTES ...

Page 277: ..._______ _______ _______ Point 1 Point 2 Point 3 Point 4 Point 5 OUTPUT ACTION Normal1 Reverse DAMPING _______ sec 0 001 to 32 00 sec LOWER RANGE VALUE _______ Specified LRV _______ LRV UPPER RANGE VALUE _______ Specified URV _______ URV INITIALIZE MODE2 Low High FAIL MODE2 Low High Last SECONDARY UNITS _______ Secondary LRV _______ Secondary URV NOTES 1 Default parameters 2 Select to maintain safe...

Page 278: ...DENSITY FACTOR _____________________ RANGE VALUE 1 _______ Units RANGE VALUE 2 _______ Units FAIL MODE2 Low High SELECT TOTALIZER EU 1 m3 gal User defined PULSE FACTOR ______________ PULSE WIDTH ______________ LOW FLOW CUTOFF ______________ DIGITAL FILTER On Off RESPONSE TIME Normal Fast RANGE CONFIGURATION 2 fwd 1 fwd 1 rev FLOW DIRECTION Fwd and rev Fwd only UPPER PV ALARM ______________ Units E...

Page 279: ...month year SET POINT UNITS LOW SET POINT RANGE HIGH SET POINT RANGE CHARACTERISTIC CURVE Linear Equal 1 25 Equal 1 50 Equal 25 1 Equal 50 1 User defined VALVE ACTION Direct Reverse DEAD BAND_____ MINIMUM STROKE RANGE _____ MAXIMUM STROKE RANGE _____ SHUT OFF VALUE _____ DEADBAND TIME LIMIT _____ sec ADJUSTED TIME UP _____ sec ADJUSTED TIME DOWN _____ sec LOW ALARM LIMIT _____ sec HIGH ALARM LIMIT ...

Page 280: ...Point 12 Point 13 Point 14 Point 15 _____ _____ _____ _____ 100 Point 16 Point 17 Point 18 Point 19 Point 20 Output 0____ _____ _____ _____ _____ Point 1 Point 2 Point 3 Point 4 Point 5 _____ _____ _____ _____ _____ Point 6 Point 7 Point 8 Point 9 Point 10 _____ _____ _____ _____ _____ Point 11 Point 12 Point 13 Point 14 Point 15 _____ _____ _____ _____ 100 Point 16 Point 17 Point 18 Point 19 Poin...

Page 281: ...e calibration N 8 TBN480 J 5 Process conductivity J 5 J 6 Process temperature J 7 TBN580 K 5 Bench pH K 7 Bench temperature K 10 D A K 11 Process K 6 TBN581 L 4 A D L 9 Bench mV L 8 Bench ORP pION L 6 Process L 5 TZID AZH M 5 Auto stroke M 5 Lever zero position M 7 Manual range adjustment M 6 Spring action actuator M 8 Calibration flowcharts AVS A 5 BCN G 5 EBTH B 5 EQN H 5 EQS C 5 MagFlow I 6 PTH...

Page 282: ...ature J 9 Erase configuration procedure 4 10 Error codes TB82 N 23 Error messages 5 1 Errors FSK devices 5 5 HART devices 5 2 Exit utilities software O 7 F Field bus 2 1 Field bus wiring 2 2 Firmware level 1 1 1 3 Firmware upgrades 6 3 Fix output 4 12 Flowcharts Calibration AVS A 5 BCN G 5 EBTH B 5 EQN H 5 EQS C 5 MagFlow I 6 PTH D 5 P 5 1 17 PTS E 5 TB82 N 4 TBN480 J 5 TBN580 K 5 TBN581 L 5 TZID ...

Page 283: ...e 4 21 Output key Monitor output 4 16 Temperature 4 18 P Physical operation 2 1 3 1 Point to point communication 2 1 Problem codes TB82 N 17 PTH calibration procedures D 5 P 5 1 17 PTS calibration procedures E 4 R Recommended spare parts 6 5 Reference documents 1 3 E 1 Remote mode O 9 Removing clip leads 3 3 Replacement parts 8 1 Report diagnostics O 13 Rerange procedure 4 19 S Security O 1 Set CO...

Page 284: ...Downloading configurations 4 25 Exit O 7 Installing 3 4 New database O 6 Open database O 7 Practices 3 4 Report diagnostics O 13 Security O 1 Set COM port O 13 Start O 6 Starting the password program O 1 System requirements 3 4 Test communication O 11 Transfer configuration O 8 Upgrade boot code O 13 Upgrade firmware O 13 Upload from STT04 O 9 User level accessibility O 3 View files of a databases...

Page 285: ...ione 243 20016 Pero Milano Italy Tel 39 02 33928 1 Fax 39 02 33928 240 ABB Instrumentation Ltd Howard Road St Neots Cambs England PE19 3EU Tel 44 0 1480 475 321 FAX 44 0 1480 217 948 ABB Inc Instrumentation Division 125 East County Line Road Warminster PA 18974 USA Tel 215 674 6000 FAX 215 674 7183 ABB Automation Products GmbH Industriestr 28 D 65760 Eschborn Germany Tel 49 0 6196 800 0 Fax 49 0 6...

Reviews: