2101510 Rev. AG
Page 4–3
•
At the command prompt, type
ipconfig /all
(space after
ipconfig
).
•
Record the PC and LAN settings displayed for later use.
2)
Make local connection to the NGC using either the USB or RS-232 cable to do
initial setup of the parameters.
3)
From the Analyzer Operation screen in PCCU, click
Show Tree View
in the
upper left corner of the screen.
4)
Click
Communications
to show the communication setup screen.
5)
Select the
Network
tab.
If using a Windows network, the user can use the network
ID feature. Network IDs are limited to 15 alphanumeric
digits, with limited special characters. See the Windows
help files for more information about naming computers.
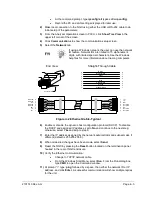
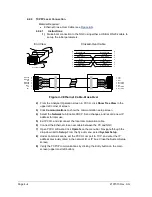
Figure 4-2 Ethernet Cable-Typical
6)
Enable or disable the dynamic host configuration protocol (DHCP). To disable
the DHCP and assigned IP address, set to
No
and continue to the next step;
otherwise, select
Yes
and skip to step 6.
7)
Enter the IP address assigned by the network administrator and subnet mask, if
different (default is 255.255.255.0).
8)
When all desired changes have been made, select
Send.
9)
Reset the NGC by pressing the
Reset
button located on the termination panel
housed in the rear of NGC enclosure.
10)
Verify the Ethernet communication:
•
Change to TCP/IP network cable.
•
From the Windows Start Menu, select
Run
. From the Run dialog box,
type
CMD
to open the Command window.
11)
At prompt “>” type:
ping
followed by a space, then either the network ID or IP
address, and click
Enter
. A successful communication will show multiple replies
for the unit.
8
7
6
5
4
3
2
1
8
7
6
5
4
3
2
1
Not Used
RX-
RX+
TX-
TX+
Not Used
Not Used
Not Used
Not Used
Not Used
Not Used
Not Used
8
7
6
5
4
3
2
1
Orange/White
8
7
6
5
4
3
2
1
Orange
Green/White
Blue
Blue/White
Green
Brown/White
Brown
Straight-Through Cable
Connector Clip
End View
RX-
RX+
TX-
TX+
8
1

