background image

6 Calibration information

6.1 When to calibrate

When to calibrate

The system must be calibrated if any of the following situations occur.

The resolver values are changed

If resolver values are changed, the robot must be re-calibrated using the calibration
methods supplied by ABB. Calibrate the robot carefully with standard calibration,
according to information in this manual.

The resolver values will change when parts affecting the calibration position are
replaced on the robot, for example motors or parts of the transmission.

The revolution counter memory is lost

If the revolution counter memory is lost, the counters must be updated. See

Updating revolution counters on OmniCore robots on page 210

This will occur

when:

The battery is discharged

A resolver error occurs

The signal between a resolver and measurement board is interrupted

A robot axis is moved with the control system disconnected

The revolution counters must also be updated after the robot and controller are
connected at the first installation.

The robot is rebuilt

If the robot is rebuilt, for example, after a crash or when the reachability of a robot
is changed, it needs to be re-calibrated for new resolver values.

Product manual - IRB 365

199

3HAC079185-001 Revision: A

© Copyright 2022 ABB. All rights reserved.

6 Calibration information

6.1 When to calibrate

Summary of Contents for IRB 365

Page 1: ...ROBOTICS Product manual IRB 365 ...

Page 2: ...Trace back information Workspace 22B version a6 Checked in 2022 06 10 Skribenta version 5 5 019 ...

Page 3: ...Product manual IRB 365 1 5 1100 OmniCore Document ID 3HAC079185 001 Revision A Copyright 2022 ABB All rights reserved Specifications subject to change without notice ...

Page 4: ...ranty by ABB for losses damage to persons or property fitness for a specific purpose or the like In no event shall ABB be liable for incidental or consequential damages arising from use of this manual and products described herein This manual and parts thereof must not be reproduced or copied without ABB s written permission Keep for future reference Additional copies of this manual may be obtaine...

Page 5: ...ng 44 3 2 1 Pre installation procedure 45 3 3 On site installation 45 3 3 1 Brief installation procedure 46 3 3 2 Minimum required free space above the robot 47 3 3 3 Securing the robot frame 49 3 3 4 Orienting assembling and securing the manipulator 57 3 3 5 Test run after installation maintenance or repair 58 3 3 6 Loads fitted to the robot stopping time and braking distances 59 3 3 7 Brake rele...

Page 6: ...ar unit 199 6 Calibration information 199 6 1 When to calibrate 200 6 2 Introduction and calibration terminology 201 6 3 Calibration method 203 6 4 Calibration movement directions for all axes 204 6 5 Calibrating axis 1 3 206 6 6 Calibrating axis 4 5 208 6 7 Fine calibration procedure on FlexPendant 210 6 8 Updating revolution counters on OmniCore robots 211 7 Troubleshooting 211 7 1 Introduction ...

Page 7: ...233 10 Spare part lists 233 10 1 Spare part lists and illustrations 235 Index Product manual IRB 365 7 3HAC079185 001 Revision A Copyright 2022 ABB All rights reserved Table of contents ...

Page 8: ...This page is intentionally left blank ...

Page 9: ...e foundation to making it ready for operation maintenance work repair work decommissioning work Note It is the responsibility of the integrator to conduct a risk assessment of the final application It is the responsibility of the integrator to provide safety and user guides for the robot system Who should read this manual This manual is intended for installation personnel maintenance personnel rep...

Page 10: ... and IRC5 or OmniCore con troller i 3HAC065036 001 Operating manual OmniCore 3HAC066554 001 Application manual Controller software OmniCore 3HAC050948 001 Technical reference manual System parameters i This manual contains all safety instructions from the product manuals for the manipulators and the controllers Revisions Description Revision First edition A 10 Product manual IRB 365 3HAC079185 001...

Page 11: ...missioning Reference information safety standards unit conversions screw joints lists of tools Spare parts list with corresponding figures or references to separate spare parts lists References to circuit diagrams Technical reference manuals The technical reference manuals describe reference information for robotics products for example lubrication the RAPID language and system parameters Applicat...

Page 12: ...ucts The manuals are aimed at those having first hand operational contact with the product that is production cell operators programmers and troubleshooters 12 Product manual IRB 365 3HAC079185 001 Revision A Copyright 2022 ABB All rights reserved Product documentation Continued ...

Page 13: ...lso include specific safety information when dangerous steps are to be performed Read more in the chapter Safety on page 15 Illustrations The product is illustrated with general figures that does not take painting or protection type in consideration Likewise certain work methods or general information that is valid for several product models can be illustrated with illustrations that show a differ...

Page 14: ...This page is intentionally left blank ...

Page 15: ...Operation of the robot when the safety devices are defective not in their intended location or in any other way not working When instructions for operation and maintenance are not followed Non authorized design modifications of the robot Repairs on the robot and its spare parts carried out by in experienced or non qualified personnel Foreign objects Force majeure Spare parts and equipment ABB supp...

Page 16: ...nfluence of alcohol drugs or any other intoxicating substances are not allowed to install maintain service repair or use the robot The plant liable must make sure that the personnel is trained on the robot and on responding to emergency or abnormal situations Personal protective equipment Use personal protective equipment as stated in the instructions 16 Product manual IRB 365 3HAC079185 001 Revis...

Page 17: ...ided will result in ser ious injury DANGER Signal word used to indicate a potentially hazardous situation which if not avoided could result in serious injury WARNING Signal word used to indicate a potentially hazardous situation related to electrical hazards which if not avoided could result in serious injury ELECTRICAL SHOCK Signal word used to indicate a potentially hazardous situation which if ...

Page 18: ...used to indicate where to find additional information or how to do an operation in an easier way TIP 18 Product manual IRB 365 3HAC079185 001 Revision A Copyright 2022 ABB All rights reserved 1 Safety 1 2 1 Safety signals in the manual Continued ...

Page 19: ...escription Symbol Warning xx0900000812 Warns that an accident may occur if the instructions are not followed that can lead to serious injury possibly fatal and or great damage to the product It applies to warnings that apply to danger with for example contact with high voltage electrical units explosion or fire risk risk of poisonous gases risk of crushing impact fall from height etc Caution xx090...

Page 20: ...0000815 Disassembling this part can cause injury Extended rotation xx0900000814 This axis has extended rotation working area compared to standard Brake release xx0900000808 Pressing this button will release the brakes This means that the robot arm can fall down Continues on next page 20 Product manual IRB 365 3HAC079185 001 Revision A Copyright 2022 ABB All rights reserved 1 Safety 1 2 2 Safety sy...

Page 21: ...tip over if the bolts are not securely fastened xx1500002402 Crush xx0900000817 Risk of crush injuries Continues on next page Product manual IRB 365 21 3HAC079185 001 Revision A Copyright 2022 ABB All rights reserved 1 Safety 1 2 2 Safety symbols on manipulator labels Continued ...

Page 22: ...31 1 06 xx1300001087 Moving robot 1 2 3 4 5 6 xx0900000819 The robot can move unexpectedly xx1000001141 1 2 3 4 xx1500002616 Continues on next page 22 Product manual IRB 365 3HAC079185 001 Revision A Copyright 2022 ABB All rights reserved 1 Safety 1 2 2 Safety symbols on manipulator labels Continued ...

Page 23: ...00001242 Lifting of robot xx0900000822 Oil xx0900000823 Can be used in combination with prohibition if oil is not allowed Mechanical stop xx0900000824 Continues on next page Product manual IRB 365 23 3HAC079185 001 Revision A Copyright 2022 ABB All rights reserved 1 Safety 1 2 2 Safety symbols on manipulator labels Continued ...

Page 24: ...that this part is pressurized Usually contains additional text with the pressure level Shut off with handle xx0900000827 Use the power switch on the controller Do not step xx1400002648 Warns that stepping on these parts can cause damage to the parts 24 Product manual IRB 365 3HAC079185 001 Revision A Copyright 2022 ABB All rights reserved 1 Safety 1 2 2 Safety symbols on manipulator labels Continu...

Page 25: ...otective stops and emergency stops are described in the product manual for the controller For more information see Product manual OmniCore C30 Product manual IRB 365 25 3HAC079185 001 Revision A Copyright 2022 ABB All rights reserved 1 Safety 1 3 Robot stopping functions ...

Page 26: ...le impact caused by a breaking or malfunctioning rotating tool or other device fitted to the robot The maximum TCP speed and the maximum velocity of the robot axes are detailed in the section Robot motion in the product specification for the respective manipulator Consider exposure to hazards such as slipping tripping and falling Hazards due to the working position and posture for a person working...

Page 27: ...o protect people working with the robot system are designed and installed correctly When integrating the robot with external devices to a robot system The integrator of the robot system must ensure that emergency stop functions are interlocked in accordance with applicable standards The integrator of the robot system must ensure that safety functions are interlocked in accordance with applicable s...

Page 28: ...rop Dump valves should be used in case of emergency Shot bolts should be used to prevent tools etc from falling due to gravity All pipes hoses and connections have to be inspected regularly for leaks and damage Damage must be repaired immediately Verify the safety functions Before the robot system is put into operation verify that the safety functions are working as intended and that any remaining...

Page 29: ...ment of robot arm WARNING Hazards due to the use of brake release devices and or gravity beneath the manipulator shall be considered A robot may perform unexpected limited movement WARNING Manipulator movements can cause serious injuries on users and may damage equipment Product manual IRB 365 29 3HAC079185 001 Revision A Copyright 2022 ABB All rights reserved 1 Safety 1 5 Safety during operation ...

Page 30: ...ns are working as intended Hot surfaces Surfaces can be hot after running the robot and touching these may result in burns Allow the surfaces to cool down before maintenance or repair Allergic reaction Elimination Action Description Warning Make sure that protective gear like goggles and gloves are al ways worn When working with lubricants there is a risk of an allergic reac tion Allergic reaction...

Page 31: ... been drained from the gearbox Specified amount de pends on drained volume For lifetime reasons always drain as much oil as possible from the gearbox The magnetic oil plugs will gather residual metal chips Contaminated oil in gearboxes Hazards related to batteries Under rated conditions the electrode materials and liquid electrolyte in the batteries are sealed and not exposed to the outside There ...

Page 32: ...orm unexpected limited movement WARNING Manipulator movements can cause serious injuries on users and may damage equipment Related information See also the safety information related to installation and operation 32 Product manual IRB 365 3HAC079185 001 Revision A Copyright 2022 ABB All rights reserved 1 Safety 1 6 1 Safety during maintenance and repair Continued ...

Page 33: ...equire using an overhead crane or similar equipment Increased injury Before releasing the brakes make sure that the weight of the manipulator does not result in additional hazards for example even more severe injuries on a trapped person DANGER When releasing the holding brakes the robot axes may move very quickly and sometimes in unexpected ways Make sure no personnel is near or beneath the robot...

Page 34: ...d 2 Switch the motor to the MOTORS OFF 3 Inspect and verify that the axis maintains its position If the manipulator does not change position as the motors are switched off then the brake function is adequate Note It is recommended to run the service routine BrakeCheck as part of the regular maintenance see the operating manual for the robot controller For robots with the option SafeMove the Cyclic...

Page 35: ...ld engineers A risk assessment must be done to address both robot and robot system specific hazards WARNING Hazards due to the use of brake release devices and or gravity beneath the manipulator shall be considered A robot may perform unexpected limited movement WARNING Manipulator movements can cause serious injuries on users and may damage equipment Related information See also the safety inform...

Page 36: ...ement of robot arm WARNING Hazards due to the use of brake release devices and or gravity beneath the manipulator shall be considered A robot may perform unexpected limited movement WARNING Manipulator movements can cause serious injuries on users and may damage equipment 36 Product manual IRB 365 3HAC079185 001 Revision A Copyright 2022 ABB All rights reserved 1 Safety 1 8 Safety during decommiss...

Page 37: ...ion robot 4 X Y Z 1 2 3 5 xx2200000421 The table shows the various forces and torques working on the robot during different kinds of operation Note These forces and torques are extreme values that are rarely encountered during operation The values also never reach their maximum at the same time Continues on next page Product manual IRB 365 37 3HAC079185 001 Revision A Copyright 2022 ABB All rights...

Page 38: ...mum resonance frequency given should be interpreted as the frequency of the robot mass inertia robot assumed stiff when a foundation translational torsional elasticity is added i e the stiffness of the pedestal where the robot is mounted The minimum resonance frequency should not be interpreted as the resonance frequency of the building floor etc For example if the equivalent mass of the floor is ...

Page 39: ... a risk that the robot stops or run with lower performance due to temperature dependent oil and grease viscosity Protection classes robot The table shows the available protection types of the robot with the corresponding protection class Protection class i Protection type IP54 Manipulator protection type Standard i According to IEC 60529 Environmental information The product complies with IEC 6300...

Page 40: ...e of the robot i h e g f d c b a WCP Z Y 0 Z 0 X xx2200000476 Dimensions i h g f e d c b a Variant 72 42 550 516 335 781 821 1031 1181 IRB 365 1 5 1100 Continues on next page 40 Product manual IRB 365 3HAC079185 001 Revision A Copyright 2022 ABB All rights reserved 2 Technical data 2 2 Working range ...

Page 41: ... 94 75 27 5 80 Axis 5 Z X xx2200000477 Product manual IRB 365 41 3HAC079185 001 Revision A Copyright 2022 ABB All rights reserved 2 Technical data 2 2 Working range Continued ...

Page 42: ...may destroy sensitive electronics Safe handling Use one of the following alternatives Use a wrist strap Wrist straps must be tested frequently to ensure that they are not damaged and are operating correctly Use an ESD protective floor mat The mat must be grounded through a current limiting resistor Use a dissipative table mat The mat should provide a controlled discharge of static voltages and mus...

Page 43: ... commenced all safety information must be observed There are general safety aspects that must be read through as well as more specific safety information that describes the danger and safety risks when performing the procedures Read the chapter Safety on page15 before performing any installation work Note Always connect the IRB 365 and the robot to protective earth and residual current device RCD ...

Page 44: ...th a lint free cloth if necessary 4 Make sure that the lifting accessory used if required is suitable to handle the weight of the robot as specified in Weight robot on page 37 5 If the robot is not installed directly it must be stored as described in Storage condi tions robot on page 38 6 Make sure that the expected operating environment of the robot conforms to the specifications as described in ...

Page 45: ... valid platform or prepare the foundation for the manipulator 2 See Orienting assembling and se curing the manipulator on page49 Lift and secure the manipulator to the plat form foundation 3 See Product manual OmniCore C30 Connect the manipulator to the controller 4 See Product manual OmniCore C30 Configure the safety settings 5 See Product manual OmniCore C30 How to start and run the robot is des...

Page 46: ...battery axis 4 and axis 5 motor cable harness Examples of access ways to the base components Service platform A service platform for access from above is recommended xx2000000672 Access way beside the robot If a platform is not possible the service personnel need to be able to stand beside the robot according to the figure xx2000000671 46 Product manual IRB 365 3HAC079185 001 Revision A Copyright ...

Page 47: ...he installation site for the robot con forms to the specifications in section Technical data on page 37 1 See Minimum required free space above the robot on page 46 Make sure that the space above the installation site is sufficient for repair and maintenance 2 Prepare the installation site 3 Use fastening bolts that withstand the requirements for current foundation Secure the robot frame to the fl...

Page 48: ...me must achieve required values for the foundation requirements to run the robot safely See Requirements foundation on page 38 xx2000000601 Spirit level A Fastening bolts that withstand requirements for current foundation B Shim C 48 Product manual IRB 365 3HAC079185 001 Revision A Copyright 2022 ABB All rights reserved 3 Installation and commissioning 3 3 3 Securing the robot frame Continued ...

Page 49: ...elescope shafts due to slide bearing damage 6 Detailed procedures for each step are given further on in this section Attachment screws The table below specifies the type of securing screws and washers to be used for securing the robot to the base foundation M16 Minimum length of thread engage ment 25 mm Suitable screws 3 pcs Quantity Screw class 8 8 with Yield Strength 640 MPa Quality 17x25x3 coat...

Page 50: ... xx0700000555 Used to push the parallel arms apart 3HAC6194 1 Pliers for parallel arms Required service parts Note Article number Consumable Isopropanol Cleaning agent Continues on next page 50 Product manual IRB 365 3HAC079185 001 Revision A Copyright 2022 ABB All rights reserved 3 Installation and commissioning 3 3 4 Orienting assembling and securing the manipulator Continued ...

Page 51: ...rt points of the manipulator base box shall be mounted against three flat surfaces with a flatness within the specification Use shims if necessary See specification in Requirements foundation on page 38 Assembling and installing The IRB 365 is delivered in sub assemblies Continues on next page Product manual IRB 365 51 3HAC079185 001 Revision A Copyright 2022 ABB All rights reserved 3 Installation...

Page 52: ...chment holes 3 Installing the base unit Use the procedure to install the base unit Note Action xx2200000600 Fasten three lifting eyes M8 1 CAUTION The weight of the complete base unit and upper arms is 86 kg All lifting accessories used must be sized accord ingly 2 Make sure the round sling has free space and does not wear against any part of the robot Attach the round slings to the lifting eyes N...

Page 53: ...ngagement 25 mm Screw class 8 8 with Yield Strength 640 MPa 3 pcs Washers 17x25x3 coated stainless steel Note Do not damage the robot cabling xx2000000469 xx2000000470 Continues on next page Product manual IRB 365 53 3HAC079185 001 Revision A Copyright 2022 ABB All rights reserved 3 Installation and commissioning 3 3 4 Orienting assembling and securing the manipulator Continued ...

Page 54: ...re leased simultaneously and instantly Note Do not interchange the 24V and 0V pins If they are mixed up damage can be caused to internal electrical components 1 Releasing the brakes on page 62 xx2200000021 Release the brakes by pressing the brake release button and move the upper arms to calibration position 2 Disconnect the 24V supply from the R1 MP con nector 3 Continues on next page 54 Product ...

Page 55: ...ing delta unit Note Do not tighten the mounting clamps screws before refitting the lower arms 1 Tightening torque 10 Nm xx2100000729 Tighten mounting clamping screws 2 Continues on next page Product manual IRB 365 55 3HAC079185 001 Revision A Copyright 2022 ABB All rights reserved 3 Installation and commissioning 3 3 4 Orienting assembling and securing the manipulator Continued ...

Page 56: ... either on the left side or the right side not both Note Be careful not to damage the ball bearing cups 4 xx2100000732 Fit the center base cover 5 Calibration Note Action See Updating revolution counters on OmniCore robots on page 210 Update the revolution counters 1 56 Product manual IRB 365 3HAC079185 001 Revision A Copyright 2022 ABB All rights reserved 3 Installation and commissioning 3 3 4 Or...

Page 57: ...rict the robot motion during service activity is removed 3 Verify that the fixture and work piece are well secured if applicable 4 Verify that all safety equipment is installed as designed for the application 5 Verify that no personnel are inside the safeguarded space 6 If maintenance or repair has been done verify the function of the part that was main tained 7 Verify the application in the opera...

Page 58: ...stops or major damage to the robot Load diagrams permitted extra loads equipment and their positions are specified in the product specification The loads must be defined in the software Stopping time and braking distances The performance of the motor brake depends on if there are any loads attached to the robot See Product specification Robot stopping distances according to ISO 10218 1 58 Product ...

Page 59: ...elease box installation The figure shows a routed cable from the brake release unit to the SMB battery compartment located on top of the base unit xx2100002498 Continues on next page Product manual IRB 365 59 3HAC079185 001 Revision A Copyright 2022 ABB All rights reserved 3 Installation and commissioning 3 3 7 Brake release unit ...

Page 60: ...ment must be installed in accordance with the specified protection class see Protection classes robot on page 39 Note Place the equipment in a manner that makes it obvious which manipulator it is connected to There must be no doubt on which manipulator is affected when activating the button Continues on next page 60 Product manual IRB 365 3HAC079185 001 Revision A Copyright 2022 ABB All rights res...

Page 61: ...cation Data Function 24V DC Signal 13A continuously Current Product manual IRB 365 61 3HAC079185 001 Revision A Copyright 2022 ABB All rights reserved 3 Installation and commissioning 3 3 7 Brake release unit Continued ...

Page 62: ...uipped with a brake release unit Note Action Note If the robot is not connected to the controller power must be supplied to the connector R1 MP according to the section Supplying power to connector R1 MP on page 63 1 DANGER When releasing the holding brakes the robot axes may move very quickly and sometimes in unexpec ted ways Make sure no personnel is near or beneath the ro bot 2 Continues on nex...

Page 63: ...er to enable the brake release buttons Note Action DANGER Incorrect connections such as supplying power to the wrong pin may cause all brakes to be released simultaneously and instantly 1 xx2100000785 Supply 0V on pin 12 24V on pin 11 Note Do not interchange the 24V and 0V pins If they are mixed up damage can be caused to internal electrical components 2 Use the brake releasing button as described...

Page 64: ...be regulated with the RAPID instruction VelSet Start the robot with its normal program but with reduced speed 1 Adjusting the speed and acceleration during warm up Depending on how cold the environment is and what program is being used the speed might need to be ramped up until reached maximum The table shows examples of how to adjust the speed Speed velocity AccSet Work cycles v100 100 mm s 20 20...

Page 65: ...imension of the robot 175 1261 850 213 545 417 461 313 90 213 50 641 295 523 Z 0 xx2200000423 Continues on next page Product manual IRB 365 65 3HAC079185 001 Revision A Copyright 2022 ABB All rights reserved 3 Installation and commissioning 3 3 10 Fitting equipment on the robot robot dimensions ...

Page 66: ...nical interface of the tool flange xx2100000962 Continues on next page 66 Product manual IRB 365 3HAC079185 001 Revision A Copyright 2022 ABB All rights reserved 3 Installation and commissioning 3 3 10 Fitting equipment on the robot robot dimensions Continued ...

Page 67: ...ing extra equipment are available on the upper and lower arms If attaching extra equipment to the arms use shaped clamping blocks Plastic cable ties can be used but risk of damaging surfaces Do not use metal directly on the lower arms Maximum extra load 0 35 kg to either M1 or M2 Equipment attached to M1 and or M2 should be calculated as a point load located in the same position as TCPO This point...

Page 68: ...th equipment fitted on the robot by the customer low voltage signals and high voltage power supply protective ground Customer cables The customer cables also handle databus communication See the product manual for the controller see document number in References on page 10 Robot cables These cables are included in the standard delivery They are completely pre manufactured and ready to plug in Conn...

Page 69: ...AC067446 003 Signal cable shielded 15 m Signal cable shielded 22 m 3HAC067446 004 Signal cable shielded 30 m Bending radius for static floor cables The minimum bending radius is 10 times the cable diameter for static floor cables A B xx1600002016 Diameter A Diameter x10 B Continues on next page Product manual IRB 365 69 3HAC079185 001 Revision A Copyright 2022 ABB All rights reserved 3 Installatio...

Page 70: ...grounding bonding point is used for potential equalizing between control cabinet manipulator and any peripheral devices xx2200000123 70 Product manual IRB 365 3HAC079185 001 Revision A Copyright 2022 ABB All rights reserved 3 Installation and commissioning 3 4 1 Robot cabling and connection points Continued ...

Page 71: ... any service work There are general safety aspects that must be read through as well as more specific safety information that describes the danger and safety risks when performing the procedures Read the chapter Safety on page 15 before performing any service work The maintenance must be done by qualified personnel in accordance with the safety requirements set forth in the applicable national and...

Page 72: ...pecified in months regardless of whether the system is running or not Operating time specified in operating hours More frequent running means more frequent maintenance activities Robots with the functionality Service Information System activated can show active counters in the device browser in RobotStudio or on the FlexPendant 72 Product manual IRB 365 3HAC079185 001 Revision A Copyright 2022 ABB...

Page 73: ...e IRB 365 on page 95 x Cleaning the robot Inspecting the telescopic shafts on page 80 x Inspecting the telescopic shafts Inspecting the telescopic shafts on page 80 x Inspecting the lower arms Changing the SMB battery on page 90 x ii Replacing the SMB battery pack Replacing ball bearing cup on page 120 xiii Replacing the ball bearing cup Inspecting the telescopic shafts on page 80 x iv Replacing t...

Page 74: ...cific component of the robot can vary greatly depending on how hard it is run Expected component life Note Expected life Component 20 000 hours Gearboxes 74 Product manual IRB 365 3HAC079185 001 Revision A Copyright 2022 ABB All rights reserved 4 Maintenance 4 2 3 Expected component life ...

Page 75: ...65 xx2100000720 Required tools and equipment Image Note Article number Equipment Content is defined in sec tion Standard toolkit on page 228 Standard toolkit Continues on next page Product manual IRB 365 75 3HAC079185 001 Revision A Copyright 2022 ABB All rights reserved 4 Maintenance 4 3 1 Inspecting the upper arms ...

Page 76: ... that all supplies for electrical power are turned off 1 xx2100000722 Remove the lower end of the lower arms from the delta unit by using the pliers either on the left side or the right side not both 2 xx2100000721 Remove the upper end of the lower arms from the upper arms by using the pliers either on the left side or the right side not both 3 Remove the lower arms 4 Continues on next page 76 Pro...

Page 77: ...attachment screws up per arm Add Loctite 243 if removing a screw 3 Refitting the lower arm Note Action xx2100000721 Refit the lower arm to the upper arm by using the pliers either on the left side or the right side not both Note Be careful not to damage the ball bearing cups 1 Repeat the procedure in the lower end of the lower arms on the delta unit 2 Continues on next page Product manual IRB 365 ...

Page 78: ...ke sure all safety requirements are met when performing the first test run 3 78 Product manual IRB 365 3HAC079185 001 Revision A Copyright 2022 ABB All rights reserved 4 Maintenance 4 3 1 Inspecting the upper arms Continued ...

Page 79: ...000730 Required tools and equipment Image Note Article number Equipment Content is defined in sec tion Standard toolkit on page 228 Standard toolkit Continues on next page Product manual IRB 365 79 3HAC079185 001 Revision A Copyright 2022 ABB All rights reserved 4 Maintenance 4 3 2 Inspecting the telescopic shafts ...

Page 80: ...ressure are turned off 1 xx2100000747 Push the brake release button and press the delta plate with head downwards to extend the two telescopic shafts Note Make sure not to over extend the length of tele scope shafts due to slide bearing damage 2 WARNING Turn off all electric power supply 3 Continues on next page 80 Product manual IRB 365 3HAC079185 001 Revision A Copyright 2022 ABB All rights rese...

Page 81: ...ve the two attachment screws with washers for telescopic shaft axis 5 6 Loosen the two attachment screws on the mounting clamp in the upper end of the telescopic shaft 7 Continues on next page Product manual IRB 365 81 3HAC079185 001 Revision A Copyright 2022 ABB All rights reserved 4 Maintenance 4 3 2 Inspecting the telescopic shafts Continued ...

Page 82: ...emove the telescopic shaft for axes 4 and 5 9 xx2100000751 Loosen the attachment screw and remove the conical connection from the telescopic shaft for axis 5 10 Continues on next page 82 Product manual IRB 365 3HAC079185 001 Revision A Copyright 2022 ABB All rights reserved 4 Maintenance 4 3 2 Inspecting the telescopic shafts Continued ...

Page 83: ...on the telescope bearing housing 7 Nm xx2100000773 Add Loctite 243 if replacing any screw Continues on next page Product manual IRB 365 83 3HAC079185 001 Revision A Copyright 2022 ABB All rights reserved 4 Maintenance 4 3 2 Inspecting the telescopic shafts Continued ...

Page 84: ...2100000755 Check the universal joints for any damage or cracks If damage or cracks are detected replace the complete joint 3 Continues on next page 84 Product manual IRB 365 3HAC079185 001 Revision A Copyright 2022 ABB All rights reserved 4 Maintenance 4 3 2 Inspecting the telescopic shafts Continued ...

Page 85: ...the new telescopic shaft axis 5 2 10 Nm xx2100000751 Add Loctite 638 on the conical surfaces and Loc tite 243 on the threads xx2100000750 Refit the two telescopic shafts on the motor axis 4 and 5 3 Tightening torque Tighten mounting clamping screws 4 10 Nm Continues on next page Product manual IRB 365 85 3HAC079185 001 Revision A Copyright 2022 ABB All rights reserved 4 Maintenance 4 3 2 Inspectin...

Page 86: ...e conical surfaces and Loc tite 243 on the threads 6 Tightening torque Refit the attachment screw for telescopic shaft and tighten axis 4 7 10 Nm xx2100000748 Add Loctite 638 on the conical surfaces and Loc tite 243 on the threads Continues on next page 86 Product manual IRB 365 3HAC079185 001 Revision A Copyright 2022 ABB All rights reserved 4 Maintenance 4 3 2 Inspecting the telescopic shafts Co...

Page 87: ...000736 Add Loctite 638 on the conical surfaces and Loc tite 243 on the threads DANGER Make sure all safety requirements are met when performing the first test run 9 Product manual IRB 365 87 3HAC079185 001 Revision A Copyright 2022 ABB All rights reserved 4 Maintenance 4 3 2 Inspecting the telescopic shafts Continued ...

Page 88: ...719 Required tools and equipment Image Note Article number Equipment Content is defined in sec tion Standard toolkit on page 228 Standard toolkit Continues on next page 88 Product manual IRB 365 3HAC079185 001 Revision A Copyright 2022 ABB All rights reserved 4 Maintenance 4 3 3 Inspecting the lower arms ...

Page 89: ...pply air pressure supply to the robot before entering the safeguarded space 1 SeeReplacing ball bearing cup on page 120 Check the ball bearing cups for wear and change if damage 2 See Replacing the lower arms on page 117 If damage or cracks are detected replace the lower arm 3 Product manual IRB 365 89 3HAC079185 001 Revision A Copyright 2022 ABB All rights reserved 4 Maintenance 4 3 3 Inspecting ...

Page 90: ... Business Portal www abb com myABB Note Article number Spare part Battery includes protection cir cuits Only replace with the spe cified spare part or an ABB ap proved equivalent 3HAC044075 001 Battery unit Required tools and equipment Note Article number Equipment Content is defined in section Standard toolkit on page 228 Standard toolkit Continues on next page 90 Product manual IRB 365 3HAC07918...

Page 91: ...obot to calibration position 1 DANGER Make sure that all supplies for electrical power hydraulic pressure and air pressure are turned off 2 ELECTROSTATIC DISCHARGE ESD The unit is sensitive to ESD Before handling the unit read the safety information in section The unit is sensitive to ESD on page 42 3 Continues on next page Product manual IRB 365 91 3HAC079185 001 Revision A Copyright 2022 ABB All...

Page 92: ...bly out of the SMB box 5 xx2100000957 Carefully pull out the battery and disconnect the battery cable Battery cable connector R2 G 6 Remove the SMB battery Battery includes protection circuits Only replace with a specified spare part or with an ABB ap proved equivalent 7 Continues on next page 92 Product manual IRB 365 3HAC079185 001 Revision A Copyright 2022 ABB All rights reserved 4 Maintenance ...

Page 93: ... down the SMB assembly into the SMB box 2 Tightening torque 10 Nm xx2100000843 Fasten the battery cover and sealing with lubric ated screws and washers Note Do not overtighten to avoid damaging the sealing 3 DANGER Make sure all safety requirements are met when performing the first test run 4 Product manual IRB 365 93 3HAC079185 001 Revision A Copyright 2022 ABB All rights reserved 4 Maintenance 4...

Page 94: ...ties Lubrication Motors and gears on the IRB365 are lifetime lubricated and maintenance free 94 Product manual IRB 365 3HAC079185 001 Revision A Copyright 2022 ABB All rights reserved 4 Maintenance 4 5 Lubrication activities ...

Page 95: ...ng Do not point the water jet at connectors joints sealings or gaskets Do not use compressed air to clean the robot Do not use solvents that are not approved by ABB to clean the robot Do not spray from a distance closer than 0 4 m Do not remove any covers or other protective devices before cleaning the robot Cleaning methods This following table defines what cleaning methods are allowed for ABB ma...

Page 96: ...ions DANGER Turn off all electrical power hydraulic and pneumatic pressure supplies before entering the workspace of the manipulator Also read the safety sections Pneumatic or hydraulic related hazards on page 28 Electrical safety on page 27 Safety during maintenance and repair on page 30 Note Action Use a vaccum cleaner to remove loose particles 1 Use a dry or moistened cloth to wipe off the dirt...

Page 97: ... the article number and the revision of both the replaced unit and the replacement unit This is particularly important for safety equipment to maintain the safety integrity of the installation Safety information Make sure to read through the chapter Safety on page 15 before commencing any service work Note If the IRB 365 is connected to power always make sure that the IRB 365 is connected to prote...

Page 98: ...lacement instructions given in the related product manuals must be strictly followed If there are any problems contact your local ABB for support L2 spare parts To replace the L2 parts require specialized training and might need special tools Only ABB field service personnel or qualified personnel trained by ABB can replace L2 parts 98 Product manual IRB 365 3HAC079185 001 Revision A Copyright 202...

Page 99: ... See the latest spare parts of the IRB 365 via myABB Business Portal www abb com myABB Level Note Article number Spare part L1 3HAC080571 001 Cable harness Required tools and equipment Note Article number Equipment Content is defined in section Standard toolkit on page 228 Standard toolkit Continues on next page Product manual IRB 365 99 3HAC079185 001 Revision A Copyright 2022 ABB All rights rese...

Page 100: ...position due to repair activity 1 DANGER Turn off all electric power supply hydraulic pressure supply air pressure supply to the robot before entering the safeguarded space 2 Removing the manipulator harness Note Action DANGER Make sure that all supplies for electrical power hydraulic pressure and air pressure are turned off 1 Continues on next page 100 Product manual IRB 365 3HAC079185 001 Revisi...

Page 101: ...and 3 3 xx2100001814 Remove the sealing plate by removing the four screws on motor axis 1 2 and 3 4 xx2100001418 Remove motor cover from motor axis 4 and 5 5 6 Continues on next page Product manual IRB 365 101 3HAC079185 001 Revision A Copyright 2022 ABB All rights reserved 5 Repair 5 3 1 Replacing the manipulator harness Continued ...

Page 102: ... and remove the cover with cable glands 7 xx2100002738 Remove the attachment screws on the SMB box top cover 8 Pull the manipulator harness out of the SMB box 9 Continues on next page 102 Product manual IRB 365 3HAC079185 001 Revision A Copyright 2022 ABB All rights reserved 5 Repair 5 3 1 Replacing the manipulator harness Continued ...

Page 103: ... plate 11 xx2100000957 Carefully pull out the battery and disconnect the battery cable Battery cable connector R2 G 12 Remove the SMB battery Battery includes protection circuits Only replace with a specified spare part or with an ABB ap proved equivalent 13 Continues on next page Product manual IRB 365 103 3HAC079185 001 Revision A Copyright 2022 ABB All rights reserved 5 Repair 5 3 1 Replacing t...

Page 104: ...e two screws and remove the connector from the bracket 16 Refitting the manipulator harness Use these procedures to refit the cable harness Refitting the manipulator harness Note Action DANGER Make sure that all supplies for electrical power hydraulic pressure and air pressure are turned off 1 Continues on next page 104 Product manual IRB 365 3HAC079185 001 Revision A Copyright 2022 ABB All rights...

Page 105: ...connector to the bracket and tighten two screws 2 10 Nm xx2100002806 Continues on next page Product manual IRB 365 105 3HAC079185 001 Revision A Copyright 2022 ABB All rights reserved 5 Repair 5 3 1 Replacing the manipulator harness Continued ...

Page 106: ...e battery under the rubber band Battery cable connector R2 G 5 2 Nm Refit the two cables for brake release unit Add Loctite 5700 thread sealant on the two screws 6 Refit the brake release sealing plate on the SMB box top cover Continues on next page 106 Product manual IRB 365 3HAC079185 001 Revision A Copyright 2022 ABB All rights reserved 5 Repair 5 3 1 Replacing the manipulator harness Continued...

Page 107: ...SMB box 7 Tightening torque Tighten the attachment screws on the SMB box top cover 8 10 Nm xx2100002738 Continues on next page Product manual IRB 365 107 3HAC079185 001 Revision A Copyright 2022 ABB All rights reserved 5 Repair 5 3 1 Replacing the manipulator harness Continued ...

Page 108: ...nnect the white connector and the yellow connector on the motor top 10 6 Nm xx2100001418 Refit the motor cover to motor axis 4 and 5 11 Continues on next page 108 Product manual IRB 365 3HAC079185 001 Revision A Copyright 2022 ABB All rights reserved 5 Repair 5 3 1 Replacing the manipulator harness Continued ...

Page 109: ...s on motor axis 1 2 and 3 13 Tightening torque Refit the motor cover axis 1 2 and 3 14 2 Nm xx2100000725 Concluding procedure Note Action See Calibration information on page 199 Calibrate the robot 1 Continues on next page Product manual IRB 365 109 3HAC079185 001 Revision A Copyright 2022 ABB All rights reserved 5 Repair 5 3 1 Replacing the manipulator harness Continued ...

Page 110: ... sure all safety requirements are met when performing the first test run 2 110 Product manual IRB 365 3HAC079185 001 Revision A Copyright 2022 ABB All rights reserved 5 Repair 5 3 1 Replacing the manipulator harness Continued ...

Page 111: ...est spare parts of the IRB 365 via myABB Business Portal www abb com myABB Level Note Article number Spare part 3HAC044168 001 SMB unit Required tools and equipment Note Article number Equipment Content is defined in section Standard toolkit on page 228 Standard toolkit Continues on next page Product manual IRB 365 111 3HAC079185 001 Revision A Copyright 2022 ABB All rights reserved 5 Repair 5 3 2...

Page 112: ...supply air pressure supply to the robot before entering the safeguarded space 2 Removing the SMB unit Note Action DANGER Turn off all electric power supply hydraulic pressure supply air pressure supply to the robot before entering the safeguarded space 1 ELECTROSTATIC DISCHARGE ESD When handling the computer outside of the con troller use the wrist strap button located on the side of the computer ...

Page 113: ...nect the cable connectors 4 xx2100001977 Cut cable straps and remove the screen grounding plate disconnect cable harness 5 Disconnect the battery cable Battery cable connector R2 G 6 Continues on next page Product manual IRB 365 113 3HAC079185 001 Revision A Copyright 2022 ABB All rights reserved 5 Repair 5 3 2 Replacing the SMB unit Continued ...

Page 114: ...TATIC DISCHARGE ESD When handling the computer outside of the con troller use the wrist strap button located on the side of the computer 1 Tightening torque Fit the new SMB unit on the bracket and tighten 4 nuts 2 3 Nm xx2100002813 Continues on next page 114 Product manual IRB 365 3HAC079185 001 Revision A Copyright 2022 ABB All rights reserved 5 Repair 5 3 2 Replacing the SMB unit Continued ...

Page 115: ...ush the SMB board in to the SMB box 5 Tighten torque Tighten the attachment screws on the SMB box top cover 6 10 Nm xx2100002751 Concluding procedure Note Action See Calibration information on page 199 Calibrate the robot 1 Continues on next page Product manual IRB 365 115 3HAC079185 001 Revision A Copyright 2022 ABB All rights reserved 5 Repair 5 3 2 Replacing the SMB unit Continued ...

Page 116: ... Make sure all safety requirements are met when performing the first test run 2 116 Product manual IRB 365 3HAC079185 001 Revision A Copyright 2022 ABB All rights reserved 5 Repair 5 3 2 Replacing the SMB unit Continued ...

Page 117: ...umbers that are listed in the table can be out of date See the latest spare parts of the IRB 365 via myABB Business Portal www abb com myABB Level Note Article number Spare part L1 3HAC079965 001 Lower arm L1 3HAC079978 001 Ball joint Continues on next page Product manual IRB 365 117 3HAC079185 001 Revision A Copyright 2022 ABB All rights reserved 5 Repair 5 4 1 Replacing the lower arms ...

Page 118: ...these procedures to remove the lower arms Preparations before removing the lower arms Note Action The robot does not need to be jogged into any specific position due to repair activity 1 Do not move the position of the upper arms during lower arms replacement CAUTION Turn off all supplies for electrical power to the robot before starting the repair work 2 Remove any loads or tools attached to the ...

Page 119: ...ove the lower arms 4 Replacing joint ball Use these procedures to replace the joint ball Replacing joint ball Note Action CAUTION Make sure that all supplies for electrical power are turned off 1 xx2100000781 Unscrew the joint ball counter clockwise 2 Tightening torque Add Loctite 243 to the joint ball 3 12 Nm Screw the joint ball clockwise Continues on next page Product manual IRB 365 119 3HAC079...

Page 120: ...l bearing cup 3 Refitting the lower arms Use these procedures to refit the lower arms Refitting the lower arm Note Action xx2100000721 Refit the lower arm to the upper arm by using the pliers either on the left side or the right side not both Note Be careful not to damage the ball bearing cups 1 Repeat the procedure in the lower end of the lower arms on the delta unit 2 Continues on next page 120 ...

Page 121: ...Make sure all safety requirements are met when performing the first test run 3 Product manual IRB 365 121 3HAC079185 001 Revision A Copyright 2022 ABB All rights reserved 5 Repair 5 4 1 Replacing the lower arms Continued ...

Page 122: ...tal www abb com myABB Level Note Article number Spare part L1 3HAC079964 001 Upper arm Service parts Following parts are affected during the replacement procedure Replace if damaged or lost Note Article number Spare part 3HAC079967 001 Ball bearing cup 3HAC079966 001 Parallel arm spring Loctite 243 3HAB7116 1 Locking liquid Continues on next page 122 Product manual IRB 365 3HAC079185 001 Revision ...

Page 123: ...t does not need to be jogged into any specific position due to repair activity 1 DANGER Turn off all electric power supply hydraulic pressure supply air pressure supply to the robot before entering the safeguarded space 2 Remove any loads or tools attached to the tilt arm on the head 3 Removing the lower arm Note Action CAUTION Make sure that all supplies for electrical power are turned off 1 Cont...

Page 124: ...ower arms from the upper arms by using the pliers either on the left side or the right side not both 3 Remove the lower arms 4 Removing the upper arm Note Action CAUTION Make sure that all supplies for electrical power are turned off 1 Continues on next page 124 Product manual IRB 365 3HAC079185 001 Revision A Copyright 2022 ABB All rights reserved 5 Repair 5 4 2 Replacing the upper arms Continued...

Page 125: ...r arm from the base unit 3 Refitting the upper arm Use these procedures to refit the upper arm Refitting the upper arm Note Action Add Loctite 243 to all screws 1 Continues on next page Product manual IRB 365 125 3HAC079185 001 Revision A Copyright 2022 ABB All rights reserved 5 Repair 5 4 2 Replacing the upper arms Continued ...

Page 126: ...ng the pliers either on the left side or the right side not both Note Be careful not to damage the ball bearing cups 1 Repeat the procedure in the lower end of the lower arms on the delta unit 2 DANGER Make sure all safety requirements are met when performing the first test run 3 Continues on next page 126 Product manual IRB 365 3HAC079185 001 Revision A Copyright 2022 ABB All rights reserved 5 Re...

Page 127: ... on page 199 Calibrate the robot 1 DANGER Make sure all safety requirements are met when performing the first test run 2 Product manual IRB 365 127 3HAC079185 001 Revision A Copyright 2022 ABB All rights reserved 5 Repair 5 4 2 Replacing the upper arms Continued ...

Page 128: ...out of date See the latest spare parts of the IRB 365 via myABB Business Portal www abb com myABB Level Note Article number Spare part L1 3HAC079972 001 Telescope Unit Required tools and equipment Note Article number Equipment Content is defined in section Standard toolkit on page 228 Standard toolkit Continues on next page 128 Product manual IRB 365 3HAC079185 001 Revision A Copyright 2022 ABB Al...

Page 129: ...ntering the safeguarded space 2 Remove any loads or tools attached to the tilt arm on the head 3 Removing the telescopic shaft Note Action WARNING Make sure that all supplies for hydraulic pressure and air pressure are turned off 1 xx2100000747 Push the brake release button and press the delta plate with head downwards to extend the two telescopic shafts Note Make sure not to over extend the lengt...

Page 130: ...wo attachment screws with washers for telescopic shaft axis 5 6 Loosen the two attachment screws on the mounting clamp in the upper end of the telescopic shaft 7 Continues on next page 130 Product manual IRB 365 3HAC079185 001 Revision A Copyright 2022 ABB All rights reserved 5 Repair 5 4 3 Replacing the telescopic shafts and shaft components Continued ...

Page 131: ...e telescopic shaft for axes 4 and 5 9 xx2100000751 Loosen the attachment screw and remove the conical connection from the telescopic shaft for axis 5 10 Continues on next page Product manual IRB 365 131 3HAC079185 001 Revision A Copyright 2022 ABB All rights reserved 5 Repair 5 4 3 Replacing the telescopic shafts and shaft components Continued ...

Page 132: ...connection over to the new telescopic shaft axis 5 2 10 Nm xx2100000751 Add Loctite 638 on the conical surfaces and Loc tite 243 on the threads xx2100000750 Refit the two telescopic shafts on the motor axis 4 and 5 3 Tightening torque Tighten mounting clamping screws 4 10 Nm Continues on next page 132 Product manual IRB 365 3HAC079185 001 Revision A Copyright 2022 ABB All rights reserved 5 Repair ...

Page 133: ...l surfaces and Loc tite 243 on the threads 6 Tightening torque Refit the attachment screw for telescopic shaft and tighten axis 4 7 10 Nm xx2100000748 Add Loctite 638 on the conical surfaces and Loc tite 243 on the threads Continues on next page Product manual IRB 365 133 3HAC079185 001 Revision A Copyright 2022 ABB All rights reserved 5 Repair 5 4 3 Replacing the telescopic shafts and shaft compo...

Page 134: ...obot 1 DANGER Make sure all safety requirements are met when performing the first test run 2 Required spare parts Note The spare part numbers that are listed in the table can be out of date See the latest spare parts of the IRB 365 via myABB Business Portal www abb com myABB Level Note Article number Spare part L1 3HAC080342 001 Universal joint L1 3HAC079975 001 Slide bearing Continues on next pag...

Page 135: ... page 228 Standard toolkit Required consumables Note Article number Consumable Loctite 243 3HAB7116 1 Locking liquid Continues on next page Product manual IRB 365 135 3HAC079185 001 Revision A Copyright 2022 ABB All rights reserved 5 Repair 5 4 3 Replacing the telescopic shafts and shaft components Continued ...

Page 136: ...joint with mounting clamp 1 xx2100000754 Remove the attachment screw and pull off the telescope bearing housing 2 xx2100000755 Pull the upper and lower part of the telescopic arm apart 3 Loosen the two attachment screws on the tele scope bearing housing and pull the slide bearing out and replace 4 Continues on next page 136 Product manual IRB 365 3HAC079185 001 Revision A Copyright 2022 ABB All ri...

Page 137: ... 243 on the screws 1 10 Nm xx2100000773 Tighten the two attachment screws on the tele scope bearing housing Continues on next page Product manual IRB 365 137 3HAC079185 001 Revision A Copyright 2022 ABB All rights reserved 5 Repair 5 4 3 Replacing the telescopic shafts and shaft components Continued ...

Page 138: ...Add Loctite 243 on the screws 4 10 Nm xx2100000753 Fit the universal joint with mounting clamp to telescopic shaft with the two attachment screws and tighten Concluding procedure Note Action See Calibration information on page 199 Calibrate the robot 1 Continues on next page 138 Product manual IRB 365 3HAC079185 001 Revision A Copyright 2022 ABB All rights reserved 5 Repair 5 4 3 Replacing the tel...

Page 139: ...safety requirements are met when performing the first test run 2 Product manual IRB 365 139 3HAC079185 001 Revision A Copyright 2022 ABB All rights reserved 5 Repair 5 4 3 Replacing the telescopic shafts and shaft components Continued ...

Page 140: ... can be out of date See the latest spare parts of the IRB 365 via myABB Business Portal www abb com myABB Level Note Article number Spare part L1 3HAC080024 001 Delta unit with tele scope Required service parts Note Article number Consumable Loctite 243 3HAB7116 1 Locking liquid Continues on next page 140 Product manual IRB 365 3HAC079185 001 Revision A Copyright 2022 ABB All rights reserved 5 Rep...

Page 141: ...nto any specific position due to repair activity 1 Do not move the position of the upper arms during parallel arm replacement DANGER Turn off all electric power supply hydraulic pressure supply air pressure supply to the robot before entering the safeguarded space 2 Remove any loads or tools attached to the tilt arm 3 Removing the lower arm Note Action CAUTION Make sure that all supplies for elect...

Page 142: ...using the pliers either on the left side or the right side not both 3 Remove the lower arms 4 Removing the delta unit Note Action CAUTION Make sure that all supplies for electrical power are turned off 1 Place a hand to support the weight of the delta unit from below 2 Continues on next page 142 Product manual IRB 365 3HAC079185 001 Revision A Copyright 2022 ABB All rights reserved 5 Repair 5 4 4 ...

Page 143: ...0000206 Remove the delta unit from the telescopic shafts Note Use light force with mallet if necessary 5 Refitting the delta unit Use these procedures to refit the delta unit Refitting the delta unit Note Action 1 Continues on next page Product manual IRB 365 143 3HAC079185 001 Revision A Copyright 2022 ABB All rights reserved 5 Repair 5 4 4 Replacing the delta unit Continued ...

Page 144: ... motor shaft 4 and the attachment point for telescopic shaft axis 4 on the delta unit Note Do not tighten the mounting clamps screws before refitting the parallel arms 3 Tightening torque Refit the two attachment screws with washers for telescopic shaft axis 5 4 1 6 Nm xx2100000770 Continues on next page 144 Product manual IRB 365 3HAC079185 001 Revision A Copyright 2022 ABB All rights reserved 5 ...

Page 145: ...ers either on the left side or the right side not both 6 Concluding procedure Note Action See Calibration information on page 199 Calibrate the robot 1 DANGER Make sure all safety requirements are met when performing the first test run 2 Product manual IRB 365 145 3HAC079185 001 Revision A Copyright 2022 ABB All rights reserved 5 Repair 5 4 4 Replacing the delta unit Continued ...

Page 146: ...ted in the table can be out of date See the latest spare parts of the IRB 365 via myABB Business Portal www abb com myABB Level Note Article number Spare part L2 3HAC079970 001 Tilt arm stool L2 3HAC079969 001 Tilt arm parts Continues on next page 146 Product manual IRB 365 3HAC079185 001 Revision A Copyright 2022 ABB All rights reserved 5 Repair 5 4 5 Replacing the tilt arm ...

Page 147: ... the robot to an appropriate working position 1 DANGER Turn off all electric power supply hydraulic pressure supply air pressure supply to the robot before entering the safeguarded space 2 Removing the tilt arm Note Action CAUTION Make sure that all supplies for electrical power are turned off 1 Continues on next page Product manual IRB 365 147 3HAC079185 001 Revision A Copyright 2022 ABB All righ...

Page 148: ...the tilt arm parts from the through shaft 4 Refitting the tilt arm Use these procedures to refit the tilt arm Refitting the tilt arm Note Action Fit the both tilt arm parts on the through shaft 1 Continues on next page 148 Product manual IRB 365 3HAC079185 001 Revision A Copyright 2022 ABB All rights reserved 5 Repair 5 4 5 Replacing the tilt arm Continued ...

Page 149: ... Tightening torque 7 Nm xx2100000780 Add Loctite 243 to all screws Tighten the tilt arm part attachment screws 3 Concluding procedure Note Action See Calibration information on page 199 Calibrate the robot 1 Continues on next page Product manual IRB 365 149 3HAC079185 001 Revision A Copyright 2022 ABB All rights reserved 5 Repair 5 4 5 Replacing the tilt arm Continued ...

Page 150: ... Make sure all safety requirements are met when performing the first test run 2 150 Product manual IRB 365 3HAC079185 001 Revision A Copyright 2022 ABB All rights reserved 5 Repair 5 4 5 Replacing the tilt arm Continued ...

Page 151: ... spare parts of the IRB 365 via myABB Business Portal www abb com myABB Note Article number Spare part 3HAC079982 001 Rot AC Motor M105 1 w adapter Required tools and equipment Image Note Article number Equipment Content is defined in sec tion Standard toolkit on page 228 Standard toolkit Continues on next page Product manual IRB 365 151 3HAC079185 001 Revision A Copyright 2022 ABB All rights rese...

Page 152: ... all hydraulic pressure supply air pressure supply to the robot before entering the safeguarded space 2 Remove any loads or tools attached to the tilt arm on the head 3 Removing the motor Note Action WARNING Make sure that all supplies for hydraulic pressure and air pressure are turned off 1 WARNING To secure no accidental movement and engage ment of drive power set robot into manual mode and also...

Page 153: ...m by using the pliers either on the left side or the right side not both 4 Remove the parallel arms 5 xx2100000725 Remove motor cover and screw 6 xx2100000969 Remove the protection plug in adapter plate 7 Look into the hole in adapter plate 8 Continues on next page Product manual IRB 365 153 3HAC079185 001 Revision A Copyright 2022 ABB All rights reserved 5 Repair 5 5 1 Replacing the axis 1 axis 2...

Page 154: ...w to the hole in adapter plate 9 xx2100002382 Loosen the hex cap screw for motor shaft 10 WARNING Turn off all electric power supply 11 Continues on next page 154 Product manual IRB 365 3HAC079185 001 Revision A Copyright 2022 ABB All rights reserved 5 Repair 5 5 1 Replacing the axis 1 axis 2 and axis 3 motor Continued ...

Page 155: ...etter 14 Remove the two remaining screws and washers 15 CAUTION Whenever parting mating motor and gearbox the gears may be damaged if excessive force is used 16 xx1900001834 Remove the motor including the bracket by sliding it out on the guide pins and lift it off 17 Continues on next page Product manual IRB 365 155 3HAC079185 001 Revision A Copyright 2022 ABB All rights reserved 5 Repair 5 5 1 Re...

Page 156: ...wo attachment screws in the front 1 Refitting the motor Use these procedures to refit the motor axis 1 3 Refitting the motor Note Action DANGER Make sure that all supplies for electrical power hydraulic pressure and air pressure are turned off 1 Continues on next page 156 Product manual IRB 365 3HAC079185 001 Revision A Copyright 2022 ABB All rights reserved 5 Repair 5 5 1 Replacing the axis 1 axi...

Page 157: ...tor and gearbox the gears may be damaged if excessive force is used 5 Lift the motor and put it on the guide pins as close as possible to its final position without pushing the motor pinion into the gear Note Clean the mating surface with isopropanol 6 Fit the attachment screws and washers Tighten by hand Do not tighten with a torque yet 7 Continues on next page Product manual IRB 365 157 3HAC0791...

Page 158: ...ite 243 to all screws 9 17 Nm Tighten the four motor attachment screws xx2100000967 Connect the two cable connectors on motor 10 WARNING Turn on all electric power supply 11 Continues on next page 158 Product manual IRB 365 3HAC079185 001 Revision A Copyright 2022 ABB All rights reserved 5 Repair 5 5 1 Replacing the axis 1 axis 2 and axis 3 motor Continued ...

Page 159: ... clamp 13 xx2100000969 Refit the protection plug in adapter plate 14 xx2100000721 Refit the lower arms to the upper arms by using the pliers either on the left side or the right side not both Note Be careful not to damage the ball bearing cups 15 Repeat the procedure in the lower end of the lower arms on the delta unit 16 Continues on next page Product manual IRB 365 159 3HAC079185 001 Revision A ...

Page 160: ...ating motor and gearbox the gears may be damaged if excessive force is used 1 See Calibration information on page 199 Calibrate the robot 2 DANGER Make sure all safety requirements are met when performing the first test run 3 160 Product manual IRB 365 3HAC079185 001 Revision A Copyright 2022 ABB All rights reserved 5 Repair 5 5 1 Replacing the axis 1 axis 2 and axis 3 motor Continued ...

Page 161: ...hat are listed in the table can be out of date See the latest spare parts of the IRB 365 via myABB Business Portal www abb com myABB Note Article number Spare part 3HAC078682 001 Rot AC motor M104 w adapter Continues on next page Product manual IRB 365 161 3HAC079185 001 Revision A Copyright 2022 ABB All rights reserved 5 Repair 5 5 2 Replacing the axis 4 and axis 5 motor ...

Page 162: ...off all hydraulic pressure supply air pressure supply to the robot before entering the safeguarded space 2 Remove any loads or tools attached to the tilt arm on the head 3 Removing the motor Note Action WARNING Turn off all hydraulic pressure supply air pressure supply to the robot before entering the safeguarded space 1 WARNING To secure no accidental movement and engage ment of drive power set r...

Page 163: ...x cap screw to the hole in adapter plate Push the brake release button to release telescop ic arm 4 WARNING Turn off all electric power supply 5 Continues on next page Product manual IRB 365 163 3HAC079185 001 Revision A Copyright 2022 ABB All rights reserved 5 Repair 5 5 2 Replacing the axis 4 and axis 5 motor Continued ...

Page 164: ...0000212 Disconnect the white connector and the yellow connector on the motor top 8 Remove the two screws and remove the cover with cable glands 9 Continues on next page 164 Product manual IRB 365 3HAC079185 001 Revision A Copyright 2022 ABB All rights reserved 5 Repair 5 5 2 Replacing the axis 4 and axis 5 motor Continued ...

Page 165: ...th isopropanol Use a lint free cloth 10 xx2000001082 Remove the four attachment screws with washers 11 xx2000001084 Fit guide pins in opposite holes 12 Continues on next page Product manual IRB 365 165 3HAC079185 001 Revision A Copyright 2022 ABB All rights reserved 5 Repair 5 5 2 Replacing the axis 4 and axis 5 motor Continued ...

Page 166: ...r 15 Refitting the motor Use these procedures to refit the motor axis 4 and 5 Refitting the motor Note Action DANGER Make sure that all supplies for electrical power hydraulic pressure and air pressure are turned off 1 Note Clean the mating surface with isopropanol 2 Continues on next page 166 Product manual IRB 365 3HAC079185 001 Revision A Copyright 2022 ABB All rights reserved 5 Repair 5 5 2 Re...

Page 167: ...r attachment holes 4 xx2000001083 Lift the motor into the base Note Clean the mating surface with isopropanol 5 Tightening torque Add Loctite 243 to all screws 6 7 Nm xx2100001421 Secure the unit with attachment screws and washers Continues on next page Product manual IRB 365 167 3HAC079185 001 Revision A Copyright 2022 ABB All rights reserved 5 Repair 5 5 2 Replacing the axis 4 and axis 5 motor C...

Page 168: ...connection box and the M6 screws 9 12 Nm xx2100002700 3 5 Nm xx2100001419 Refit the cover with cable glands and the two M5 screws 10 Continues on next page 168 Product manual IRB 365 3HAC079185 001 Revision A Copyright 2022 ABB All rights reserved 5 Repair 5 5 2 Replacing the axis 4 and axis 5 motor Continued ...

Page 169: ...vement parts 11 Tightening torque 6 Nm xx2100001418 Refit the motor cover and M5 screws 12 WARNING Turn on all electric power supply 13 Continues on next page Product manual IRB 365 169 3HAC079185 001 Revision A Copyright 2022 ABB All rights reserved 5 Repair 5 5 2 Replacing the axis 4 and axis 5 motor Continued ...

Page 170: ...See tightening torque on the mounting clamp 15 xx2100002706 Refit the protection plug in adapter plate 16 Concluding procedure Note Action CAUTION Whenever parting mating motor and gearbox the gears may be damaged if excessive force is used 1 See Calibration information on page 199 Calibrate the robot 2 Continues on next page 170 Product manual IRB 365 3HAC079185 001 Revision A Copyright 2022 ABB ...

Page 171: ...ure all safety requirements are met when performing the first test run 3 Product manual IRB 365 171 3HAC079185 001 Revision A Copyright 2022 ABB All rights reserved 5 Repair 5 5 2 Replacing the axis 4 and axis 5 motor Continued ...

Page 172: ...rt numbers that are listed in the table can be out of date See the latest spare parts of the IRB 365 via myABB Business Portal www abb com myABB Note Article number Spare part 3HAC080023 001 Gear unit Continues on next page 172 Product manual IRB 365 3HAC079185 001 Revision A Copyright 2022 ABB All rights reserved 5 Repair 5 5 3 Replacing the axis 1 axis 2 and axis 3 gear unit ...

Page 173: ...ific position due to repair activity 1 WARNING Turn off all hydraulic pressure supply air pressure supply to the robot before entering the safeguarded space 2 Remove any loads or tools attached to the tilt arm on the head 3 Removing the motor Note Action WARNING Make sure that all supplies for hydraulic pressure and air pressure are turned off 1 WARNING To secure no accidental movement and engage ...

Page 174: ...by using the pliers either on the left side or the right side not both 4 Remove the parallel arms 5 xx2100000725 Remove motor cover and screw 6 xx2100000969 Remove the protection plug in adapter plate 7 Look into the hole in adapter plate 8 Continues on next page 174 Product manual IRB 365 3HAC079185 001 Revision A Copyright 2022 ABB All rights reserved 5 Repair 5 5 3 Replacing the axis 1 axis 2 a...

Page 175: ...to the hole in adapter plate 9 xx2100002382 Loosen the hex cap screw for motor shaft 10 WARNING Turn off all electric power supply 11 Continues on next page Product manual IRB 365 175 3HAC079185 001 Revision A Copyright 2022 ABB All rights reserved 5 Repair 5 5 3 Replacing the axis 1 axis 2 and axis 3 gear unit Continued ...

Page 176: ...ter 14 Remove the two remaining screws and washers 15 CAUTION Whenever parting mating motor and gearbox the gears may be damaged if excessive force is used 16 xx1900001834 Remove the motor including the bracket by sliding it out on the guide pins and lift it off 17 Continues on next page 176 Product manual IRB 365 3HAC079185 001 Revision A Copyright 2022 ABB All rights reserved 5 Repair 5 5 3 Repl...

Page 177: ...ash ers and remove the gear unit 3 Refitting the gear unit Use these procedures to refit the gear unit Refitting the gear unit Note Action DANGER Make sure that all supplies for electrical power hydraulic pressure and air pressure are turned off 1 Continues on next page Product manual IRB 365 177 3HAC079185 001 Revision A Copyright 2022 ABB All rights reserved 5 Repair 5 5 3 Replacing the axis 1 a...

Page 178: ...washers 3 Add Loctite 243 to the four attachment screws 4 Tightening torque Refit the adapter plate and tighten the four attach ment screws with washers 5 4 55 Nm xx2100001428 Continues on next page 178 Product manual IRB 365 3HAC079185 001 Revision A Copyright 2022 ABB All rights reserved 5 Repair 5 5 3 Replacing the axis 1 axis 2 and axis 3 gear unit Continued ...

Page 179: ...ach other 7 Refitting the motor Note Action DANGER Make sure that all supplies for electrical power hydraulic pressure and air pressure are turned off 1 Note Clean the mating surface with isopropanol 2 Continues on next page Product manual IRB 365 179 3HAC079185 001 Revision A Copyright 2022 ABB All rights reserved 5 Repair 5 5 3 Replacing the axis 1 axis 2 and axis 3 gear unit Continued ...

Page 180: ...may be damaged if excessive force is used 5 Lift the motor and put it on the guide pins as close as possible to its final position without pushing the motor pinion into the gear Note Clean the mating surface with isopropanol 6 Fit the attachment screws and washers Tighten by hand Do not tighten with a torque yet 7 Continues on next page 180 Product manual IRB 365 3HAC079185 001 Revision A Copyrigh...

Page 181: ...e 243 to all screws 9 17 Nm Tighten the four motor attachment screws xx2100000967 Connect the two cable connectors on motor 10 WARNING Turn on all electric power supply 11 Continues on next page Product manual IRB 365 181 3HAC079185 001 Revision A Copyright 2022 ABB All rights reserved 5 Repair 5 5 3 Replacing the axis 1 axis 2 and axis 3 gear unit Continued ...

Page 182: ...lamp 13 xx2100000969 Refit the protection plug in adapter plate 14 xx2100000721 Refit the lower arms to the upper arms by using the pliers either on the left side or the right side not both Note Be careful not to damage the ball bearing cups 15 Repeat the procedure in the lower end of the lower arms on the delta unit 16 Continues on next page 182 Product manual IRB 365 3HAC079185 001 Revision A Co...

Page 183: ...ing motor and gearbox the gears may be damaged if excessive force is used 1 See Calibration information on page 199 Calibrate the robot 2 DANGER Make sure all safety requirements are met when performing the first test run 3 Product manual IRB 365 183 3HAC079185 001 Revision A Copyright 2022 ABB All rights reserved 5 Repair 5 5 3 Replacing the axis 1 axis 2 and axis 3 gear unit Continued ...

Page 184: ...art numbers that are listed in the table can be out of date See the latest spare parts of the IRB 365 via myABB Business Portal www abb com myABB Note Article number Spare part 3HAC080023 001 Gear unit Continues on next page 184 Product manual IRB 365 3HAC079185 001 Revision A Copyright 2022 ABB All rights reserved 5 Repair 5 5 4 Replacing the axis 4 and axis 5 gear unit ...

Page 185: ...ogged into any specific position due to repair activity 1 WARNING Turn off all hydraulic pressure supply air pressure supply to the robot before entering the safeguarded space 2 Remove any loads or tools attached to the tilt arm on the head 3 Loosen the upper mounting clamps for telescopic shaft Note Action WARNING Make sure that all supplies for hydraulic pressure and air pressure are turned off ...

Page 186: ...emove the center base cover 3 xx2100000729 Loosen the two attachment screws on the mounting clamp in the upper end of the telescopic shaft 4 Removing the motor Note Action 1 Continues on next page 186 Product manual IRB 365 3HAC079185 001 Revision A Copyright 2022 ABB All rights reserved 5 Repair 5 5 4 Replacing the axis 4 and axis 5 gear unit Continued ...

Page 187: ...stop on the FlexPendant 2 xx2100002706 Remove the protection plug in adapter plate 3 xx2100002687 Rotate telescopic arm to align the hex cap screw to the hole in adapter plate Push the brake release button to release telescop ic arm 4 WARNING Turn off all electric power supply 5 Continues on next page Product manual IRB 365 187 3HAC079185 001 Revision A Copyright 2022 ABB All rights reserved 5 Rep...

Page 188: ...00212 Disconnect the white connector and the yellow connector on the motor top 8 Remove the two screws and remove the cover with cable glands 9 Continues on next page 188 Product manual IRB 365 3HAC079185 001 Revision A Copyright 2022 ABB All rights reserved 5 Repair 5 5 4 Replacing the axis 4 and axis 5 gear unit Continued ...

Page 189: ... isopropanol Use a lint free cloth 10 xx2000001082 Remove the four attachment screws with washers 11 xx2000001084 Fit guide pins in opposite holes 12 Continues on next page Product manual IRB 365 189 3HAC079185 001 Revision A Copyright 2022 ABB All rights reserved 5 Repair 5 5 4 Replacing the axis 4 and axis 5 gear unit Continued ...

Page 190: ...ve force is used 13 xx2000001083 Use caution and lift the motor straight up to get the pinion parted from the gear 14 Continues on next page 190 Product manual IRB 365 3HAC079185 001 Revision A Copyright 2022 ABB All rights reserved 5 Repair 5 5 4 Replacing the axis 4 and axis 5 gear unit Continued ...

Page 191: ... unit Refitting the gear unit Note Action DANGER Make sure that all supplies for electrical power hydraulic pressure and air pressure are turned off 1 Add Loctite 243 to the four attachment screws 2 Continues on next page Product manual IRB 365 191 3HAC079185 001 Revision A Copyright 2022 ABB All rights reserved 5 Repair 5 5 4 Replacing the axis 4 and axis 5 gear unit Continued ...

Page 192: ...escopic shaft Note Action Tightening torque Refit the mounting clamp in the upper end of the telescopic shaft and tighten the two attachment screws 1 10 Nm xx2100000729 Continues on next page 192 Product manual IRB 365 3HAC079185 001 Revision A Copyright 2022 ABB All rights reserved 5 Repair 5 5 4 Replacing the axis 4 and axis 5 gear unit Continued ...

Page 193: ...rface with isopropanol 2 xx2100001422 Refit the motor The recess on the top of the motor must be oppos ite oriented from protection plug at the adapter 3 xx2000001088 If not already fitted fit two guide pins to the motor attachment holes 4 Continues on next page Product manual IRB 365 193 3HAC079185 001 Revision A Copyright 2022 ABB All rights reserved 5 Repair 5 5 4 Replacing the axis 4 and axis ...

Page 194: ...e the unit with attachment screws and washers Clean with isopropanol 7 Add transclear into the groove for the o ring 8 Tightening torque Refit connection box and the M6 screws 9 12 Nm xx2100002700 Continues on next page 194 Product manual IRB 365 3HAC079185 001 Revision A Copyright 2022 ABB All rights reserved 5 Repair 5 5 4 Replacing the axis 4 and axis 5 gear unit Continued ...

Page 195: ...ctor The cables must not interfere movement parts 11 Tightening torque 6 Nm xx2100001418 Refit the motor cover and M5 screws 12 WARNING Turn on all electric power supply 13 Continues on next page Product manual IRB 365 195 3HAC079185 001 Revision A Copyright 2022 ABB All rights reserved 5 Repair 5 5 4 Replacing the axis 4 and axis 5 gear unit Continued ...

Page 196: ...e tightening torque on the mounting clamp 15 xx2100002706 Refit the protection plug in adapter plate 16 Concluding procedure Note Action CAUTION Whenever parting mating motor and gearbox the gears may be damaged if excessive force is used 1 See Calibration information on page 199 Calibrate the robot 2 Continues on next page 196 Product manual IRB 365 3HAC079185 001 Revision A Copyright 2022 ABB Al...

Page 197: ...e all safety requirements are met when performing the first test run 3 Product manual IRB 365 197 3HAC079185 001 Revision A Copyright 2022 ABB All rights reserved 5 Repair 5 5 4 Replacing the axis 4 and axis 5 gear unit Continued ...

Page 198: ...This page is intentionally left blank ...

Page 199: ...ost If the revolution counter memory is lost the counters must be updated See Updating revolution counters on OmniCore robots on page 210 This will occur when The battery is discharged A resolver error occurs The signal between a resolver and measurement board is interrupted A robot axis is moved with the control system disconnected The revolution counters must also be updated after the robot and ...

Page 200: ...enerates a new zero posi tion of the robot Fine calibration A calibration routine that in the first step generates a reference to current zero position of the robot The same calibration routine can later on be used to re calibrate the robot back to the same position as when the reference was stored Reference calibration This routine is more flexible compared to fine calib ration and is used when t...

Page 201: ...can be performed after a gearbox or an upper arm has been replaced to ensure en hanced robot arm accuracy than when perform ing standard calibration Factory reset alters the robot s unique production settings for axis 1 3 Factory reset To perform tool calibration the lower arms must first be removed from the robot The up per arms must then be positioned horizontally so that the calibration tool ca...

Page 202: ...n method gives a better nominal kinematics and the modified cal_positions will help to get back to the same points when calibrating with Standard calibration 202 Product manual IRB 365 3HAC079185 001 Revision A Copyright 2022 ABB All rights reserved 6 Calibration information 6 3 Calibration method Continued ...

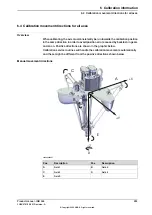
Page 203: ... the graphic below Calibration service routines will handle the calibration movements automatically and these might be different from the positive directions shown below Manual movement directions D X Y Z A B C E xx2200000237 Description Pos Description Pos Axis 2 B Axis 1 A Axis 4 D Axis 3 C Axis 5 E Product manual IRB 365 203 3HAC079185 001 Revision A Copyright 2022 ABB All rights reserved 6 Cal...

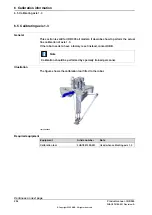
Page 204: ...bration should be performed by specially trained personnel Illustration The figure shows the calibration tool fitted to the robot xx2100002603 Required equipment Note Article number Equipment Used when calibrating axis 1 3 3HAC081390 001 Calibration tool Continues on next page 204 Product manual IRB 365 3HAC079185 001 Revision A Copyright 2022 ABB All rights reserved 6 Calibration information 6 5 ...

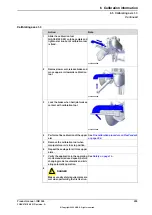
Page 205: ...nt on page 208 Perform a fine calibration of the upper arm 4 Remove the calibration tool when manipulator arm is in zero position 5 Repeat these steps for all three upper arms 6 See Safety on page 15 Verify the application in the operating mode manual reduced speed before changing mode to automatic and initi ating automatic operation 7 DANGER Make sure all safety requirements are met when performi...

Page 206: ...rained personnel Note When calibrating axis 4 and 5 both axis 4 and 5 are calibrated simultaneously Illustration The figure shows the calibration tool fitted to the robot xx2200000017 Required equipment Note Article number Equipment Used when calibrating axis 4 5 3HAC081391 001 Calibration tool Continues on next page 206 Product manual IRB 365 3HAC079185 001 Revision A Copyright 2022 ABB All right...

Page 207: ...on page 208 Perform a fine calibration of the tilt arm 3 Remove the calibration tool when manipulator tilt arm is in zero position 4 See Safety on page 15 Verify the application in the operating mode manual reduced speed before changing mode to automatic and initi ating automatic operation 5 DANGER Make sure all safety requirements are met when performing the first test run 6 Product manual IRB 36...

Page 208: ... and make sure that all the notches are matched Note Action On the start screen tap Calibrate 1 Select Calibration from the menu 2 The Mechanical Units page displays a list of available mechanical units Note This step is required only if you are not already in the Mechanical Unit page when you open Cal ibrate Note The Mechanical Unit page is displayed only if there are more than one mechanical uni...

Page 209: ...alibrated 7 Tap Calibrate 8 A dialog box is displayed warning that calibration of the selected axes will be changed which cannot be undone Tap Calibrate to proceed Tap Cancel to cancel Tapping Calibrate results in briefly displaying a dialog box announcing that the calibration pro cess has started The axis is calibrated and the system returns to the list of available mechanical units Tap OK 9 The ...

Page 210: ...d to be updated 3 The calibration summary page for the selected mechanical unit is displayed 4 Calibration method used at factory for each axis is shown as well as calibration method used during last field calibration Tap Calibration Methods on the right pane 5 The calibration options are displayed Tap Revolution Counters 6 In the Selection column select the axes for which revolution counters need...

Page 211: ...ed and correctly fitted 2 Replace one thing at a time 3 Do not replace units randomly 4 Make sure that there are no loose screws turnings or other unexpected parts remaining after work has been performed 5 When the work is completed verify that the safety functions are working as intended Keep a track of history Make a historical fault log to keep track of problems over time Consult those working ...

Page 212: ...tibilities between hardware and software options and their configuration The robot recently had a software upgrade Check connections software versions The robot has recently been moved from one site to another an already working robot 212 Product manual IRB 365 3HAC079185 001 Revision A Copyright 2022 ABB All rights reserved 7 Troubleshooting 7 1 Introduction to troubleshooting Continued ...

Page 213: ... parts If the noise is emitted from a gearbox the following can also apply Overheating Recommended actions The following actions are recommended Information Action CAUTION Allow hot parts to cool down 1 Verify that the service is done according to the maintenance schedule 2 If a bearing is emitting the noise determine which one and make sure that it has suffi cient lubrication 3 If possible disass...

Page 214: ...rounding equipment Possible causes The symptom can be caused by Faulty brake Faulty power supply to the brake Recommended actions The following actions are recommended Information Action Determine which motor s causes the robot to collapse 1 See the circuit diagram Check the brake power supply to the col lapsing motor during the Motors OFF state 2 If found faulty the motor must be replaced as a co...

Page 215: ...caused by Robot colliding with external equipment in the programmed path e g a conveyor belt Recommended actions The following actions are recommended Information Action Attempt to jog the robot out of stuck position 1 Attempt to release the robot from stuck position with brake release 2 Attempt to reverse or disengage the mechanism in which the manipulator is stuck 3 If step 1 3 has been performe...

Page 216: ...This page is intentionally left blank ...

Page 217: ...ordance with the current legislation of the country in which the robot and the control unit are installed If the robot or the control unit is partially or completely disposed of the various parts must be grouped together according to their nature which is all iron together and all plastic together and disposed of accordingly These parts must also be disposed of in accordance with the current legis...

Page 218: ...ble specifies some of the materials in the product and their respective use throughout the product Dispose components properly according to local regulations to prevent health or environmental hazards Example application Material Base structure upper arms tilt arm gear housing motors connection box cable harness Aluminium Serial measurement board Batteries Lithium Cast iron nodular iron Cables mot...

Page 219: ...f oil and grease near lakes ponds ditches down drains or onto soil Incineration must be carried out under controlled conditions in accordance with local regulations Also note that Spills can form a film on water surfaces causing damage to organisms Oxygen transfer could also be impaired Spillage can penetrate the soil causing ground water contamination Product manual IRB 365 219 3HAC079185 001 Rev...

Page 220: ...orch it will explode Always remove all oil grease in gearboxes If exposed to heat for example from a blow torch the oil grease will catch fire When motors are removed from the robot the robot will collapse if it is not properly supported before the motor is removed A used robot does not have the same performance as on delivery Springs brakes bearings and other parts might be worn or broken 220 Pro...

Page 221: ...chapter includes general information complementing the more specific information in the different procedures in the manual Product manual IRB 365 221 3HAC079185 001 Revision A Copyright 2022 ABB All rights reserved 9 Reference information 9 1 Introduction ...

Page 222: ...eral requirements normative reference from ISO 10218 1 IEC 60204 Electromagnetic compatibility EMC Part 6 2 Generic standards Immunity standard for industrial environments IEC 61000 6 2 Electromagnetic compatibility EMC Part 6 4 Generic standards Emission standard for industrial environments IEC 61000 6 4 Safety of machinery Safety related parts of control systems Part 1 General principles for des...

Page 223: ...ty 39 37 in 3 28 ft 1 m Length 2 21 lb 1 kg Weight 0 035 ounces 1 g Weight 14 5 psi 100 kPa 1 bar Pressure 0 225 lbf 1 N Force 0 738 lbf ft 1 Nm Moment 0 264 US gal 1 L Volume Product manual IRB 365 223 3HAC079185 001 Revision A Copyright 2022 ABB All rights reserved 9 Reference information 9 3 Unit conversion ...

Page 224: ...en handling screws treated with Gleitmo protective gloves of nitrile rubber type should be used Generally screws are lubricated with Gleitmo 603 mixed with Geomet 500 or Geomet 702 in proportion 1 3 Geomet thickness varies according to screw dimensions refer to the following Geomet thickness Lubricant Dimension 3 5 μm Gleitmo 603 Geomet 500 M6 M20 any length except M20x60 3 5 μm Gleitmo 603 Geomet...

Page 225: ...ecified value is 10 Oil lubricated screws with slotted or cross recess head screws The following table specifies the recommended standard tightening torque for oil lubricated screws with slotted or cross recess head screws Note A special torque specified in the repair maintenance or installation procedure overrides the standard torque Oil lubricated screws with allen head screws The following tabl...

Page 226: ...Molycote 1000 Gleitmo 603 or equivalent with allen head screws Note A special torque specified in the repair maintenance or installation procedure overrides the standard torque Tightening torque Nm Class 12 9 lubricated i Tightening torque Nm Class 10 9 lubricated i Dimension 35 28 M8 70 55 M10 120 96 M12 300 235 M16 550 460 M20 950 790 M24 i Lubricated with Molycote 1000 Gleitmo 603 or equivalent...

Page 227: ...accessory when handling components with a weight exceeding 22 kg A wide range of lifting accessories and devices are available for each manipulator model Example Following is an example of a weight specification in a procedure Note Action CAUTION The arm weighs 25 kg All lifting accessories used must be sized accord ingly Product manual IRB 365 227 3HAC079185 001 Revision A Copyright 2022 ABB All ...

Page 228: ...toolkit Rem Tool Qty Ring open end spanner 8 19 mm 1 Socket head cap 2 5 17 mm 1 Torx socket no 20 60 1 Box spanner set 1 Torque wrench 10 100 Nm 1 Torque wrench 75 400 Nm 1 Ratchet head for torque wrench 1 2 1 Hexagon headed screw M10x100 2 Hexagon headed screw M16x90 1 Hex bit socket head cap no 14 socket 40 mm L 100 mm 1 To be shortened to 12 mm Hex bit socket head cap no 14 socket 40 mm L 20 m...

Page 229: ... toolkit on page 228 and of special tools listed directly in the instructions and also gathered in this section Special tools Note If the replacing procedure is not listed in the table below only standard tools are needed for the procedure Continues on next page Product manual IRB 365 229 3HAC079185 001 Revision A Copyright 2022 ABB All rights reserved 9 Reference information 9 7 Special tools ...

Page 230: ... ordered from ABB Removal tools 1 xx0700000555 Used to push the parallel arms apart 3HAC6194 1 Pliers for parallel arms Continues on next page 230 Product manual IRB 365 3HAC079185 001 Revision A Copyright 2022 ABB All rights reserved 9 Reference information 9 7 Special tools ...

Page 231: ...piece of lifting accessories is not detailed in the activity procedure but in the instruction delivered with each piece of lifting accessories The instructions delivered with the lifting accessories should be stored for later reference Product manual IRB 365 231 3HAC079185 001 Revision A Copyright 2022 ABB All rights reserved 9 Reference information 9 8 Lifting accessories and lifting instructions...

Page 232: ...This page is intentionally left blank ...

Page 233: ...al but delivered as a separate document for registered users on myABB Business Portal www abb com myABB Tip All documents can be found via myABB Business Portal www abb com myABB Product manual IRB 365 233 3HAC079185 001 Revision A Copyright 2022 ABB All rights reserved 10 Spare part lists 10 1 Spare part lists and illustrations ...

Page 234: ...This page is intentionally left blank ...

Page 235: ...t updating revolution counters 210 foundation requirements 38 free space above robot 46 G grease 30 disposal 218 H hanging installed hanging 26 hazard levels 17 hazardous material 218 height installed at a height 26 hot gearbox oil 213 hot surfaces 30 HRA 26 humidity operation 39 storage 38 I inspecting Inspecting the lower arms 88 Inspecting the lower arms inspecting 88 Inspecting the telescopic ...

Page 236: ...ng 111 Replacing the telescopic shafts and shaft components replacing 128 Replacing the tilt arm replacing 146 Replacing the upper arms replacing 122 report replacements 97 requirements on foundation 38 responsibility and validity 15 revolution counters storing on FlexPendant 210 updating 210 risk of burns 30 robot dimension 65 labels 19 protection class 39 protection types 39 symbols 19 technical...

Page 237: ...V validity and responsibility 15 velocity adjusting 64 W weight 37 base unit 52 working range robot 40 Product manual IRB 365 237 3HAC079185 001 Revision A Copyright 2022 ABB All rights reserved Index ...

Page 238: ......

Page 239: ......
Page 240: ... 47 22 87 2000 ABB Engineering Shanghai Ltd Robotics Discrete Automation No 4528 Kangxin Highway PuDong New District SHANGHAI 201319 China Telephone 86 21 6105 6666 ABB Inc Robotics Discrete Automation 1250 Brown Road Auburn Hills MI 48326 USA Telephone 1 248 391 9000 abb com robotics 3HAC079185 001 Rev A en Copyright 2022 ABB All rights reserved Specifications subject to change without notice ...

Reviews: