


11
G
B
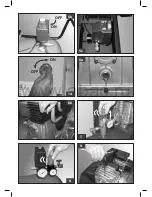
operating on the knob with the valve open (pulling it up and turning it in a
clockwise direction to increase pressure and counterclockwise to reduce
this) (
fig. 7
). Once you have set the value required, push the knob down to
lock it.
• The value set can be checked on the gauge (for versions equipped with
this,
fig. 8
).
•
Please check that the air consumption and the maximum working
pressure of the pneumatic tool to be used are compatible with the
pressure set on the pressure regulator and with the amount of air
supplied by the compressor
.
• When you have finished working, stop the machine, pull out the plug and
empty the reservoir.
MAINTENANCE
3
• The service life of the machine depends on maintenance quality.
•
PRIOR TO ANY OPERATION SET THE PRESSURE SWITCH TO THE
OFF POSITION, PULL OUT THE PLUG AND COMPLETELY DRAIN THE
RESERVOIR.
• Check that all screws (in particular those of the head of the unit) are
tightly drawn up (
fig. 9
). The check must be carried out prior to the first
compressor starting.
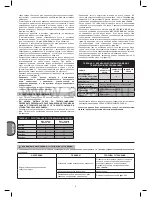
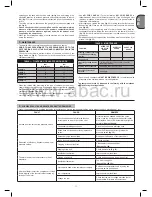
TABLE 1 – TIGHTENING OF HEAD TENSION RODS
Nm
Min. torque
Nm
Max. torque
Screw M6
9
11
Screw M8
22
27
Screw M10
45
55
Screw M12
76
93
Screw M14
121
148
• Clean the suction filter according to the type of environment and in any
case at least every 100 hours. If necessary, replace the filter (a clogged
filter impairs efficiency while an inefficient filter causes harsher wear on the
compressor
(figures 10a - 10b)
.
• Change the oil after the first 100 hours of operation and subsequently
every 300 hours. Check the oil level periodically.
• Use
API CC/SC SAE 40
. (For cold climates,
API CC/SC SAE 20
is
recommended). Never mix different grade oils. If the oil changes color
(whitish = presence of water; dark = overheated), it is good practice to
replace the oil immediately.
• After topping up, tighten the plug (
fig. 11
) making sure that there are no
leaks during use. Once a week, check the oil level to assure lubrication in
time (
fig. 6a
).
• Periodically (or after completing work if for more than an hour), drain the
condensate that forms inside the reservoir due to the humidity in the air
(
fig. 12
) in order to protect the reservoir from rust and so as not to restrict
its capacity.
• Periodically, check the tension of the belts which must have a flexion (f) of
around 1 cm (
fig. 13
).
*
Spent oil and condensate
MUST BE DISPOSED OF
in compliance with
protection of the environment and current legislation.
The compressor must be disposed in conformity with the methods
provided for by local regulations
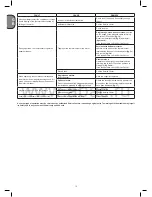
POSSIBLE FAULTS AND RELATED PERMITTED REMEDIES
4
Request the assistance of a qualified electrician for operations on electric components (cables, motor, pressure switch, electric panel, etc).
FAULT
CAUSE
REMEDY
Air leak from the valve of the pressure switch.
Check valve does not perform its function
correctly due to wear or dirt on the seal.
Unscrew the hex-shaped head of the check
valve, clean the housing and the special rubber
disk (replace if worn). Re-assembler and tighten
carefully (
figures 14a-14b
).
Condensate drainage cock open.
Close the Condensate drainage cock.
Rilsan hose not inserted correctly in pressure
switch.
Insert the Rilsan hose correctly inside the
pressure switch
(fig. 15)
.
Reduction of efficiency, frequent start-up. Low
pressure values.
Excessively high consumption.
Decrease the demand of compressed air.
Leaks from joints and/or pipes.
Change gaskets.
Clogging of the suction filter.
Clean/replace the suction filter
(
figures 10a-10b
).
Slipping of the belt.
Check belt tension
(fig. 13).
The motor and/or the compressor overheat
irregularly.
Insufficient ventilation.
Improve ambient conditions.
Closing of air ducts.
Check and if necessary clean the air filter.
Insufficient lubrication.
Top up or change oil
(
figures 16a-16b-16c
).
After an attempt to start the compressor, it stops
due to tripping of the thermal cutout caused by
forcing of the motor.
Start-up with head of the compressor charged.
Release the compressor head by using the
pressure switch push button.
Low temperature.
Improve ambient conditions.
Voltage too low.
Check that the mains voltage matches that of
the dataplate. Eliminate any extensions.
TABLE 2 – MAINTENANCE
FUNCTION
AFTER THE
FIRST 100
HOURS
EVERY 100
HOURS
EVERY 300
HOURS
Cleaning of intake filter and/
or substitution of filtering
element
•
Change of oil*
•
•
Tightening of head tension
rods
The check must be carried out prior to the first
compressor starting.
Draining tank condensate
Periodically and at the end of work
Checking the tension of
the belts
Periodically
www.abac.ru