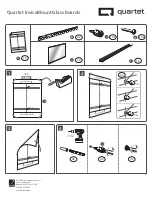
H-2
L
6mm
H-1
5mm
D
B
A
K
6
Page 1: ...T78CPM8610101B v1...
Page 2: ...tions Caution EN 1 Veuillez lire enti rement ce manuel et en suivre attentivement les instructions avant l installation 2 Le fabricant ne sera tenu l galement responsable d aucun dommage l quipement o...
Page 3: ...nte se reserva el derecho de cambiar el dise o sin previo aviso 10 Consulte el manual en ingl s si tiene alguna duda acerca de las condiciones ES 2 F F F F PL Ostrze enie 1 Aby zapewni bezpiecze stwo...
Page 4: ...3 4 5 6 7 8 2 9 10 F F F F 1 Per garantire la sicurezza leggere attentamente questo manuale prima di effettuare l installazione e seguire le istruzioni qui contenute Conservare questo manuale in un l...
Page 5: ...e Werkzeuge Herramientas necesarias Ferramentas necess rias Potrzebne narz dzia Strumenti necessari Verktyg som kr vs Enclosed Parts 6 mm 5 mm A 1 A 2 B D E F G H 1 H 2 N P Q S 1 S 2 4 I OR C 2 J M L...
Page 6: ...t Height Adjust Range Model Name Model 1 2 3 4 M4 M5 M6 M8 Mounting pattern Screw Type Material Dimension 0 90 0 or 90 500mm 19 69 80 Model 1 Model 2 Model 3 Model 4 120 kg 264 55 lbs 800mmX600mm W131...
Page 7: ...H 2 L 6mm H 1 5mm D B A K 6...
Page 8: ...Q N Remote Controller Holder S 1 S 2 OR 7 H 1 I I B 1 5mm Model 3 Model 4 B 2 A Model 1 Model 2...
Page 9: ...F C G M Make sure mount bracket being upright before display to be installed 8...
Page 10: ...If tray module available If tray module available 5mm 5mm Model 1 Model 3 only Model 1 Model 3 only J 9 2 4mm 1 J 3 Tighten 4 E Hook...
Page 11: ...the Setting of the DIP SWITCH is the same as the PIN code showing on the PIN code sticker RF Remote Control Setting 2 The PIN code can be also found out on the control box 2 1 ON 1 2 3 4 5 6 ECE Remot...
Page 12: ...fuse box Connect the power cord Repeat Step 3 to see if all moves normal Specs on Fuse Voltage 10A Length 20 mm 5 Make sure designated trouble shooting has to be conducted by qualified technician Sha...