background image

Configuring The Controller

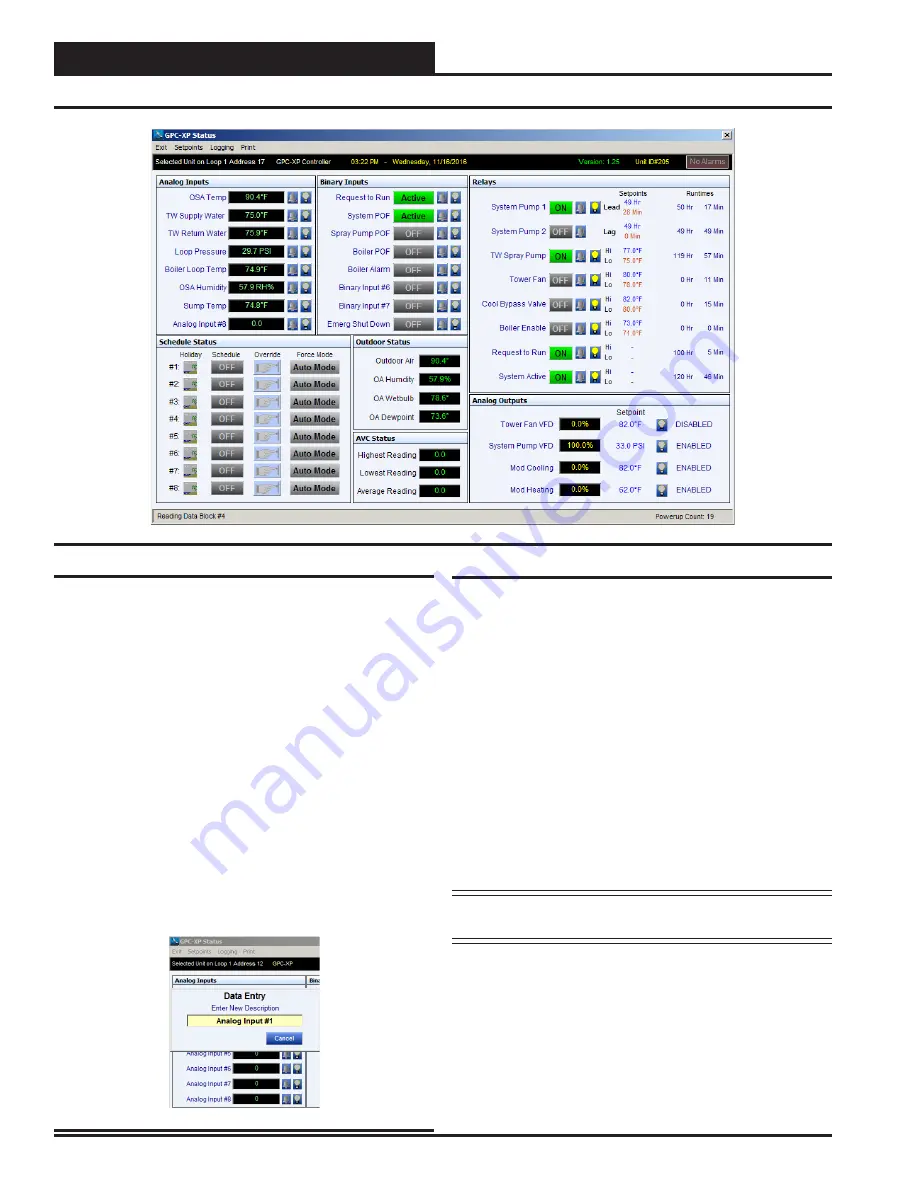
Figure 8: GPC-XP Status Screen

Status Screen  

Figure 8

 shows a typical GPC-XP status screen after being configured 

for use as a Central Plant Controller. To create a description for an 

input “double click” on any of the existing descriptions to change to an 

appropriate description for the Central Plant Controller input or output 

you selected. A popup window will appear allowing you to change the 

description as needed. See 

Figure 9

.

For Analog Input #1 change the description to “Outdoor Air Tempera-

ture” and hit the “Enter” key as shown above.

If you have a Supply Water Temperature sensor enter it as the Analog 

Input #2 with its description. If you have a Return Water Temperature 

sensor enter it as Analog Input #3 with its description. If you have a Dif-

ferential Pressure Sensor enter it  as the Analog Input #4 with its descrip-

tion. Enter a description for any other input sensors you have in the rest 

of the remaining input description areas. At the very minimum you will 

need to create Analog Inputs for OA Temperature and Return or Supply 

Water Temperature in order to control the equipment on your Central 

Plant system. Other inputs may be required for your specific project.

NOTE:

   Be sure to hit “Enter” after each description is changed 

or the change will not occur.

The configuration and setpoints can also be reached from the ‘Status 

Screen” by double clicking the data display box to the right of the de-

scription area. Once configured and the system is communicating this 

box will contain the current value of the input you have entered. “Double 

click” the data box next to the “Outdoor Air Temperature” description 

to open the configuration and setpoint screen for AIN1.

General  

Using the GPC-XP as a Water Source Heat Pump Loop Controller 

requires that it be configured for your application. The information that 

follows will show you how to configure a GPC-XP controller for a typical 

Central Plant Loop Controller application. If you want to start with the 

typical setpoints we have used in this manual as a starting point you can 

enter them by hand or you can download and install a pre-configured 

setup screen and setpoints used in these examples if you wish. 

To download the typical WSHP Loop controller setup screen go to the 

Auto-Zone 2 Controls web site at www.az2controls.com. Click on the 

software tab at the top of the web page. Scroll to the bottom of the web 

page and find the listing “

GPC-XP Used For WSHP Loop Control-

ler – Setup File

” and click on the “click here” text to download the 

self extracting file. 

Once you have downloaded the file go to its location and “double click” 

on the file and then unzip it to the directory listed in the “unzip to win

-

dow”. You can now select the “Restore To File” tab located under the 

“Setpoints” tab at the top of the GPC-XP Status screen to select the file 

“WSHP-Typ-Setpoints.SPT” and it will populate the GPC-XP status 

screen with all the typical setpoints and descriptions like the screen 

shown in 

Figure 8

. You can now change or delete the setpoints or con-

figurations as desired to match your requirements.

Figure 9: Entering Input & Output Descriptions

Configuration

14

                                                                     WSHP Loop Controller

 GPC-XP Guide

Summary of Contents for Auto-Zone 2 GPC-XP

Page 1: ...WSHP Loop Control Using The GPC XP Controller Application Guide www az2controls com ...

Page 2: ... Power Supply 10 Communication Baud Rate Settings Wiring Info 11 Input Wiring 12 Output Wiring 13 Configuring The Controller 14 General 14 Status Screen 14 Analog Input 1 15 Analog Input 2 17 Analog Input 3 17 Analog Input 4 17 Analog Input 5 19 Analog Input 6 19 Analog Input 7 19 Analog Input 8 19 Binary Input 1 21 Binary Input 2 21 Binary Input 3 21 Binary Input 4 23 Binary Input 5 23 Binary Inp...

Page 3: ...oints are fully adjustable and can be set according to your systems requirements When a lower water temperature is required in the loop water is above the design loop water temperature the cooling bypass valve is de energized and the cooling tower is enabled by the controller to bring on a cooling tower fan and tower spray pump to cool the water to the required temperature The heat rejection setpo...

Page 4: ... a heating cooling coil a compressor a fan a reversing valve and controls During the cooling mode the tube in tube heat exchanger functions as a condenser and the coil as an evaporator In heating mode the tube in tube heat exchanger functions as an evaporator and the coil as a condenser A reversing valve is installed in the refrigerant circuit permitting changeover from heating to cooling and vice...

Page 5: ... and sizes as thermal zones or zone occupancy change This system is often installed in ceiling plenums which frees up valuable floor space Another valuable benefit of water source heat pumps is that they can accommodate simultaneous calls from zones requiring heating or cooling Depending on the climate outside air may require preheat or cooling prior to being introduced to the unit In the example ...

Page 6: ...urn Water Temperature to determine the need for Heating or Cooling of the loop water Pump On Off Control When a Request to Run is received the GPC XP Loop Controller activates the System Pump to initiate water flow to the heat pumps and other devices on the loop The pumps can either be constant flow or controlled by a VFD see Pump VFD Control If controlled by a VFD a water pressure transducer must...

Page 7: ...ulating signal to the cooling tower fan if equipped with a VFD to provide an increase or decrease using a direct acting floating point control of the output signal for modulating the cooling tower fan VFD Heat Addition Staged Heating The GPC XP Loop Controller monitors the loop water temperature to determine if the loop water needs to be heated If the loop water tem perature falls below a user def...

Page 8: ...ead lag start capabilities Duct Temperature Sensor 6 Probe OE230 Used for return or supply air water sensing applications 10k Ohm Duct Temperature Sensor 2 wire Used with OE291 immersion well listed below Immersion Well for OE230 Water Temperature Sensor OE366 Includes Stainless steel thermowell to be used with the OE230 Temperature Sensor listed above The ther mowell is designed to thread into a ...

Page 9: ...s system from any computer connected to your building s LAN It can also be configured to allow access to the control system from the Internet through your LAN if your Ethernet firewall is configured for this option Includes IP Link module 10 ft long Ethernet cable and installation instructions MiniLink 5 OE364 23 AZ2 Used with all AZ 2 Controllers to provide network communications zone voting alar...

Page 10: ...switches When using Prism 2 to program and configure the GPC XP Controller you would enter this address to communicate with the controller When the system is to be connected to other HVAC unit controllers on a communication loop each controller s address switch must be set with a unique address between 1 and 59 Settings Important Wiring Considerations Please read carefully and apply the following ...

Page 11: ... The Address Switch Settings In Order For Any Changes To Take Effect Caution Disconnect All Communication Loop Wiring From The Controller Before Removing Power From The Controller Reconnect Power And Then Reconnect Communication Loop Wiring Address 1 9600 Baud ADD A D D A D D The Address For Each Controller Must Be Unique To The Other Controllers On The Local Loop And Be Between 1 and 59 COM FROM ...

Page 12: ...Figure 6 Typical Water Source Heat Pump Loop Controller Input Wiring using GPC XP Input Wiring Wiring 12 WSHP Loop Controller GPC XP Guide ...

Page 13: ...Figure 7 Typical Water Source Heat Pump Loop Controller Output Wiring using GPC XP Output Wiring Wiring 13 WSHP Loop Controller GPC XP Guide ...

Page 14: ...nicating this box will contain the current value of the input you have entered Double click the data box next to the Outdoor Air Temperature description to open the configuration and setpoint screen for AIN1 General Using the GPC XP as a Water Source Heat Pump Loop Controller requires that it be configured for your application The information that follows will show you how to configure a GPC XPcon...

Page 15: ...ing will be shown in degrees Fahrenheit on the status screen You may also set this to Celsius if desired Figure 10 AIN1 Sensor Screen 1 2 3 4 5 Item 3 indicates the Sensor Scaling has been configured to 10 which will show tenths of a degree on the screen So at a 74 51 degrees actual temperature signal from the sensor the screen would show 74 5 degrees If the scaling factor is set to 1 the screen w...

Page 16: ...Configuring The Controller Configuration Figure 11 AIN2 Sensor Screen 1 2 3 Figure 12 AIN3 Sensor Screen 1 2 3 16 WSHP Loop Controller GPC XP Guide ...

Page 17: ...his is the input configuration screen used for the Differential Pressure Sensor Loop Pressure when used It is located on Analog Input 4 AIN4 Either a Differential Pressure Sensor or a Differential Pressure Switch is required for the Loop Controller operation If a Differential Pressure Switch is used instead it is wired to the Binary Input 2 BIN2 which is described under the Binary Input 2 informat...

Page 18: ...Configuring The Controller Configuration Figure 14 AIN5 Sensor Screen 1 2 3 Figure 15 AIN6 Sensor Screen 1 2 3 4 18 WSHP Loop Controller GPC XP Guide ...

Page 19: ...ous configuration of the Supply Water Temperature sensor Analog Input 8 Analog Input 8 AIN8 is not configured in this typical Central Plant Controller configuration but could be used for any other sensor applica tion your project may need Analog Input 6 In this example this is the input configuration screen for the Outdoor Air Humidity sensor OAS Humidity when used located on Analog Input 6 AIN6 I...

Page 20: ...Configuring The Controller Configuration Figure 17 BIN1 Input Screen 1 Figure 18 BIN2 Input Screen 1 20 WSHP Loop Controller GPC XP Guide ...

Page 21: ...onfiguration screen for System POF on Binary Input 2 BIN2 Item 1 in Figure 18 indicates the System Proof Of Flow input is configured for a normally open contact In this configuration it indicates the system pump is running and producing water flow when this contact is activated This could be from a water flow switch or a current switch on the system pump motor Binary Input 3 IIn this example this ...

Page 22: ...Configuration Configuring The Controller Figure 20 BIN4 Input Screen 1 Figure 21 BIN5 Input Screen 1 22 WSHP Loop Controller GPC XP Guide ...

Page 23: ...ut 5 In this example this is the input configuration screen for BoilerAlarm on Binary Input 5 BIN5 Item 1 in Figure 21 indicates the Boiler Alarm binary input is configured for a normally open contact In this configuration an alarm contact from the boiler protection control by others would close to activate this alarm contact In this case it is shown as a normally open contact Binary Input 6 In Fi...

Page 24: ...Configuring The Controller Configuration Figure 23 BIN7 Input Screen 1 Figure 24 BIN8 Input Screen 1 24 WSHP Loop Controller GPC XP Guide ...

Page 25: ...will be activated It also has a Enabling Relay of Request To Run as shown in Item 3 The Request To Run relay output is configured on Relay 7 Item 4 is the Changeover Interval for the Lead Lag Pump sequence In this example it has been configured to switch from System Pump 1 Lead to System Pump 2 Lag after 80 hours of runtime on System Pump 1 Item 5 is the Proof Failure Time Out Delay This is set fo...

Page 26: ...Configuration Configuring The Controller Figure 26 Relay Output 2 Screen 1 Figure 27 Relay Output 3 Screen 1 2 4 5 6 3 26 WSHP Loop Controller GPC XP Guide ...

Page 27: ...ource for this relay will be the Tower Return Water Temperature TW Return Water on AIN2 Item 3 indicates that the Hi Limit Setpoint will be 77 0 F and the Lo Limit Setpoint will be 75 0 F Item 4 Shows the Enabling Relay to be the System Active Relay output configured on Relay 8 This means that in addition to the Tower Return Water Temperature being above setpoint the System Active relay must be ac...

Page 28: ...Configuration Configuring The Controller Figure 28 Relay Output 4 Screen 1 6 2 3 4 5 Figure 29 Relay Output 5 Screen 1 6 2 3 4 5 28 WSHP Loop Controller GPC XP Guide ...

Page 29: ...quest To Run BIN1 binary input is inactive the TW Fan Relay 4 will deactivate Relay Output 5 In this example Relay Output 5 is configured for the Cool Bypass Valve output In Figure 29 Item 1 it indicates it has a Main Control Method of On Above Off Below This means it will use a setpoint that will activate the Relay Output at a Hi Limit Setpoint and deactivate it at a Lo Limit Setpoint Item 2 indi...

Page 30: ...Configuration Configuring The Controller Figure 30 Relay Output 6 Screen 1 6 2 3 4 5 Figure 31 Relay Output 7 Screen 1 2 3 30 WSHP Loop Controller GPC XP Guide ...

Page 31: ...ow This means it will use a setpoint that will activate the Relay Output at a Hi Limit Setpoint and deactivate it at a Lo Limit Setpoint Item 2 indicates the Control Source for this relay will be the Tower Return Water Temperature TW Return Water on AIN2 Item 3 indicates that the Hi Limit Setpoint will be 73 0 F and the Lo Limit Setpoint will be 71 0 F Item 4 Shows the Enabling Relay to be the Sys...

Page 32: ...Configuration Configuring The Controller Figure 32 Relay Output 8 Screen 1 2 3 Figure 33 Analog Output 1 Screen 1 2 3 5 4 6 32 WSHP Loop Controller GPC XP Guide ...

Page 33: ...t is active When the TW Return temperature AIN2 is between 85 0 F and 79 0 F and the TW Spray Pump Relay 3 output is active the TW Fan VFD will maintain its speed at a constant level The Tower Fan VFD will modulate its speed towards 0 0 0 VDC when the TW Return temperature AIN2 is 3 0 F below the 82 0 F setpoint 79 0 F and the TW Spray Pump Relay 3 output is active If the Tower Spray Pump Relay 3 ...

Page 34: ...Configuration Configuring The Controller Figure 35 Analog Output 3 Screen 1 2 3 6 4 7 5 Figure 34 Analog Output 2 Screen 1 2 3 5 4 6 34 WSHP Loop Controller GPC XP Guide ...

Page 35: ...hen the Loop Pressure P S I AIN4 is 3 0 P S I below the 33 0 P S I setpoint 30 P S I and the System Active Relay 8 output is active Analog Output 3 In this example Analog Output 3 is configured for the Mod Cooling output In Figure 35 Item 1 it indicates it has a Control Type of Direct Acting Floating Point Item 2 indicates the Control Source for this relay will be the Tower Re turn Water Temperatu...

Page 36: ...tion to the previous re quirements BIN2 must also be active for Mod Heating to modulate Item 6 indicates it has Output Limits of Max Voltage 10 0 VDC Min Voltage 2 0 VDC Item 7 shows that its calculation settings are Calculation Interval Controls Speed 3 0 Sec Proportional Control Window 1 0 F With this configuration sequence the Mod Heating will modulate towards 100 10 VDC when the TW Water tempe...

Page 37: ... selection will also allow that Alarm to send out an email notification if your system is set up for that function See the Prism 2 Technical Guide for instructions on setting up email alarm notifications Due to the quantity of Inputs and Outputs on the GPC XP alarms have been grouped into Sensor Input High Low Alarm Indication and Relay Run Time Alarm Indication The remaining 3 alarm indicators ap...

Page 38: ... 20 mA or Thermistor Type III They are user configurable via computer with Prism software installed to read in Farhenheit or Celsius configured to read a wall mounted sensor with slide offset a communicating E BUS temperature sensor a communicating E BUS CO2 sensor a communicating E BUS humidity sensor or a global analog signal broadcast from another controller www az2controls com GPC XP Controlle...

Page 39: ...ontrol direct acting P I D control and reverse acting P I D control Notes www az2controls com GPC XP Controller Configuration Worksheet Project Name _________________________________________________________________________________ WattMaster Controls Inc Phone 816 505 1100 8500 NW River Park Drive Fax 816 505 1101 Parkville Mo 64152 Toll Free 866 918 1100 System Pump 1 Lead System Pump For Lead La...

Page 40: ... AZ2 WSLC AGD 01B Printed in the USA July 2017 All rights reserved Copyright 2017 WattMaster Controls Inc 8500 NW River Park Drive Parkville MO 64152 Phone 816 505 1100 www az2controls com Fax 816 505 1101 ...

Reviews: