background image

GENERATOR PREPARATION

For subsequent operation, the oil level should be checked before each use, or after every 8 hours of opera-
tion. The generator is equipped with a low-oil sensor and will NOT start without a sufficient amount of oil. 

Upper Limit

Lower Limit

Fig. 7 

To check oil level (before every subsequent start):

1. Place the generator on a level surface. Make sure the engine is OFF
before adding or checking oil. 

2. Open the oil access cover. Remove and wipe the dipstick with a 
clean rag. 

3. Insert the dipstick into the oil fill without screwing it in. Remove the 
dipstick to check the oil mark (Fig. 7). 

If the oil mark covers less than one half of the dipstick, slowly add oil 
until the oil mark reaches to the top of the dipstick (or when you can 
see the oil coming halfway up the oil fill threads). 

4. Wipe clean any oil leaks and firmly tighten the dipstick. Reinstall 
the oil access cover.

STEP 2 - ADD/CHECK FUEL


GASOLINE WARNING:

 Keep generator away from open flame. This generator may emit highly 

flammable and explosive gasoline vapors, which can cause severe burns or even death if ignited. A 
nearby open flame can lead to explosion even if not directly in contact with gasoline.

• Do not operate near open flame, heat, or any other ignition source. 
• Do not smoke near the generator.
• Always operate on a firm, level surface.
• Always turn generator off before refueling. Allow generator to cool for at least 2 minutes before re

-

moving the fuel cap. Loosen cap slowly to relieve pressure in tank.
• Do not overfill fuel tank. Fuel may expand during operation. Do not fill to the top of the tank. Allow for 
expansion.
• Always check for spilled fuel before operating. Clean up any spilled fuel before starting.
• Empty fuel tank before storing or transporting the generator to prevent spilling.

Use ONLY fresh (within 30 days from purchase), lead-free gasoline with a 

minimum of 87 octane rating. 

The generator performs best with ethanol-free gasoline. DO NOT use gasoline with over 10% ethanol. 
The capacity of the fuel tank is 

2.6 US gallons (10.0 L)

.  DO NOT mix oil with gasoline. 

NOTICE:

• Never use an oil/gasoline mixture.

• Never use old gasoline.

• Keep gasoline away from sparks, open flames, pilot lights, heat and other sources of ignition.

• Avoid getting dirt or water into the fuel tank.

• Gasoline can age in the tank and make starting difficult. Never 
store generator for more than 2 months with fuel in the tank.

18

Summary of Contents for SUA4000i

Page 1: ...10887 Commerce Way Unit A Fontana CA 92337 SUA4000i ...

Page 2: ...1 ...

Page 3: ...Diagram 30 Exploded View Parts List 31 Warranty Statement 33 KEY SPECIFICATIONS 2 Starting Wattage 4000W Running Wattage 3500W Model NO SUA4000i Phase Single Frequency 60Hz Voltage AC 120V Amperage 29 2A Engine Type 4 stroke OHV single cylinder with forced air cooling system Engine Displacement 223cc Fuel Tank Capacity 2 6 US gallon 10 0 L 87 octane minimum Oil Capacity 20 2 fl oz 0 6 L 100 Load R...

Page 4: ... maintenance instructions Before operating this generator be sure to read and observe all warnings and instructions both on the generator labels and in this instruction manual Failure to follow all instructions listed below may result in personal injury NOTE The following safety information is not meant to cover all possible conditions and situations that may occur AIPOWER reserves the right to ch...

Page 5: ...4 IMPORTANT SAFETY INSTRUCTIONS ...

Page 6: ...5 IMPORTANT SAFETY INSTRUCTIONS ...

Page 7: ...6 IMPORTANT SAFETY INSTRUCTIONS ...

Page 8: ...7 IMPORTANT SAFETY INSTRUCTIONS ...

Page 9: ...8 IMPORTANT SAFETY INSTRUCTIONS ...

Page 10: ...e re moving fuel cap Loosen cap slowly to relieve pressure in tank Do not overfill fuel tank Gasoline may expand during operation Do not fill to the top of the tank Allow for expansion Always check for spilled fuel before operating If fuel spills move the generator at least 30 feet away from the spill and wipe clean any spilled fuel before starting the engine Empty fuel tank before storing or transp...

Page 11: ...ring operation Do not fill to the very top of the tank Leave room for gasoline expansion Always check for spilled fuel before operating 3 If any part of the generator electrical device or power cord is broken damaged or defective make sure it is repaired or replaced before operation Service should only be performed by a qualified technician Do not use receptacles or cords that show signs of damage s...

Page 12: ...uch HOT PARTS This generator produces heat when running Temperatures near exhaust can exceed 150º F 65º C Allow generator to cool down after use before touching engine or areas of the gen erator that become hot during use 8 Turn off all connected electrical devices before stopping the generator 9 Always turn generator off before refueling Allow generator to cool for at least 2 minutes before remov...

Page 13: ...KNOW YOUR GENERATOR Foot Carrying Handle Control Panel Fuel Cap Oil Access Cover Wheel Recoil Starter GENERATOR Maintenance Cover Muffler Battery Access Cover Telescopic Rod 12 ...

Page 14: ... Breaker for NEMA 5 20R 20A 14 Main Breaker 30A 12 DC 5V USB Outlets 1 5A 4 Indicator Light Output indicator Overload alarm Low oil alert 3 Parallel Operation Outlets Connect two AIPOWER inverter generators through a parallel connection kit for a higher output 6 DC 12V Outlets 8A 7 Grounding Nut Ground generator to reduce risk of electric shock 13 Data Center Voltage Run Time Frequency Power and F...

Page 15: ...lectrical power The AIPOWER Parallel Operation Kit can be purchased Follow the instructions included with your parallel operation kit for proper installation and operation LOW IDLE SWITCH This generator is equipped with an LOW IDLE Switch Fig 1 Engaging this switch allows the system to regulate the engine speed and automatically adjust its fuel consumption to match the required load When the elect...

Page 16: ...nning Watts 1350 Highest Starting Watts Total Running Watts 1255 Highest Starting Watts 1350 Total Starting Watts Needed 2605 With nothing connected to the generator start the engine as described later in this manual 1 To prolong the life of the generator and attached devices it is important to take care when adding electrical loads to the generator There should be nothing connected to the generat...

Page 17: ...er 800 1200 Furnace blower 800 1300 Computer 800 0 Electric drill 600 900 Television 500 0 Stereo 400 0 Box fan 300 600 Security system 180 0 Common light bulb 75 0 The chart below serves as a reference for the estimated wattage requirements of common electrical de vices However do not solely rely on this chart all electronics and appliances are built differently Always check the wattage listed on...

Page 18: ...ine 3 Using an oil funnel or appropriate dispenser slowly add oil into the oil fill Fig 5 being careful not to overfill the unit Fill the Fig 4 crankcase to the upper fill line so you can visually see the oil coming halfway up the oil fill threads Fig 6 4 Reinstall the oil dipstick and firmly tighten it Wipe clean any spilled oil 5 Reinstall the oil access cover Turn the oil access cover knob to the lo...

Page 19: ...d A nearby open flame can lead to explosion even if not directly in contact with gasoline Do not operate near open flame heat or any other ignition source Do not smoke near the generator Always operate on a firm level surface Always turn generator off before refueling Allow generator to cool for at least 2 minutes before re moving the fuel cap Loosen cap slowly to relieve pressure in tank Do not over...

Page 20: ... front control panel Fig 9 against a grounding wire A generally acceptable grounding wire is a No 12 AWG American Wire Gauge stranded copper wire This grounding wire should be connected at the other end to a copper brass or steel grounding rod that is driven into the earth Wire and grounding rods are not included with the generator Grounding Nut WARNING Failure to properly ground the generator inc...

Page 21: ...h air RIGHT AWAY See a doctor You may have carbon monoxide poisoning WARNING The exhaust from this product contains chemicals known to the State of California to cause cancer birth defects or other reproductive harm WARNING DO NOT operate generator near open flame or flammable materials This generator may emit highly flammable and explosive gasoline vapors which can cause severe burns or even death i...

Page 22: ...the generator during ignition Otherwise it will be difficult for the engine to start To start the generator perform the following steps 1 Turn the LOW IDLE switch to OFF Fig 10 2 Turn the FUEL switch to the ON position Fig 11 Fig 10 Fig 13 Fig 12 Fig 11 5 When engine starts push the CHOKE LEVER in to the RUN position Fig 14 3 Pull the CHOKE LEVER out to the START position Fig 12 NOTE Skip this if s...

Page 23: ... time can make it difficult to start the generator in the future NEVER store the generator for extended periods of time over 2 months with fuel in the fuel tank Refer to STORING THE GENERATOR Fig 15 1 Turn off all electrical devices prior to unplugging them from the generator Unplugging running devices can cause damage to the generator 2 Allow generator to run at no load for a few minutes to stabil...

Page 24: ...SCHEDULE IMPORTANT GENERATOR MAINTENANCE TIPS Drain your carburetor after each use and before storage to prevent it from clogging Do not store the generator with fuel inside the tank for more than 2 months the fuel will go bad Run the generator for at least 20 minutes every month to charge the battery and maximize the generator s lifespan NOTE Failure to properly maintain the generator will void t...

Page 25: ...ase contact your authorized service center 4 Reinstall the air filter element air filter cover and maintenance cover Fig 16 Air Filter Maintenance Cover Knob WARNING Running the engine with a dirty damaged or missing air filter element can result in danger to the operator and cause the engine to wear out prematurely Refer to Recommended Maintenance Schedule for maintaining the spark plug The spark ...

Page 26: ...ars Replace the spark arrester if it is damaged Fig 19 4 Visually inspect the spark plug If it is cracked or chipped or if the electrodes are worn or burned discard it and replace with a new spark plug 5 If re using the spark plug use a wire brush to clean any dirt from around the spark plug base then re gap the spark plug 6 Measure the plug gap with a spark plug gap gauge The gap should be 0 7 0 ...

Page 27: ... will be drained out 4 The carburetor can be accessed between the engine and the air filter Fig 20 Locate the transparent tube from the carburetor Fig 21 that extends down through the base plate of the generator 5 Prepare an approved gasoline storage container and direct the end of the drain tube into the container Fig 21 Fig 20 6 Open up the carburetor drain screw Fig 21 with a flat head screwdri...

Page 28: ... Place a suitable container underneath the generator to catch the used oil 4 Reach under the generator and remove the black rubber seal located below the oil drain plug 5 Remove the oil fill cap dipstick 6 Use a wrench ro remove the oil drain plug and allow the oil to drain completely 7 Reinstall the oil drain plug after the oil has drained 8 Reinstall the black rubber seal 9 With the generator in...

Page 29: ... Drain the carburetor Disconnect the negative lead from the battery Add fuel stabilizer Follow the suggested portions and instructions of your preferred stabilizer Run the engine for 15 to 20 min utes allowing the fuel stabilizer to mix with the gasoline and circulate through the carburetor and then top off with fuel Filling the fuel tank full reduces the amount of air in the tank and helps fight d...

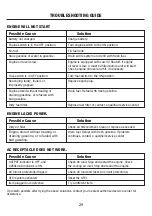
Page 30: ...alified service center Engine stored without treating or draining gasoline or refueled with bad gasoline Stale gasoline or water in gasoline Drain entire system and refill with fresh fuel Engine oil level is low Engine is equipped with Low Oil Shutoff If engine oil level is low it must be filled before unit will start Check engine oil level and fill if necessary Battery not charged Charge battery ...

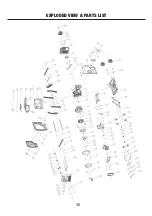
Page 31: ...EXPLODED VIEW PARTS LIST 30 ...

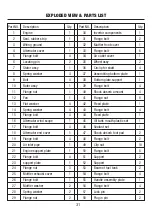
Page 32: ...plate Flange nut Muffler exhaust cover Flange bolt Muffler washer Spring washer Flange nut Part NO 30 31 32 33 34 35 36 37 38 39 40 41 42 43 44 45 46 47 48 49 50 51 52 53 54 55 56 57 58 Qty 1 2 1 6 1 2 4 1 1 4 4 8 1 4 1 1 1 2 2 10 8 2 2 2 4 1 4 2 2 Description Invertor components Flange bolt Muffler front cover Flange bolt Air outlet cover Wheel assy Circlip for shaft Assembling bottom plate Botto...

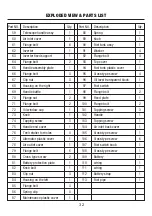
Page 33: ...astic cover Air outlet cover Flange bolt Cross type screw Battery protection plate Knob bolt Clip nut Housing on the left Flange bolt Spring clip Maintenance plastic cover Part NO 88 89 90 91 92 93 94 95 96 97 98 99 100 101 102 103 104 105 106 107 108 109 110 111 112 113 Qty 1 1 1 4 4 1 1 4 1 1 2 1 2 3 1 1 1 1 6 1 1 1 1 1 1 1 Description Spring Knob Fuel tank assy Washer Flange bolt Top cover Fuel...

Page 34: ...ts ONLY Thank you for choosing A iPower products To ensure proper registration of your product warranty please submit your warranty registration along with proof of purchase within 10 days of the date of purchase this can be done by a Completing the Warranty Registration form at the back of this manual and mailing to A IPOWER CORP 10887 COMMERCE WAY UNIT A FONTANA CA 92337 USA b Visit us at www a ...

Page 35: ...his warranty does not cover improper or unauthorized assembly alteration modification or any other damage resulting from misuse or neglect Normal maintenance parts this warranty does not cover spark plugs air filters adjustments or other related service due to obstructions and other build ups resulting from improper maintenance Additional exclusions this warranty does not cover wearable parts such...

Page 36: ...t be drained Completely Thoroughly prior to shipment Gas caps and oil plugs must be left off for 24 hours prior to shipping Please note liability for this violation of the law resides with the sender of the shipment Return to address provided in return authorization using the parcel service required Units returned without authorization will not be honored Please Note Refunds will not be granted fo...

Page 37: ...Product registration states to complete and should be mailed to our address or go on line to support a ipower com ...

Page 38: ......

Page 39: ......

Page 40: ...32082 02992 00 ...

Reviews: