background image

4O3A Signature – Antenna Genius User Manual


Index


Page 

5

 of 

56


1.3. Backing Up Your Configuration


Important!


During the process of upgrading to the new firmware the configuration 

will be lost.  


However, the new version is completely backwards compatible with the previous 
generation configuration file. 
The configuration is stored in the memory on-board the Antenna Genius but it can be 
backed up into an XML configuration file stored on your PC.  
 
In order to back up your configuration: 


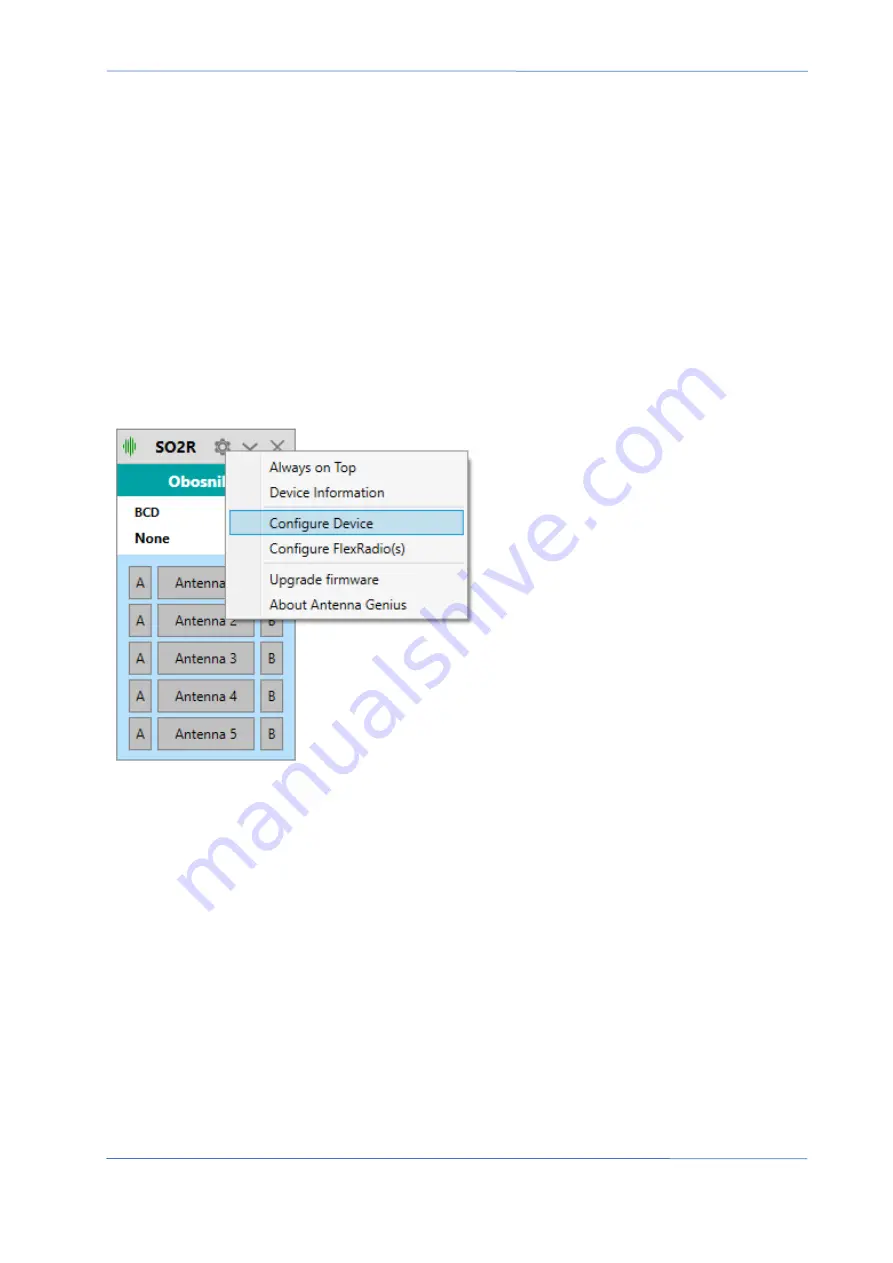
1. Go to the configuration menu of your 
Antenna Genius. 


Summary of Contents for Signature ANTENNA GENIUS 8x2 v2 PLUS

Page 1: ...ANTENNA GENIUS User Manual Software Version 4 1 0 rev 1...

Page 2: ...1 4 1 Multiple control options 11 4 2 SO2R and multi op with a single FLEX 6000 11 5 HOW IT WORKS 13 5 1 Tech 13 5 2 Hardware 13 5 3 Software 13 5 4 FlexRadio Ecosystem 13 6 ONLINE RESOURCES 14 7 WHAT...

Page 3: ...4 Output Relays Designer 41 9 8 5 Output Groups 42 9 8 6 Keyboard Shortucuts 45 9 8 7 Bands Range Configuration 46 9 8 8 FlexRadio 46 9 8 9 BCD 47 9 8 10 PTP 48 9 8 11 Network Settings 48 9 8 12 Stac...

Page 4: ...ersion 4 1 is the first publicly available version from the new generation Version 4 0 was never released to the public and was used for extensive beta testing The new firmware has been designed to en...

Page 5: ...new API and network protocol are more reliable easier to use and offer enhanced functionality The new API is publicly available and we encourage anyone who wants to use it to refer to https github com...

Page 6: ...iguration will be lost However the new version is completely backwards compatible with the previous generation configuration file The configuration is stored in the memory on board the Antenna Genius...

Page 7: ...nius User Manual Index Page 6 of 56 2 Click on the Export Configuration button 3 Choose a path and name and save your config file You can load this file into your Antenna Genius again after upgrading...

Page 8: ...thernet 100 Mbps DHCP or manually assigned network address TCP IP Power consumption 300 mA 13 8 VDC Frequency range DC through 55 MHz Port to port isolation 90dB between ports worst case 14 MHz 80dB b...

Page 9: ...ment off and on the user is encouraged to try to correct the interference by one or more of the following measures Reorient or relocate the receiving antenna Increase the separation between the equipm...

Page 10: ...ation or repair whichever is longer 4O3A Signature will also correct any failure caused by defective parts and materials The complete unit must be sent to 4O3A Signature at your expense in the origina...

Page 11: ...eniusTM Rotator GeniusTM Station GeniusTM Interface GeniusTM and 4O3A Genius SystemTM are trademarks of Sky Sat d o o FlexRadio SystemsTM and SmartSDRTM are trademarks of Bronze Bear Communications In...

Page 12: ...ave five ways to control your AG 1 FlexRadio over your TCP IP network AG will automatically follow two different Slice band selections and obtain band data from them 2 Manual band switching from the A...

Page 13: ...us Systemtm products use standard TCP IP protocols to communicate with each other and with other suitably equipped devices The 4O3A Signature team believes in open standards in ham radio and makes its...

Page 14: ...so for the hardware lockout that prevents two radios from being connected to the same antenna there is also a software lockout for redundant protection The design priority was maximum port to port iso...

Page 15: ...ms Community a great resource for anything related to FLEX 6000 Signature SeriesTM SmartSDRTM and MaestroTM https community flexradio com flexradio EXPERT TIP Join the 4O3A Signature Web Site Forum 4O...

Page 16: ...e Two DE 15 VGA type for users opting for BCD or 12 VDC pin to port control in lieu of network control for controlling standard radios as Yaesu Elecraft etc These are left unconnected if you are using...

Page 17: ...d 8 4 Where to put it Most users will install AG near their station bulkhead the location where their antenna feed lines AC mains DSL cable TV and or other cables enter the shack and where the single...

Page 18: ...ch mounting are provided on the top of the AG case AG is a 100BASE T network device using standard TCP IP protocols it is therefore subject to the usual 328 foot 100m LAN cable run limitations per TIA...

Page 19: ...distribution units you can use the 1 Amp blade fuse that comes with RIGrunners If you don t have a RIGrunner we strongly suggest you place a 1 Amp DC fuse in series with the hot side of your DC power...

Page 20: ...s will slow down your LAN 8 7 DIP Switch configurations As of version 4 1 0 DIP switches are no longer used to configure band data sources ID or group ID Important All these settings are now done thro...

Page 21: ...take to reinstall firmware on a bricked device 1 remove DC power from AG 2 move DIP 8 to ON position 3 turn DC power back on 4 Open the app 5 Click on the Settings wheel and select Firmware Recovery 6...

Page 22: ...from a FlexRadio using the TCP IP network Important tip From software version 4 1 0 DIP switches are no longer used to set band data sources It is now exclusively done through the Utility App Click on...

Page 23: ...lexRadio under Bands and your FlexRadio will be discovered automatically and listed on the right Set Antenna option to assign the desired Flex antenna port to Port A and Port B respectively Set PTT op...

Page 24: ...is now exclusively done through the Utility App Click on the band source icon in the app and select the Flex as the source Typical radios using BCD band data include Yaesu FT 1000 MP FT DX 5000 FT 10...

Page 25: ...H L H L L L L HEX Code 1 2 3 4 5 6 7 8 9 A 0 Note that it is not possible to select 60M band through BCD Different radio models use different pinout for their BCD output PIN Antenna Genius in Yaesu F...

Page 26: ...enna Genius go to the app and click on the band source button then select P2P Band sources for each radio port are selected independently so make sure to set both ports to the desired band source This...

Page 27: ...me the following priority list is followed 1 P2P 2 BCD 3 FLEX The logic being that connecting a hardware band source is more intentional then any kind of software setup You will never be allowed to do...

Page 28: ...AG App is used to perform seven tasks 1 Fully configuring your Antenna Genius 2 Programming band antenna assignments for automated operation antenna selection driven by radio band data received direc...

Page 29: ...Initial set up 9 1 1 Download and install the latest AG Windows App The AG Windows App has been tested to run on Windows 10 and 11 and is available free from the Downloads page on 4O3A com Download t...

Page 30: ...ep the default location C Program Files x86 4O3A Signature Antenna Genius and hit Next Now you should see the Ready to Install window Double check the data if correct hit Install If not correct use th...

Page 31: ...connection and a flashing yellow LED indicates network traffic It is normal for the yellow LED to flash even if you are not actively sending band change data to AG EXPERT TIP The terms LAN home netwo...

Page 32: ...indow Your AG should be detected automatically by the app If so just click on Connect If you don t see your AG under local devices it is possible your LAN subnet does not correspond with your AG devic...

Page 33: ...see the AG Control window Both SO2R mode pictured EXPERT TIP You can select Always on top the AG App in Windows to make it easy to find and launch Just click on configure and select Always on Top 9 2...

Page 34: ...a Genius Hardware Version There are several versions of the AG hardware over time version 4 is the latest version 8x2 v2 Plus Bootloader Version The version of your bootloader the small software on th...

Page 35: ...dio Port A as set by DIP switches either LAN GSD BCD or PTP Port B Band Current band detected for Port B Radio 9 3 Is your firmware up to date If the firmware on your AG is older than the latest AG fi...

Page 36: ...etwork automatically Double click and connect to your AG You will be prompted to confirm the upgrade process Considerations Make sure your network connection is stable and reliable Otherwise you might...

Page 37: ...36 of 56 The firmware installation file comes pre loaded with the Utility application Click the Upgrade Firmware button and wait for the process to finish Should not take longer than a few seconds Cli...

Page 38: ...top to bottom 1 The title bar that hosts the Configure Minimize and Close buttons 2 Your Antenna Genius device name 3 Band source selection for both ports 4 Current band for both sources 5 The Antenna...

Page 39: ...will toggle between enabled and disabled 9 7 View Output Relays This feature displays the status of all the output ports on the relay output module It is designed for debugging and making sure you con...

Page 40: ...Device Settings in the config menu to access the main configuration menu for the AG 9 8 1 Basic Information Under the basic information tab you can name your Antenna Genius device This is mainly usefu...

Page 41: ...assigned a band or multiple bands There is no limit to the number of multiple bands Antennas can be now configured as RX receiving TX transmitting or inband You can have multiple antenna options for...

Page 42: ...eset device button re sends the current antenna band data to AG 9 8 4 Output Relays Designer Output relay designer is used to configure your output relay module Relays are controlled by buttons and bu...

Page 43: ...Groups of buttons A group can be bound to Antenna Ports or a band or multiple bands The green plus button adds another Output button If Toggle is checked this button will turn off all the other butto...

Page 44: ...group You can delete groups by clicking on the Delete Group button on the bottom of the screen The output relay window shows three rows of 16 relays and represents 3 OM modules connected together dais...

Page 45: ...If Toggle is unchecked you will be able to turn on multiple buttons in the group at the same time Your group will now appear in a separate movable window when the corresponding antenna is selected The...

Page 46: ...on the right will allow you to assign a custom keyboard shortcut to activate your relay outputs You can use any combination of ctrl alt shift keys as well as just plain keystrokes In this case we ve c...

Page 47: ...xRadio as band source only BCD and PTP modes are fixed you only select the band by a fixed number instead of reading frequency data 9 8 8 FlexRadio Click on the FlexRadio button under Bands Click the...

Page 48: ...Save 9 8 9 BCD BCD as band source works exactly the same as in version 3 and has the exact same pinout If your radio doesn t have a BCD output but rather a CAT or CI V you can use the B2BCD Genius acc...

Page 49: ...ual controller switch https 4o3a com manual antenna controller s8 9 8 11 Network Settings By default the DHCP is enabled and is the recommended option for most users If you are knowledgeable about com...

Page 50: ...4o3a com antenna genius Click the drop down list Your AG will be detected automatically Use the serial number to determine the exact AG you want to use if you have more than one on the network The ser...

Page 51: ...e and verify that switching is occurring correctly but you will not be able to control it directly 9 8 13 Advanced Options In the Advanced Options you can Set your Inband port The chosen port will sho...

Page 52: ...s mainly used for remote operation The other prerequisite for remote operation is setting up your router with port forwarding so you can access the switch from outside the network This is a topic that...

Page 53: ...connect to each other automatically However for this discovery protocol to work properly there are a few prerequisites that need to be met First and foremost your computer must be connected to the sam...

Page 54: ...relay switching board with 16 pairs of outputs 11 2 1 Output Module Hardware Outputs P1A and Outputs P1B are different contact of DPDT relays Each port can be used differently to supply internal 12V n...

Page 55: ...use proper external power supply and set jumpers to EXT Internal power supply in AG is 1A which is on the margin if all relays are in use 11 2 2 Output Module Connection Connect your OM module to the...

Page 56: ...time The bootloader uses a fixed IP address 192 168 1 250 so make sure your network is using the same subnet Follow these steps to take to reinstall firmware on a bricked device 12 remove DC power fr...

Page 57: ...versions Acronyms AG Antenna Genius App v4 1 0 Release 28 Aug 2021 Firmware version v4 1 0 New generation of AG firmware and Windows app released This version has been written from the ground up and h...

Reviews: