background image

13

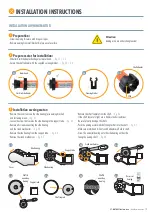
INSTALLATION AWNING MOTOR

1

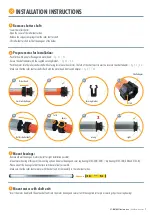
 Preparation:

 Screw in awning & secure with straps or ropes.

 Remove awning from wall bracket & place on safe surface.

2

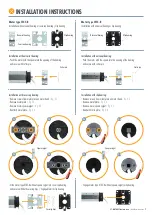
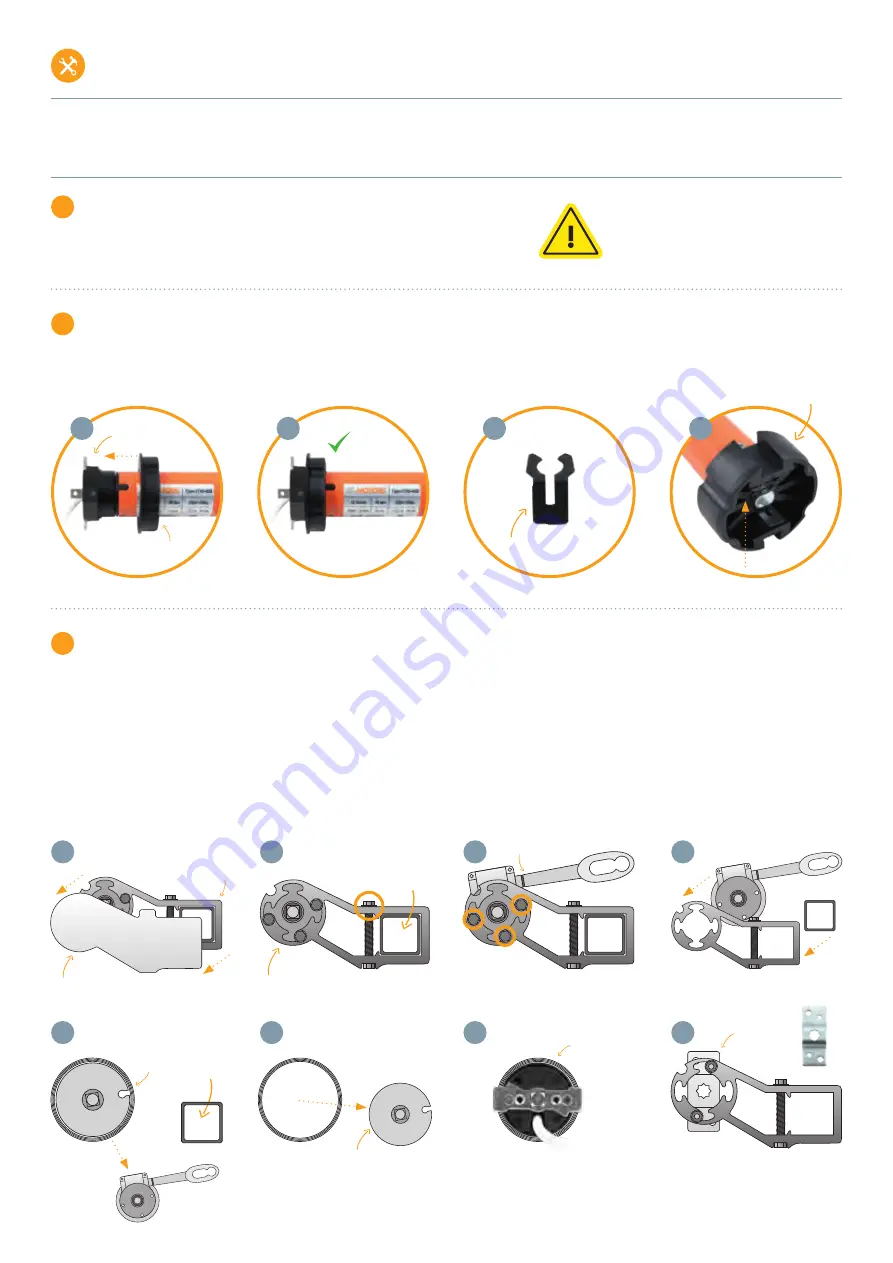
 Prepare motor for installation:


Slide limit switch adapter flush against motor head.  

>


fig. 2.1 / 2.2

 Secure the shaft adapter with the supplied securing bracket.  

>


fig. 2.3 / 2.4

3

 Installation awning motor:

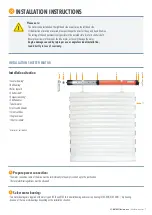
 Remove the cover to access the side bearing (also awning bracket) 

  and fastening screws.  

>


fig. 3.1

 Loosen the screw that secures the side bearing to the support tube.  

>


fig. 3.2

 Remove all screws connecting the side bearing 

  and the crank mechanism.  

>


fig. 3.3

 Remove the side bearing from the support tube.  

>


fig. 3.4

 Remove the crank mechanism.  

>


fig. 3.5

Attention: 


Awning arms are under strong tension!

2.1

Limit switch adapter

Motor head

2.2

2.3

Securing bracket

2.4

Click

Shaft adapter

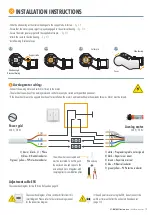
 Remove the shaft capsule from the shaft.  

>


fig. 3.6


If the shaft capsule is tight, use a hammer and screwdriver. 

  Be careful not to damage the shaft.


Push the awning motor with shaft adapter first into the shaft.  

>


fig. 3.7


Make sure motor head & limit switch adapter are flush in shaft.

 Screw the universal bearing onto the side bearing on the side 

  facing the awning shaft.  

>


fig. 3.8

3.7

3.8

Shaft & 

wound up 

Awning

 INSTALLATION INSTRUCTIONS

3T-MOTORS Tubular motors

  |  Installation instructions

Side bearing

Cover

3.1

Support tube

Side bearing

3.2

3.2

3.4

Crank mechanism

3.5

3.6

Support tube

Shaft capsule

Shaft & 

wound up 

Awning

Universal 

bearing

Summary of Contents for 3T-MOTORS 3T45-10B

Page 1: ...B For shafts from 40 mm 3T35 10B 3T35 13B www 3t components de WEEE Reg Nr DE 77028333 INTELLIGENT DRIVES CONTROLS FOR SHUTTERS AND AWNINGS INSTALLATION OPERATING INSTRUCTIONS Instructions and notes...

Page 2: ...ning motor Page 13 15 1 Preparation Page 13 2 Prepare motor for installation Page 13 3 Mounting awning motor Page 13 14 4 Awning motor wiring Page 14 5 Setting the end positions Page 15 Troubleshootin...

Page 3: ...account rail guidance of approx 10 Roller shutter area m x Weight roller shutter material m Weight roller shutter kg 10 Friction losses Required traction force kg Example PVC Roller shutter area 3 00...

Page 4: ...mains connection cable of the drives must be laid internally in the empty conduit up to the junction box The local electrical regulations must be observed For the electrical connection of the tubular...

Page 5: ...230 V 608 mm 587 mm 3 m 4 min IP44 4260601761380 3T45 20B 20 Nm 40 kg 6 m 4 7 m 161 W 15 U min 22 U 230 V 608 mm 587 mm 3 m 4 min IP44 4260601761397 3T45 30B 30 Nm 60 kg 9 m 7 m 200 W 15 U min 22 U 2...

Page 6: ...mm SW40 only use shafts with an external fold Steel shafts with an internal fold will damage and destroy the motor Grinding marks of any kind on the motor housing will void the warranty The inspection...

Page 7: ...5 B and 3T35 B Universal bearing and cover cap bearing 3T45 30B 3T45 40B clip bearing Use one of the two motor bearings depending on the installation situation 1 2 3 4 5 6 7 8 9 10 11 Please note The...

Page 8: ...g clip bearing Installation with universal bearing Push the motor with the square into the opening of the bearing and secure with cotter pin Installation with cover cap bearing Remove screws from meta...

Page 9: ...er fig 4 7 4 8 5 Mount bearings Remove old wall bearing on motor side left or right installation possible Mount motor bearing at this point 2 mounting options Universal bearing and cover cap bearing 3...

Page 10: ...cupied and must be insulated To do this push the enclosed wire end cap onto the wire end and press it together with crimping pliers or combination pliers Wire end cap 3T MOTORS Tubular motors Installa...

Page 11: ...g the end points with adjustment cable ESK Connect tubular motor to ESK Test the direction of rotation of the motor and change it if necessary To change the direction of rotation swap the up and down...

Page 12: ...SW40 only use shafts with an external fold Steel shafts with an internal fold will damage and destroy the motor Explanation Avoid overstressing and resulting premature aging of the motor by using the...

Page 13: ...e support tube fig 3 4 Remove the crank mechanism fig 3 5 Attention Awning arms are under strong tension 2 1 Limit switch adapter Motor head 2 2 2 3 Securing bracket 2 4 Click Shaft adapter Remove the...

Page 14: ...connection diagram of time switches differs from this circuit diagram Please refer to the corresponding manual for the connection diagram If the end points are set using the ESK do not connect the sw...

Page 15: ...eturn step by step Setting the end points with adjustment cable ESK Connect tubular motor to ESK Test direction of rotation Press Up button Awning moves IN Press Down button Awning moves OUT Change th...

Page 16: ...ler shutter motor page 11 awning motor page 15 the motor stops running after continuous operation The thermal protection switch of the motor has tripped After a cooling phase min 10 min the motor is r...

Page 17: ...nden Anforderungen der aufgef hrten EG EU Richtlinien erf llt 2014 35 EU Niederspannungsrichtlinie 2014 30 EU EMV Richtlinie 2011 65 EU RoHS Richtlinie 2012 19 EU WEEE Richtlinie angewandte Standards...

Page 18: ...3 5 mm Limit switch adapter Shaft adapter 3 8 m m Engine bearing Roll off bearing Enables the rolling shutter to unroll in case of defective motor or power failure Motor bearing for tubular motors wit...

Page 19: ...140 cm 160 cm Suspension spring Maxi Required when using roller shutter motors Maxi spring up to 65 mm profile height For roller shutter shaft SW60 Powder coated Anti burglary effect Pick up width 10...

Page 20: ...www instagram com 3tcomponents twitter com 3TComponents INTELLIGENT DRIVES CONTROLS FOR SHUTTERS AND AWNINGS Service and Quality make the difference 3T Components GmbH Co KG Bahnhofstr 34 55578 Walle...

Reviews: