background image

3M

 Pocket Projector MP160


12


© 2010 3M. All Rights Reserved.

En

gl

ish

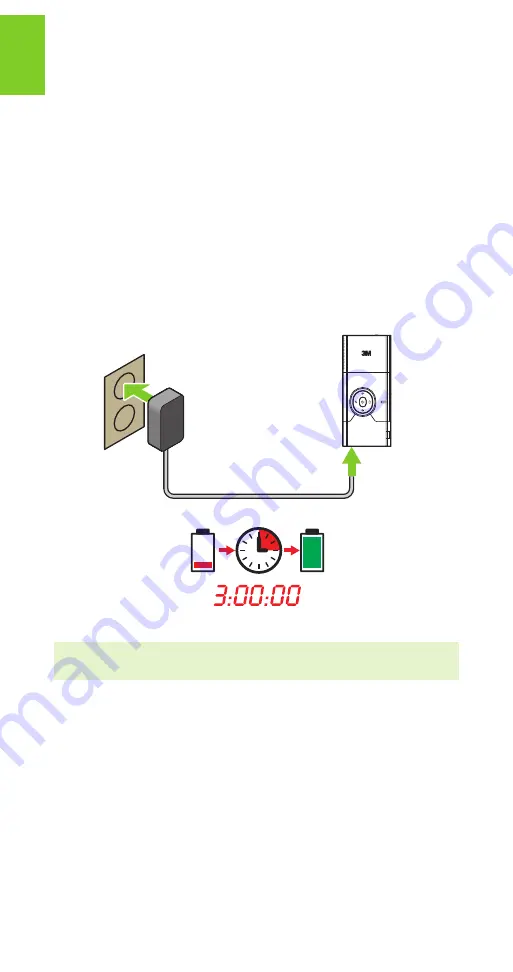
Charge the Battery

The rechargeable battery gives you up to two hours of battery life. When the battery 
needs to be charged, the status indicator will flash red. The battery should be fully 
charged before using the projector.

Charge the battery by connecting the power adapter to the projector. 

Turn the projector power off. 

Connect the power adapter to the projector’s DC input. 

Connect the other end of the power adapter into the electrical outlet.

The status indicator will change to amber while the battery is charging. 

Allow three hours to fully charge the battery. When charging is complete, the 
status indicator will turn off.

110–240 VAC

50/60 Hz

Note: The battery status will not appear when the power adapter is connected 
to the projector. The power adapter icon will appear instead.

Summary of Contents for MP 160

Page 1: ...PocketProjector Operator s Guide 3M MP160 3 ...

Page 2: ...3M Pocket Projector MP160 2 2010 3M All Rights Reserved English ...

Page 3: ...glish Contents Intended Use Statement 4 Safety Information 4 Safety Labels 7 Package Contents 8 Parts 9 Getting Started 10 Making Connections 14 Basic Operating Instructions 17 Cleaning the Projector 21 Troubleshooting 22 Specifications 24 Limited Warranty 26 ...

Page 4: ...ion or performance of the projector Use of this product in adverse conditions will void the product warranty Safety Information Please read understand and follow all safety information contained in these instructions prior to the use of this projector Retain these instructions for future reference Explanation of Signal Word Consequences m Warning Indicates a potentially hazardous situation which i...

Page 5: ...tor or battery in any liquid or allow either to get wet Use only 3M approved power supply and lithium ion battery provided Do not disassemble or short circuit the battery Do not dispose of the battery by incineration or fire Do not operate this projector in any environment above 35 C 95 F Do not expose the projector or battery to direct sunlight in a closed space such as a vehicle Do not carry the...

Page 6: ...ives off an odor generates heat or becomes discolored or deformed Keep away from exposed flames if the battery leaks or emits an odor Flush the eyes with water and seek medical attention if the battery leaks and battery fluid gets in the eyes m Caution To reduce the risks associated with hearing loss Be sure to read earphone manufacturer s instructions with respect to volume level User is responsi...

Page 7: ...78 6972 0026 5 m Warning Use a specified charger Do not throw the battery into fire or heat Do not short circuit the battery terminals Do not disassemble the battery Charging Specification Standard Charge 11 1V 1 3A Cut Off Voltage 8 5V Max Charge 12 3V 1 3A LED Light Output CLASS 1 LED PRODUCT IEC60825 1 1993 A1 1997 A2 2001 Maximum Radiant Power 1 693 mW ...

Page 8: ...Package Contents 1 3M Pocket Projector MP160 2 Table Top Tripod 3 Rechargeable Battery 4 Carrying Pouch 5 Outlet Adapters 4 6 Power Adapter 7 AV Adapters 3 8 Product Warranty and Safety Guide 9 Quick Start Guide 10 AV Cable 11 VGA Audio Cable 1 2 4 8 9 11 5 7 10 6 3 ...

Page 9: ...ton 2 Mute Button 3 Volume Down Button 4 Volume Up Button 5 Battery Status Button 6 Status Indicator 7 Focus Wheel 8 Lens 9 Speaker 10 Flip Stand 11 Tripod Socket 12 Battery 13 Battery Latch 14 Earphone jack 15 VGA A V Input 16 DC Power Input 1 2 3 4 7 8 9 10 14 15 16 11 13 9 12 5 6 ...

Page 10: ...h the battery To install the battery point the contacts on the battery toward the contacts on the projector insert the end farthest from the battery latch first then push down until the battery clicks into place Remove Battery To remove the battery slide the battery latch away from the battery and then lift the battery out starting at the end closest to the latch Important Note Use only the 3M spe...

Page 11: ...ower the 3M MP160 projector in most countries Installing an Outlet Adapter onto the Power Adapter 1 Select the outlet adapter that will plug into your wall outlet 2 Align the outlet adapter to the power adapter and slide the outlet adapter into place Replacing the Outlet Adapter 1 Push the button on the outlet adapter 2 Slide the outlet adapter up 3 Remove the outlet adapter 4 Replace with the new...

Page 12: ...wer adapter to the projector 1 Turn the projector power off 2 Connect the power adapter to the projector s DC input 3 Connect the other end of the power adapter into the electrical outlet 4 The status indicator will change to amber while the battery is charging 5 Allow three hours to fully charge the battery When charging is complete the status indicator will turn off 110 240 VAC 50 60 Hz Note The...

Page 13: ...t ages Therefore as the battery ages the battery life will decrease Battery Maintenance Tips Remove the battery when the projector will not be used for one week or longer Charge and discharge the battery by turning on the projector at least once a month When storing the battery for more than a month store it at 50 charge The battery is at 50 charge when the battery icon has three bars Do not store...

Page 14: ...nd digital media players into the VGA AV input on the projector 1 Connect the AV cable to the projector s VGA AV input 2 Connect the other end of the AV cable to the video device s audio and video outputs Tip Some video devices do not have the standard audio and video connections and may require an AV cable specified by the manufacturer The AV cable allows you to connect your video device to your ...

Page 15: ...e Pr component video signal Be careful to connect the red audio to red audio and red video to red video If these connectors are switched the projected image will appear green and an abnormal noise will come from the right speaker Tip Some video devices do not have the standard audio and video connections and may require an AV cable specified by the manufacturer The AV cable allows you to connect y...

Page 16: ...WXGA resolutions For best results set the computer s resolution to SVGA 800x600 1 Connect the VGA cable to the 3M Pocket Projector MP160 2 Connect the VGA cable to the computer s video and audio outputs 3 Set the computer resolution to one of the supported resolutions Description Resolution width x height Refresh Rate VGA 640 x 480 60 Hz SVGA 800 x 600 60 Hz XGA 1024 x 768 60 Hz WXGA 1280 x 768 60...

Page 17: ...the status indicator turns green Tip The video output on some devices is turned off by default Please refer to the device s documentation for details on enabling the video output Powering Off Press and hold the power button for three seconds Release the power button when the projected image is gone The projector is off when the status indicator is off or solid amber When the status indicator is so...

Page 18: ...n repeats The projector cannot charge the battery Flashes Red The projector cannot turn on because the battery needs to be charged On Screen Icons The projector will display a video icon when it is connected to a video cable or a video source Icon Description Meaning The projector detects the audio video cable NTSC The projector detects an NTSC video input signal PAL The projector detects a PAL vi...

Page 19: ... 52 8 cm 15 5 8 in 39 6 cm 31 2 8 in 79 2 cm 32 in 81 28 cm 25 5 8 in 65 cm 19 1 4 in 48 8 cm 38 3 8 in 97 5 cm 38 in 96 52 cm 30 3 8 in 77 2 cm 22 3 4 in 57 9 cm 45 5 8 in 115 8 cm 44 in 111 76 cm 35 1 4 in 89 4 cm 26 3 8 in 67 1 cm 53 in 134 1 cm 50 in 127 cm 40 in 101 6 cm 30 in 76 2 cm 60 in 152 4 cm 60 in 152 4 cm 48 in 121 9 cm 36 in 91 4 cm 72 in 182 9 cm 70 in 177 8 cm 56 in 142 2 cm 42 in...

Page 20: ... to mute the volume An icon will appear on the screen to indicate the current setting To restore the volume press the MUTE button again If you press the Volume Up or Volume Down button while the volume is muted the volume will also be restored but from an initial volume level of zero Checking the Battery Level To check the battery press the Battery Status button A battery bar will appear on the sc...

Page 21: ...jector 1 Turn off the projector and disconnect power and other cables 2 Use a soft cloth such as the 3M High Performance Cleaning Cloth to wipe off dust If the dust is difficult to remove dampen the cloth with clean water and then wipe the projector clean Then use a clean cloth to dry the projector Important Note Do not use cleaning chemicals or solvents to clean the projector Cleaning chemicals a...

Page 22: ...jector is powered on and projecting an image Project the image onto a flat white surface Decrease the light on the surface where the image is being projected Decrease the size of the image When there is nothing connected to the projector it will project the startup screen The projector is displaying a question mark The projector does not support the video or computer input signal Switch to a signa...

Page 23: ... projected image will appear green and an abnormal noise will come from the right speaker My video device is connected to the projector but the projector will not display the video Unplug the AV cable from the projector and the splash screen will display Plug the AV cable into the projector and the icon in the upper left corner of the image will display the AV cable icon See On Screen Icons on pag...

Page 24: ...in inc VGA and component Compatible Resolutions VGA SVGA XGA WXGA 1280 x 960 60Hz 1440 x 900 60Hz MAC 640 x 480 67Hz 832 x 624 75Hz 1152 x 870 75Hz Vertical Scan Rate 50 Hz 60 Hz MAC 67 Hz 75 Hz Horizontal Scan Rate 31 5 kHz 49 68kHz Video Compatibility NTSC PAL Video Resolutions 480i 480p 576i 576p PAL NTSC H 264 SD 480i 576i HD 720p 1080i Dimensions 5 91 x 2 56 x 1 20 in 150 x 65 x 30 5 mm Weigh...

Page 25: ...r local laws Supported Computer Signals Description Resolution width x height Refresh Rate VGA 640 x 480 60 Hz SVGA 800 x 600 60 Hz XGA 1024 x 768 60 Hz WXGA 1280 x 768 60 Hz 1280 x 960 60Hz 1440 x 900 60Hz MAC 640 x 480 67Hz 832 x 624 75Hz 1152 x 870 75Hz Replacement Parts Accessories Description 3M Part Number Power Adapter with US EU UK AUS plugs 78 6972 0033 1 Lithium Ion Battery 78 6972 0026 ...

Page 26: ...roduct All replaced parts or products become property of 3M If the product is repaired 3M will repair the defective part s with a new or used part s If the 3M product is replaced 3M will replace the 3M product with the same or equivalent model and with a new or refurbished 3M product In the case of an approved warranty claim the replacement 3M product will carry only the remaining term of the orig...

Page 27: ...fied or reproduced by the technician the customer will be responsible for call out costs FAILURE TO FOLLOW THE INSTRUCTIONS CONTAINED IN THE APPROPRIATE 3M PRODUCT MANUAL OR TO USE THE 3M PRODUCT IN ACCORDANCE WITH 3M S INTENDED USE STATEMENT WILL VOID ALL WARRANTIES AND LIMITED REMEDIES EXCEPT AS SPECIFICALLY STATED IN THE APPLICABLE 3M PRODUCT MANUAL 3M SHALL NOT BE LIABLE FOR ANY INDIRECT INCID...

Page 28: ... installation If this equipment does cause harmful interference to radio or television reception which can be determined by turning the equipment off and on the user is encouraged to try to correct the interference by one or more of the following measures Reorient or relocate the receiving antenna Increase the separation between the equipment and receiver Connect the equipment into an outlet on a ...

Page 29: ...ive 2002 95 EC 1 RoHS compliant means that the product or part does not contain any of the substances in excess of the following maximum concentration values in any homogeneous material unless the substance is in an application that is exempt under RoHS as amended a 0 1 by weight for lead mercury hexavalent chromium polybrominated biphenyls or polybrominated diphenyl ethers or b 0 01 by weight for...

Page 30: ...ny 3 Mobile Interactive Solutions 3M Austin Center 6801 River Place Blvd Austin TX 78726 9000 866 631 1656 www 3MPocketProjector com meetings mmm com Please Recycle Printed in China 3M 2010 All Rights Reserved 78 6971 1546 3 Rev A ...

Reviews: