background image

32 

MicroTouch™ ClearTek™ II Integration Guide 

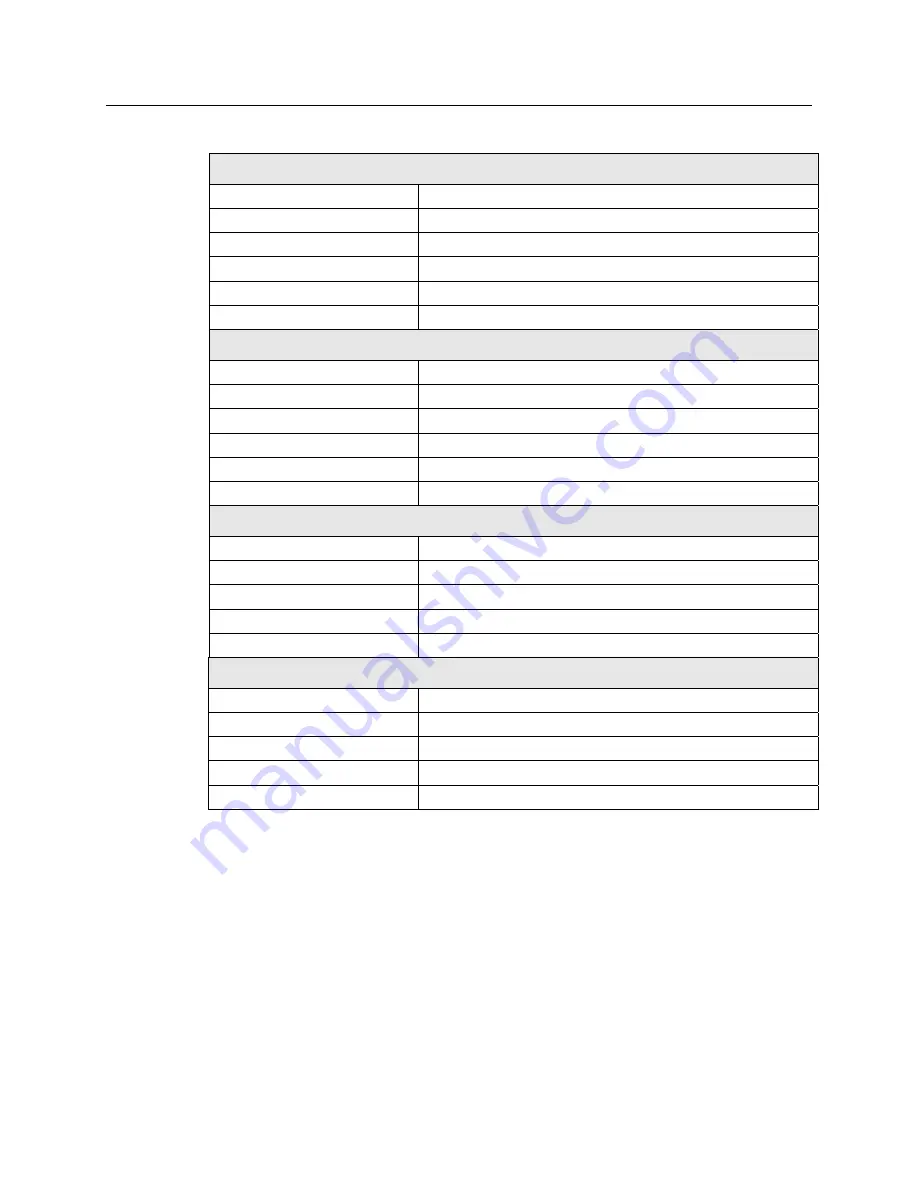
Table 1. ClearTek II Compatible Controllers 

EX II 1700SC series 

Communications protocol 

Serial RS-232 

Documentation 

EX II Serial Controller Reference Guide (29087) 

Form factor 

Cased: 3.75 in (95 mm) by 2.5 in (64 mm) by 0.84 in (21 mm) 


Uncased: 3.5 in (89 mm) by 2.25 in (57 mm) by 0.3 in (8 mm) 

Touch screens supported 

ClearTek II touch screens with NOVRAM cable adapters  

Installation options 

Internal (uncased) or external (cased) 

EX II 5700UC series 

Communications protocol 

USB 1.1 

Documentation 

EX II USB Controller Reference Guide (29489) 

Form factor 

Cased: 3.75 in (95 mm) by 2.5 in (64 mm) by 0.84 in (21 mm) 


Uncased: 3.5 in (89 mm) by 2.25 in (57 mm) by 0.3 in (8 mm) 

Touch screens supported 

ClearTek II touch screens with NOVRAM cable adapters  

Installation options 

Internal (uncased) or external (cased) 

EX II 7700SC series 

Communications protocol  

Serial RS232 

Documentation 

EX II Serial Controller Reference Guide (29087) 

Form factor 

1.3 in (33 mm) by 2.44 in (62 mm) by 0.32 in (8.1 mm) 

Touch Screens supported:  

Standard ClearTek II touch screens 

Installation options 

Internal only 

EX II 7700UC series


Communications protocol 

USB 1.1 

Documentation 

EX II USB Controller Reference Guide (29489)  

Form factor 

1.3 in (33 mm) by 2.44 in (62 mm) by 0.32 in (8.1 mm)  

Touch Screens supported 

Standard ClearTek II touch screens  

Installation options 

Internal only 

Disassembling the Chassis 

1.  Remove the screws securing the display control panel cover to the chassis. Be sure to 

save and label these screws for reassembly. 

2.  Take a moment to inspect the display’s internal hardware before you disconnect any 

wires. 

a. 

Note where each wire is attached and how each wire is routed. 

b. 

Label each wire. Labeling the wires makes reassembling easier. 

c. 

Most LCD display manufacturers connect the major components with detachable 
cables that have keyed connectors and labels. In addition, cables are of such 
lengths that they usually connect to only one place. However, not all displays 

3M Touch Systems Proprietary Information 

Summary of Contents for MicroTouch ClearTek II

Page 1: ...MicroTouch ClearTek II Integration Guide 3M Touch Systems Read and understand all safety information contained in this document before using this product 3M Touch Systems Proprietary Information ...

Page 2: ...ices as defined by United States federal law 3M Touch Systems Inc products and software should not be used in such applications without 3M Touch Systems Inc express written consent User should contact its sales representative if User s opportunity involves a medical device application IMPORTANT NOTICE TO PURCHASER Specifications are subject to change without notice These 3M Touch Systems Inc produ...

Page 3: ...nstallation Procedure 12 Chapter 2 Touch Screen Design Considerations Design Considerations 13 Electrical Considerations 13 Mechanical Considerations 15 Touch System Location 17 Designing Software Applications 18 Chapter 3 Installing a 3M Touch Systems Touch Screen Installation Considerations 21 Disassembling the Display 22 Fitting the Touch Screen 23 Mounting the Touch Screen to the LCD Panel 24 ...

Page 4: ...ssembling the Chassis 32 Mounting the Touch Screen Controller Internally 33 Completing Controller Mounting 34 Powering the Touch Screen Controller 35 Locating Power for the Touch Screen Controller 36 Modifying the Display for the Controller Cable 37 Using Your 3M Touch Systems Touch Screen 38 3M Touch Systems Proprietary Information ...

Page 5: ...es controller Mated with an EX II 7700 series controller With a 12 pin connector for EX II 1700 and EX II 5700 series controllers Each ClearTek II touch screen requires an EX II touch screen controller These controllers come in different form factors and may be cased or uncased refer to the appropriate EX II Controllers Reference Guide and the MT 7 Software User Guide for more information on your ...

Page 6: ...The MicroTouch ClearTek II Integration Guide is intended to instruct and guide you in the integration of a ClearTek II touch screen into an existing flat screen display This manual provides specific instructions for an LCD panel with chassis attached to the front bezel but these same steps apply to the majority of integrations These touch screens are intended for indoor use only and are not design...

Page 7: ... and federal regulations CAUTION To avoid the risk of glass breakage which may result in minor or moderate injury Handle the touch screens with care to avoid breaking the glass Be aware of cracked or broken touch screens with sharp edges If you need to remove the touch screen for servicing do not try to pry the touch screen off the LCD panel You may break the glass and injure yourself or others To...

Page 8: ...r fixed posture strains It is recommended you take periodic breaks from continuous use 3M Touch Systems Support Services 3M Touch Systems provides extensive support services through our website and technical support organization Visit the 3M Touch Systems website at http www 3Mtouch com where you can download touch screen software and drivers obtain regularly updated technical documentation on 3M ...

Page 9: ...lies and Tools Needed for the Installation later in this chapter Set up a clean comfortable and spacious working area Having sufficient room to work makes the installation easier Test your display to ensure good working condition before you install the touch screen Identify the different components to install and review the summary of the installation procedure It is important to know how all the ...

Page 10: ...e display and touch screen Cable tie wraps Lead free solder RoHS compliant Replacement screws for mounting flat panel to bezel or chassis Ring lugs or crimps Nylon spacers and washers Sealing tape Flat closed cell foam single sided adhesive Mounting tape closed cell acrylic foam 3M VHB 4956 double sided adhesive Tools Needed Flat blade screwdriver with insulated handle Phillips head screwdriver So...

Page 11: ...101 or USB cable 7312256 Software and technical documentation found on the www 3Mtouch com Save the invoice shipping container and all packing material in case you need to transport the equipment any time in the future Testing the Display Video Whether you are installing the touch screen on a new or older display you should make sure that the display is in good working condition and the video outp...

Page 12: ...lly For the EX II 7700 you can supply internal power 5V to 12 VDC though the 2 pin power input connector pin 2 5V to 12 V and pin 1 RTN A square pin indicator on the bottom of the board marks pin 1 Details on the power requirements of the EX II series controllers can be found in the EX II Serial Controller Reference manual available at http www 3mtouch com Summary of the Installation Procedure Sea...

Page 13: ...ld and takes advantage of the superior sensitivity and noise rejection of EX II controllers Refer to the EX II Controller Reference Guide for how to select signal frequency for best EMI rejection Electrical Considerations EMI and Shielding The front surfaces of flat panel displays carry potentials that fluctuate at the harmonics of display scan frequencies EX II controllers default to a frequency ...

Page 14: ...ch may result in minor or moderate injury or property damage Exercise caution when working with an ungrounded faceplate CRT Because of the hazards involved 3M Touch Systems recommends against using this specific type of CRT monitor in all touch applications Follow all instructions and recommendations in the manufacturer s documentation When a touch screen integrated monitor using an ungrounded CRT...

Page 15: ...on the glass Tail bond and strain relief area Always design your touch screen integration with the flex tail exiting from the top or sides of the display Never design tail exits from the bottom as spills could accumulate in the tail attachment area and cause electrical shorting Avoid creasing the tail within 0 5 inch 1 27 cm of the strain relief A soft bend is acceptable The touch screen tail is d...

Page 16: ...ouch screen 3M foam tapes provide superior resistance to moisture and chemicals over other traditional cellular foam tapes Important Note Be aware that certain sealing materials may contain active chemicals such as sulfur acidic compounds or chlorine that can if allowed to diffuse tarnish the silver conductors and thus affect the operation of the touch screen In selecting sealing materials it is i...

Page 17: ... the touch screen This could be recognized as a touch In the design phase avoid metal bezels whenever possible If your current design has a metal bezel ensure that it does not directly contact the touch screen The bezel should be appropriately grounded and very rigid Use insulating tape or gasketing as a spacer Be aware that some plastic bezels have conductive paint that could act as a metal bezel...

Page 18: ... at from different angles is a common problem in many computer applications The combination of the touch screen in front of the display and differing heights of users can cause parallax When designing your touch system software application use the following guidelines to help reduce the effects of parallax Position the user sees to touch Touch screen Design large buttons to facilitate touch Rememb...

Page 19: ...er possible One size does not fit all Consider the varying heights of users and thus viewing angles when designing the application Turn off the cursor Users may inadvertently try to drag the cursor to the correct location on the screen emulating moving a mouse instead of touching the button directly Design your applications to work with a single touch to activate rather than a double touch 3M Touc...

Page 20: ......

Page 21: ...the touch screen and its flex tail Assure that the integration design does not subject the flex tail bond area to pinch points and or mechanical stresses When installing the touch screen be careful not to route the touch screen flex tail and power wires near the backlight inverter of the LCD panel Because the touch screen edges are electrically active they should not come in contact with any condu...

Page 22: ...er must be disconnected and the pedestal removed 1 Look at the front of the display Some displays have a small door that hides the brightness and contrast controls It is a good idea to tape this door closed to prevent damage when handling the bezel 2 Gently place the display face down on a foam pad or other scratch resistant surface so that the rear of the display and pedestal are accessible 3 Dis...

Page 23: ...se the mechanical integrity of the display b You can reassemble with a gap between front and back housings This gap is a result of the thickness added by the touch screen For aesthetic purposes a plastic belly band can be inserted in the gap This band is a T shaped strip usually made of Teflon that fills in the gap and smoothes the edge Modifying the Bezel You now need to determine if the sealing ...

Page 24: ...e cutout area Make sure you preserve the structural integrity in the rest of the rib area Mounting the Touch Screen to the LCD Panel Before you begin this process please review the Mechanical Considerations Mounting Tape to LCD section in Chapter 2 for additional important information on this subject Note For ease of maintenance you might want to put a border of Kapton tape or a similar strength t...

Page 25: ... reduce the risk of damage to the LCD films make sure the tape either Kapton tape or VHB tape does not touch the surface of the LCD Ensure that the tape is aligned with the frame of the LCD not in the viewing area The foam tape serves the following purposes Holds the touch screen in place on the LCD panel Maintains a constant distance between the touch screen and the LCD panel Cushions the LCD and...

Page 26: ...d water solution ratio of 50 50 is the best cleaning agent for your touch screen You can also use straight isopropyl alcohol In addition 3M Touch Screen Cleaner CL680 has been tested and approved for this use Be sure to follow solvent manufacturer s precautions and directions for use when using any solvents It is important to avoid using any corrosive chemicals on the touch screen Do not use any v...

Page 27: ...stalled properly 1 Set the LCD panel in its standard upright position 2 Look at the front of the LCD panel and ensure the touch screen flex tail exits from the correct location 3 Check for proper alignment Make sure the touch screen is not off center or crooked If the touch screen is not correctly aligned with the LCD panel you must remove and remount the touch screen before you can continue with ...

Page 28: ...y and free of grease or oils 3 Remove the paper backing from the tape Adhere a strip of gasket tape to each inside edge of the bezel opening Align one edge of the gasket to the edge of the bezel opening If the gasket overlaps the bezel edge it will be visible from the front of the LCD If the gasket is spaced away from the bezel edge you will create a gap that can collect dust liquids etc 4 Pay clo...

Page 29: ...ass from breaking by forcing too short screws to work The replacement screws should be the same type and size as the factory screws but 3 16 inch to 1 4 inch 4 76 to 6 35 mm longer The size depends on the amount of space you added between the bezel and LCD panel 65 2406 6 Install the replacement screws as follows a Thread the screws into the holes that connect the LCD to the bezel b Work diagonall...

Page 30: ...D panel or bore right through the bezel Adjust the spacers or screws to get a secure attachment to the bezel without squeezing too tightly Make sure the bezel ribs and fins do not contact the touch screen at any point If necessary remove the bezel and trim the ribs and fins For more information refer to Fitting the Touch Screen earlier in this chapter Reconnecting the Bezel and Chassis 1 Reconnect...

Page 31: ... 2 3 This chapter covers the following information Mounting the controller Supplying power to the controller Connecting the controller to the computer Types of Touch Screen Controllers There are different 3M Touch Systems controllers that can be used to operate your touch screen The most common types are the EX II 1700SC and EX II 7700SC series serial capacitive controllers and the EX II 5700UC an...

Page 32: ...ial Controller Reference Guide 29087 Form factor 1 3 in 33 mm by 2 44 in 62 mm by 0 32 in 8 1 mm Touch Screens supported Standard ClearTek II touch screens Installation options Internal only EX II 7700UC series Communications protocol USB 1 1 Documentation EX II USB Controller Reference Guide 29489 Form factor 1 3 in 33 mm by 2 44 in 62 mm by 0 32 in 8 1 mm Touch Screens supported Standard ClearTe...

Page 33: ...nternally Mounting the controller inside the display housing results in a neater cleaner finish but requires internal space Before you begin make sure that there is sufficient room for the controller board inside the chassis Care must also be taken when attaching the controller board internally as the boards can short out if they are not attached properly Additional space will also be needed betwe...

Page 34: ...hown in the following diagram These spacers will prevent the board from shorting out Note Ensure that the two controller mounting holes are connected to the chassis ground of the LCD display 3 Plug the touch screen cable into the controller board making sure that the pins are oriented in the correct direction With the controller board properly mounted all cables connected and excess wiring cable t...

Page 35: ...Table 2 Serial Controllers EX II 1700SC series Internal power option Power input contacts Orange green and gray wires attached to the touch screen cable connector Connections NOVRAM Green yellow Chassis ground Grey GND RTN Orange l2VDC External power option RS 232 Power Plug Power input contacts Auxiliary plug on the RS 232 connector of controller cable Connections Green yellow Chassis ground Grey...

Page 36: ...efore beginning the controller installation A multi meter or the display schematic can be used to locate an appropriate power source on the display s main board The power source must meet the following requirements Minimum current supplied 100mA Maximum voltage drop allowed 100 mV To determine the display s voltage drop at the power source conduct the following test 1 Measure voltage across the po...

Page 37: ...ole using a blunt tool Reassembling the LCD Panel and Display Cover Once you drill the holes in the display cover for the touch screen controller cable you are ready to reassemble the display 1 Check the LCD panel mounting for proper adjustment Make sure all wires are properly attached including the touch screen s green wire to the chassis ground Check for video and power cables that originate ins...

Page 38: ...inux Kernel 2 4 2 6 Microsoft Windows CE Microsoft Windows Windows NT 4 0 Microsoft Windows Windows 9x Microsoft Windows Windows Me These drivers as well as relevant technical documentation and legacy drivers can be found on the web at www 3Mtouch com After the software is installed restart your computer to load and activate the touch screen driver To complete the setup of your touch monitor make ...

Reviews: