1)
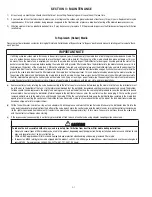
At least every six months you should check the time of day setting. Power outages will cause the unit to lose time.
2)
If your unit contains activated carbon (A media), you must replace the carbon and gravel underbed at least every three (3) years. Replacement may be
required sooner if the taste and odor being reduced reappears in the treated water or pressure drop due to fouling of the media becomes excessive.
3)
Filtration media will last an indefi nite period of time. It may be necessary to replace it, if the pressure drop across the fi lter becomes too great or fi ltration
results drop.
To Replenish (Rebed) Media
Pressure must be relieved on system by turning both Inlet and Outlet knobs of Bypass Valve to “Bypass” position and manually rotating control valve to “Back-
wash” position.
IMPORTANT NOTE
If utilizing activated carbon media that needs to be entirely replaced you will need to empty the media tank of both the gravel underbed and media. The
use of a garden hose and several buckets to place the spent media into is helpful. The changing of the media should take place outdoors as this can
be messy. Once the media tank is emptied, you can rinse the media tank out and inspect the distributor for damage or fi nes lodged into the slots of the
basket assembly. Clean as required before loading the media tank with gravel or fi lter media. Place the distributor into the media tank and ensure it is in
the dimple on the bottom of the media tank. Utilizing the extension tube, red cap and funnel place over the distributor tube and into the opening of the
fl anged tank. Next take the correct amount of gravel and dump into the media tank. Hold the distributor tube and gently shake the media tank to level the
gravel in the media tank. Next load the fi lter media into the media tank to the proper level. This can be determined by observing the media level line on
the outside of the media tank. Gently shake the media tank to level the media. Using a hose or clean bucket fi ll the media tank with water to help saturate
the fi lter media before placing the control valve on the media tank. Using a clean rag or paper towel, wipe the opening of the media tank to remove any
media fi nes before attaching the control valve. Dispose of spent media in accordance with federal, state, and local regulations.
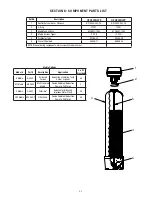
(a) Remove control valve by rotating the valve head assembly to the left or counter-clockwise. Before loading the media into the tank, the distributor must
be all the way to the bottom of the tank. It is therefore recommended that the distributor be removed and the gravel dumped out and saved. The distribu-
tor tube should then be replaced in the empty tank making sure it rests on the bottom. Use the centering tool provided to cover the distributor tube and
prevent media from entering the distributor. Material lodged in the distributor tube can enter the control valve, thus damaging it. First, pour the gravel
removed earlier back into the media tank and then add the media. Utilize the centering tool to help keep the distributor tube centered in the media tank
opening to aid in mounting the control over the distributor tube. Never add media to a level above the line on the side of the tank. Additional media may
have been shipped for future replenishment.
(b) Fill the tank with water. Lubricate o-ring on tank adapter with silicone grease and reinstall the control valve. Make sure the distributor tube fi ts into the
valve body tube adapter protruding from the bottom of the valve body. Secure the control valve onto the media tank by turning the control valve clockwise
(to the right when viewed from above) until it contacts the media tank, then approximately 1/4 turn more. Take care to not cross thread the media tank
with the control valve threads when starting.
(c) If the bypass valve/yoke assembly is not factory pre-installed, attach to back of control valve using adapter couplings, clips and screws.
CAUTION
CAUTION
To reduce the risk associated with skin, eye, and respiratory tract irritation from dust from fi lter media during installation:
• Gravel and several types of fi lter media may be used in this product, depending upon the application. During installation, dust may cause irritation to skin,
eyes, and respiratory tract, and may affect lungs.
• Utilize a NIOSH-approved dust fi lter mask and appropriate eye protection when handling and pouring gravel and fi lter media.
• To request an MSDS relating to the media shipped with this product, call 203-238-8965 or go to www.3M.com, select country, and use the search engine to
search MSDS. For emergencies, call 800-364-3577 or 651-737-6501 (24 hours).
3-1
SECTION 3: MAINTENANCE

