2-2
Step 1
(a) Remove control valve by rotating the valve head assembly to the left or counter-clockwise. Before loading the media into the tank, the distributor must be all
the way to the bottom of the tank. It is therefore recommended that the distributor be removed and the gravel dumped out and saved. The distributor tube
should then be replaced in the empty tank making sure it rests on the bottom. Use the centering tool provided to cover the distributor tube and prevent media
from entering the distributor. Material lodged in the distributor tube can enter the control valve, thus damaging it. First, pour the gravel removed earlier back
into the media tank and then add the media. Utilize the centering tool to help keep the distributor tube centered in the media tank opening to aid in mounting
the control over the distributor tube. Never add media to a level above the line on the side of the tank. Additional media may have been shipped for future
replenishment.
(b) Fill the tank with water. Lubricate o-ring on tank adapter with silicone grease and reinstall the control valve. Make sure the distributor tube fi ts into the valve
body tube adapter protruding from the bottom of the valve body. Secure the control valve onto the MEDIA tank by turning the valve clockwise (to the right
when viewing from the top)until the valve contacts the media tank, then approximately 1/4 turn more. Take care to not cross thread the MEDIA tank with the
control valve threads.
(c) If the bypass valve/yoke assembly is not factory pre-installed, attach to back of control valve using adapter couplings, clips and screws.
IMPORTANT NOTE
IMPORTANT NOTE
Never add media above line indicated on side of tank. You may have received more media than required for the initial fi ll, save extra media for future
replenishment.
CAUTION
CAUTION
To reduce the risk associated with skin, eye, and respiratory tract irritation from dust from fi lter media during installation:
• Gravel and several types of fi lter media may be used in this product, depending upon the application. During installation, dust may cause irritation to skin,
eyes, and respiratory tract, and may affect lungs.
• Utilize a NIOSH-approved dust fi lter mask and appropriate eye protection when handling and pouring gravel and fi lter media.
• To request an MSDS relating to the media for this product, call 203-238-8965 or go to www.3M.com , select country, and use the search engine to search
MSDS. For emergencies, call 800-364-3577 or 651-737-6501 (24 hours).
Step 2
Shut off water at main supply. On a private well systems, turn off power to pump and drain pressure tank. Make certain pressure is relieved from complete system
by opening nearest faucet to drain system.
CAUTION
CAUTION
To reduce the risk associated with property damage due to water leakage:
•
SHUT OFF FUEL OR ELECTRIC POWER SUPPLY TO WATER HEATER
after water is shut off.
Step 3
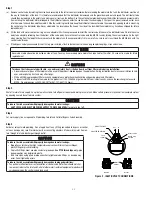
Cut main supply line as required to fi t plumbing to Inlet and Outlet of Bypass Valve Assembly.
Step 4
Solder or solvent weld plumbing. Do not apply heat to any fi tting connected to bypass or control
valve as damage may result to internal parts or connecting adapters. Make certain water fl ow en-
ters through inlet and discharges through outlet.
CAUTION
CAUTION
To reduce the risk associated with property damage due to water leakage:
•
Do not
use a torch or other high temperature sources near fi lter system, cartridges,
plastic fi ttings or plastic plumbing.
• On plastic fi ttings, never use pipe sealant or pipe dope.
Use PTFE thread tape only,
pipe
dope properties may deteriorate plastic.
• Take care when using pliers or pipe wrenches to tighten plastic fi ttings, as damage may
occur if over tightening occurs.
To reduce the risk associated with property damage due to plugged water lines:
• Pay particular attention to correct orientation of control valve. Water fl ow should match ar-
row on control valve. The Inlet and Outlet of other water treatment equipment products will
vary depending on the control valve brand used.
CLIP &
SCREW
DRAIN LINE
FITTING
OUT
IN
BYPASS VALVE
SERVICE
BYPASS
ROTATE
KNOBS
BYP
ASS
BYP
ASS
ADAPTER COUPLING
ADAPTER YOKE
Figure 2 . INLET/OUTLET CONNECTIONS

