background image

Pannoramic 250 FLASH III 3.0.2 User’s Guide

1.1.4 Main parts of the Base Unit

1.1.4  Main parts of the Base Unit

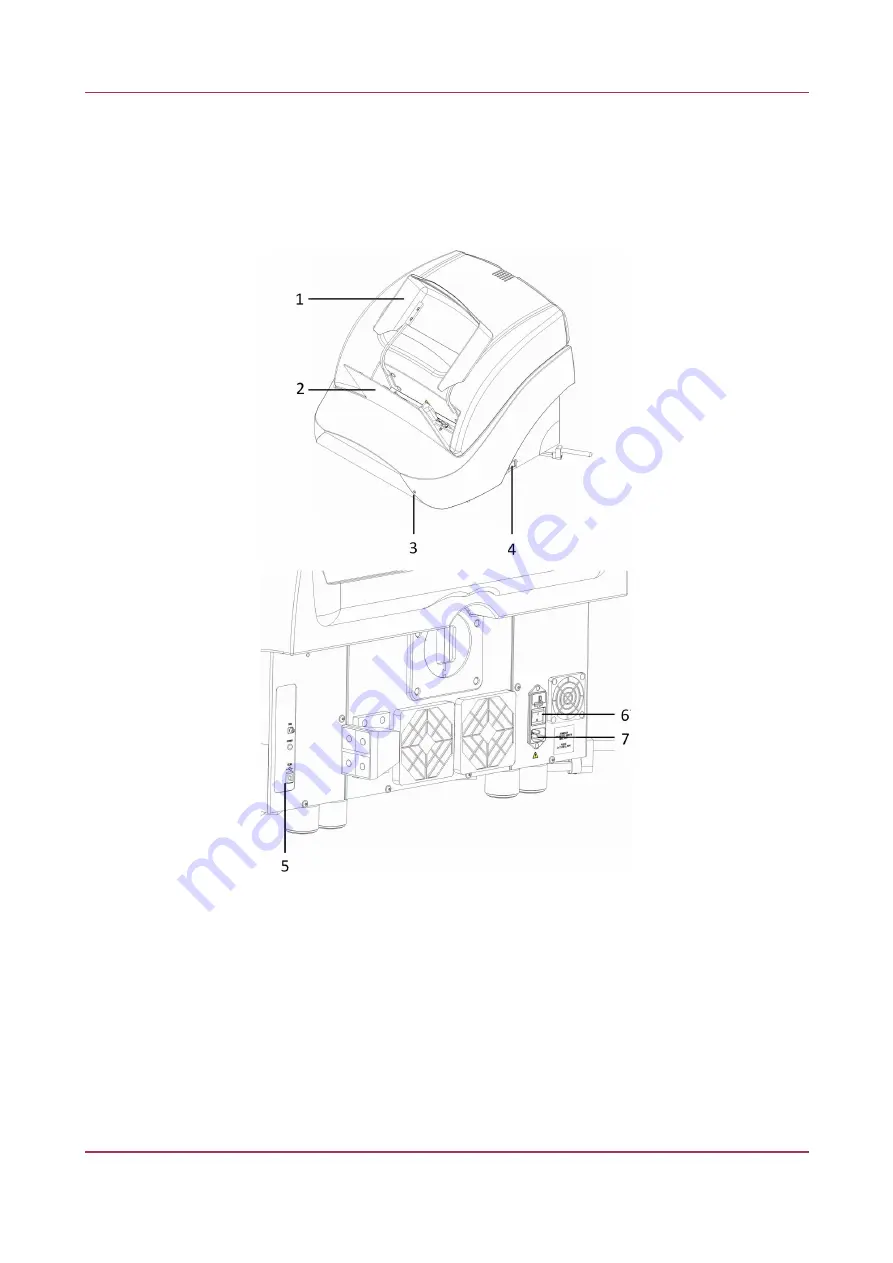
The following figures show the main parts of the base unit.

Figure 2 – Main parts of base unit

1. Protective FL cover
2. Input and output stack for magazines
3. Cover release hole
4. Power supply switch
5. USB port
6. Main power switch
7. Power supply cable connector

September 16, 2020 – Rev. 1

3DHISTECH Ltd.

17(156)

Summary of Contents for Pannoramic 250 FLASH III

Page 1: ...P250FIII302 UG Rev1 Pannoramic 250 FLASH III 3 0 2 User s Guide Sep 16 2020 Rev 1 ...

Page 2: ... 2 2 Hardware Options 19 1 2 3 Control Software 23 2 Installation 24 2 1 Operation system of the control computer 24 2 2 Control computer ports 26 2 3 Connectors and cables 27 2 4 Mounting the Lumencor SPECTRA 6 unit 27 2 5 Power the scanner on off 29 3 Operating Slides and Magazines 30 3 1 Preparing Slides and Magazines 30 3 2 Affixing Barcode Stickers to Slides 32 3 3 Inserting and Removing Slid...

Page 3: ... 107 5 3 3 General functions at the slide menu 108 5 3 4 Slide view with card 109 5 3 5 Table view mode 112 5 3 6 Card collection view mode 113 5 4 Profile editor for Scheduler 114 5 5 Progress features 115 5 6 Settings and Service 116 5 6 1 Settings 116 5 6 2 Service 125 5 7 Hosting 133 6 Using Profiles 135 7 Troubleshooting and Maintenance 137 7 1 Recovery functions 137 7 2 Safety Information 13...

Page 4: ...Pannoramic 250 FLASH III 3 0 2 User s Guide 7 4 5 Removing a Magazine from the Transporting System 147 7 4 6 Transporting 149 8 Technical Data 151 Index 156 September 16 2020 Rev 1 3DHISTECH Ltd 4 156 ...

Page 5: ...EP 1644767 US 7327515 The above mentioned granted patents granted utility model registered trademarks pending international and national patent applications and the other corresponding IP are the sole properties of the 3DHISTECH Ltd 3DHISTECH Ltd is not liable for damage of whatever nature including but not limited to general or specific damage indirect damage consequential damage or incidental da...

Page 6: ... as these may interfere with the proper operation THE SOFTWARE IS PROVIDED AS IS AND WITHOUT WARRANTY OF ANY KIND EXPRESSED IMPLIED OR OTHERWISE INCLUDING WITHOUT LIMITATION ANY WARRANTY OF MERCHANTABILITY OR FITNESS FOR A PARTICULAR PURPOSE Further Information For the latest information on 3DHISTECH products and services please visit our website at the following URL http www 3dhistech com Company...

Page 7: ...example function keys such as F11 or the Ctrl M key combination Example Cross references within this document or to other documents Warning It might cause irreversible damage or harm to the user of the product or the product itself if this instruction is not followed Caution It might cause the product not to work properly if this instruction is not followed Note Calls attention to some important f...

Page 8: ...rements for in vitro diagnostic IVD medical equipment UL 61010 1 2012 R4 16 Safety Requirements for Electrical Equipment for Measurement Control and Laboratory Use Part 1 General Requirements CISPR 11 2009 A1 2010 Limits and methods of measurement of radio disturbance characteristics of industrial scientific and medical ISM radio frequency equipment Conformity with Directive 2014 30 EU is marked b...

Page 9: ...al Safety for more information and a copy should be kept in the close proximity or near the scanner for reference whenever required This User s Guide is a part of the Pannoramic 250 FLASH III system identified by the following article numbers PFL3BADC000A0010001 PFL3BADC000A0030001 PFL3FADCGHMBA01SOL1 PFL3FADCGHMBA03SOL1 PFL3FADCGHMCA01SOL1 PFL3FADCGHMCA03SOL1 PFL3FADCGHMBA01LUM1 PFL3FADCGHMBA03LU...

Page 10: ...is performed by other than duly authorized service personnel All claims for warranty and warranty services will be null and void in any such case Warning Insert the power cord plugs only into a grounding outlet The protective action must not be rendered ineffective by extension cables without protective conductor The Pannoramic 250 FLASH III has a built in protection which must not be rendered ine...

Page 11: ...ing the insert Warning Clogged or covered ventilation slots may result in a heat build up with a damaging effect for the Pannoramic 250 FLASH III In extreme cases this may also cause fire Keep the ventilation slots always unobstructed and refrain from inserting or dropping objects into a ventilation slot Warning A defective Pannoramic 250 FLASH III is not classified as domestic waste It must be pr...

Page 12: ...anty will be accepted in cases of natural wear notably wear and tear parts or improper product handling The Product Manufacturer will refuse any liability in the event of damage resulting from faulty operation negligence or unauthorized intervention into the product notably from the replacement of product parts or the usage of accessory parts from other manufacturers Any such case will void the us...

Page 13: ...ge and covalent modification therefore fluorescent signals cannot be properly detected SWAP A file that is used as a temporary location on the computer to store information that is not currently used by the RAM Virtual Slide Slide A digital image of a thin glass plate on which specimens are mounted for microscopic study a dynamic interactive image that you can manage save magnify zoom name evaluat...

Page 14: ...nformation loss Warning Any modification to a hardware or software component of the PC will highly affect the functionality of the scanner program 1 1 2 Features and Benefits The Pannoramic 250 FLASH III offers world class brightfield and fluorescent whole slide scanning on up to 9 channels An outstanding 0 19 µm pixel in Brightfield and 0 16 µm pixel in Fluorescent resolution is achieved with a 4...

Page 15: ...t slides against photo bleaching Image quality Image sharpening both for Fluorescence and Brightfield feature which improve the visual appearance of digital slides Focus algorithm finds the focus which is most appealing to the human eye Motorized camera changer for color camera for brightfield and a cooled monochrome CCD camera or a scientific CMOS camera for fluorescence Motorized Objective chang...

Page 16: ...tion Labels The following figure contains the labels used on the Pannoramic 250 FLASH III main unit Figure 1 Warning and information labels NOTE The symbol at the magazine feeder refers to the possibility of exposure to biological hazards whenever handling slides September 16 2020 Rev 1 3DHISTECH Ltd 16 156 ...

Page 17: ... Unit The following figures show the main parts of the base unit Figure 2 Main parts of base unit 1 Protective FL cover 2 Input and output stack for magazines 3 Cover release hole 4 Power supply switch 5 USB port 6 Main power switch 7 Power supply cable connector September 16 2020 Rev 1 3DHISTECH Ltd 17 156 ...

Page 18: ...components 1 2 1 Pannoramic 250 FLASH III system The following figure shows the main parts of the Pannoramic 250 FLASH III system Figure 3 Pannoramic 250 FLASH III system overview 1 Pannoramic 250 FLASH III base unit 2 Monitor 3 Mouse 4 Control computer 5 Keyboard 6 Slide magazine 7 Lumencor SPECTRA Light Engine illumination unit September 16 2020 Rev 1 3DHISTECH Ltd 18 156 ...

Page 19: ...wing ultra fast scanning up to 180 fps pco edge 4 2 Equipped with a high quality sCMOS image sensor for fluorescent applications allowing fast scanning and an outstanding low read out noise High quantum efficiency cooled with Peltier element Point Grey Grasshopper 3 Mono 1 CCD monochrome camera for high quality sensitive fluorescent applications pco edge 4 2 bi Back illuminated 16 bit sCMOS pco ed...

Page 20: ...nd adapter 2 brightfield position at the same time They are set and switched by the software automatically without any human assistance This system also enables switching between brightfield and fluorescent scanning by one click Warning The installation of the cameras in Pannoramic 250 FLASH III must be carried out by trained professionals In any other case the warranty will be automatically voide...

Page 21: ...irst objective 1 and the second objective 2 Plan Apochromat 10 NA 0 45 20x NA 0 80 or 40x NA 0 95 objectives can be used You can change between the objectives with one click This helps you to select the magnification and resolution that is the most suitable for your requirements Important Note that higher resolution results in slower digitization process September 16 2020 Rev 1 3DHISTECH Ltd 21 15...

Page 22: ...II Basic Fluorescence Option base unit completely equipped with Point Grey Grasshopper 3 camera and Lumencor SPECTRA 6 fluorescence illumination unit trigger cable and filters for fluorescence scanning Pannoramic 250 FLASH III Advanced Fluorescence Option base unit completely equipped with Adimec QUARTZ Q 12A180 camera for Brightfield scanning and with pco edge 4 2 camera and Lumencor SPECTRA 6 fl...

Page 23: ... 1 2 3 Control Software Pannoramic Scanner control software Optional Fluorescence Extended focus Z stack Barcode reader licensed feature Converter software 2 3 2 RTM only available in Full scanner install mode Pannoramic Viewer software fully functional Optional CaseCenter CaseViewerPannoramic Viewer TMA module 3D Reconstruction module QuantCenter HistoQuant NuclearQuant MembraneQuant FISHQuant CI...

Page 24: ...nough space for ventilation and for safe and efficient operator maintenance Caution If the temperature of the location where the scanner is operated is much lower than the temperature of the equipment for example the device is brought in from an outer storage or has been transported to the site please leave enough time to normalize the temperature differences before operating the device within the...

Page 25: ...ecommend that you use the SWAP partition for storing temporary files generated during scanning as the lack of space required will result in interruption of scanning Microsoft Hardware Driver Updates We are not taking responsibility for errors caused by automatic hardware driver updates issued by Microsoft so we recommend that you turn the automatic updates option off Third Party Driver Updates War...

Page 26: ...nents from each other Figure 7 Ports on control computer 1 Status display 2 DVD drive RW 3 Power on off button 4 Earphone and microphone 3 5mm Jack ports 5 2x USB port 6 Power supply connector 7 PS 2 mouse port 8 PS 2 keyboard port 9 4x USB port 10 2x USB port 11 Network port 12 Matrox Radient eCL Camera Link ports for pco edge 4 2 camera or 4x USB 3 0 ports for Point Grey Grasshopper 3 camera 13 ...

Page 27: ... supply cable between 230V 110V and Pannoramic 250 FLASH III main unit Trigger cable between pco edge 4 2 and Lumencor SPECTRA 6 fluorescent illumination unit USB to RS232 serial communication cable between Lumencor SPECTRA 6 fluorescent illumination unit and control computer Warning Only connect external devices that are safety extra low voltage rated to the instrument to avoid the risk of electr...

Page 28: ... Lumencor SPECTRA 6 unit 2 upside down Figure 8 Mounting position 4 Move the lever 1 to the open position which is to the right when facing the front of the unit see Figure 9 Figure 9 Positioning locking lever 5 Attach the Lumencor SPECTRA 6 unit so the contact surfaces at the mounting point are tightly compressed see Figure 10 Step 1 September 16 2020 Rev 1 3DHISTECH Ltd 28 156 ...

Page 29: ...nner and the illumination unit 9 Connect TTL trigger cable between pco edge 4 2 camera out 4 and the Lumencor SPECTRA 6 unit TTL and USB to RS232 communication cable between the Lumencor unit and the computer Figure 11 Lumencor SPECTRA 6 light engine connecting ports 2 5 Power the scanner on off The main power switch is a rocker switch see Figure 2 part 4 in chapter 1 1 4 that is located at the bo...

Page 30: ... 19 mm Corners 45 beveled or 90 cut corners Edges Ground or cut Warning Always wear personal protective equipment safety goggles gloves and coat when working with bio hazardous material or slides Warning Do not use a slide when it is broken or its edges are not properly cut or grounded Using such slides can lead to injury Warning If the scanner is equipped with a 40 objective the outer rim of the ...

Page 31: ...ead for marking area of interest Note The distance between slide edges and the edges of the mounted coverslip should be 1 2 mm and they should be parallel with each other Note Fluorescent signals become more easily detectable for the scanner therefore resulting in a brighter and better image by treating the slide with a formula that prevents rapid photobleaching of fluorescent reagents e g VECTASH...

Page 32: ...ickers to slides do the following 1 Peel off the barcode sticker 2 from the roll 2 Stick it on the colored label area of the slide 1 on the specimen side Caution Ensure that a marginal space of 1 2 mm remains on all sides between the sticker and the label area outer limits It is vital for barcode identification Do not let barcode sticker protrude from slide edges or stick on the coverslip surface ...

Page 33: ...h its barcode end 2 first The symbols on the side of the magazine demonstrate the proper way of inserting slides The magazine and its proper insertion is identified by a sensor in the main unit upon actuating it by the magnet in the side of the magazine 4 Note You should insert several slides into a magazine without empty slots Begin the insertion on position 1 of the magazine Caution To insert or...

Page 34: ...ken glass and other mounting media residues Slide loader will only operate safely and properly if magazines are clean 3 3 2 Insert and remove magazines Figure 14 Inserting a magazine Pannoramic 250 FLASH III has two pairs of guide rails 5 to manage the loading and unloading of magazines September 16 2020 Rev 1 3DHISTECH Ltd 34 156 ...

Page 35: ...tly If the magazine is placed correctly there may be a problem with the sensor In this case contact 3DHISTECH Service Support 1 Remove magazine cover before you insert magazines 2 Put a magazine 2 into the input stack 3 The magazine s rack the back side of the magazine 1 must contact with the guide rails 5 with its open side towards the scanner NOTE The symbol at the magazine feeder refers to the ...

Page 36: ...e 16 Misplaced magazine Note The input stack can be filled with a maximum of 11 magazines in addition to the one in the magazine loader Caution Do not place magazines into the output stack 4 or remove magazines with already digitized slides from there during the digitization process Only remove magazines from the output stack when you have finished digitization of all slides September 16 2020 Rev ...

Page 37: ...s and lay it down to the upper cover of the unit then insert magazines When scanning slides close the FL protective cover 1 of the base unit after inserting the magazine s into the input stack 1 Mount the protective cover properly 2 After finishing the digitization process open the protective cover 3 Remove the magazine s from the output stack and put the magazine cover on them September 16 2020 R...

Page 38: ...lanner scanner modes and the Service mode After selecting the required mode the main window is displayed Microscope mode for digitization of individual slide or individual rack set scanning profile of the slide run Live teleconsultation use Live microscope Planner mode plan the entire scanning procedure assign one or more profiles to each slide define Brightfield and Fluorescence or mixed scanning...

Page 39: ...anner 3 0 2 main window The following functions are available for you to select from at the main menu bar switch between Microscope and Planner modes Microscope initialization all motors and the preview camera during start up Brightfield mode the camera set for brightfield scanning is initialized Fluorescence mode the camera set for fluorescence scanning is initialized Remote server hosting start ...

Page 40: ...he left of the control bar then click Change to load another magazine in the feeder If there is a lens marking at the bottom of the position preview in the magazine image the preview image of that slide has already been created and if a question mark is displayed the slide was not yet loaded A slide that is loaded at the moment is highlighted with a blue background and outer line Microscope object...

Page 41: ...re time of 200 ms is set the pixel values are multiplied by 2 and the exposure time is reset to 100 ms Therefore the resulting images will have a higher noise level This function is useful for fluorescent live view where in spite of the higher noise level the resulting image will be refreshed as in normal mode Image intensity The intensity of the pixel at which the cursor is placed is displayed by...

Page 42: ...cal Slide naming Slide name can be defined manually or automatically If you want to name the slide manually turn on the Manual naming function and if you want to generate slide name based on the corresponding settings set in Preferences activate Generate function Barcode parsing Select the type of barcode profile from the drop down list for slide naming though parsing the barcode string By using D...

Page 43: ...ow functions Click at the left of a list item to open the Barcode editor window in which the settings of the selected profile can be edited If you click Add new item on the list blank input fields will be displayed September 16 2020 Rev 1 3DHISTECH Ltd 43 156 ...

Page 44: ... subfolders when parsing data from the barcode Type name of the subfolder in the Folder1 Folder2 etc fields depending on the depth you want to define Click Save to apply settings and click Create new at the top of the panel to create a new profile item Slide save path Set destination folder in the input field by typing in the path or clicking to browse for the folder Free space Free space capacity...

Page 45: ...is performed without overlapping Tiled TIFF settings Click Reset to set everything to default Zero based index in names Z Stack layers of the generated TIFF files will be indexed starting with 0 and the focus distance of the actual layer will not be included inactive by default Display FL channels RGB colorized a 24 48 bit color TIFF image is generated based on the FL channels File size is bigger ...

Page 46: ...sed 8 bit Uncompressed native color depth of the source slide is inherited 16 bit is supported Compression rate default is 80 on a scale of 1 100 Zoom scale set the level of zoom at which the TIFF image is created in order to get the smallest file size possible DICOM settings Click Reset to set everything to default Frame number maximum default 0 Optical path frame default 3 Pixel size accuracy de...

Page 47: ...luation of the completed digital slide by using the integrated QuantCenter right after the scanning has finished Warning Make sure that the proper Quant probe XML file is selected for the quantification of the slide as the resulting measurement data will be incorrect Note The scanner control software is compatible with licensed QuantCenter application only otherwise the control software may close ...

Page 48: ... displayed in the QuantCenter Processing Queue window For further information on QuantCenter please read QuantCenter User s Guide Other settings Scan separately The FOV areas of the preview image will be scanned and saved separately as discrete digital slides Scan to Server Figure 20 Scan to Server September 16 2020 Rev 1 3DHISTECH Ltd 48 156 ...

Page 49: ... window Display Name Host Name Protocol Figure 21 Window of server editor Server Editor stores each of the created server in a list List entries can be removed or a new entry can be added if required With the Filters function you can narrow down the results by searching for a specific server data By double clicking a list item server data will be loaded in the Scan to Server panel After loading se...

Page 50: ...ing can be modified in the Barcode Editor window Figure 22 Window of Barcode Editor If using MIL for barcode reading you can select the following barcode types 1D barcode types Code 39 Code 128 Code 16K Interleaved 2 of 5 Standard 2 of 5 IATA 2 of 5 Matrix 2 of 5 Telepen Code 93 Code 11 MSI Codabar Patch Code Pharmacode EAN 13 EAN 8 September 16 2020 Rev 1 3DHISTECH Ltd 50 156 ...

Page 51: ... based on the CaseID containing slide and patient data stored on HIS LIS Therefore Folder Case Block and Slide name field data cannot be modified only a profile can be selected Activate Generate to create slide name automatically based on the criteria defined in the corresponding settings of the Preferences window Activate the option Manual naming to name slides manually Slide save path Synchroniz...

Page 52: ...preview of slides in the magazine is taken automatically Available preview types are the following from top to bottom Brightfield Darkfield Pre Scan FL Pre Scan High Resolution FL Pre Scan High Resolution FL Figure 23 Take all preview selector Activate Retake Preview for all the slides in the magazine if necessary This operation can be initiated from the slide preview window as well The scanner so...

Page 53: ... window containing a list of previously saved profiles is opened Based on the Illumination type profiles are grouped into two clusters Brightfield and Fluorescence Additional profiles can be created after clicking Create You can also search for a specific profile by filtering based on the following data Objective type Multilayer mode Illumination Filters Modify date Last use date Click Search to r...

Page 54: ...Pannoramic 250 FLASH III 3 0 2 User s Guide 4 2 Main window functions Figure 24 Profile browser window September 16 2020 Rev 1 3DHISTECH Ltd 54 156 ...

Page 55: ...into the text field and clicking Save as Reset Zoom This function is active only in Live view at 1 1 magnification Live image magnification Settings and Service function descriptions are detailed in chapter 5 6 Settings and Service Help In the About window the version of the software and licensing details are included September 16 2020 Rev 1 3DHISTECH Ltd 55 156 ...

Page 56: ...ter 5 6 Services and Settings for more information Settings see chapter 5 6 Services and Settings for more information In accordance with the selected mode the Profile Settings Panel and the Microscope Control Panel views are modified 5 1 Brightfield Scanning Mode Microscope View consist of three different sections Main functions Located at below the window header these functions are identical in ...

Page 57: ...e in the selection boxes This is useful if focusing was not targeted on the specimen but on a spot on the coverslip Focus distance the distance of focal points can be set to create a focus map based on which the software calculates interpolated focus values one step in distance means one FOV Auto focus Focus value is set automatically to match sample characteristics Manual focus The manually set f...

Page 58: ...e Settings panel Specimen threshold This value is definable manually This sets the sensitivity of the specimen detection To set the desired threshold value manually change the setting in the Specimen threshold level selection box in the range of 0 255 The default value is 220 Smaller values result in a more sensitive scanning meaning that more areas will be digitized however this may also include ...

Page 59: ...ox in the range of 0 255 This sets the sensitivity of the specimen detection inside the marker area To set the desired threshold value manually change the setting in the Specimen threshold selection box in the range of 0 255 The default value is 105 Everything within marker To scan everything within the marked area check the Everything within marker selection box Alternatively click in the preview...

Page 60: ...men will also be scanned Often these holes contain small sample objects that otherwise would not be scanned Remove specks If selected the scanner does not digitize objects smaller than the predetermined size This helps filtering specks and other uninteresting objects out Set the maximum size of specks not to be digitized by adjusting the slider Dilate mask Adjust the slider to enlarge or decrease ...

Page 61: ...ngle layer of the slide By choosing the Extended focus option the software selects the sharpest image from each focus level for each image field and combines them into one single image Therefore those parts that were blurry in auto manual focus will also be sharp This method guarantees the maximum depth of sharpness however it reduces digitization speed Figure 29 Focus level and step size Z Stack ...

Page 62: ...ord the next FOV Flash This is a much faster method than of the Stop and go The slide tray is moved in a vertical line continuously from bottom to top so that a stack of FOVs is recorded during it movement The tray stops only at the end of the recorded column Use Color matrix Select an applicable preset color profile to be used for Brightfield scanning from the drop down menu Settings according to...

Page 63: ...l slides Use this function when the slide is completely covered by the specimen for example blood smear thereby making compensation image capture impossible For such slides use an empty slide with coverslip to grab a compensation image If you select this the software will not create new compensation images for each slide Compensation images are reference images used for white balancing and shading...

Page 64: ...ng and selection of the area to be scanned Figure 31 Preview panel Threshold options This section is located at right side of the preview window Scanmap Source is designed to set which type of scanmap is used on the preview image This scanmap is displayed automatically in the Profile Scanmap Source setting Selectable scanmap types are the following Use threshold Load previously saved Scanmap from ...

Page 65: ...ges of the coverslip are not detected as specimen to be scanned Depending on the threshold level it is possible that the edges of the coverslip are detected as areas to be digitized Figure 32 Preview image with and without coverslip edge Caution It requires lots of time since it cannot find focus neither on the edges nor on specks to digitize coverslip edges Select Remove coverslip function to eli...

Page 66: ...tings have two different statuses Auto threshold It automatically detects the specimen in the preview image Caution Make sure that the detection result is acceptable for you Otherwise set the threshold value manually Manual threshold Set threshold value manually or calculate value on the actual preview with Calculate Threshold function which is active only if setting the value manually This sets t...

Page 67: ...hold level selection box in the range of 0 255 This sets the sensitivity of the specimen detection inside the marker area To set the desired threshold value manually change the setting in the Threshold selection box in the range of 0 255 The default value is 212 Everything within marker This function is available only to select if the Use marker with threshold function is activated To scan everyth...

Page 68: ...efine the Live image that you can access from the Live view Union Add the selected areas to the preview Mark area for scanning based on the shape selected in the Preview Toolbar This area will not be scanned Erase Delete selected areas from the preview image Deselection is made based on the selected shape from the Preview Toolbar This area will not be scanned Figure 34 Not scanned selection Edit T...

Page 69: ...lection by defining a polygon shape Finish area selection by double clicking with the mouse at or near the starting point TMA tool TMA tool is used for selecting TMA spots on TMA slides You can set the selection settings on the following four tabs TMA Grid Setting This function is enabled only if a TMA grid has already been placed on the preview image Set grid parameters row and column numbers and...

Page 70: ...t to default Use selection box restriction The preview image shows the area that will be digitized with a red and or an orange mask If the Use selection box is enabled and the crop function is selected a black frame displayed in the image and only the area inside the box is scanned It is useful if you only want to scan the area that is equivalent with the size of the coverslip so external specks w...

Page 71: ...Pannoramic 250 FLASH III 3 0 2 User s Guide 5 1 2 Microscope Control Panel Figure 38 Colors in preview image and Label area switching button September 16 2020 Rev 1 3DHISTECH Ltd 71 156 ...

Page 72: ...review camera detects the marker pen The inside areas appear in red color and will be digitized Areas scanned in This color is only displayed during scanning Hide all layers All the layers will be hidden existing but not visible The original preview image is shown but layer information are still valid Note that while this function is active none of the other preview functions can be selected NOTE ...

Page 73: ... limits by selecting the desired value in the selection boxes By using Set Range the Lower limit value is set to 32 of the current focus value and the Upper limit value is set to 32 of the current focus value This is useful if Auto Focus does not find the focus on the specimen but on the coverslip Also this makes the focusing sequence faster For manual focusing define the manual focus step size by...

Page 74: ...ntensity or gray level of the image at that point The pixel intensity at the coordinate pointing at with the cursor is displayed in the Image Intensity window Figure 42 Window of Image Intensity 5 1 2 5 Stage positioning Click to activate Stage Positioning Tool to navigate on the slide so to perform microscope movements on the Live image with this control function The number at the center of the c...

Page 75: ...cess to main preview related functions Drag Draw Erase Retake previews Settings Toggle deletion always on top Reset zoom Window auto size Clean scanmap Figure 44 Quick toolbar 5 1 4 Quick microscope functions A quick microscope functions tool can be displayed upon right clicking on the background of the main window outside the preview window It includes quick access buttons to main functions Figur...

Page 76: ... FLASH III 3 0 2 User s Guide 5 1 4 Quick microscope functions Autofocus Live tools Fast mode Screenshot Magnifier Ruler Image processor plugins Add scanmap Auto exposure September 16 2020 Rev 1 3DHISTECH Ltd 76 156 ...

Page 77: ...ing Exp Time If Auto Exp is inactive exposure time of each filter can be defined manually Values such as Calc Exposure time in Microscope Control panel and those that are specified manually are loaded in these fields Value units can be the following microsec millisec sec Exc The given value specifies the excitation intensity in percentage of the illumination unit DG Digital Gain This is camera dep...

Page 78: ...e focus value turn live image on and set a suitable focus position You can accept the current Z value by clicking Assign Current Interpolated focus If you select the Interpolated focus option the coarse focus level is calculated from three different focus points of the specimen Carry out a manual focusing sequence in the preview image on those three points Set the correct focus value of the desire...

Page 79: ...xposure The exposure time during focusing it can have three states Short Normal Long Sample detection The Sample detection panel offers options for setting threshold and the selection of scannable areas Source Brightfield preview a normal type of illumination in the microscope for scanning the slide This option is recommended when scanning in Brightfield mode Darkfield sample detection is performe...

Page 80: ...this may also include specks or other imperfections of the slide Greater values result in a less sensitive scanning but it is possible that some of the smaller specimen areas will not be digitized Auto Threshold By clicking the specimen will automatically be detected in the preview image Caution Make sure that the detection result is acceptable for you Otherwise set the threshold value manually or...

Page 81: ... activate this function Figure 47 Scan everything within the marked area selected not selected Threshold enhancement Remove coverslip If selected the edges of the coverslip are not detected as specimen to be scanned Depending on the threshold level it is possible that the edges of the coverslip are detected as areas to be digitized Figure 48 Preview image with and without coverslip edge September ...

Page 82: ...ider Dilate mask Adjust the slider to enlarge or decrease the scanned area The edge is extended discretely by 100 µm each time Scanmap option The previously saved scanmap can be loaded for use Select one of the following as Scanmap source Use Threshold Preview settings set in Microscope Controller Panel Preview window are applied to create a scanmap Loaded scanmap This function is useful if the sl...

Page 83: ...nd below the FOVs are captured Therefore it is advised to choose an odd number for the focus levels Separate layers are created and stored this way and can be opened with Viewer applications The Z Stack slide contains the extended focus layers Flash Z stack This function allows the scanning of Z stack layers with flash illumination Each layer is saved as a single slide and are stored in a specific...

Page 84: ...re time consuming Note Make sure to select the Change filters at each field of view option if using multi band filter for multi channel digitization Caution If the specimen area is barely visible it is possible that the software will analyze that area as an empty one Maximum exposure time A limit value can be set to determine that the exposure time cannot be longer than the time of focusing and ca...

Page 85: ...ng scanning Legacy uses original extended focus algorithm it is recommended for wide field fluorescence scanning Note that this algorithm is optimized for scanning large areas so if the size of the area to be scanned is insufficient the correction might not be perfect Maxima the final image is made up from all of the layers created areas pixel groups with the highest intensity are combined togethe...

Page 86: ...set in the value box Greater values result in better quality but larger files The default setting is 80 Bit depth 8 bit Stitching Use Stitching function enables the seamless stitching of digital tiles Sharpening Select this option to improve the visual appearance of digital slides Save focus quality The measurement of focus quality correctness of average focus on layers is saved This option is ina...

Page 87: ...canned Figure 51 Pre scan preview image Threshold options This section is located at right side of the preview window Scanmap Source is designed to set which type of scanmap is used on the preview image This scanmap is displayed automatically in the Profile Scanmap Source setting Selectable scanmap types are the following Use threshold Load previously saved scanmap from file Custom scan map Septem...

Page 88: ...ates a High Resolution fast FL preview image of every FOV within the selected area in single layer DAPI with an illumination time of 20ms that is displayed in the Profile Wizard window Scanning process takes a couple of minutes only and cannot be interrupted Pre scan high resolution creates a High Resolution fast FL preview image of every FOV within the selected area in single layer DAPI with an i...

Page 89: ... holes inside the specimen will also be scanned Often these holes contain small sample objects that otherwise would not be scanned Remove specks If selected the scanner does not digitize objects smaller than the predetermined size This helps filtering specks and other uninteresting objects out Set the maximum volume of specks manually in the setting window Threshold Auto threshold Select this opti...

Page 90: ...n for example weak contrast it can help to encircle completely the specimen with a black marker pen You have to draw a full circle with the pen to enable the detection Marker pen detection will make specimen detection easier by limiting the scanned area Manual setting of Use marker with threshold If this option is selected only the area encircled with a marker pen will be scanned You can define th...

Page 91: ...anmap Position To position the specimen holder that holds the current slide click Position sample and then click on the area of interest on the preview image This will define the Live image that you can access from the Live view Union Add the selected areas to the preview Mark area for scanning based on the shape selected in the Preview Toolbar This area will not be scanned Erase Delete selected a...

Page 92: ...t tools on the Preview toolbar Place focus point You can add manual focus points on the preview image the coordinates of the manual focus points you add are listed on the Focus settings panel NOTE The maximum number of focus points that you can manually add is 100 Rectangle tool Draw rectangle shaped area Ellipse tool Draw ellipse selection Polygon tool Area selection by defining a polygon shape F...

Page 93: ...le Figure 56 TMA tool Grid selector Delete TMA grid by clicking the X at the top right corner and rotate grid by clicking the icon at the bottom right corner Enter the number of rows and columns in the Rows and Columns fields or select the appropriate values with the arrows Enter the distance between two spots on the X and the Y axis in µm in the Core distance fields or select the appropriate valu...

Page 94: ...that will be digitized with a red and or an orange mask If the Use selection box is enabled and the crop function is selected a black frame displayed in the image and only the area inside the box is scanned It is useful if you only want to scan the area that is equivalent with the size of the coverslip so external specks will not be scanned Figure 57 Use selection box September 16 2020 Rev 1 3DHIS...

Page 95: ... on the basis of user settings for example Fill holes in scan area and not detected by the selected threshold value Detected sample areas that will be scanned These areas are digitized They are detected on the basis of the selected threshold value Detected sample areas that will not be scanned These areas are not digitized on the basis of their position for example they are outside the selection b...

Page 96: ...e still valid Note that while this function is active none of the other preview functions can be selected NOTE If all layers are hidden the scanning selection is not visible Separate scanning Discrete sample areas will be scanned separately as individual slides If there are two samples on a slide two separate virtual slides will be created NOTE Discrete areas are numbered in the preview window You...

Page 97: ...2 or SetI3 If you want to go back to any of the previously set focus points click the appropriate button To delete the stored values click Clear Values The software calculates a coarse focus level from the three values determined this way as a basis for the fine focusing routine You can only define the start parameter here This will however speed up the focusing process If you deselect the Use fin...

Page 98: ...Indicator in Fluorescence scan mode Select the types of filters you want to use during scanning You can select the filter types and the number of channels to be used The values in the EXC column define the excitation of the Lumencor illumination in TW define exposure time weight and in the DG the amount of digital gain is displayed It is also available for you to enable Extended Focus EF and or Z ...

Page 99: ...oint The pixel intensity at the coordinate pointing at with the cursor is displayed in the Image Intensity window Figure 63 Window of Image Intensity 5 2 2 4 Stage positioning After clicking you can perform microscope movements on the Live image with this control function The number at the center of the controller defines the step size by which the stage is moved Value can be entered by hand or wi...

Page 100: ... the Live image Figure 65 Settings of preview quick toolbar A Quick Toolbar pops up by right clicking any of the control menu items It allows a quick access to main functions and for FL these are the following Drag Draw Erase Retake preview Settings Toggle deletion always on top Reset Zoom Window auto size Clear Scanmap September 16 2020 Rev 1 3DHISTECH Ltd 100 156 ...

Page 101: ...ol can be displayed upon right clicking on the background of the main window outside the preview window It includes quick access buttons to main functions Figure 66 Quick toolset for microscope Autofocus Figure 67 Autofocus Objective type Figure 68 Objective type 20x 40x Filters Figure 69 Filters September 16 2020 Rev 1 3DHISTECH Ltd 101 156 ...

Page 102: ...ns Microscope mode Brightfield Fluorescence Figure 70 Microscope mode Live tools Fast mode Screenshot Magnifier Ruler Image processor plugins Use pseudo color Add scanmap Figure 71 Live tools Auto exposure Figure 72 Auto exposure September 16 2020 Rev 1 3DHISTECH Ltd 102 156 ...

Page 103: ...eft corner of the main window Figure 73 Progress of the profile modification history Once you are moving the mouse cursor over a unit all of the parameters will become visible in a pop up window Figure 74 Details of parameter modification For the easier perspicuity modifications can be observed in a pop up window by clicking the button in which both the original and the modified values are present...

Page 104: ...d magazine can be planned but also profile assignment to slides of prepared virtual magazines is available to be performed It is also possible to scan to different locations with each profile and virtual slides can be created and stored in different folder or server Planner module offers you three window layout types for planning scans located under the Preferences Planner Layout Selector menu Sli...

Page 105: ...nitiated Stop scan Stop actual process Take all previews Preview images of all the slides in the magazine are taken automatically Select the required preview type from the following from top to bottom Brightfield Darkfield Pre Scan Pre Scan High Resolution Pre Scan High Resolution Figure 76 Take all previews selector By clicking Take all previews the scanner records all the preview images taken of...

Page 106: ... a CSV file can be loaded Note that by the Barcode parameter in the CSV file the barcode of the slide can be specified but this parameter is optional and does not need to be specified Warning To prevent case mix up ALWAYS pay special attention when entering barcodes manually as the slide will be identified based on the barcode specified in the CSV file Before loading the CSV file the required sett...

Page 107: ...ne menu Rack view mode selector Switch view by clicking this button Click to add a virtual magazine to the planner and to remove a magazine from the planner Profile management for selected magazine menu includes the following global settings applicable to all magazines Add current profile for all slides Open profile to all slides Detach current profile from all slides Detach profiles from slides C...

Page 108: ...nail of a slide selected as skipped and click Reset Figure 78 General functions at the slide menu You can apply a selected profile to a defined range of slides at the Profile range section Set the slide positions within the range first and last slide then click You can also set Scan properties range to a slide with a profile attached When more profiles are attached to a slide always the last scan ...

Page 109: ...ppearance settings Planner layout selector to activate this view Depending on the actual view preference selected at slide positions can have a horizontal or vertical layout Slide preview and the list of the assigned profiles are displayed Figure 80 Vertical slide view with card September 16 2020 Rev 1 3DHISTECH Ltd 109 156 ...

Page 110: ...cking or profiles can be added or removed for from the slide respectively The parameters of the assigned profile is displayed in a card The colors of a Brightfield and a Fluorescence profile cards are different Figure 82 Brightfield profile card and Fluorescence profile card September 16 2020 Rev 1 3DHISTECH Ltd 110 156 ...

Page 111: ...s marked as Failed delete status before scanning by clicking If the virtual slide is created the scanning is finished the location path of the destination folder is displayed To re scan and thus recreate the slide click at the front of the displayed path to start the scanning process over Scan properties Profile editor for Scheduler NOTE Once scanning has finished the thumbnail of the digital slid...

Page 112: ...rofiles can either be BF or FL if the scanner is capable to operate in these two scanning modes Figure 83 Table view mode In Table view the following information are displayed in the profile strip based on the loaded profile Profile Illumination Priority Quant probe Objective Filters Progress Scan properties The location of the virtual slide with the selected profile can be defined Scan result Sca...

Page 113: ...d collection view mode If you click the button each of the slide previews are displayed in the window Add profiles by clicking and detach profiles by clicking Functions are the same as with the other modes Figure 84 Card collection view mode September 16 2020 Rev 1 3DHISTECH Ltd 113 156 ...

Page 114: ...f the profile settings in coherence with the view type of the Profile Setting panel Slide preview is displayed in the Preview window in which the scanmap can be modified until beginning the scanning process Every aforementioned Profile setting can be modified depending on the scan profile type being Brightfield or Fluorescence Figure 85 Profile editor for Scheduler window in Planner mode September...

Page 115: ...e is a running hardware operation or scanning procedure Progress content can be therefore different depending on the type of the running procedure Figure 86 Progress information The following information is included in the progress log list during scanning Filter Elapsed time Location Slide name Free space FOV number September 16 2020 Rev 1 3DHISTECH Ltd 115 156 ...

Page 116: ...g and Services by clicking at the right side of the main menu bar 5 6 1 Settings Activate Settings by clicking at the right side of the main menu bar Preferences This panel contains user settings that have global effect on the GUI and some of its functions Figure 87 Preferences September 16 2020 Rev 1 3DHISTECH Ltd 116 156 ...

Page 117: ...with card Table Card Collection Preview window start position Initial position Last position Center screen Live mode Rendered live image is displayed in an embedded window External legacy live image is displayed in an external window Default scanner mode selector Microscope or Planner mode Server scan result viewer Open digital slide with InstantViewer in web browser or CaseViewer when scanning to...

Page 118: ...fication is successful Rotate barcode image by 180 degrees Unload slide after planner scan Enable reloading of magazines with same slide set Automatic empty slide position detection Slide positions of the magazines to which slides are not loaded into will be detected by the software and slides without including any marking etching label on the label area will be classified as skipped Upon selectin...

Page 119: ...lide Scanner Stage Software log All of the circumstances and states of the slide scanning procedure is saved LogID is the sequence number of scanning performed on the scanner in use Profile Name Illumination mode Scan type Scan Start Scan Finished URL Error Filtering for the following parameters is available Scanning date Profile name Illumination mode URL September 16 2020 Rev 1 3DHISTECH Ltd 119...

Page 120: ...use by defining a location in the Planner autosave folder field a scan plan will be automatically saved The save frequency can be set in the Number of reserved autosave box Set the character as value separator used in the Planner export file at the CSV separator field Click Apply to accept modifications Profile behavior settings Figure 89 Profile behavior settings Use profile history save With thi...

Page 121: ...0 Prescan settings Unlike Scan settings in Microscope or Planner mode Prescan toolbar includes the same settings for pre scanning but these depend on the hardware filter settings External application call Figure 91 External application call September 16 2020 Rev 1 3DHISTECH Ltd 121 156 ...

Page 122: ...ill pass them to the software that it starts If no parameter is defined then the parameter will not be passed The default parameters are the following For Slide scanning has finished SLIDENAME transfers the slide name For Scanning error has occurred ERRORTEXT transfers the error message NOTE Pannoramic Scanner control software is able to provide not only the SLIDENAME but the path of the digital s...

Page 123: ...cate an e mail server through which the software sends e mails to the selected recipients Figure 92 Messenger Setup window In the Messenger Setup window the following parameters can be set Message Type E mail Host Address Port E mail Authentication User ID and User password are required Secure Connection SSL If activated the messages will be sent through secured connection If you have properly set...

Page 124: ...l and maintenance functions Emerg position The slide holder will be moved to a position where the slide can be removed manually after opening the cover see chapter 6 3 1 Opening the protective cover Slide removed Click this button to notify the software that you have removed the slide manually PSF settings This panel serves to specify Point Spread Function values PSF values are required to use the...

Page 125: ...he right side of the main menu bar Service password Enter password first to enable service settings for modification Camera settings Figure 95 Camera settings Position of the objectives Objective type Select the type and the magnification level of the objective September 16 2020 Rev 1 3DHISTECH Ltd 125 156 ...

Page 126: ...lor scheme is defined by calibration standard Gamma value 2 2 is applied sRGB standard Microscope Like Color scheme is defined by calibration standard Gamma value White Point D50 Legacy a Color scheme calibrated for the previous software version is applied Custom parameters are freely customizable as follows Color Scheme Calibrated Scheme is defined by the color calibration slide Legacy a Color sc...

Page 127: ...amera rotation Camera rotation angle is measured Alpha blending The two images are blended Lower image position Moves the upper image sideways in distinctive steps Reset all camera rotation Click this button to set camera rotation values to default Save settings by clicking Filter settings Figure 96 Filter settings On this panel you can define which filters occupy which turret positions The actual...

Page 128: ...urret Select Filter type Filter channel and Filter name Check Available for scanning Set Lumencor LED light source set Excitation and Emission wavelength bandwidth values for the selected filter Set Pseudo color Select channels used for grayscale conversion Select Enable Lumencor hardware trigger Click Save to save settings Z difference This function is available only for fluorescence settings it ...

Page 129: ... compensation image s click Take Comp image Click the Stop button to interrupt the process The progress bar at the bottom of the window displays the progress of the compensation image creation Export image Save compensation image Barcode settings By predefining barcode type foreground color black or white the color of the barcode and other settings you enable the Read Barcode option when using the...

Page 130: ...code settings Note If you did not set the barcode type correctly or there is no barcode in the barcode area the software will display the following error message Barcode detection unsuccessful There might be no barcode present September 16 2020 Rev 1 3DHISTECH Ltd 130 156 ...

Page 131: ...econd barcode priority The software is capable to read two barcodes at the same time If activated the second barcode will be the barcode used for slide identification Note When having two barcodes on the slide barcode layout must be consequential Resize image Label image is downsized to 1 4 before barcode reading Apply erode algorithm The Erode algorithm is run before barcode reading It is a usefu...

Page 132: ...ty Objective guide Step size X Y values or navigation arrows Goto Goto Preview Origin Flash intensity Set flash illumination intensity Slide load tester Slide loading operation can be checked for each of the slides in a magazine Click Insert magazine if the prepared magazine or magazines are placed at the bottom of the input guide rails September 16 2020 Rev 1 3DHISTECH Ltd 132 156 ...

Page 133: ...will be the host with direct access to the scanner Note Both the client s and the host s scanner software version must be identical Once client users have connected they will be able to reach the following functions of scanner Live image Preview window Profile content Stage control Each participant see the same live image within the same preview window The active user can navigate on the slide and...

Page 134: ...ultation as a client 1 Start the Lite version of the scanner software 2 Type in your nickname used during the session 3 Enter Host address and Port number 4 Click Connect On Client side the following functions are unavailable inactive Selection box Scan properties Separate scanning Note During a fluorescence Live consultation the shutter of light path will be closed automatically during the host t...

Page 135: ...cent Scan Options Focus frequency in Fluorescent mode Focus frequency in Brightfield mode Compression procedure Use of a fixed compensation image in Brightfield mode ON OFF Use of Save focus quality ON OFF Use of stitching ON OFF Determination of the area to be scanned Use of automatic threshold specimen Use of specimen threshold value Use of Brightfield Darkfield preview image Use of marker pen t...

Page 136: ...tion s Selected focus channel Selected stitching channel Flat field correction ON OFF Intensity statistics Intensity reducing Intensity equalization Sharpening ON OFF Other settings Limitation of focus range ON OFF Use of objective position Enable disable Multilayer options Use of extended focus or Z stack step size and focus level Output resolution September 16 2020 Rev 1 3DHISTECH Ltd 136 156 ...

Page 137: ...and safer use the Planner autosave function allows the taking of automatic backups while creating a scan plan The backups are placed in the default document folder of the actual windows user and can be loaded by clicking the Load plan button 7 2 Safety Information Check cables plugs and connections before operation and if defective or cannot be replaced contact 3DHISTECH Service for support Check ...

Page 138: ...ompliance with the currently valid legal requirements Lumencor SPECTRA 6 illumination unit NEVER switch on the Lumencor SPECTRA 6 light source when it is not mounted to the microscope Do not cover the unit as it would cause abnormal temperature rising Ensure that the light source is mounted well and the fixing lever is closed 7 2 1 Cleaning the device Before cleaning switch off the device and pull...

Page 139: ... the service personnel The product does not start Power supply is interrupted 1 Make sure that both the main power supply switch and the side switch are on see chapter 1 1 4 Main parts of the Base Unit 2 Check cable connections Control software has stopped Magazine jammed 1 Exit control software 2 Switch off control computer and the power supply disconnect power supply cable see chapter 1 1 4 Main...

Page 140: ... across its entire surface Focus range enabled Disable Limiting focus range Poor image quality Imaging error for example chromatic aberrations Contact 3DHISTECH Service for support Warning Do not modify the camera driver settings as the default settings adjusted by 3DHISTECH give the most accurate images Virtual slides show poor stitching in Pannoramic Viewer Scan camera is not properly adjusted f...

Page 141: ...e option Focus range setting is incorrect Change focus range setting All individual images show a shading effect Algorithm failed to find empty image fields Capture a reference image with a blank slide see chapter 5 6 1 Settings 7 3 1 Fluorescent Applications optional The switching of the Lumencor SPECTRA 6 cannot be triggered in spite of trigger connection through the camera Contact 3DHISTECH Ser...

Page 142: ...cables see chapter 1 1 4 Main parts of the Base Unit Warning The opening mechanism is operated by a pre tensioned hinge Be sure that before opening the protective cover open the FL cover first so it will not lash to the cover during opening For information on how to open the FL cover see chapter 3 3 3 Opening Closing the FL protective cover Figure 100 Opening the cover To open the cover you will n...

Page 143: ...t to the main power supply switch at the back side of the Pannoramic 250 FLASH III 3 Release lock 1 by pushing the lever to the left so the insert 2 can be pulled out Figure 101 Location of the fuse compartment 4 Remove insert from the compartment Figure 102 Removing the fuse insert 5 Replace fuses put the insert back into its mounting and push it inwards until you hear a snap so the lever locks F...

Page 144: ...efore you remove a jammed slide cancel the running digitization process terminate the software session and turn the power off Any manipulation performed on a mechanical component must be followed by a complete device initialization routine software restart Figure 104 Removing the slide loader 1 Open the protective cover see chapter 7 4 1 Opening the protective cover 2 Push locking lever 1 to the l...

Page 145: ...ock releases 5 Retrieve slide 3 from the holder 6 Release clamping lever 4 7 Turn down the slide loader 2 back into the original position and pull it inwardly to the Pannoramic 250 FLASH III until the guiding pin 5 connects with the motor block groove again Figure 106 Putting the slide loader back to its place September 16 2020 Rev 1 3DHISTECH Ltd 145 156 ...

Page 146: ...nstalling and removing the filter module 1 Turn off the illumination unit Warning Crush hazard Stop the running digitization process and turn off the scanner refer to chapter 2 5 Power the scanner on off before you proceed with filter module installation or removal 2 Select the desired filter in the corresponding software window see chapter 5 6 1 Settings The filter will be positioned in such a wa...

Page 147: ...filters excitation filter 5 and emission filter 4 7 To remove the filter module first slightly tilt it out of its upper spring loaded fixtures then pull it out of the bottom spring loaded components and take it off 8 Close the protective cover see chapter 7 4 1 Opening the protective cover 9 Power on the scanner See chapter 2 4 Power the scanner on off on how to power on the device 10 Enter the re...

Page 148: ... on the guide rails 2 to the right to remove it from the transporting system as to the left the Adimec camera is on the way blocking the path 4 If the magazine is tilted because of twisted tappets 1 first restore the tappets to their initial position They are correctly positioned if vertically aligned exactly one above each other Turn the gear 5 by hand until the tappets are in their initial posit...

Page 149: ...enance 7 4 6 Transporting The following procedure shows how to transport Pannoramic 250 FLASH III Figure 109 Transporting handles Caution Do not use the FL protective cover 2 to raise shift or transport Pannoramic 250 FLASH III September 16 2020 Rev 1 3DHISTECH Ltd 149 156 ...

Page 150: ...nd the weight data of the base unit in chapter 8 Technical Data To transport Pannoramic 250 FLASH III do the following 1 Switch power supply off see chapter 1 1 4 Main parts of the Base Unit and detach all other cables 2 Pull carrying handles out 1 until mechanical stop position A 3 Turn carrying handles by 90 B towards the base unit to secure them 4 Now you can transport Pannoramic 250 FLASH III ...

Page 151: ...n approx 51 kg Ambient conditions Transportation shipment packed Permissible ambient temperature 40 C to 70 C Storage Permissible ambient temperature 0 C to 60 C Permissible relative air humidity non condensing 25 75 Operation Permissible ambient temperature 10 C to 35 C Permissible relative air humidity 25 75 Altitude at installation site max 2000 m Atmospheric pressure 70 to 110 kPa Degree of po...

Page 152: ...mption of the complete device max 350W Fuses 2x T3 15A L 250V Light sources Brightfield illumination PAX 601 3 Precision Aligned Pulsed Xenon Light Source Average service life 1 109 flashes Fluorescent light source 1 optional SOLA SM II 365 5 solid state sources producing white light Wavelength range 350 680 nm Average service life 20 000 hours Fluorescent light source 2 optional SPECTRA 6 individ...

Page 153: ...Peltier with forced air fan Connection type Dual Camera Link Full 10 taps 85MHz pco edge 4 2 bi 13 3 mm 13 3 mm backside illuminated sCMOS Pixel size 6 5 µm 6 5 µm Camera resolution 2048 2048 active pixel Frame rate 40 fps full resolution Bit depth 16 bit Pixel resolution with 20 objective and 1 C mount adapter 0 33µm Pixel resolution with 20 objective and 1 6 C mount adapter 0 20µm Pixel resoluti...

Page 154: ...2048 W pixel Frame rate 75 fps Bit depth 10 bit 12 bit Pixel resolution with 20 objective and 0 63 C mount adapter 0 27 µm Pixel resolution with 20 objective and 1 C mount adapter 0 17 µm Pixel resolution with 40 objective and 0 63 C mount adapter 0 14µm Pixel resolution with 40 objective and 1 C mount adapter 0 09 µm Connection type USB 3 0 Control computer minimum system requirements Operating S...

Page 155: ... 2 User s Guide 8 Technical Data Ports 1x CoaXPress Quad 1x Double CameraLink port 1x FireWire 1394 A 4 USB 2 0 Network connection 1 Gb s Ethernet cable class CAT6A with Rj45 connector September 16 2020 Rev 1 3DHISTECH Ltd 155 156 ...

Page 156: ... 130 Fluorescent 11 12 13 17 18 20 21 24 28 129 130 135 140 151 Focus 13 21 92 122 129 130 134 135 L Lumencor 13 16 135 Lumencor SPECTRA 6 20 21 24 25 26 132 M Marker 129 P Pannoramic 7 Pannoramic 250 FLASH III 7 8 9 10 12 14 16 18 19 20 21 22 24 25 26 30 31 133 134 136 137 139 142 143 144 Pannoramic Viewer 21 134 Pco edge 4 2 13 17 20 24 153 Preview 13 20 24 29 92 129 134 S Scan 12 24 32 92 121 1...

Reviews: