
9
USB Cabling
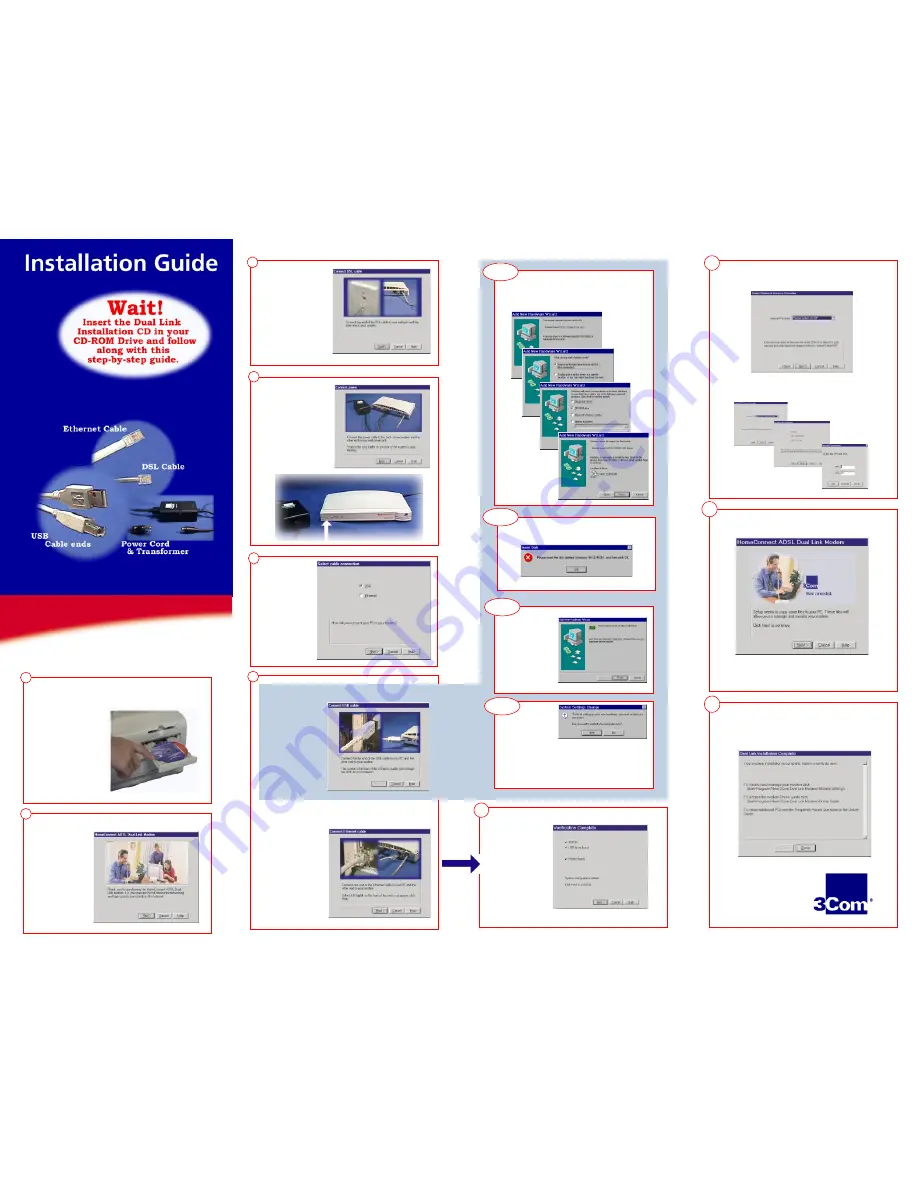
6
3
4
When this screen
appears, connect one
end of the DSL cable
(supplied) to the DSL
wall jack and the
other end to the
ADSL port on the
back of your modem,
then click
Next
.
Connect the power
cable to the back of
your modem and to
the power plug.
Wait for the Alert
light on the front
of the modem to
stop flashing, then
click
Next
.
5
When this
screen
appears,
select how
you will
connect your
PC to the
Dual Link
modem, then
click
Next.
When this screen
appears, connect
the flat end of the
USB cable to your
PC and the other
end to your modem.
Follow USB Steps
One to Four to
complete the USB
Installation.
7
If this message is displayed, insert your Windows ’98
CD-ROM and click
OK
.
When this screen
appears (it could
take up to one
minute) make sure
the Dual Link
Installation disk is
in the CD-ROM
drive, then click
Finish.
If this screen
appears, click
Yes
to restart your PC.
When this screen appears, select your Internet Service Provider
(ISP) from the selection boxes, then click
Next
.
Depending on what you select, you may see one or more of
the following screens. Complete the required information,
then click
Next.
The setup procedure will now copy files to your system.
After clicking
Next
you may be directed to insert your
Windows CD and restart your computer. Follow the
directions on the screen.
The following screen may vary slightly from what is shown
here, depending on the information you input about your
service provider. It will tell you what your next steps are to
fully begin accessing the Internet.
The following
screen will appear
when a
continuity check
of cabling and
driver installation
is complete. If the
check was
successful, click
Next
. Otherwise,
click
Help
.
It could take up to three minutes for your PC to
restart. When your PC restarts, the Dual Link
installation will automatically continue at step 7.
(Note: In Windows 2000, the USB Cabling screen will
redisplay with an active
Next
button. Click
Next
to
continue.)
USB-3
USB-4
USB-2
USB-1
Part No. 1.024.2416-00
Published April 2000
Copyright © 2000 3Com Corporation. All rights
reserved. 3Com and 3Com logo are registered
trademarks of 3Com Corporation. Other product and
brand names may be registered trademarks of their
respective owners. All specifications are subject to
change without notice. Products may differ from
photos shown.
10
8
Ethernet Cabling
When this screen
appears, connect one
end of your Ethernet
cable to the Ethernet
port on your PC and
the other end of the
Ethernet cable to the
LAN port on the Dual
Link, then click
Next
.
The LAN light on
the front of the
modem should
turn GREEN.
The CD should autoplay and display the following screen.
1
2
Congratulations on your purchase of the 3Com
HomeConnect ADSL Modem Dual Link.
Unpack your kit and
insert the Dual Link
Installation CD in
your CD-ROM drive.
DO NOT connect any
cables yet. You
should cable your
modem as directed
during the install
process.
If the CD does
not autoplay,
select
start>run
and type
D:\setup.exe
where
D:
is the
letter of your
CD-ROM drive.
HomeC
HomeC
HomeC
HomeC
HomeConne
onne
onne
onne
onnect
ct
ct
ct
ct
®
ADSL
ADSL
ADSL
ADSL
ADSL Modem Dual Link
Modem Dual Link
Modem Dual Link
Modem Dual Link
Modem Dual Link
Installation Guide
Click
Next
through the following screens
.
(Note: Windows 2000 install screens will vary slightly
from those shown. Simply continue through to the
end of the procedure.)


