


6-4
C
HAPTER
6: D
IAGNOSTICS
AND
T
ROUBLESHOOTING
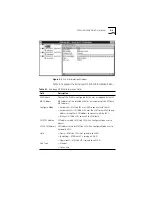
The diagnostic utility main screen appears, as shown in
Figure 6-1.
Figure 6-1
Diagnostic Utility Main Screen
Navigating Within the Diagnostic Utility
Use a mouse (if a mouse driver is loaded) or the keyboard to
access the diagnostic utility’s character-based interface. In this
guide it is assumed that a mouse is used. Keyboard commands
are described in Table 6-2.
Table 6-2
Function Key Descriptions of the Diagnostic Utility
Keystroke
Action
[Esc]
Exit to previous screen
[Tab]
Move cursor to next field
[Shift]+[Tab]
Move cursor to previous field
[Alt]+[Highlighted letter]
Execute indicated function
Up and Down arrow keys
Move cursor up and down a list
[F1]
Display Help screen for highlighted item
[F3]
Exit to MS-DOS
[F5]
Display Run Tests screen
[F6]
Display Test Setup screen
[F8]
Display NIC Information screen
[F9]
Display NIC Statistics screen
[Esc]
Exit to previous screen