background image

Illuminator HD Installation Manual V2.1.23

Page 17

© 360 Vision Technology Ltd.

PTZ buttons can be used to move the camera so that simple preset positions can be programmed or recalled.

PTZ position co-ordinates are also shown, use the refresh button to refresh the data if the camera has been 

moved.

PTZ position co-ordinates can also be added manually, use the go button to send the camera to the coordinates 

set.

Use the pan preset offset to set the camera to 0°, this would be used to set the camera to North if using the pan 

compass option.

Use the clear button to reset the pan or tilt offset settings.

OK

 to program the new settings into the Illuminator HD.

Cancel

 to abandon the changes to the advanced feature settings.

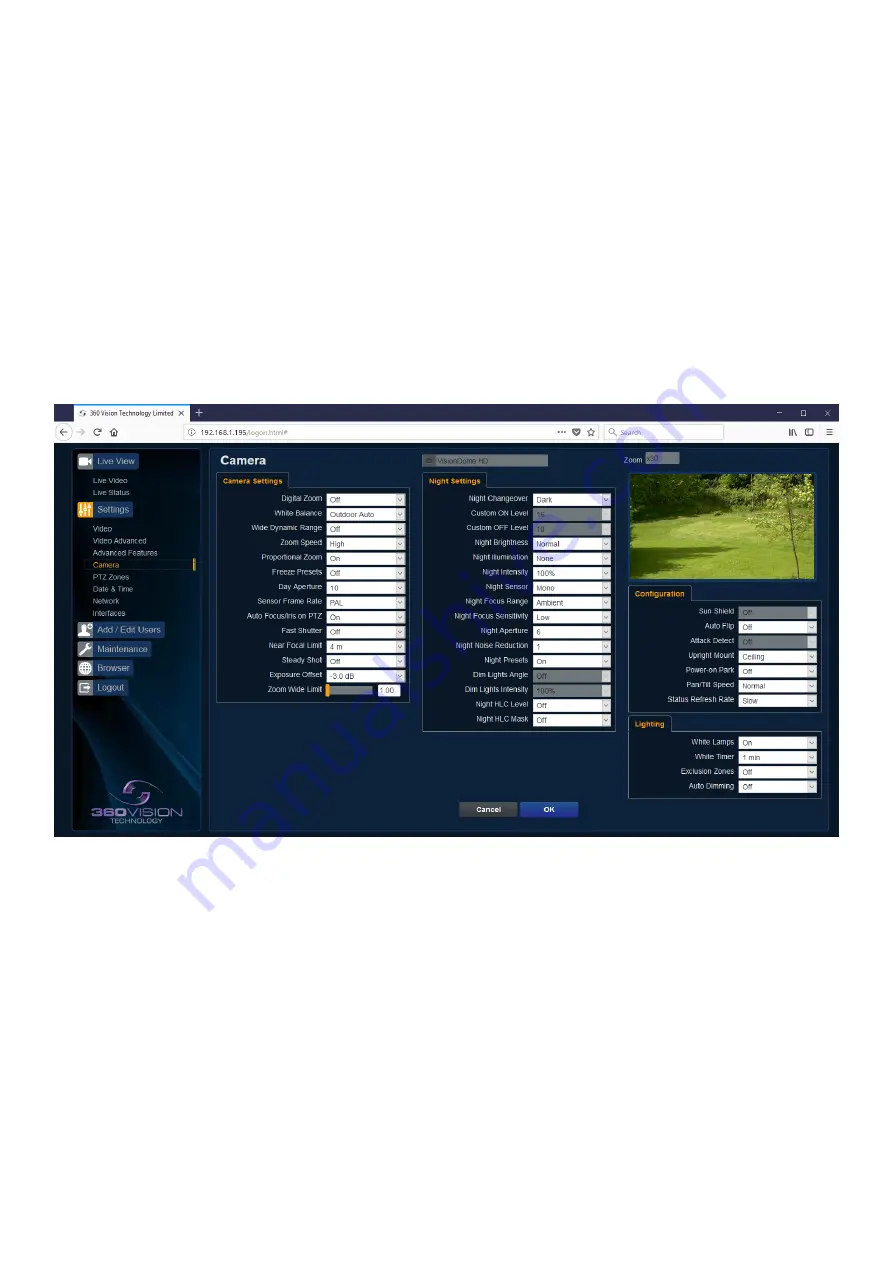
6.2.4 Camera

•  Camera - Cannot be edited, shows label/name given to the camera.

(See Video - Camera - page 12).

The Camera page, offers options to:-

Camera Settings

• 

Digital Zoom - Enable digital zoom. Default is off.

•  White Balance - Select White Balance settings to suit camera location. 

(See page 31 for table of options).

• 

Wide Dynamic range - Enable WDR. Options available are ON, Auto and Off. Default is off.

•  Zoom speed - Select zoom speed of the lens. Options are slow, medium, high and highest. Default is 

high.

•  Proportional Zoom - Automatically reduces/increases pan/tilt speed depending on zoom ratio. Default 

is on.

•  Freeze Presets - This option freezes the image, when moving between presets. This can help reduce 

the bandwidth. Default is off.

•  Day Aperture - Can be used to increase the picture detail. Default is 10.

•  Sensor Frame Rate - Can be used to set the camera to suit 25fps or 30fps. Unit must be rebooted for 

settings to apply. Default is PAL.

Summary of Contents for Illuminator HD

Page 1: ...Illuminator HD Installation Manual V2 1 23 Page 1 360 Vision Technology Ltd Illuminator HD Installation Configuration Manual ...

Page 2: ...tatus 10 6 2 Settings 12 6 2 1 Video 12 6 2 2 Video Advanced 13 6 2 3 Advanced Features 15 6 2 4 Camera 17 6 2 5 PTZ Zones 20 6 2 6 Date Time 21 6 2 7 Network 22 6 2 8 Interfaces 23 6 3 Add Edit Users 24 6 4 Maintenance 25 6 5 Browser 27 7 Network Settings Recovery 28 8 Special Presets 28 9 Important Care of Painted Surfaces 29 10 Storage and Handling 29 11 Warranty 29 12 PSU Enclosure 29 13 1080p...

Page 3: ...wards a bright light source sunlight or expose the camera to intensive light situations as this may damage the camera pick up device 4 Installation should be carried out by suitably qualified personnel in accordance with local codes of practice and regulations 5 360 Vision Technology Limited accept no liability for any damage caused by incorrect or improper installation 2 Housing Dimensional Drawi...

Page 4: ...visiontechnology com 125 OUTSIDE DIAMETER 9 x4 ON 101 6 4 INCH PCD USE M8 BOLT FOR FIXING TO POLE 60 M8 x4 ON 101 6 4 INCH PCD FIX PREDATOR USING M8x30 HEX HEAD BOLTS x4 STAINLESS STEEL M8 SPRING LOCK WASHER x4 STAINLESS STEEL 73 M20x1 5P M20x1 5P 73 M20x1 5P 8 0 x4 ON 101 6 4 INCH PCD FIX PREDATOR USING M8x30 HEX HEAD BOLTS x4 STAINLESS STEEL M8 SPRING LOCK WASHER x4 STAINLESS STEEL 5 3 0 125 OUT...

Page 5: ... 2AF OUTPUT FUSE VRID PSU SM FUSE 1 6 3AT FUSE 2 1AT FUSE 4 N A MAINS input 100 240Vac Io Vo Adj Adj Model Number VRID PSU SM Serial Number yymmndd xxxx Input Voltage 100 240VAC 50 60Hz Input current 2 1A Output Voltage 30V DC Output Current 6 2A VRID PSU SM 255 x 180 x 100mm Enclosure Dimensions 360 USE To Camera 30Vdc 30Vdc ...

Page 6: ...mps 5 2A PTZ IR Lamps 5 5A Idle White Lamps TBC PTZ White Lamps TBC Voltage at PSU 30Vdc Voltage at Camera PTZ IR Fast tour 27 5Vdc Current Voltage test at cable length 1 5mm 15m To ensure optimum Illuminator HD performance these parameters must be adhered to Failure to do so will invalidate the warranty Internal Illuminator HD Connections The Illuminator HD connection board is located at the top ...

Page 7: ...e technical support to find the IP address of the Illuminator HD Note the ports are Protocol Port ONVIF HTTP 80 TCP RTP Stream 1 6970 TCP UDP RTCP Stream 1 6971 TCP UDP RTP Stream 2 6972 TCP UDP RTCP Stream 2 6973 TCP UDP RTSP 554 8554 TCP 360 SDK 3600 TCP 360 Event 9001 TCP 6 Connecting to the Illuminator HD Type in the IP address of the Illuminator HD into the address bar of Internet browser and...

Page 8: ... select the box Remember Password it could compromise the security of the Illuminator HD camera Select Login The web page will show JPEG images every second See Browser page 27 For live video please use the 360 HD Discovery Config Tool this can be downloaded from the camera web page ...

Page 9: ... the desired position Zoom In Out This will operate the optical and digital zoom if digital zoom is enabled See Camera Digital Zoom page 17 Focus Far Auto Near This will operate the manual focus near far or automatically focus as required See Camera AF AI when PTZ page 17 Iris Open Auto Close This will operate the manual iris open close or automatic as required See Camera AF AI when PTZ page 17 Pr...

Page 10: ...Illuminator HD Installation Manual V2 1 23 Page 10 360 Vision Technology Ltd 6 1 2 Status Status page shows information relating to the camera status Status page top section Status page bottom section ...

Page 11: ... of codec and mainboard software loaded Video Streams Shows the current video streams configuration Streaming Shows the IP address on the PC that is receiving the video streams System Shows how long the camera has been powered how much bandwidth it is using etc Current Status Shows the camera function information Frame Statistics Gives information about the video stream how big the frames are how ...

Page 12: ...ll show the date as text on the video stream See Date Time page 21 Time Selecting this option will show the time as text on the video stream See Date Time page 21 Text Selecting this option will show the selected text on the video stream Positions available are top left or right of the image Detailed Info This will show the information about the stream on the video Custom A Used to enable the opti...

Page 13: ... to the video settings 6 2 2 Video Advanced Multicast See Stream Tables page 30 Tick the box to enable multicast If the box is not ticked then unicast is selected Multicast Stream 1 Set IP address and port for stream 1 Multicast Stream 2 Set IP address and port for stream 2 Concurrent Uni Multicast Enable to allow concurrent unicast multicast streams RTSP protocols allow multicast or unicast trans...

Page 14: ...gle video stream When using multicast all intermediate network switches and routers must be set to allow the stream from the new UDP address to be routed correctly Configuration Use the below settings to set how the video is sent adjusting the settings can help to eliminate any stutter or pulsing on the video image Stream Description RTP Block Size 1448 default Range 1440 to 65500 IP Ratio 25 defa...

Page 15: ...e used for the preset that include lamps See also Camera Night Presets page 17 Simple For setting a simple PTZ preset no lamp options Re Map Choose which function preset you want to re map to the new preset number above Tour Set the preset to start or stop a preset tour Mimic Set the preset to start or stop a mimic tour User Used on systems supporting 360 SDK Auxiliary Can be used to recall an aux...

Page 16: ...uminator HD Each tour can have between 2 and 90 points each point can be a preset in the range 1 to 360 Different points can use any preset number including repeats of ones that have been used before The speed that the camera will travel at to reach the preset can be in the range 1 sec slowest to 100 sec fastest To seek the preset at maximum speed set speed to 0 The delay dwell at each point is de...

Page 17: ...tings 6 2 4 Camera Camera Cannot be edited shows label name given to the camera See Video Camera page 12 The Camera page offers options to Camera Settings Digital Zoom Enable digital zoom Default is off White Balance Select White Balance settings to suit camera location See page 31 for table of options Wide Dynamic range Enable WDR Options available are ON Auto and Off Default is off Zoom speed Se...

Page 18: ...mal 30x zoom has been extended to 36x zoom This is effectively a digital zoom and as such when 1080P is used the resolution of the picture has been slightly reduced When the camera is set to 720P it is usual for full resolution to be achieved for the full range of zoom settings Exposure Offset Used to set the camera exposure setting Zoom Wide Limit Used to set the camera zoomed out limit physical ...

Page 19: ...t is off Pan Tilt Speed Can be used to set the pan tilt speed Options are Normal 20 40 60 80 Slower 20 40 60 or 80 Faster Default is normal Status Refresh Rate Can be used to help speed up telemetry control of the camera by slowing down the refresh rate Lighting White Lamps Set if white lights are to be used White Timer Set white light timer Exclusion Zones Option to be used if a white light exclu...

Page 20: ...overlay Text Input required text for sector zone overlay PTZ buttons can be used to move the camera so that simple preset positions can be programmed or recalled PTZ position co ordinates are also shown use the refresh button to refresh the data if the camera has been moved PTZ position co ordinates can also be added manually use the go button to send the camera to the coordinates set Preset Seek ...

Page 21: ...ime page offers options to Set Manually Input time date manually Synchronize with Computer Time Put a tick in the button and then click OK to apply the local computer date time to the camera Synchronize with NTP Server Put a tick in the button and then click OK to apply the local server date time to the camera NTP Server Input the address of the time server required default is pool ntp org Time Zo...

Page 22: ...bles the Network recovery process See Network Settings Recovery page 28 NTP NTP Server Input the address of the time server required default is pool ntp org MAC MAC Address Displays the camera MAC address Quality of Service Best Effort Will send network packets with no quality of service policies Expedited Forwarding Will send network packets with an assured bandwidth quality of service policy Cus...

Page 23: ...lamps ambient focus range Force HLC On Switch on HLC option Force HLC Off Switch off HLC option Iris Open Opens the camera iris Iris Close Closes the camera iris Iris Auto Switches on auto iris Iris Manual Sets camera to manual iris mode Dark relates to when the camera is in dark mode see section Camera Night Changeover page 17 Force Onvif Version Configuration Reported Version Can be used to chan...

Page 24: ...finable Show re definable pre defined presets only e g Home Omit Do not show the pre defined presets when the VMS requests the presets from the camera Iris Scale Used on certain VMS systems options are position or attentuation dB OK to apply the new settings into the Illuminator HD Cancel to abandon the changes to the interface settings 6 3 Add Edit Users The Add Edit Users page allows the admin u...

Page 25: ...rate the codec clock to a NTP server so that the codec time is more accurate Start Click on this option to start the process Synchronize with NTP Server option must be selected with access to the NTP server The process takes approximately 20 minutes Parameters and Settings Backup Settings Save Used to save the camera settings The file is displayed as Visiondome_HD_YYYYMMDD_HHMM DAT clicking on thi...

Page 26: ...ed The Illuminator HD camera will re boot once the update has been performed DO NOT interfere with this process as it may stop the camera from working Contact 360 Vision Technical Support for the link to the codec update files Content Upload Upload application software to camera memory Server Upload Download application files from FTP HTTP server SSL Certificate Import SSL certificate SSL Key Impo...

Page 27: ...f UDP or TCP Network Latency Adjust Video player latency buffer Download Download video plug in from the camera Desktop Application Framework Download framework to run desktop application Application Download software for the standalone application Notes Notes on how to install the desktop application OK to apply the new settings into the Illuminator HD Cancel to abandon the changes to the mainten...

Page 28: ...ary disconnect the Illuminator HD from the main network Turn power to the Illuminator HD OFF for 3 seconds Turn power to the Illuminator HD ON for 4 seconds Repeat the above five times On the final power ON leave the power switched on for at least 5 minutes to allow the Illuminator HD to initialise See section Locating the Illuminator HD on your network page 7 8 Special Presets Illumination When i...

Page 29: ...h from the factory they should not be stacked to a height of more than three Illuminators When Illuminators are being stored before installation they should be kept in the transit packaging and located in a dry indoor environment preferably between 1 C and 35 C which is dry and dust free Humidity should such that water vapour is non condensing Illuminators can be allowed to be outside this range f...

Page 30: ...20 x 576 MPEG4 rtsp ipaddress mpeg4main MJPEG rtsp ipaddress mjpeg 720p 1280 x 720 D1 720 x 576 720p 1280 x 720 1080p 1920 x 1080 Resolution VGA 640 x 480 D1 720 x 576 720p 1280 x 720 QVGA 432 x 240 1080p 1920 x 1080 D1 720 x 576 Dual MPEG4 rtsp ipaddress mpeg4main rtsp ipaddress mpeg4sub 720p 1280 x 720 D1 720 x 576 D1 720 x 576 1080p 1920 x 1080 Resolution QVGA 432 x 240 D1 720 x 576 QVGA 432 x ...

Page 31: ...1 720 x 576 720p 1280 x 720 720p 1280 x 720 Resolution VGA 640 x 480 D1 720 x 576 720p 1280 x 720 D1 720 x 576 Dual MPEG4 rtsp ipaddress mpeg4main rtsp ipaddress mpeg4sub 720p 1280 x 720 D1 720 x 576 D1 720 x 576 720p 1280 x 720 Resolution QVGA 432 x 240 D1 720 x 576 QVGA 432 x 240 D1 720 x 576 Dual H 264 rtsp ipaddress h264main rtsp ipaddress h264sub 720p 1280 x 720 D1 720 x 576 D1 720 x 576 720p...

Page 32: ...Illuminator HD Installation Manual V2 1 23 Page 32 360 Vision Technology Ltd ...

Reviews: