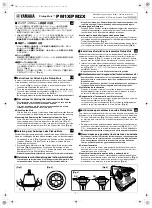


■ ピックアップミュート装着時の注意
ミュートの機能を十分に発揮させるために、ミュート本体を楽器の
ベルに差し込んだ後、以下の手順でしっかりと装着してください。
1
[Fig. 1]
のように、ベルのふち
A
を支えながらミュートのフランジ部
B
を
親指でベル内部に押しこみます。
2
[Fig. 2]
の番号の順(
q
-
q
、
w
-
w
、
e
-
e
)に押さえる位置を変え、ミュートを
深く押しこみます。このとき、ミュートがベルの端面と平行になるようにします。
* 楽器が変形するほどの過度な力で押しこまないでください。
■ 楽器ケース収納時の注意
* ミュートを装着した状態でケースに収納できる楽器については、ヤマハ
ホームページでご確認ください。
* 長期間ミュートを使用しない場合は、ベルからミュートを取り外して保管
してください。
ミュートの装着
収納形態(「組立説明書」参照)にしたミュートを、装着時と同様の手順
でベルに深く押しこみます。
楽器ケースへの出し入れ
「ミュートがベルから大きくはみ出ていない」、「はみ出たミュート部は
ベルの端面と平行になっている」ことを確認してからケースに入れてく
ださい。
[Fig. 3]
楽器をケースから取り出す際は、ケースのくぼみに対して垂直に静か
に持ち上げてください。
[Fig. 4]
Instructions for Attaching the Pickup Mute
In order to obtain optimum performance from the mute, insert it into the bell
of the instrument, and then follow the procedure below to attach firmly.
1 As shown in
[Fig. 1]
, use your thumbs to push the mute flange
B
into
the bell while supporting the bell rim
A
.
2 Push the mute deeper into the bell by pressing on the mute in the posi-
tions and order indicated by the numbers in
[Fig. 2]
(
q
-
q
,
w
-
w
,
e
-
e
).
Make sure that the mute is parallel to the bell face.
* Do not apply excessive force when pushing to avoid deforming the bell.
Precautions for Storing the Instrument in its Case
* For information on instruments that can be stored in a case with the
mute attached, please check the Yamaha website.
* If you do not plan to use the mute for an extended period of time,
remove it from the bell and store it properly.
Attaching the Mute
With the mute in its storable condition (see Assembly Manual) slide the mute
as far as possible into the bell using the same procedure as when mounting.
Inserting and Removing the Instrument to/from the Case
Make sure that the mute does not protrude far out of the bell, and that
the protruding part of the mute is parallel to the bell’s face.
[Fig. 3]
When taking the instrument out of the case, gently lift it up and out of the
case keeping the instrument parallel to the shape of the case.
[Fig. 4]
Anleitung zum Anbringen des Pickup Mute
Damit der Dämpfer optimal funktioniert, setzen Sie ihn in den Trichter des Instru-
ments ein, und befolgen Sie dann die Anweisungen unten, um ihn zu befestigen.
1 Verwenden Sie wie in
[Fig. 1]
gezeigt Ihre Daumen, um den Kunststoff-
rand des Dämpfers
B
in den Trichter zu drücken, während Sie den
Trichterrand festhalten
A
.
2 Drücken Sie den Mute tiefer in den Trichter, indem Sie in der durch die
Zahlen in
[Fig. 2]
angegebenen Position und Reihenfolge auf den
Dämpfer drücken (
q
-
q
,
w
-
w
,
e
-
e
). Achten Sie darauf, dass sich der
Dämpfer parallel zur Trichteröffnung befindet.
* Wenden Sie keinen übermäßigen Druck an, um den Trichter nicht zu verformen.
Warnhinweis zur Aufbewahrung des Instruments im Koffer
* Informationen zu Instrumenten, die mit eingesetztem Dämpfer im Koffer
aufbewahrt werden können, finden Sie auf der Yamaha-Website.
* Wenn Sie vorhaben, den Dämpfer längere Zeit nicht zu verwenden, soll-
ten Sie ihn aus dem Trichter entfernen und ordnungsgemäß lagern.
Anbringen des Dämpfers
Schieben Sie den Dämpfer, der auf die Aufbewahrungsposition eingestellt ist
(siehe Montageanleitung) so weit wie möglich in den Trichter, mit dem glei-
chen Verfahren, das Sie auch beim Anbringen verwenden.
Instrument in den Koffer legen und herausnehmen
Achten Sie darauf, dass der Dämpfer nicht zu weit aus dem Trichter her-
ausragt und dass der herausragende Teil des Dämpfers sich parallel zur
Trichteröffnung befindet.
[Fig. 3]
Wenn Sie das Instrument aus dem Koffer herausnehmen, heben Sie es
vorsichtig heraus und halten Sie es dabei parallel zum Koffer.
[Fig. 4]
Instructions d'installation de la sourdine Pickup Mute
Afin de tirer le meilleur parti de la sourdine, insérez-la dans le pavillon de l'ins-
trument, puis suivez la procédure ci-dessous pour l'installer correctement.
1 Comme l'indique la
[Fig. 1]
, poussez le bord de la sourdine
B
dans le
pavillon avec les pouces tout en maintenant la couronne du pavillon
A
.
2 Insérez la sourdine plus profondément dans le pavillon en appuyant
dessus en suivant les emplacements et l'ordre indiqués par les chiffres
de la
[Fig. 2]
(
q
-
q
,
w
-
w
,
e
-
e
). Veillez à ce que la sourdine soit
parallèle au pavillon.
* N'appuyez pas trop fort afin d'éviter de déformer le pavillon.
Précautions concernant le rangement de l'instrument dans son étui
* Pour obtenir des informations sur les instruments pouvant être rangés
dans l'étui avec la sourdine dans le pavillon, veuillez consulter le site
Web de Yamaha.
* Si vous ne prévoyez pas d'utiliser la sourdine pendant une période pro-
longée, retirez-la du pavillon et rangez-la de manière appropriée.
Installation de la sourdine
Préparez la sourdine comme si vous alliez la ranger (voir le manuel
d'assemblage) et faites-la glisser le plus loin possible dans le pavillon
en suivant la même procédure que lors du montage.
Rangement de l'instrument dans l'étui et retrait
Vérifiez que la sourdine ne ressort pas trop du pavillon et que sa partie
saillante est parallèle au pavillon.
[Fig. 3]
Lorsque vous sortez l'instrument de l'étui, soulevez-le délicatement en
veillant à ce qu'il reste parallèle à la forme de l'étui.
[Fig. 4]
Instrucciones para colocar la sordina Pickup Mute
Para obtener un rendimiento óptimo de la sordina, insértela en el pabellón del
instrumento y siga el procedimiento a continuación para colocarla firmemente.
1 Tal como se muestra en
[Fig. 1]
, utilice los dedos pulgares para empu-
jar el borde de la sordina
B
en el pabellón mientras sostiene el aro del
pabellón
A
.
2 Empuje la sordina más profundamente en el pabellón presionándola en las
posiciones y en el orden indicados por los números en
[Fig. 2]
(
q
-
q
,
w
-
w
,
e
-
e
). Asegúrese de que la sordina esté en paralelo a la cara del pabellón.
* No aplique excesiva fuerza al empujar para evitar deformar el pabellón.
Precauciones para guardar el instrumento en su estuche
* Para obtener información sobre los instrumentos que se pueden guardar
en un estuche con la sordina colocada, consulte el sitio web de Yamaha.
* Si no tiene planeado utilizar la sordina durante un largo periodo de
tiempo, quítela del pabellón y guárdela adecuadamente.
Colocar la sordina
Con la sordina en su estado para guardarla (ver Manual de montaje),
deslícela tanto como sea posible en el pabellón usando el mismo pro-
cedimiento que para el montaje.
Insertar el instrumento en el estuche y extraerlo de él
Asegúrese de que la sordina no sobresalga demasiado del pabellón y de
que la parte que sobresale esté en paralelo a la cara del pabellón.
[Fig. 3]
Al extraer el instrumento del estuche, levántelo con cuidado y sáquelo
manteniéndolo en paralelo a la forma del estuche.
[Fig. 4]
[Fig.1]
[Fig.2]
A
B
A
B
[Fig.4]
[Fig.3]
OK
NG
Pickup Mute™
PM1X/PM2X
Manual Development Group © 2017 Yamaha Corporation
Published 03/2017
发行
PO-A0
Printed in China
JA
EN
FR
ES
DE
ZY45840-0
- 1 -
PM1X_2X_leaflet_0308.fm Page 1 Wednesday, March 8, 2017 6:08 PM


