background image

NAVIGO OWNER’S MANUAL

©2021 by Yamaha Motor Corporation, U.S.A.

December 2021
All rights reserved.

Any reprinting or unauthorized use without the written permission 
of Yamaha Motor Corporation, U.S.A. is expressly prohibited.

Printed in Japan.

OWNER’S MANUAL

X0F-28199-B2

Wheelchair Power Add-on Kits

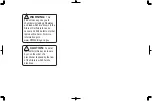
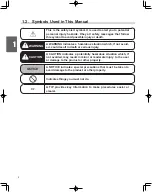
READ THIS MANUAL CAREFULLY!

It contains important safety information.

Summary of Contents for NAVIGO

Page 1: ...rights reserved Any reprinting or unauthorized use without the written permission of Yamaha Motor Corporation U S A is expressly prohibited Printed in Japan OWNER S MANUAL X0F 28199 B2 Wheelchair Power Add on Kits READ THIS MANUAL CAREFULLY It contains important safety information ...

Page 2: ... known to the State of California to cause cancer and birth defects or other reproductive harm For more information go to www P65Warnings ca gov CAUTION Federal law restricts this device to sale by or on the order of a practitioner licensed by the law of the State in which he she practices ...

Page 3: ... 29 2 6 Lithium Ion Battery ESB1 30 2 7 Charger for Lithium Ion and Nickel Metal Hydride Battery ESC3 31 3 Before Sitting in the Wheelchair 32 3 1 Inspecting the Wheelchair 32 3 2 Checking Your Clothing 36 3 3 Checking the Residual Capacity of the Battery and Installing the Battery on the Wheelchair 36 4 Riding the Wheelchair 38 4 1 Sitting in the Wheelchair 38 4 2 Moving the Wheelchair 40 4 3 Adj...

Page 4: ...8 2 How to Use the Nickel Metal Hydride Battery JWB2 59 8 3 Characteristics and Handling of the Nickel Metal Hydride Battery JWB2 61 8 4 How to Charge the Nickel Metal Hydride Battery JWB2 63 8 5 Refresh Charging the Nickel Metal Hydride Battery JWB2 67 8 6 Charger ESC3 Indicator Lamps 68 9 Lithium Ion Battery and Charger 70 9 1 Features of the Lithium Ion Battery ESB1 70 9 2 How to Use the Lithiu...

Page 5: ...ery Bag 90 11 3 Anti tip Device 93 11 4 Controller Holder 96 11 5 Assistant Controller Optional 102 11 6 Clutch Levers 102 11 7 Parameter Settings 102 11 8 Smart Tune Settings 104 12 Maintenance Daily Check Periodic Inspection106 12 1 Maintenance 107 12 2 Daily Checks 109 12 3 End of NAVIGO Use Recycling 109 13 Dimensions and Specifications 110 14 Troubleshooting Repairs Warranty 112 14 1 Before R...

Page 6: ...mble the wheelchair Refer to 2 Names of Parts to ensure that these components are installed to the wheelchair that you purchased and that the battery and charger are included If you visually notice that any of these components are not installed are not included or are damaged before using the wheelchair immediately contact the dealer without using the wheelchair NAVIGO 24 NAVIGO 16 For information...

Page 7: ...n which the NAVIGO has been installed are wheelchairs for physically handi capped people and legal status of someone in a wheelchair is that of a pedestrian Make sure to ad here to the traffic rules and manners of a pedestrian 2 The NAVIGO 24 withstands a load of 275 lb 125 kg Use with a total maximum load including the chair frame weight of 275 lb 125 kg NAVIGO 16 withstands a load of 220 lb 100 ...

Page 8: ... death or serious injury A CAUTION indicates a potentially hazardous situation which if not avoided may result in minor or moderate injury to the user or damage to the product or other property WARNING CAUTION A NOTICE indicates special precautions that must be taken to avoid damage to the product or other property NOTICE Indicates things you must not do A TIP provides key information to make proc...

Page 9: ...rnings in 1 5 Warnings and Notes for the Operation be sure to have an assistant accompany you and pay sufficient attention to safety while traveling 1 3 Operation Diagnosis Check Depending on the extent of your disabilities it may be dangerous to travel unaccompanied Use this diag nosis check as a guide to determine whether or not you can travel unaccompanied 1 Are you able to move the switches on...

Page 10: ...peration do not attempt to provide it 1 5 Warnings and Notes for the Operation Please read this manual before using the product Please read this manual carefully to ensure safe and comfortable operation After reading it store it where it can be accessed easily for future reference Unless specifically noted the following information applies to when the user is operating the wheelchair themselves an...

Page 11: ...d 5 Report all incidents of unintended movement or brake release to the powered wheelchair manufacturer or distributor and note whether there is a source of EMI nearby Electromagnetic interference EMI from sources such as radio and TV stations amateur radio HAM transmitters two way radios and cellular phones can affect powered wheelchairs and motorized scooters Following the warnings listed below ...

Page 12: ...h no fur ther modification has an immunity level of 20 V m There are a number of sources of relatively intense electromagnetic fields in the everyday environment Some of these sources are obvious and easy to avoid Others are not apparent and exposure is unavoid able However we believe that by following the warnings listed below your risk to EMI will be minimized The sources of radiated EMI can be ...

Page 13: ...res Always keep the air pres sure in the rear tires at a normal level If the air pressure in the rear tires decreases the parking brakes may become ineffective Before using the wheelchair each day ensure that the anti tip devices are in the correct position If the anti tip devices are not in the correct position the wheelchair could fall backward Before using the wheelchair each day check the resi...

Page 14: ...ect any electric instruments to the plug on the joystick This plug is to connect a PC for the Smart Tune software Plugging other electric instruments like audio microphone or earphones may cause unit trouble About the Smart Tune software refer to 11 Wheelchair Disassembly and Adjustment Do not hang anything on the joystick on the controller It may get in the way of your operation or the weight of ...

Page 15: ...not touch the back of the drive units During or after operation the back of the drive units may be hot In addition if the wheelchair is near a source of heat the drive units may become hot While operating the wheelchair be careful not to get your hands tangled in the wheel spokes wheel holes etc The wheels of the NAVIGO 16 are not equipped with hand rims When operating the NAVIGO 16 do not manuall...

Page 16: ... apply the parking brakes on a level and stable ground and then with the power turned off switch the clutch levers Never operate the wheelchair after consuming alcohol or taking medicine that causes drowsiness Never operate the wheelchair while holding an umbrella or other items Never tow the wheelchair Do not use the wheelchair to tow or pull anything If you are using a wheelchair with no parking...

Page 17: ...porting lug gage or for any other purpose than to provide as sistance to a disabled person Do not operate the wheelchair near a device that produces strong radio waves If the wheel chair is near a source of radio waves and starts to operate abnormally immediately turn off the power and quickly move away from that location using the assistant operations or manual operation The weak electromagnetic ...

Page 18: ...e for wheelchairs such as shown below If you drive with such clothing you or other people around you may get injured Long scarves Pants skirts with wide hems Clothing with loose sleeves Bare feet sandals slippers ill fitting footwear etc WARNING ...

Page 19: ...ddle of a road etc If the road has a sidewalk operate the wheelchair on the sidewalk If the road does not have a sidewalk operate the wheelchair on the side strip of the road where pedestrians walk If the road does not have a side strip operate the wheelchair on the side of the road where pedestrians walk If two or more wheelchairs are traveling together outdoors the wheelchairs should be oper ate...

Page 20: ...it for the vehicle to pass and then check in front of you and behind you for safety before proceeding Do not operate the wheelchair outdoors at night Not being able to see the road conditions you may lose balance and fall or people or cars may collide into you if they cannot recognize you If it is raining or snowing do not operate the wheelchair outdoors Automobiles and other vehicles may collide ...

Page 21: ...nd fall off the wheelchair WARNING 1 5 9 Going Up Down Curbs The wheelchairs equipped with the NAVIGO are built to be lighter compared to other electric wheelchairs that use a heavier general lead battery For this reason when a person sits in it the overall center of gravity may be different Therefore use caution when traveling on a curb When going up down a curb for the first time have an assista...

Page 22: ...nger or assistant could get injured if the wheelchair tips over When descending from a curb with the assistant operations descend in reverse If the as sistant moves the wheelchair forward when descending the passenger may plunge forward and fall off the wheelchair When going up down a curb with the assistant operations the safety wheels of the anti tip device may be raised or folded temporarily de...

Page 23: ...ross the street WARNING 1 5 11 Railroad Crossings Avoid railroad crossings if you can go around them Be sure to stop before the railroad crossing and check to the left and right for safety Be careful not to travel too close to the edge when traveling over a railroad crossing Other wise the wheels could accidentally move off the railroad crossing If case of an emergency do not panic Have the assist...

Page 24: ... pany you Do not drive the wheelchair on a frozen surface You may not be able to stop the wheelchair Go around locations where snow or water has ac cumulated or have an assistant accompany you In such places where you do not know the road conditions or if the wheelchair slips you could lose control or the brakes may become ineffective If the wheelchair travels through a deep puddle and water enter...

Page 25: ...ate automobile do not use the wheelchair as a seat Sit in one of the au tomobile s seats When getting on off a lift vehicle always have an assistant accompany you to ensure safety When using a train station always have an assis tant accompany you stop the wheelchair on the train station platform so that it is parallel to the railroad tracks and be sure to apply the parking brakes Some train statio...

Page 26: ...arts of the wheelchair to fall off resulting in an injury or damage to the equipment When lifting a wheelchair never lift it by the battery cable or controller Otherwise any of these devices may come off and cause an injury or damage to the equipment WARNING Be sure to store the disconnected battery with the protective cap on it Exposed contacts can cause short circuits and lead to a fire or batte...

Page 27: ...ectronic devices can get damaged which may lead to malfunction Do not clean with solvents such as gasoline or paint thinner This may damage the painting and plastic parts 1 5 17 Assistant Operations in an Emergency During assistant operations in case of an emergency the assistant should switch the clutch levers to the manual position and move the wheelchair to a safe location WARNING ...

Page 28: ...1 22 1 6 Warning Label Location Diagram Power Unit and Controller NAVIGO 16 FRONT BACK ...

Page 29: ...1 23 NAVIGO 24 FRONT BACK ...

Page 30: ...1 24 Lithium Ion Battery Nickel Metal Hydride Battery Back side ...

Page 31: ...1 25 Charger for Lithium Ion and Nickel Metal Hydride Battery ESC3 ...

Page 32: ...y set is supplied Controller Pages 28 40 42 43 Rear tire Page 33 Upper holder Assistant controller Optional Pages 28 and 50 53 Battery Pages 29 30 54 80 Cable Pages 86 and 88 Color cap Hand rim Anti tip device Page 32 Lower holder Upper holder lock lever Clutch lever Pages 38 50 84 86 Drive unit ...

Page 33: ...p device Page 32 Safety wheel Page 32 Battery Pages 29 30 54 80 Clutch lever Pages 38 50 84 86 Rear tire Page 33 Controller Pages 28 40 42 43 Upper holder lock lever Either a nickel hydride battery set or a lithium ion battery set is supplied NOTICE Please be advised the black tire may leave mark on floor or wall ...

Page 34: ...vement possible lamp Retracted anti tip device warning lamp Joystick Page 40 Pages 35 40 45 Pages 50 53 NOTICE The USB power port is used only to supply power It does not feature any communication functions The capacity of the USB power port is 500 mA It is not capable of charging using a USB device that requires a power current greater than 500 mA Do not insert any object other than a USB connect...

Page 35: ...e indicating the model JWB2 and the manufactured lot is printed Protective cap Spare battery fuse Yellow 20 A Release button Yellow Page 49 Capacity indicator lamp Pages 36 59 62 and 65 Battery fuse Yellow 20 A NOTICE If the battery fuse blows instead of replacing it by yourself consult with your dealer If you replace the fuse without eliminating what caused it to blow the fuse may blow again or t...

Page 36: ... Indicator switch Pages 36 70 75 78 Contacts Page 36 Capacity indicator lamp Pages 36 70 73 75 78 Connector cover Pages 75 and 77 Connector for charger Pages 75 and 77 Manufactured date displayed Bottom Page 74 Shows the model ESB1 Protective cap ...

Page 37: ... Lithium Ion Battery Pages 75 and 78 Power plug Power cord Pages 75 and 78 Charge lamp Green Page 63 68 and 80 The label on the reverse side shows the model Refresh lamp Orange for Nickel Metal Hydride Battery Page 63 67 68 Refresh switch for Nickel Metal Hydride Battery Page 67 Battery insertion slot for Nickel Metal Hydride Battery Pages 63 ...

Page 38: ...heels are in the upward position be sure to turn them to the downward position Pull the lock lever and turn the safety wheels to the downward position When the safety wheels are in the upward position the warning label is visible from above If the mark is visible turn the safety wheels to the downward position In addition move the safety wheels back and forth and side to side to ensure that they a...

Page 39: ...to ensure that there is tire depth Check the surface of the tire to en sure that there are no cracks in it Check to ensure that there is air in the tire Check by pressing the tire with your finger If not enough pump up to 65 PSI 450 kPa 4 5kg cm2 for NAVIGO 24 or 50 PSI 345 kPa 2 5kg cm2 for NAVIGO 16 Rear tire Rear tire If the safety wheels are facing upwards be sure to turn them so they face dow...

Page 40: ...ing brakes are applied Push the wheelchair with the brakes applied on both wheels to ensure that the tires do not move Check the parking brakes to en sure that they do not wobble 5 Casters Check to ensure that there is tire depth Check the tires to ensure that they are not damaged Check the caster forks to ensure that there are no cracks in them Check the nuts to ensure that they are not loose WAR...

Page 41: ... height of the foot supports so that the clear ance between the foot supports and the ground is 2 inch 5 cm or more If the foot supports are too low the foot supports may come in contact with bumpy ground or objects on the ground possibly causing the wheelchair to tip over Assistant controller Controller Greater than 2 inch 5 cm 6 Controller Check the controller to ensure that it is firmly secured...

Page 42: ...red immobile 3 Install the battery on the wheelchair How to install a nickel metal hydride Ni MH battery Turn off the power switch Insert the battery until it clicks into place Contacts Click 3 2 Checking Your Clothing Wear bright colored easily visible clothing when operating the wheelchair Do not operate the wheelchair while wearing clothing that is not suitable for wheelchair use Refer to 1 5 6...

Page 43: ...rminals and cause a malfunction How to install a lithium ion Li ion 00 battery Turn off the power switch Insert the battery Pull the grip down to the side Firmly insert the battery Grip WARNING Do not drop or apply an impact to the battery This may cause the battery to become damaged overheat or rupture Do not insert the battery if the battery slot is dirty or wet This may cause a short circuit an...

Page 44: ...ower drive position 3 Apply the parking brakes If the wheelchair has no parking brakes the assistant must hold it firmly 4 Get into the wheelchair and firmly sit down so that you will not fall out Power drive Traveling in power drive is pos sible The brakes are applied when not traveling Normally use the wheelchair in this state Manual The brakes are released and the assistant can push the wheel c...

Page 45: ...h levers are in the power drive position and the parking brakes are applied When switching the clutch levers to the manual position apply the parking brakes in a level and stable location and have the assistant do so when the power is turned off If you are using a wheelchair with no parking brakes have the assistant hold the wheelchair to ensure that it doesn t move when you are getting into it If...

Page 46: ...4 The wheelchair starts moving with you tilt the joystick to the de sired direction Make sure that the joystick returns to its neutral position and the wheelchair stops properly when you release the joystick For beginners refer to pages 46 and 47 and practice the basic operations until you become familiar with them Battery residual capacity warning When the battery residual capacity becomes less t...

Page 47: ... green flashes Release the joystick turn off the power and then turn it back on again b Are you tilting the joystick with the left and right clutches in the manual position This is a buzzer to warn you that the clutch has been disengaged Beeps Pi Pi Pi Pi Pi Pi Turn off the power switch the left and right clutches to the power drive position and then turn the power back on If the buzzer beeps whil...

Page 48: ...djust the maximum speed 1 Move the speed selector switch to change the speed Hold the switch up to move the lamp up continu ously towards high speed To decrease the maximum speed perform the same steps in reverse direction Maximum speed is adjustable in five steps Maximum speed selector switch Speed setting 5 Move the speed selector switch up or down Move the speed selector switch up or down Speed...

Page 49: ...of the controller 2 Battery residual capacity warning When the battery residual capacity becomes less than 10 the residual capacity indication flashes and a short buzzer beeps Pi Pi Pi Pi 4 times 3 Once the battery runs out the residual capacity indication changes to E and flashes a long buzzer beeps Pi once and stops Battery residual capacity indication Nickel metal hydride battery and lithium io...

Page 50: ... once hold the speed selector switch down and you will hear the beep sound 4 Press and hold the horn switch soon after the beep sound 5 Completed this setting after Pi sound again Speed selector switch If you hear the horn sound when you hold the horn switch try again from 3 Anti theft function keeps on turning the power switch off and then back on TIP TIP Horn switch Pi Pi ...

Page 51: ...tes the power turns off automati cally default setting To resume operation turn the power switch off and then back on How to Unlock the Anti Theft Function 1 Hold the speed selector switch up until the beep sound 2 Press and hold the horn switch after the beep sound 3 Completed to unlock the anti theft function after Pi sound If you can hear the horn sound when you hold the horn switch try again T...

Page 52: ...urn the joystick to the center position and the wheelchair stops Try moving in the following manners Forward and stop Backwards Familiarize your self with the handling and performance characteristics of backward travel Check behind you for safety Turns Make turns on a single spot Practice turning right and left S shaped curves Practice until you can travel in the desired direction Learn the feel o...

Page 53: ...r wheelchair before a curb and then proceed carefully Crosswalk Allow sufficient time to cross the road at a crosswalk Be careful with the curb between the road and the sidewalk Slope Get the feel of riding up and down a slope Restart carefully on an uphill Automatic door Practice at the proper stopping position Check the condition of the road you frequently use on wheelchair on a daily basis Is t...

Page 54: ...st the joystick causing it to start moving and you or people in your surrounding area may get injured Get off the wheelchair in a level and stable location If you park the wheelchair on an incline and try to get off it from there onto a bed or a chair you may lose your balance and fall off the wheelchair If you get off the wheelchair with the left and right clutch levers in the manual position and...

Page 55: ...battery by pulling it straight outwards while press ing the release button Stand the grip upright Disconnect the battery by pull ing it straight outwards Do not pull it out on an angle Store the battery with the protective cap on it Store the battery with the protective cap on it Protective cap Protective cap WARNING Be sure to store the disconnected battery with the pro tective cap on it Exposed ...

Page 56: ...6 2 Starting Assistant Travel Mode Forward switch Reverse switch Power switch After 1 second All lamps turn on The battery residual capacity lamp indicates the current battery residual capacity The warning lamp red turns off The power lamp green stays lit 2 Turn on the power for the assistant controller When you turn on the power the lamp display changes as shown in the lower right figure When you...

Page 57: ...h curb After getting up the curb be sure to lower the safety wheels on the anti tip device 3 Adjust the Maximum speed as necessary Turn the speed adjustment dial clockwise to increase speed and counterclockwise to decrease speed In the beginning adjust it to a low speed Gradually adjust the speed after you become accustomed to the operation The speed can be adjusted steplessly within the range of ...

Page 58: ...ry has run out If the warning lamp turns on immediately after replacing the battery with a fully charged battery and the wheelchair does not move there may be a malfunction in the unit Contact your dealer If the buzzer sounds and the wheelchair does not move Are you pushing the operation button with one or both of the left and right clutch levers in the manu al position This is a buzzer to warn yo...

Page 59: ...or other people in your surrounding area may get injured Position the wheelchair in a level and stable location next to a bed or chair If you park the wheelchair on an incline the user may lose balance and fall when trying to get off the wheelchair If the user gets off the wheelchair with the left and right clutch levers in the manual position and with the parking brakes released the wheelchair ma...

Page 60: ... you want to use Check the label on the battery The label on the nickel metal hydride battery shows The label on the lithium ion battery shows The nickel metal hydride and lithium ion batteries each come with its own designated charger Read 8 Nickel Metal Hydride Battery and Charger if you are using a nickel metal hydride battery and 9 Lithium Ion Battery and Charger if you are using a lithium ion...

Page 61: ...ry or charger directly with your fingers or clean the terminals with a wet towel Otherwise electric shock or a short circuit could result Do not disassemble or modify the battery Do not place the battery near an open fire or throw it into a fire Do not place the battery in water or splash water on it When transporting the wheel chair in an automobile for ex ample remove the battery from the wheelc...

Page 62: ...store the battery in a place where children or pets could come near it Do not drop or subject the battery to impact Do not use a broken or damaged battery Do not charge the battery in a place where children or pets could come near it Use the charger on a level surface After use do not keep it plugged into the power outlet Do not use the charger out doors or near any flamma ble object ...

Page 63: ...ds involved Children shall not play with the charger Cleaning and user maintenance shall not be made by children without supervision Do not use a damaged cord Do not touch the charger and power cord with a wet hand Do not use the charger sub merge it in water splash wa ter on it or leave it in the rain Do not disassemble or modify the charger Do not drop or subject the battery to impact While char...

Page 64: ... mishandle either of these batteries or their chargers it may result in heat generation rupture electric shock or injury Be sure to adhere to the items below When inserting or removing the lithium ion battery be careful not to pinch your finger with the grip Avoid prolonged contact with the skin It is normal for the charger to heat up while it is charging Therefore prolonged contact with the skin ...

Page 65: ...24 V 6 7 Ah 8 2 How to Use the Nickel Metal Hydride Battery JWB2 1 Attaching and removing the battery to and from the wheelchair For instructions on attaching and removing the nickel metal hydride battery to and from the wheel chair see 4 Riding the Wheelchair and 5 After You are Finished Riding the Wheelchair 2 Checking the residual capacity of the battery Press the indicator switch to display th...

Page 66: ...0 25 C is optimal for storing Fully charge the battery that you do not plan to use for a long period of time 30 days or more If you intend to store the battery for more than 3 months without using it fully charge the battery every 3 months Always put on the protective cap when storing the battery Protective cap ...

Page 67: ...e battery capacity to rapidly de crease For information on degradation see Bat tery s deterioration characteristics on the next page 2 Memory effect and refresh charging When a shallow discharging and charging cycle is per formed repeatedly on a nickel metal hydride battery a phenomenon called the memory effect occurs in which the actual usable capacity decreases The memory effect can be prevented...

Page 68: ...arge cycles under normal use TIP Even if a battery is not used when it is stored over a long period of time its capacity will decrease When you are using multiple batteries alternate between the batteries The extent of the deterioration of a nickel metal hydride battery can be checked after charging is done by pushing the indicator switch The capacity has deteriorated to less than 80 The capacity ...

Page 69: ...lic object or other foreign substance into the plug or the connector for this may cause the charger to malfunction or damage the battery Do not place the charger in locations exposed to direct sunlight near a heater or other heat source or where the temperature may drop below freezing If the charger or the battery becomes hot the charger protection function may prevent the unit from starting or tu...

Page 70: ...diagram Battery Charger Charge lamp green Refresh lamp orange Charge lamp green The charge lamp green on the charger turns on and the battery starts charging The capacity indicator lamps on the battery flash and the number of lamps that are lit increases according to the charging level If the charge lamp green does not turn on and the refresh lamp orange flashes refer to 8 5 Refresh Charging the N...

Page 71: ...sing the battery indica tor switch If not all of the lamps turn on the following could have occurred While charging the temperature of the battery rose excessively causing the protection mech anism to abort the charging process The battery deterioration has advanced and the capacity is decreasing and so on Unplug the power cord from the power outlet Remove the battery from the charger If you want ...

Page 72: ...the battery Since charging has not ended it is necessary to charge again after the battery temperature has decreased Charging a battery immediately after travel or charging a new battery is likely to cause its tempera ture to increase which increases the likelihood of the charger stopping charging before completion WARNING Be sure to store the disconnected battery with the protective cap on it Exp...

Page 73: ...ing process begins The time it takes from the start of refresh charging to the completion of normal charging is 3 19 hours If the temperature of the battery rises during a refresh charge the charge lamp green may flash and the charging process may pause When the battery reaches an appropriate temperature the charge lamp will change from a flashing to an on state and charging will start automatical...

Page 74: ...ug the charging plug and the power plug Re locate the charger in ac cordance with 8 4 How to Charge the Nickel Metal Hydride Battery JWB2 and try to charge the battery again The charger protection function may be activated by a change in the ambient temperature even while charging is in progress In this case the charge indicator lamp will flash red and the charger will stop charging If this happen...

Page 75: ...erature falls within the chargeable range during standby charging will start automatically and the charge lamp green changes from a flashing to an on state However if the charge standby condition continues for a long time charging will end and the power for the charger will turn off Charge lamp green is flashing 5 times per second Charge lamp green On Flashing Indicates timeout of charge standby T...

Page 76: ...essary and its charges can be replenished additively Battery does not contain mercury or cadmium Compact but high capacity Capacity 25 V 11 8 Ah 9 2 How to Use the Lithium Ion Battery ESB1 1 Attaching and removing the battery to and from the wheelchair For instructions on attaching and removing the lithium ion battery to and from the wheelchair see 4 Riding the Wheelchair and 5 After You are Finis...

Page 77: ... the battery until 3 lamps turn on Always put on the protective cap when storing the battery Protective cap WARNING Be sure to store the disconnected battery with the protective cap on it Exposed contacts can cause short circuits and lead to a fire or battery rupture If you are unable to charge the battery Refer to 14 Troubleshooting Repairs Warranty If the vehicle has traveled a long distance or ...

Page 78: ...o ration characteristics on the next page While traveling if the internal temperature of the lithium ion battery becomes too high or too low a buzzer will notify you When using a lithium ion battery a buzzer will beep continuous Pi Pi Pi Pi if the battery s internal temperature drops to 32 F 0 C or below or rises to 113 F 45 C or above for 5 seconds When the buzzer beeps promptly return to the env...

Page 79: ...fully completed charging fully charged pushing the indicator switch will always show all 5 lamps lit Even if deterioration has pro gressed all 5 lamps should turn on when fully charged This display format was adopted for this battery as the rate of deterioration of lithium ion batteries is gradual TIP Battery life alert The capacity indicator lamps start alerting you from 3 months prior to the bat...

Page 80: ... time after shipment from the factory This does not match the manufactured date above Once the integral charge capacity reaches 8 000 Ah the battery will not be usable even if it has not been 8 years The integral charge capacity of 8 000 Ah is approximately 700 times the capacity of the ESB1 lithium ion battery hence equivalent to approximately 700 charge cycles when fully charged from 0 residual ...

Page 81: ...so do not insert any metallic object or other foreign substance into the plug or the connector for this may cause the charger to malfunction or damage the battery Do not place the charger in locations exposed to direct sunlight near a heater or other heat source or where the temperature may drop below freezing If the charger or the battery becomes hot the charger protection function may prevent th...

Page 82: ...9 6 Charger ESC3 Indicator Lamps While charging you can check the charge sta tus using the capacity indicator lamps on the battery The capacity indicator lamps will turn off after charging has completed Assuming that charging started with the battery in an empty state the time to completion is typ ically 4 5 hours Place the charger on a flat stable surface with the charge indicator lamp facing up ...

Page 83: ...gage from the backrest and anything else that can potentially tangle the charge cable Park the wheelchair indoor on a level floor and apply the parking brakes Turn off the power switch on the wheelchair As a safety measure during on vehicle charging the wheelchair will not power on even if it is switched on Insert the power plug of the dedicated charger ESC3 into the residential power outlet Open ...

Page 84: ...ter charging has completed Assuming that charging started with the battery in an empty state the time to completion is typ ically 4 5 hours After charging has completed unplug the char ger plug and the power plug then securely close the battery s connector cover NOTICE Do not pull on the power cord This can cause the wires to break Charge lamp Charging Charging starts Charging complete All lamps t...

Page 85: ...harge lamp green will change from a flashing to an on state and charging will start automatically The length of the standby time varies with the condi tions The battery temperature increases during charging However if the battery temperature rises above 113 F 45 C the power for the charger will turn off to protect the battery Since charging has not ended it is necessary to charge again after the b...

Page 86: ...andby charging will start automatically and the charge lamp green changes from a flashing to an on state However if the charge standby condition continues for a long time charging will end When this happens the charge lamp flashes rapidly in green Flashing green 5 times per second Charge lamp green Flashing On Indicates timeout of charge standby The charger has remained in standby mode for a long ...

Page 87: ...nexpectedly during transport Be sure to put the protective cap on the removed battery 3 Lock the wheels Set the left and right clutch levers to the power drive position so that the wheels will not spin and then apply the parking brakes 4 Remove any detachable parts Remove the foot leg supports and any other parts that can be detached 5 Detach the drive units If necessary detach the drive units fro...

Page 88: ...ir Secure the wheelchair to prevent it from moving or hitting any sur rounding objects When loading This product uses precision electronic parts Do not apply sharp impact Load it upright whenever possible If loading it on its side place it so that the controller is at the top Secure the wheelchair ensuring that the controller is not hitting against any surrounding object Securing the Wheelchair St...

Page 89: ...n the correct position WARNING If the foot leg supports are removed or foldable parts are folded be sure to place them in their original positions before operating the wheelchair Never operate the wheelchair with parts removed or folded You may injure yourself If the anti tip device is folded or its safety wheels are facing upwards be sure to place it in its original position and confirm that it i...

Page 90: ...the wheelchair operates correctly every 3 months WARNING Be sure to remove the battery when not in use so that its power will not turn on unexpect edly in storage Be sure to store the disconnected battery with the protective cap on it Exposed contacts can cause short circuits and lead to a fire or battery rupture Protective cap When storing the battery for a long period of time see sections below ...

Page 91: ...n Airplane Once your plane trip has been determined inform your airline company in advance that you will be using an electric wheelchair and follow their instructions At this time provide the airline company with details of your wheelchair In particular see the specifications for the battery you are using below About the lithium ion battery There may be restrictions in regard to carrying the lithi...

Page 92: ...els with manual wheels or when transporting the wheelchair 1 Removing the power units from the frame Turn off the power and remove the battery Put the protective cap on the removed battery Switch the left and right clutches to the power drive position Ring Connector Turn the connector ring at the end of the cable counterclockwise while pulling the connector up to disconnect the cable On models tha...

Page 93: ...ands and pushing the middle of the center cap a with your fingers pull out each power unit using both hands 2 Installing the power units to the frame Place the wheelchair so that it will not become unstable For example as shown in the figure Switch the clutches on the units to the power drive position While pushing the middle of the center cap a with your fingers install each power unit using both...

Page 94: ...tor at the end of the cable with the white dot on the connector on the wheel side and then push in the cable connector until it clicks Connect the cable with an L mark to the connector with an L mark on the wheel side and connect the cable with an R mark to the connector with an R mark on the wheel side Make sure that the connector will not be disconnected NOTICE When you install the right wheel o...

Page 95: ...ople around the wheelchair may get injured After the power units are installed to the frame be sure to check that the balls on the end of each axle can be seen and that the units will not come off if pulled If the axles are not secured the axles could suddenly come off while the wheelchair is traveling and the wheel chair could tip over causing serious injury ...

Page 96: ...fastener of battery bag band part and remove the battery bag Hook and Loop Fastener Battery Bag Belt Battery Bag Band Part of Battery Bag Rear side is Hook and Loop Fastener for entire surface 5 Remove the hook and loop fastener of belt and remove the belt 6 Feed the belt through the frame under back support and attach the hook and loop fastener Belt Hook and Loop Fastener of Belt Frame Hook and L...

Page 97: ...ng Make sure the belt is taut A slack or loose belt could allow the battery bag to come off or the belt could get caught in moving parts Belt Belt Edge NG Belt Edge Frame Belt Frame 8 Feed the band part of battery bag through upper side frame and fix the belt by using fitting tape Hook and loop fastener of male at both sides There are two 2 ways for fitting tape attaching methods as follows Select...

Page 98: ... battery bag once and attach the surplus band part tip to the hook and loop fastener male of battery bag After attached the band attach the hook and loop fastener female to the original position Battery Bag Battery Bag Band Part of Battery Bag Band Part of Battery Bag Fitting Tape Fitting Tape Frame Frame Band Part Tip Hook and Loop Fastener male of Battery Bag Hook and Loop Fastener female Batter...

Page 99: ...er Battery Bag Battery Bag Belt Belt 11 3 Anti tip Device The anti tip device of the NAVIGO can be turned upwards Do so when going over bumps with the assis tant operations Immediately after going over a bump return the anti tip device to its original position NAVIGO 24 1 Turning upwards the anti tip device Pull the lock knob and turn the anti tip device inward while the lock lever is pushed Lock ...

Page 100: ...he an ti tip devices are 1 4 2 0 inches 35 50 mm above the ground when the casters and rear wheels are in contact with the ground If the distance between the safety wheels and the ground is not within this range contact your dealership Check that the distance between the center of the wheel chair back pipe where the axles of the rear wheels are installed and the center of the safety wheels on the ...

Page 101: ...oing over bumps also pay close attention to the condition of the road surface Even if the anti tip device is in the correct position the wheelchair could rollover due to various factors such as a bumpy road surface holes level differences and slopes Carefully choose routes you use frequently to be sure they are not hazardous In case of NAVIGO 16 1 Placing the safety wheels in an upward facing posi...

Page 102: ...e Mounting position and angle of the controller can be adjusted Consult with your dealer on this adjustment Retracting the controller The controller can be retracted Retract the controller to move close to a table or desk Vertical type controller holders Standard Parallel arm type controller holders Optional Horizontal type controller holders Optional ...

Page 103: ... Power ON Do not retract or pull out the controller from holder with the power on and do not turn on the power after retracting or pulling out it The joystick may tilt caus ing the wheelchair to move unexpectedly and this may result in you or other people in your surrounding to getting injured Never travel in power drive mode with the controller retracted or pulled out Also do not retract or pull ...

Page 104: ...e power switch 2 Move the upper holder lock lever outward Adjusting the mounting position of the controller The Mounting position and angle of the controller can be ad justed Consult with your dealer on this adjustment Off Upper holder lock lever 3 Pull the controller upward to remove it Controller ...

Page 105: ...usting the mounting position of the controller Adjusting the Horizontal position The Mounting position can be adjusted for 3 positions of Center inner and outer side 1 Turn off the power switch 2 Adjusting the position of controller while the lock lever of the holders is pulled up 3 After release the lock lever the controller position is fixed with lock position Inner side Outer side Lock lever ...

Page 106: ...lt with your dealer on this adjustment How to retract the controller 1 Turn off the power switch Forward Backward Angle Direction Off 2 Moving the controller with pulling up the Lock lever 3 The moving range is wider than the range of the fixed position Lock lever ...

Page 107: ...tion Consult with your dealer on this adjustment How to retract the controller 1 Turn off the power switch Position Angle Direction 2 Turn the controller while the lock lever of the holder is pushed forward 3 To return the controller to its original position reverse the procedure Make sure that the controller is locked in position Off Lock lever ...

Page 108: ... of the NAVIGO can be changed to fit your usage These changes are performed by changing the parameter settings Consult with your dealer on changing the parameter settings There are two parameter settings Functional Parameters and Driving Parameters 1 Functional Parameters Auto power off function This is a function that turns off the power after a specified time of non operation Setting 1 The power...

Page 109: ...s function adjusts the time until the electromagnetic brake is applied after the wheelchair stops Setting 1 The electromagnetic brake is applied 10 seconds after the wheelchair stops Default setting Setting 2 The electromagnetic brake is applied immediately after the wheelchair stops 2 Driving Parameters You can adjust settings such as speed acceleration and joystick sensitivity Preset mode Select...

Page 110: ...tomatically Buzzer sound This function is for sounding a buzzer when the power is turned on or when an error such as disengaged clutches occurs Setting 1 The buzzer sound is enabled Default setting Setting 2 The buzzer does not sound when the power is turned maximum speed is adjusted when operated with the clutch levers in manual position etc It is impossible to disable the horn and alert sounds L...

Page 111: ... 1 Soft mode Setting 2 Normal mode Default setting Setting 3 Sports mode Free mode You can fine adjust such settings as the speed acceleration motor torque WARNING When evaluating the need to change parameter settings and choosing the actual changes consult the guidance of experts such as physical therapists and occupational therapists at the dealer ...

Page 112: ...oke looseness breakage Torque stop tightening Dust cover installation Anti tip device looseness deformation damage Dirty terminals on battery seat Clutch operation clutch cable damage Wire connection looseness damage 2 Controller Damage deformation looseness harmful damage burrs sharp points and so on Power switch speed selector switch operation Rubber cap damage Joystick operation actually move t...

Page 113: ...to the wheelchair while traveling and may result in a rollover or fall 12 1 Maintenance Cleanup If the NAVIGO becomes dirty due to normal use use a tightly wrung out towel to wipe off any dirt If the dirt is excessive use a towel and neutral detergent to remove the dirt After removing the dirt be sure to wipe off any remaining detergent NOTICE Do not wash by directly hosing it down with water or h...

Page 114: ...hair is not repaired or assembled completely the user or those around the user could be injured To perform repairs and service the dealer uses the service manual parts catalog and other docu mentation These items are not sold to the general public When requesting repairs do not send the wheelchair directly First contact the dealer In addition a substitute wheelchair will not be provided during rep...

Page 115: ... Make sure that the parking brakes can stop the wheels from moving and that they are installed securely to the frame Wheels Make sure that the wheels are not deformed and the spokes are not broken Casters Make sure that there is tire depth and there are no cracks Make sure that the caster forks are not damaged Make that the nuts securing the tires are not loose Battery Check the residual capacity ...

Page 116: ...r size Operating conditions environment Inside and outside temperature 32 F to 95 F 0 C to 35 C humidity Less than or equal to 90 IEC waterproof standard IPX4 resistance against splashing water Load capacity including the rider luggage and frame weight 275 lb 125 kg 3 220 lb 100 kg 3 Travel range Continuous travel range in accordance with Yamaha spec with Ni MH battery JWB2 10 mi 16 km 4 9 4 mi 15...

Page 117: ...te 6 7 Ah 160 8 Wh 11 8 Ah 295 Wh Battery Charger Model ESC3 Charging method Automatic Charging controlled by the microprocessor Rated input during charging 100 V 240 V 50 60 Hz 1 1A 0 5 A Plug type Power cord A type Rated output during charging 29 V 2 6 A 29 2 V 3 A Chargeable battery JWB2 JWB2 ESB1 Charging time Time for normal charging Approx 3 hr Approx 4 5 hr Time for refresh charging 3 19 hr...

Page 118: ...ame hot such as inside a car Switch to manual operation Is the battery properly inserted Insert the battery properly When operated by the rider is the assistant controller turned on In this case turn off the power switches on both controllers and turn on the power for the controller When operated by the assistant is the con troller turned on In this case turn off the power switches on both control...

Page 119: ...icient speed Is the battery sufficiently charged Replace with a new battery For a nickel metal hydride battery try refresh charging Is the ambient temperature low The battery power decreases when the temperature drops Is the wheelchair carrying heavy loads or driving uphill Heavy loads tend to shorten the travel range Is the speed parameter set to the standard setting Contact your dealer Is the sp...

Page 120: ...n an environment with an appropriate temperature Stops charging halfway Off Residual capacity indicator lamps are lighted only halfway Is the temperature of the battery high After the battery has cooled down try charging again Takes too long to charge Lit orange Residual capacity indicator lamps are lit and then turned off successively Are you refresh charging the battery The battery is being disc...

Page 121: ... Residual capacity indicator lamps are lit Is the ambient temperature appropri ate Charge the battery in an environment with an appropriate temperature cool in the summer and warm in the winter Stops charging halfway Off Residual capacity indicator lamps are lighted only halfway Is the temperature of the battery high After the battery has cooled down try charging again After charging is completed ...

Page 122: ...ler from which you purchased NAVIGO When contacting the dealer your product serial number may be required Refer to below to check the se rial number and provide it to the dealer 14 3 Serial Number Location The serial number is shown on the bottom of the battery seat Sales dealer Model Manufactured lot number ...

Page 123: ...ate of Purchase and owner information in the entry boxes above and signs where indicated PERIOD OF WARRANTY The power unit including the motor assembly housing cover internal components motor control unit assembly controller assembly battery assembly battery box assembly wheels and anti tip bar and charger will be warranted for a period of two 2 years from the Date of Purchase subject to exclusion...

Page 124: ...g conditions such as ambient temperatures load inclines frequent starting and stopping and normal system protection functions as well as temperature related performance of the battery charger SPECIFIC PARTS EXCLUDED FROM WARRANTY Parts subject to normal wear or routine maintenance such as the battery regarding cell degradation tires and tubes Charges for transporting the NAVIGO equipped wheelchair...

Page 125: ...rights reserved Any reprinting or unauthorized use without the written permission of Yamaha Motor Corporation U S A is expressly prohibited Printed in Japan OWNER S MANUAL X0F 28199 B2 Wheelchair Power Add on Kits READ THIS MANUAL CAREFULLY It contains important safety information ...

Reviews: