background image

SERVICE MANUAL

[XA41, XA42, XA43]

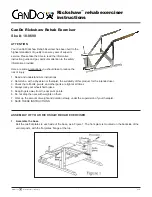
XA4-28197-00 (English)

Electric power-assist unit for wheelchairs

This manual has been compiled as a guide to installing the 

 on commer-

cial wheelchairs, and providing after-sales service. Information which dupli-
cates that contained in the 

 Service Manual has been omitted.

Summary of Contents for JW-II

Page 1: ...sh Electric power assist unit for wheelchairs This manual has been compiled as a guide to installing the on commer cial wheelchairs and providing after sales service Information which dupli cates that contained in the Service Manual has been omitted ...

Page 2: ...s regarding inspection and maintenance Yamaha Motor Co Ltd New Business Development Division The contents and specifications noted in this manual are subject to change without notice due to improvements Photographs and contents may differ from the actual products in some respects based on changes in specifications and other factors This Service Manual is intended for use by persons with basic know...

Page 3: ...able Type 11 Fixed Type 14 Installation Inspection And Adjustment After Installing 15 Inspection Points and Adjustment Points 15 Service At Delivery 19 Outline of the Running Control System 19 Explaining Operation Characteristics to the User 21 Battery 24 Names of Parts and Circuits 24 Construction and Characteristics of Nickel Hydrogen Batteries 25 Battery Construction and Characteristics 26 Batt...

Page 4: ...peration input Hand rims are vinyl chloride coated S Type recommended for those with sufficient grasping power ex paraplegia catalogue in dication A type The power assist function will work after with sufficient manual operation in put Stainless steel hand rims C This type is recommended for persons capable of operating with one hand ex hemiplegia catalogue indication C type Steering is done with ...

Page 5: ...ns XA41 catalogue indication A type XA42 catalogue indication B type XA43 catalogue indication C type A and B types 15 8 Kg C type 17 2 Kg 22 1 3 8WO tire outer diameter 570 3 mm 24 1 3 8WO tire outer diameter 608 3 mm Direct current brush type motor 24 V 90 W 2 Left wheel 1 right wheel 1 A and B types Approx 15 km C type Approx 10 km For continuous travel on a level surface at 5 km h the C type i...

Page 6: ...e such as screws for stoppers as in the figure below Grease B general type 90890 69916 General waterproof grease can be used on sliding portions spin axis bearings and gear contact portions 2 Supplemental Materials Where to apply thread lock 1 Threaded portion of the stopper Degrease the threaded portion before applying thread lock Special tools 2 Threaded portion of the main switch 3 Threaded por...

Page 7: ...bracket Ass y bolt Bracket clamp bolt Main switch angle adjusting bolt Main switch length adjusting screw Bracket battery mounting bolt 1 2 3 4 5 6 7 8 Tool size 24 mm socket 17 mm deep socket 12 mm deep socket 12 mm socket 5 mm hexagon socket 4 mm hexagon socket 5 mm hexagon socket 12 mm deep socket Tightening torque 40 to 50 N m 400 to 500 kgf cm 40 to 50 N m 400 to 500 kgf cm 8 5 to 12 N m 85 t...

Page 8: ... Axle diameter Detachable type Fixed type ø12 7 mm 5 The distance from the center of the axle hole to the base pipe must be 105 mm or more and there must be 43 mm or more of space in front of the back pipe 6 Non reclining type Installation Preparation Basic Judgment Concerning Applicability of Example of a wheelchair on which the cannot be installed CAUTION Do not install the on a wheelchair that ...

Page 9: ...le or fixed Detachable type 22S 24S 22K 24K Fixed type 22SR 24SR 20KR 22KR 24KR 22CR Detachable type No Name Part Number Quantity 1 Right wheel tilt lock assembly Differsfromdetachabletype 1 2 Left wheel tilt lock assembly Differsfromdetachabletype 1 3 Spacer for ø 22 mm XA3 43141 00 4 4 Washer for adjustment 92903 12200 4 5 Washer tilt lock hole spacer 90201 12541 2 No Name Part Number Quantity 6...

Page 10: ...Length of the Main switch Extended Standard setting Extended Standard setting Extended Standard setting Extended Standard setting Angle of the Main switch 3 8 3 3 Position of the Clamp Bracket Front Rear Front Rear Position of the Stopper Left Right 2 5 Left Right 2 6 Left Right 2 6 Left Right 2 6 Preparation for installation NOTE Before installing change the mounting position of the parts to matc...

Page 11: ...ustment of the stoppers At delivery the stoppers are installed in po sition 2 for the left and position 4 for the right For the sports type change the stop per positions to position 1 for the left and po sition 6 for the right NOTE Apply thread lock to the threaded portions of the stoppers and tighten with the specified tighten ing torque 4 Position of the clamp bracket The installed clamp bracket...

Page 12: ...20 mm No Name Part Number Quantity 1 Spacer tube clamp bracket 2 XA3 43142 00 4 2 Detachable type with an axle hole diameter of 16 mm No Name Part Number Quantity 1 Bolt clamp set A XA3 W4313 10 2 CAUTION Set the nut tightening torque slightly lower than the standard 25 to 30 N m 250 to 300 kgf cm 3 Frame pipe diameter other than ø22 mm No Name Part Number Quantity 2 Spacer for ø24 mm XA3 43141 10...

Page 13: ...rame or brakes Initial charging Charge the battery before starting the installation New batteries cannot be used without being charged Charge the battery before starting the instal lation It takes about 3 hours to charge the battery completely CAUTION When charging batteries choose a place with good ventilation and an ambient temperature of 10 to 30 C Handling the various parts Handle the various ...

Page 14: ...eft 3 Install the bolt clamp bracket of the on the wheelchair frame NOTE Place the bolt head portion from the frame outside 4 Insert the tilt lock into the bolt clamp bracket and apply the washer and nut Then tighten them tentatively NOTE The tilt lock has a longitudinal hole in it As a standard the upper end of the hole should be used 5 Install the fitting spacer on the clamp bracket NOTE Select ...

Page 15: ... tightening torque range on page 4 9 Install wheel assembly NOTE The wheel cannot be installed unless each part is adjusted to the position indicated on the list on page 7 1 Lift the cam shaft lever 2 Insert the wheel by matching the each posi tion of the axle and the stopper NOTE If it is too tight to insert temporarily loosen the clamp bracket installation screw and retighten it in a position wh...

Page 16: ...13 Installation Procedure Detachable Type 11 Connect the wire by matching the white line on the coupler ...

Page 17: ...3 Insert the axle of the wheel assembly into the axle hole of the wheelchair 4 Place the plain washer small on the axle Then mount the tilt lock assembly and place the plain washer large followed by the U nut NOTE Place the plain washer small so it will fit inside the tilt lock assembly installation hole Be care ful that they do not overlap 5 The following section describes the same procedure with...

Page 18: ...nd the frame 2 Adjust the length and angle of the main switch if it is difficult to operate the switch To make adjustments first cut the clamp of the wire harness Adjusting the angle Remove the attachment bolt from the main switch ass y and adjust to an angle which facilitates operation NOTE The angle can also be adjusted by removing the middle bracket and reassembling like the main switch ass y s...

Page 19: ... remove it Procedure 1 Remove the right wheel 2 Remove the plate cover 2 screws 3 Remove the 3 screws of the battery fitting plate 4 Shift the position of the bat tery fitting plate by discon necting the largest connector 5 Change the position by re moving the three battery bracket fixing bolts CAUTION Tighten with the tightening torque specified on page 4 5 Adjust the length of wire harness If th...

Page 20: ...ration Are there any abnormal sounds Is operation normal CAUTION Check for loose bolts nuts or screws Adjusting the auxiliary brake 1 Turn the brake assembly nut until the clear ance between the brake rubber and the rim is the same on the left and right The left wheel is adjusted by slightly loosening the 10 mm nut on the lower side and the right wheel by slightly loosening the 10 mm on the upper ...

Page 21: ...st the play of the brake lever Lengthening the adjuster reduces the clearance and the amount of play Shortening the adjuster increases the clearance and the amount of play Play at tip of brake lever 10 to 20 mm NOTE After completing the adjustment tighten the lock nut of the adjuster securely 3 Inspect the brakes to see how well they work With someone sitting in the wheelchair check to make sure t...

Page 22: ...19 Service At Delivery Outline of the Running Control System ...

Page 23: ...al travel mode the stand by mode and the power assisted travel mode vary depending on whether the main switch is on or off and on how the hand rims are operated Also the is designed so that a braking function is activated if the main switch is on but the hand rims are not operated for a certain period of time Manual travel Power off Brake function off Power assisted travel Power on Power assist on...

Page 24: ...while the power switch is on The power assist function will be activated and wheelies will become extremely difficult When doing a wheelie while the power is on hold the tire instead of the hand rim This is the same as going over curbs from a stopped state Points of installing and removing wheels 1 Remove the battery before installing or removing the wheels 2 When removing the right wheel hold ont...

Page 25: ...diately after re placing the battery There may be a malfunction in the system 3 Warning of the remaining battery power Replace the battery as soon as possible when the indicating light starts blinking slowly at a cycle of approximately 1 second and the buzzer sounds pi pi pi pi If power assisted travel is continued until the battery has completely run out the indication light will light and the bu...

Page 26: ...isconnected LED rapid blinking Buzzer Sounds Indication Goes off after lighting for 3 seconds Slow blinking 1 second cycle Rapid blinking 0 25 second cycle Lights LED indications When it is indicated When the power switch is turned on Battery remaining power warning 1 When power is turned on while applying force to the hand rims 2 When power is turned on while connector between right and left whee...

Page 27: ...rol unit Battery management controller Black Black thin Black thin Thermistor Temperature fuse Internal connections diagram Release button Battery fuse 30 A blade type Attachment screw Contact point Protective cap Spare battery fuse Remaining capacity display Display switch Seal Battery control unit Battery ...

Page 28: ... the battery temperature NOTE Charging a warm battery in a warm location may take longer than the normal charging time The customer should be advised to charge the bat tery at an ambient temperature of 30 C or less The battery can be charged as long as the surface temperature is between 0 C and 40 C Outside this temperature range the charger goes into temperature standby mode The charging LED flas...

Page 29: ...teries is the same as that at normal temperatures but at low tem peratures the discharging capacity drops be cause the voltage is lower The recommended low temperature usage range for batteries is 5 C or higher If the surface temperature of the battery is 5 or lower only about 50 to 70 of the power obtainable at room temperature can be ob tained As a result if using the wheelchair at below freezin...

Page 30: ...ates if charging is done at a high tem perature but can be eliminated by using re fresh charging NOTE When the memory effect appears the capac ity indicator becomes inaccurate Advise the customer that whenever the charging unit indicates that refresh charging is necessary it should be carried out as soon as possible It is recommended that the battery be used as long as possible before charging it ...

Page 31: ...y deteriorates adversely affecting the performance of the battery NOTE If the battery is to be stored for a long period of time we recommend storing it in a charged state at low temperatures 0 to 30 C The control unit monitors the amount of self discharging and displays the remaining ca pacity Advise the customer that if the capac itydisplaydecreaseswhenthebatteryisstored the battery should be cha...

Page 32: ...display lamps in six stages the first lamp is used to display two stages depending on whether it is flashing or lighted Function 2 Battery deterioration display As the battery deteriorates when the capacity decreases to 80 or less of its original level the top stage 5th stage of the display no longer lights after the battery is charged As the deterioration progresses when it reaches 60 or less the...

Page 33: ... and discharging char acteristics become unstable and the remaining capacitydisplaycannolongerbedisplayedaccu rately A recommendation should be made at this point that the battery be replaced The remaining capacity display does not func tion correctly outside of the guaranteed tem perature range If this occurs the LEDs indi cating the remaining capacity will flash to alert the user If the fuse blo...

Page 34: ...d Shifts when switch is pressed Shifts when switch is pressed Shifts after 30 second display Shifts after 30 second display Service mode The battery control unit is equipped with a service mode which can be used to make a simple diagnosis of the battery Usage of the service mode Procedure Hold down the display switch for at least 10 seconds the capacity display goes out after 5 seconds When the ca...

Page 35: ...harging Advise that refresh charging must definitely be done when the next alert is displayed Note 1 Bottom LED lights Tester diagnosis is needed A comprehensive diagnosis is needed using a battery tester Please consult Service Center Note 1 If the refresh alert was displayed when the diagnosis was conducted advise that refresh charging must be carried out Displays the deterioration status of the ...

Page 36: ...ed Flashing Lighted 0 to 99 100 to 149 150 to 199 200 to 249 250 to 299 300 to 349 350 to 399 400 or more The number of times the battery has been used is displayed counting one charging and discharging as one cycle Display of no of times used ...

Page 37: ...ure Is the PCB lead disconnected or a connector defective or disconnected Replace the fuse Charge the battery Is the case broken The battery control unit has broken down Contact the Service Center for consultation Start diagnosis Is the fuse blown Is the power supply OK 20 V or more YES YES NO NO Has a switch on the PCB been pressed Drop in battery voltage NO YES 20 V or less 2 The battery cannot ...

Page 38: ...ischarged battery 3 Follow up charging When the battery is warm from being charged charging is done at a low current level following fast charging to supplement the amount of charging 4 Trickle charging Charging is done with a tiny amount of current following methods 2 and 3 to compensate for the amount consumed through self discharging NOTE If the battery has just been shipped or if it has been d...

Page 39: ...it is charged the charger controls the charging process based on the battery temperature data sent from the battery control unit NOTE The battery temperature must be between 0 and 40 C for charging to start If the battery temperature reaches 50 C charging is forcibly stopped Function 4 Multi input function The XA4 charger can accommodate input power supplies of AC 100 to 240 V 50 60 Hz As long as ...

Page 40: ...Lighted Various forms of flashing see the later section called Error Diagnosis Location of problem Problem with battery Problem with communication Problem with charger 1 Problem with charger 2 internal high temperature problem Display Flash simultaneously Flash alternately Flash sequentially in order of green green yellow Flash sequentially in order of green green green yellow Solution Replace the...

Page 41: ...e charger battery and contact points Diagnosis procedure Can the capacity be displayed for the battery alone Are the contact points deformed or is there foreign matter on them Can charging be done on a normal battery NO Charger has broken down Replace the charger Battery control unit in the battery has broken down Repair and clean the contact points Replace the fuse See the section on diagnosing f...

Page 42: ...motor current Problem with PCB internal power supply 12 V No remaining battery power Incorrect wiring connections between left and right wheels disconnected connector Disconnected or shorted communication cir cuit Disconnected power supply circuit on left wheel side Torque input exists when power supply is turned on Poor neutral point adjustment of torque sen sor Problem with torque sensor from po...

Page 43: ... minus screwdriver in the other end of the inner axle Fixed Type Remove the cap by loosening it with a minus screwdriver large or a coin 2 The rear wheel caps can be removed by hand after removing the cir clip with the minus driver Remove them from the claw portion one at a time 3 If the LED is blinking behind the hub when turning the power switch on after setting the battery in place there is a m...

Page 44: ...e point where the LED starts to light Left wheel Slowly turn the sensor clockwise and find the point where the LED starts to light 5 Tighten the mounting screw of the sensor in that position The figure shows the position of the service LED for the right wheel For the left wheel the position is 180 symmetri cal bottom side CAUTION Service mode Always access the Service mode before adjusting the sen...

Page 45: ...50 00 Revision number If there is a first revision the number will change from 0 to 1 Design number If it is necessary to distin guish specifications the numbers 1 2 and so on are added NOTE The end digit of the part number will change depending on the revision Please indicate the production number as well when ordering parts Model number Fundamental number ...

Page 46: ...E MANUAL XA41 XA42 XA43 First edition April 1999 All rights reserved Written and published by Yamaha Motor Co Ltd YAMAHA MOTOR CO LTD 2500 SHINGAI IWATA SHIZUOKA JAPAN Printed on recycled paper 9904 0 5 1 CR ...

Reviews: