background image


This A

MANUAL DEL PROPIETARIO

3B5-28199-61

YFZ350W

MANUEL DU PROPRIÉTAIRE

OWNER’S MANUAL

Summary of Contents for BANSHEE YFZ350W

Page 1: ...This A MANUAL DEL PROPIETARIO 3B5 28199 61 YFZ350W MANUEL DU PROPRIÉTAIRE OWNER S MANUAL ...

Page 2: ...PRINTED IN JAPAN 2006 07 0 7x1 E F S YAMAHA MOTOR CO LTD ...

Page 3: ...This A 3B5 28199 61 E0 YFZ350W OWNER S MANUAL ...

Page 4: ......

Page 5: ...des important safety information It provides information about special tech niques and skills necessary to ride the ATV It also includes basic maintenance and inspection proce dures If you have any questions regarding the operation or maintenance of your ATV please consult a Yamaha dealer AN IMPORTANT SAFETY MESSAGE READ THIS MANUAL COMPLETELY BEFORE OPERATING YOUR ATV MAKE SURE YOU UNDER STAND AL...

Page 6: ...ifications are subject to change without notice The Safety Alert Symbol means ATTENTION BECOME ALERT YOUR SAFETY IS INVOLVED Failure to follow WARNING instructions could result in severe injury or death to the ATV operator a bystander or a person inspecting or repairing the ATV A CAUTION indicates special precautions that must be taken to avoid damage to the ATV A NOTE provides key information to ...

Page 7: ...this ATV on any paved surface paved street paved road or motorway Please check your local riding laws and regulations before operating this ATV EBU17390 YFZ350W OWNER S MANUAL 2006 by Yamaha Motor Co Ltd 1st edition June 2006 All rights reserved Any reprinting or unauthorized use without the written permission of Yamaha Motor Co Ltd is expressly prohibited Printed in Japan ...

Page 8: ...t pedal 4 7 Kickstarter 4 7 Fuel tank cap 4 7 Fuel 4 8 Fuel cock 4 9 Starter choke 4 10 Seat 4 11 Adjusting the front shock absorber assemblies 4 12 Adjusting the rear shock absorber assembly 4 13 PRE OPERATION CHECKS 5 1 Pre operation check list 5 1 Fuel and 2 stroke engine oil mixing ratio 5 4 Transmission oil 5 4 Coolant 5 4 Front and rear brakes 5 4 Throttle lever 5 5 Drive chain 5 5 Tires 5 6...

Page 9: ...ark arrester 8 19 Changing the carburetor settings 8 21 Adjusting the engine idling speed 8 28 Adjusting the throttle cable free play 8 30 Checking the front and rear brake pads 8 31 Checking the brake fluid level 8 32 Changing the brake fluid 8 33 Checking the front brake lever free play 8 33 Checking the brake pedal position 8 34 Adjusting the parking brake free play 8 35 Brake light switches 8 ...

Page 10: ... tail brake light bulb 8 47 Removing a wheel 8 48 Installing a wheel 8 49 Troubleshooting 8 49 Troubleshooting charts 8 51 CLEANING AND STORAGE 9 1 Cleaning 9 1 Storage 9 2 SPECIFICATIONS 10 1 CONSUMER INFORMATION 11 1 Identification numbers 11 1 ...

Page 11: ...child under age 16 to operate an ATV without adult supervision and never allow continued use of an ATV by a child if he or she does not have the abilities to operate it safely Never carry a passenger on an ATV Always avoid operating an ATV on any paved surfaces including sidewalks driveways park ing lots and paved streets Never operate an ATV on any paved street paved road or motorway Watch carefu...

Page 12: ...ur abilities Practice on smaller hills before attempting larger hills Always follow proper procedures for climbing hills as described in this manual Check the ter rain carefully before you start up any hill Never climb hills with excessively slippery or loose sur faces Shift your weight forward Never open the throttle suddenly or make sudden gear changes Never go over the top of a hill at high spe...

Page 13: ...ommended in this manual Remember that wet brakes may have reduced stopping ability Test your brakes after leaving water If necessary apply them several times to let friction dry out the linings Always use the size and type of tires specified in this manual Always maintain proper tire pressure as de scribed in this manual Never modify an ATV through improper installa tion or use of accessories Neve...

Page 14: ...vapor or get some gasoline in your eyes seek medical help immediately If gasoline spills on your skin wash with soap and wa ter If gasoline spills on your clothing change your clothes WARNING EWB00070 Always operate your ATV in an area with ade quate ventilation Never start or run the engine in a closed area Exhaust fumes are poisonous and may cause loss of consciousness and death within a short t...

Page 15: ...2 1 1 2 3 4 5 6 7 8 9 10 11 EBU17660 LOCATION OF THE WARNING AND SPECIFICATION LABELS 1 2 3 4 5 6 ...

Page 16: ...erstand all of the labels on your ATV These labels contain important information for safe and proper operation Never remove any labels from your ATV If a label becomes difficult to read or comes off request a replace ment label from your Yamaha dealer ...

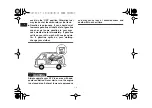
Page 17: ...2 3 1 2 3 4 5 6 7 8 9 10 11 ...

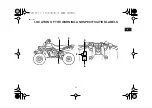
Page 18: ...2 4 1 2 3 4 5 6 7 8 9 10 11 ...

Page 19: ...2 5 1 2 3 4 5 6 7 8 9 10 11 ...

Page 20: ...2 6 1 2 3 4 5 6 7 8 9 10 11 ...

Page 21: ...0 Right view 1 Front shock absorber assembly 2 Radiator 3 Fuel cock 4 Rear shock absorber assembly 5 Spark arrester 6 Starter choke 7 Shift pedal 1 2 3 4 5 7 6 1 Tail brake light 2 Seat 3 Kickstarter 4 Fuel tank cap 5 Headlight 6 Brake pedal 7 Brake light switch 1 2 3 4 5 6 7 ...

Page 22: ...2 Controls and instruments NOTE The ATV you have purchased may differ slightly from the figures shown in this manual 1 Clutch lever 2 Parking brake lock plate 3 Main switch 4 Brake lever 5 Throttle lever 6 Handlebar switches 1 2 3 4 6 5 ...

Page 23: ... positions of the main switch are as follows ON All electrical systems are supplied with power The headlights and taillight come on when the light switch is on and the engine can be started The key cannot be removed OFF All electrical systems are off The key can be re moved 1 Main switch OFF ON ...

Page 24: ... taillight Set the switch to OFF to turn off all the lights CAUTION ECB00040 Do not use the headlights with the engine turned off for an extended period of time oth erwise the battery may discharge to the point that the starter motor will not operate properly If this should happen remove the battery and recharge it EBU18280 Throttle lever Once the engine is running movement of the throt tle lever ...

Page 25: ...or or the throttle ca ble should malfunction and will not close fully take your thumb off the throttle lever The throttle override system immediately cuts off the ignition WARNING EWB00260 Riding with a malfunction increases the chance for an accident and injury Make sure that the cause of the malfunction is corrected before restarting the engine or have the ATV in spected by a Yamaha dealer EBU18...

Page 26: ...g screw out more than 12 mm 0 47 in or the throttle cable could be dam aged Always make sure the throttle lever free play is adjusted to 4 0 6 0 mm 0 16 0 24 in See page 8 30 EBU18372 Clutch lever The clutch lever is located on the left handlebar To disengage the clutch pull the clutch lever toward the handlebar grip To engage the clutch release the clutch lever The clutch lever should be pulled r...

Page 27: ...sh down on the brake pedal EBU18500 Parking brake Use the parking brake before starting the engine or parking the ATV especially on a slope Squeeze the clutch lever while pushing the button then push in the lock plate to apply the parking brake Squeeze the clutch lever to release the parking brake NOTE When the parking brake is used engine speed is limited to 2300 r min Be sure the parking brake i...

Page 28: ...f the parking brake is not ap plied This could cause loss of control or a collision Always be sure you have released the park ing brake before you begin to ride The brake could overheat if you ride the ATV without re leasing the parking brake You could lose braking performance which could cause an accident You could also wear out the brakes 1 Button 2 Parking brake lock plate 1 2 1 Locked position...

Page 29: ...tarter lever move it down lightly with your foot until the gears engage and then push it down smoothly but forcefully This model is equipped with a primary kickstarter allowing the engine to be started in any gear if the clutch is dis engaged However shifting the transmission into the neutral position before starting is recommend ed EBU18720 Fuel tank cap Remove the fuel tank cap by turning it cou...

Page 30: ...s shown NOTE If knocking or pinging occurs use a different brand 1 Fuel tank cap 1 1 Fuel level 2 Filler tube Recommended fuel PREMIUM UNLEADED GASOLINE ONLY For Europe PREMIUM UNLEADED GASO LINE ONLY with a research octane number of 95 or higher Fuel tank capacity 12 0 L 3 17 US gal 2 64 Imp gal Fuel reserve amount 2 5 L 0 66 US gal 0 55 Imp gal ...

Page 31: ...l fuel especially on the engine or exhaust pipe which can cause a fire and severe injury Wipe up any spilled fuel immediately Do not refuel right after the engine has been running and is still very hot Be sure the fuel tank cap is closed securely EBU18830 Fuel cock The fuel cock supplies fuel from the tank to the car buretors while also filtering it The fuel cock lever positions are explained as f...

Page 32: ... is made available Turn the fuel cock lever to this position if you run out of fuel while riding When this occurs refuel as soon as possible and be sure to turn the fuel cock lever back to ON EBU18840 Starter choke Starting a cold engine requires a richer air fuel mix ture which is supplied by the starter choke Move the starter choke in direction a to turn on 1 Arrow mark positioned over ON ON FUE...

Page 33: ...tion on page 6 1 for proper operation EBU18870 Seat To remove the seat Pull the seat lock lever upward and pull up the seat at the rear To install the seat Insert the projection on the front of the seat into the seat holder and push down on the seat at the rear NOTE Make sure that the seat is securely fitted 1 Starter choke 1 a b 1 Seat lock lever 1 ...

Page 34: ...usting ring in direction a to increase the spring preload and thereby harden the suspen sion and in direction b to decrease the spring preload and thereby soften the suspension NOTE A special wrench can be obtained at a Yamaha dealer to make this adjustment 1 Projection 2 Seat holder 1 2 1 Spring preload adjusting ring 2 Position indicator Spring preload setting Minimum soft A Standard C Maximum h...

Page 35: ... stand the following information before han dling the shock absorber assembly Do not tamper with or attempt to open the cylinder assembly Do not subject the shock absorber assembly to an open flame or other high heat source This may cause the unit to explode due to ex cessive gas pressure Do not deform or damage the cylinder in any way Cylinder damage will result in poor damping performance Do not...

Page 36: ...g preload the longer distance A is the lower the spring preload With each complete turn of the adjusting nut distance A is changed by 1 5 mm 0 06 in 3 Tighten the locknut to the specified torque 1 Locknut 2 Spring preload adjusting nut 1 2 a b 1 Distance A Spring preload setting Minimum hard Distance A 213 5 mm 8 4 in Standard Distance A 220 5 mm 8 7 in Maximum soft Distance A 228 5 mm 9 0 in Tigh...

Page 37: ...und damping force and thereby soften the damping Compression damping force Turn the adjusting knob in direction a to increase the compression damping force and thereby hard en the damping and in direction b to decrease the compression damping force and thereby soft en the damping 1 Rebound damping force adjusting dial 1 a b Rebound damping setting Minimum soft 20 click s in direction b Standard 12...

Page 38: ...to check the number of clicks of each damping force adjusting mechanism and to modify the specifications as necessary WARNING EWB00460 Suspension components become hot during operation Never touch the compression damping force adjusting knob the rebound damping force adjusting dial or the oil reser voir with your bare hand or skin until suspen sion components have cooled 1 Compression damping forc...

Page 39: ... fuel line for leakage Correct if necessary 4 8 5 4 Transmission oil Check oil level in transmission case and add recommended oil to specified level if necessary Check ATV for oil leakage Correct if necessary 5 4 8 9 Coolant Check coolant level in reservoir and add recommended coolant to specified level if necessary Check cooling system for leakage Correct if necessary 5 4 8 11 Front brake Check o...

Page 40: ...nd adjust if necessary 5 5 8 30 Control cables Make sure that operation is smooth Lubricate if necessary 8 41 Drive chain Check chain slack and adjust if necessary Check chain condition Lubricate if necessary 5 5 8 38 8 40 Wheels and tires Check wheel condition and replace if damaged Check tire condition and tread depth Replace if necessary Check air pressure Correct if necessary 5 6 5 7 5 7 Brake...

Page 41: ...t your ATV each time you use it to make sure it is in safe operating condition Always follow the inspection and maintenance procedures and schedules described in the Owner s Manual Failure to inspect increases the possibility of an accident or equipment damage ...

Page 42: ...st be checked on a cold en gine since the level varies with engine tempera ture WARNING EWB00510 Wait for the engine and radiator to cool before removing the radiator cap You could be burned by hot fluid and steam blown out under pressure Always put a thick rag over the cap when opening Allow any remaining pressure to escape before completely removing the cap EBU19710 Front and rear brakes Brake l...

Page 43: ... starting out to make sure they are working properly If the brakes do not provide proper braking performance check the brake pads for wear See page 8 31 WARNING EWB00580 Always check the brakes at the start of every ride Do not ride the ATV if you find any prob lem with the brakes or you could lose braking ability which could lead to an accident If a problem cannot be corrected by the adjust ment ...

Page 44: ...NLOP KT877A Size AT20 x 10 9 Type Tubeless The tires should be set to the recommended pressure Recommended tire pressure Front 30 0 kPa 4 4 psi 0 300 kgf cm2 Rear 30 0 kPa 4 4 psi 0 300 kgf cm2 Check and adjust tire pressures when the tires are cold Tire pressures must be equal on both sides Tire pressure below the minimum speci fied could cause the tire to dislodge from the rim under severe ridin...

Page 45: ...ust or dirt in the gauge could cause the first reading to be incorrect Set the tire pressure when the tires are cold Set the tire pressures to the following specifications EBU19830 Tire wear limit Replace the tire when the tire groove decreases to 3 mm 0 12 in 1 Low pressure tire gauge 1 Recommended pressure Front 30 0 kPa 4 4 psi 0 300 kgf cm2 Rear 30 0 kPa 4 4 psi 0 300 kgf cm2 Minimum Front 27 ...

Page 46: ...840 Chassis fasteners Make sure that all nuts bolts and screws are prop erly tightened EBU19850 Instruments lights and switches Check that all instruments lights and switches are working properly Correct if necessary 1 Tire wear limit ...

Page 47: ...cold weather If the control cables are frozen or do not work smoothly you could be unable to control the ATV which could lead to an acci dent or collision CAUTION ECB00150 See the Engine break in section on page 6 4 prior to operating the engine for the first time 1 Set the parking brake 2 Turn the fuel cock to ON 3 Turn the main switch to ON and the engine stop switch to RUN 4 Shift the transmiss...

Page 48: ...old 8 Continue warming up the engine until it idles smoothly then return the starter choke to position 3 before riding NOTE The engine is warm when it responds normally to the throttle with the starter choke turned off When the parking brake is applied engine speed is limited to 2300 r min Make sure the parking brake is released before moving the throttle lever otherwise the engine will misfire pr...

Page 49: ...ys close the throttle before shifting gears otherwise damage to the engine and drive train may result 2 Pull the clutch lever to disengage the clutch 3 Shift into first gear 4 Open the throttle gradually and at the same time release the clutch lever slowly 5 Once the ATV has attained adequate speed release the throttle and at the same time quickly pull in the clutch lever 6 Shift the transmission ...

Page 50: ...ransmission in the neutral po sition do not coast for long periods of time with the engine off and do not tow the ATV for long distances The transmission is prop erly lubricated only when the engine is run ning Inadequate lubrication may damage the transmission Always use the clutch when changing gears The engine transmission and drive train are not designed to withstand the shock of forced shifti...

Page 51: ...ttle position 160 320 km 100 200 mi or 10 20 hours Avoid prolonged operation above 3 4 throttle Rev the engine through the gears freely but do not use full throttle at any time 320 km 200 mi or 20 hours and beyond The ATV can now be operated normally CAUTION ECB00220 If any engine trouble should occur during the engine break in period immediately have a Yamaha dealer check the ATV EBU20721 Parking...

Page 52: ...block the front and rear wheels with rocks or other objects Do not park the ATV at all on hills that are so steep you could not walk up them easily 1 Bring the ATV to a stop by applying the brakes in first gear 2 Stop the engine and release the clutch lever 3 With the rear brake applied apply the parking brake and slowly release the brake pedal EBU20910 Accessories and loading EBU20920 Accessories...

Page 53: ...ssories The ATV may handle differently than it does without accessories EBU20940 Loading As originally equipped this ATV is not designed to carry cargo or tow a trailer If you choose to add ac cessories so that you can carry cargo or tow a trail er you must use common sense and good judgment as the stability and handling of an ATV can be changed When adding accessories keep the following points in...

Page 54: ...p turns unless at very slow speeds Avoid hills and rough terrain Choose terrain carefully Added weight affects the stability and handling of the ATV WARNING EWB00820 Never exceed the stated load capacity for this ATV Overloading this ATV or carrying or tow ing cargo improperly could cause changes in ATV handling which could lead to an accident Cargo should be properly distributed and se curely att...

Page 55: ...7 1 1 2 3 4 5 6 7 8 9 10 11 EBU21141 RIDING YOUR ATV ...

Page 56: ...s on your ATV RIDE WITH CARE AND GOOD JUDGEMENT Get training if you are inexperienced Beginners should get training from a certified in structor Become familiar with this ATV at slow speeds first even if you are an experienced operator Do not at tempt to operate at maximum performance until you are totally familiar with the ATV s handling and performance characteristics WARNING EWB01380 Never oper...

Page 57: ...ssenger The long seat is to al low the operator to shift position as needed during operation It is not for carrying passen gers Carrying a passenger on this ATV greatly reduces your ability to balance and control this ATV It could cause an accident resulting in harm to you and or your passenger Apparel Always wear an approved motorcycle helmet that fits properly You should also wear eye protection...

Page 58: ...n accident and in creases your chances of a severe injury in the event of an accident Operating without protec tive clothing increases your chances of severe injury in the event of an accident Do not operate after consuming alcohol or drugs The operator s performance capability is reduced by the influence of alcohol or drugs WARNING EWB01420 Never consume alcohol or drugs before or while driving t...

Page 59: ...his ATV with improper or uneven tire pres sure may cause loss of control increasing your risk of an accident Do not operate at speeds too fast for your skills or the conditions WARNING EWB01450 Always go at a speed that is proper for the ter rain visibility and operating conditions and your experience Operating this ATV at speeds too fast for your skills or the conditions in creases your chances o...

Page 60: ... your speed when adding additional loads WARNING EWB01460 Never exceed the stated load capacity for this ATV Cargo should be properly distributed and se curely attached Reduce speed when carrying cargo or pull ing a trailer Allow greater distance for brak ing Always follow the instructions in your Own er s Manual for carrying cargo or pulling a trailer During operation Always keep your feet on the...

Page 61: ...ootboard your foot or leg may come into con tact with the rear wheels which could injure you or cause an accident Avoid wheelies and jumping You may lose control of the ATV or overturn WARNING EWB01480 Never attempt stunts such as wheelies or jumps Don t try to show off Modifications WARNING EWB01490 Never modify this ATV through improper in stallation or use of accessories All parts and accessori...

Page 62: ...round dry grass brush or other combustible materials to pre vent causing a fire hazard WARNING EWB01500 Do not touch the hot exhaust system Do not park the ATV during or after operation in a place where others might be likely to touch it Do not operate idle or park the ATV in dry grass dry ground cover or combustible ma terials BE CAREFUL WHERE YOU RIDE This ATV is designed for use on unpaved surf...

Page 63: ... any paved public street road or motorway WARNING EWB01520 Never operate this ATV on any paved street paved road or motorway You can collide with another vehicle In many areas it is illegal to operate ATVs on public streets roads and highways Know the terrain where you ride Ride cautiously in unfamiliar areas Stay alert for holes rocks or roots in the terrain and other hidden hazards which may cau...

Page 64: ...ls necessary to control the ATV on such terrain Failure to use extra care when operating on excessively rough slippery or loose terrain could cause loss of traction or ATV control which could result in an accident including an overturn When riding in an area where you might not easily be seen such as desert terrain mount a caution flag on the ATV DO NOT use the flag pole bracket as a trailer hitch...

Page 65: ... You should practice control of the throttle brakes shifting procedures and turning techniques in this area before trying more difficult terrain Always avoid riding on paved surfaces the ATV is designed for use on unpaved surfaces only and handling maneuvers are more difficult to perform on pavement Set the parking brake and follow the instruction on page 6 1 to start the engine Once it has warmed...

Page 66: ...G EWB01720 Always open the throttle gradually and release the clutch lever slowly Otherwise the ATV could wheelie which would increase the chance of an accident CAUTION ECB00230 Do not shift gears without releasing the throt tle Damage to the engine or drive train may oc cur When slowing down or stopping release the throt tle and apply the brakes smoothly and evenly As you slow down shift to a low...

Page 67: ...the turn Use the throttle to maintain an even speed through the turn This maneuver will let the wheel on the inside of the turn slip slightly allowing the ATV to make the turn properly This procedure should be practiced at slow speed many times in a large unpaved area with no obsta cles If an incorrect technique is used your ATV may continue to go straight If the ATV doesn t turn come to a stop an...

Page 68: ...acles that might cause you to lose control WARNING EWB01580 Never operate the ATV on hills too steep for the ATV or for your abilities The ATV can overturn more easily on extremely steep hills than on level surfaces or small hills Practice on small er hills before attempting large hills It is important when climbing a hill to make sure that your weight is transferred forward on the ATV This can be...

Page 69: ...teep hill if possible When crossing the side of a hill Always follow proper procedures as de scribed in the Owner s Manual Avoid hills with excessively slippery or loose surfaces Shift your weight to the uphill side of the ATV If your ATV has stalled or stopped and you believe you can continue up the hill restart carefully to make sure you do not lift the front wheels which could cause you to lose...

Page 70: ...e Dismount on uphill side or to a side if pointed straight uphill Turn the ATV around and re mount following the procedure described in the Owner s Manual RIDING DOWNHILL When riding your ATV downhill shift your weight as far to the rear and uphill side of the ATV as pos sible Move back on the seat and sit with your arms straight Choose a low gear which will allow the en gine compression to do mos...

Page 71: ...angle that would cause the ATV to lean sharply to one side Go straight down the hill where possi ble CROSSING A SLOPE Traversing a sloping surface on your ATV requires you to properly position your weight to maintain proper balance Be sure that you have learned the basic riding skills on flat ground before attempting to cross a sloping surface Avoid slopes with slip pery surfaces or rough terrain ...

Page 72: ...as de scribed in the Owner s Manual Avoid hills with excessively slippery or loose surfaces Shift your weight to the uphill side of the ATV CROSSING THROUGH SHALLOW WATER The ATV can be used to cross slow moving shal low water of up to a maximum of 35 cm 14 in in depth Before entering the water choose your path carefully Enter where there is no sharp drop off and avoid rocks or other obstacles whi...

Page 73: ...rol which could lead to an accident Test your brakes after leaving the water Do not continue to ride your ATV without verifying that you have regained proper braking ability CAUTION ECB00240 After riding your ATV in water be sure to drain the trapped water by removing the check hose at the bottom of the air filter case Wash the ATV in fresh water if it has been operated in salt water or muddy cond...

Page 74: ...large obsta cles such as large rocks or fallen trees When you go over obstacles always follow proper procedures as described in the Owner s Manu al SLIDING AND SKIDDING Care should be used when riding on loose or slip pery surfaces since the ATV may slide If unex pected and uncorrected sliding could lead to an accident To reduce the tendency for the front wheels to slide in loose or slippery condi...

Page 75: ...nce of skidding or sliding out of control WHAT TO DO IF This section is designed to be a reference guide only Be sure to read each section on riding tech niques completely WHAT TO DO If your ATV doesn t turn when you want it to Bring the ATV to a stop and practice the turning maneuvers again Be sure you are putting your weight on the footboard to the outside of the turn Position your weight over t...

Page 76: ...eight positioned to wards the uphill side of the ATV to maintain proper balance If the ATV starts to tip steer down the hill if there are no obstacles in your way to regain balance If you discover that the ATV is going to tip over dismount on the uphill side See page 7 14 If your ATV encounters shallow water Ride slowly and carefully through slow moving water watching for obstacles Be sure to let ...

Page 77: ...EATHER TERRAIN GEOGRAPHICAL LOCATION AND INDIVIDUAL USE THE MAINTENANCE INTER VALS MAY NEED TO BE SHORTENED WARNING EWB01840 Never service an engine while it is running Moving parts can catch clothing or parts of the body causing injury Electrical components can cause shocks or start fires Turn off the en gine when performing maintenance unless otherwise specified Have a Yamaha dealer perform the ...

Page 78: ... you do not have the tools or experience required for a particular job have a Yamaha dealer perform it for you WARNING EWB01850 Never modify this ATV through improper in stallation or use of accessories as it may cause changes in handling which in some sit uations could lead to an accident All parts and accessories added to this ATV should be gen uine Yamaha or equivalent components de signed for ...

Page 79: ...a Yamaha dealer as they require special tools data and technical skills NO ITEM CHECK OR MAINTENANCE JOB INITIAL EVERY Whichev er comes first month 1 3 6 6 12 km mi 320 200 1200 750 2400 1500 2400 1500 4800 3000 hours 20 75 150 150 300 1 Fuel line Check fuel hoses for cracks or other damage and replace if necessary 2 Spark plugs Replace 3 Air filter element Clean and replace if necessary Every 20 ...

Page 80: ...place if nec essary 10 Tires Check tread depth and for damage and replace if necessary Check air pressure and balance and correct if necessary 11 Wheel bearings Check for looseness or damage and replace if necessary 12 Upper and lower arm pivots Lubricate with lithium soap based grease 13 Drive chain Check chain slack and adjust if necessary Check rear wheel alignment and correct if necess sary Cl...

Page 81: ...19 Crankcase breather system Check breather hose for cracks or other damage and replace if necessary 20 Transmission oil Change Check ATV for oil leakage and correct if neces sary 21 Cooling system Check coolant level and ATV for coolant leakage and correct if necessary Replace coolant Every 2 years 22 Moving parts and cables Lubricate 23 Throttle lever hous ing and cable Check operation and corre...

Page 82: ...he brake hoses every four years and if cracked or damaged 24 Exhaust system Check for leakage and replace gasket s if neces sary Check for looseness and tighten all screw clamps and joints if necessary 25 Spark arrester Clean 26 Front and rear brake switches Check operation and correct if necessary 27 Lights and switches Check operation and correct if necessary Adjust headlight beams NO ITEM CHECK...

Page 83: ...ine To remove a spark plug 1 Remove the spark plug cap 2 Remove the spark plug as shown with the spark plug wrench included in the owner s tool kit To check the spark plugs 1 Check that the porcelain insulator around the center electrode of each spark plug is a medi um to light tan the ideal color when the ATV is ridden normally 2 Check that all spark plugs installed in the en gine have the same c...

Page 84: ...d if necessary adjust the gap to specification 2 Clean the surface of the spark plug gasket and its mating surface and then wipe off any grime from the spark plug threads 3 Install the spark plug with the spark plug wrench and then tighten it to the specified torque NOTE If a torque wrench is not available when installing Specified spark plug NGK BR8ES Spark plug gap 0 7 0 8 mm 0 028 0 031 in 1 Sp...

Page 85: ...face 2 Start the engine warm it up for several min utes and then turn it off 3 Wait a few minutes until the oil settles remove the oil filler cap wipe the dipstick off with a clean rag insert it back into the oil filler hole without screwing it in and then remove it again to check the oil level NOTE The transmission oil should be between the mini mum and maximum level marks 4 If the oil is at or b...

Page 86: ...lubricates the clutch do not mix any chemical additives Do not use oils with a diesel specification of CD or oils of a higher quality than specified In ad dition do not use oils labeled ENERGY CONSERVING II or higher Make sure that no foreign material enters the crankcase 7 Start the engine and then let it idle for several minutes while checking the transmission for oil leakage If oil is leaking i...

Page 87: ...oolant level 1 Place the ATV on a level surface NOTE The coolant level must be checked on a cold en gine since the level varies with engine tempera ture 2 Check the coolant level in the coolant reser voir NOTE The coolant should be between the minimum and maximum level marks 3 If the coolant is at or below the minimum level mark remove the seat See page 4 11 4 Open the coolant reservoir cover 1 Ma...

Page 88: ...on If water has been added to the coolant have a Yamaha dealer check the antifreeze con tent of the coolant as soon as possible oth erwise the effectiveness of the coolant will be reduced 6 Close the coolant reservoir cover 7 Install the seat NOTE If the engine overheats see page 8 51 for further instructions EBU23521 To change the coolant WARNING EWB01890 Wait for the engine and radiator to cool ...

Page 89: ...ore completely removing the cap 1 Place the ATV on a level surface 2 Remove the radiator cover by removing the bolts 3 Place a container under the engine and re move the coolant drain bolts 4 Remove the radiator cap 1 Radiator cover 2 Radiator cover bolt 1 2 2 1 Coolant drain bolt 1 1 ...

Page 90: ...4 1 2 3 4 5 6 7 8 9 10 11 5 Remove the coolant reservoir cap 6 Disconnect the hose on the coolant reservoir side and drain the coolant from the coolant reservoir 1 Radiator cap 1 1 Coolant reservoir cap 1 ...

Page 91: ...available use distilled water or soft tap water instead Do not use hard wa ter or salt water since it is harmful to the en gine If water has been used instead of coolant re place it with coolant as soon as possible otherwise the cooling system will not be pro 1 Coolant reservoir hose 2 Coolant reservoir Tightening torque Coolant drain bolt 10 Nm 1 0 m kgf 7 ft lbf 1 2 Antifreeze water mixture rati...

Page 92: ... Start the engine and then check for coolant leakage NOTE If any leakage is found have a Yamaha dealer check the cooling system 15 Install the radiator cover by installing the bolts EBU23620 Cleaning the air filter element The air filter element should be cleaned at the in tervals specified in the periodic maintenance and lubrication chart Clean the air filter element more frequently if you are ri...

Page 93: ... filter element out of the air filter case 4 Remove the lock plate by turning it and then remove the sponge material from the air filter element frame 1 Air filter case cover 2 Air filter case cover holder 1 2 2 1 Air filter element lock plate 1 ...

Page 94: ...eeze the excess solvent out of the sponge material and let it dry CAUTION ECB00440 Do not twist the sponge material when squeez ing it 7 Check the sponge material and replace it if damaged 8 Apply a quality foam air filter oil to the sponge material NOTE The sponge material should be wet but not drip ping 9 Pull the sponge material over the air filter ele ment frame and then install the lock plate...

Page 95: ...tings and the rubber joint manifold fittings for an air tight seal Tighten all fit tings securely to avoid the possibility of unfiltered air entering the engine CAUTION ECB00460 Make sure that the air filter element is prop erly seated in the air filter case Never operate the engine with the air filter el ement removed This will allow unfiltered air to enter the engine causing rapid engine wear an...

Page 96: ...sing 4 Make sure the gasket is properly positioned then insert the tailpipe into the muffler and align the screw holes 5 Install the screws and tighten them WARNING EWB02340 Do not start the engine when cleaning the spark arrester otherwise it could cause injury to the eyes burns carbon monoxide poison ing possibly leading to death and start a fire Always let the exhaust system cool prior to 1 Scr...

Page 97: ...eak fuel which would be a fire hazard Carburetor adjustments should only be per formed by a Yamaha dealer Do not attempt to perform these procedures unless you have mechanical knowledge and the neces sary tools Do not perform this procedure while the en gine is hot Place a rag under each carbure tor to catch any fuel Wipe up any spilled fuel completely After servicing the carburetors always check ...

Page 98: ...0 m 5000 ft Main jet Jet needle Pilot air screw Main jet Jet needle Pilot air screw Above 0 C 32 F 200 3rd groove 2 0 turns out 190 3rd groove 2 1 2 turns out from 5 C 41 F to 15 C 5 F 220 3rd groove 1 1 2 turns out 200 3rd groove 2 0 turns out from 10 C 14 F to 30 C 22 F 240 4th groove 1 1 2 turns out 220 3rd groove 1 1 2 turns out ...

Page 99: ...emoving the carburetors 1 Turn the fuel cock to the OFF position 2 Turn out the carburetor drain screw to drain the fuel 3 Remove the seat 4 Remove the radiator cover and side cover by removing the screws 5 Disconnect the fuel hoses 6 Remove the fuel tank by removing the bolts 7 Remove the air filter case cover by unhooking the holders 1 Radiator cover 2 Fuel tank 3 Screw 1 2 3 3 3 3 1 Fuel tank 2...

Page 100: ...9 10 11 8 Remove the mixing chamber cap securing plate by removing the screw 9 Loosen the carburetor joint screws 1 Air filter case cover 2 Air filter case cover holder 1 2 2 1 Mixing chamber cap securing plate 2 Screw 2 1 ...

Page 101: ...e the mixing chamber cap 11 Remove the throttle cable from the throttle valve and then remove the throttle cable hold er by removing the screws 1 Joint screw 1 1 1 1 1 Throttle cable 2 Throttle valve 3 Throttle cable holder 4 Screw 1 2 3 4 ...

Page 102: ... Remove the float and needle valve 14 Change the main jet and the jet needle clip po sition NOTE Optional main jets can be obtained at a Yamaha dealer After the jet needle clip position is changed the throttle cables may need to be adjusted 1 Float chamber 2 Screw 1 2 2 2 2 1 Float 2 Needle valve 3 Main jet 1 2 3 ...

Page 103: ...screw CAUTION ECB00501 Be sure to match one of the projections on the carburetor cap with one of the slots on the se curing plate If the securing plate does not match a projection tighten the carburetor cap until they align Do not loosen the carburetor cap 7 Tighten the mixing chamber cap securing plate screw to the specified torque 8 Tighten the carburetor joint screws Adjusting the throttle cabl...

Page 104: ...il the specified position is obtained 5 Move the throttle lever a few times and re check the position 6 Install the fuel tank side cover radiator cover and air filter case cover 7 Connect the fuel hoses 8 Install the seat EBU24020 Adjusting the engine idling speed The engine idling speed must be checked and if necessary adjusted as follows at the intervals specified in the periodic maintenance and...

Page 105: ...hrottle 2 Attach the tachometer to the spark plug lead 3 Turn in both pilot air screws until they lightly seat 4 Turn out both pilot air screws to specification See the Changing the carburetor settings section on the page 8 21 5 Remove the seat See page 4 11 6 Check the engine idling speed and if neces sary adjust it to specification by turning the throttle stop screws at the carburetors To in cre...

Page 106: ...tment 7 Install the seat EBU24043 Adjusting the throttle cable free play The throttle cable free play should be checked and if necessary adjusted at the intervals speci fied in the periodic maintenance and lubrication chart The throttle cable free play should measure 4 0 6 0 mm 0 16 0 24 in at the throttle lever Period ically check the throttle cable free play and if nec essary adjust it as follow...

Page 107: ...wear indicator which allows you to check the brake pad wear without having to disassemble the brake To check the brake pad wear check the position of the wear indicator while applying the brake If a brake pad has worn to the point that the wear indicator almost touches the brake disc have a Yamaha dealer re place the brake pads as a set EBU24190 Rear brake pads Each brake pad is provided with a we...

Page 108: ...a set EBU24251 Checking the brake fluid level Insufficient brake fluid may allow air to enter the brake system possibly causing it to become inef fective Before riding check that the brake fluid is above the minimum level mark and replenish if neces sary A low brake fluid level may indicate worn brake pads and or brake system leakage If the brake fluid level is low be sure to check the brake pads ...

Page 109: ...painted surfaces or plastic parts Always clean up spilled fluid imme diately As the brake pads wear it is normal for the brake fluid level to gradually go down However if the brake fluid level goes down suddenly have a Yamaha dealer check the cause EBU24290 Changing the brake fluid Have a Yamaha dealer change the brake fluid at the intervals specified in the NOTE after the peri odic maintenance an...

Page 110: ...free play is correct Make sure the brakes do not drag Make sure the brakes are not spongy All air must be bled from the brake system Replacement of brake components requires professional knowledge These procedures should be performed by a Yamaha dealer EBU24611 Checking the brake pedal position The brake pedal position must be checked and if necessary adjusted at the intervals specified in the per...

Page 111: ... brake system Replacement of brake components requires professional knowledge These procedures should be performed by a Yamaha dealer EBU24670 Adjusting the parking brake free play The parking brake free play must be checked and if necessary adjusted at the intervals specified in the periodic maintenance and lubrication chart Cable length A should measure 46 50 mm 1 81 1 97 in Adjust the parking b...

Page 112: ...ult a Yamaha dealer 5 Tighten the locknut at the clutch lever 6 Turn in the adjusting bolt at the rear brake cal iper by hand until it feels tight then turn it out 1 8 turn and tighten its locknut to the specified torque CAUTION ECB00520 When tightening the locknut hold the adjust ing bolt with a wrench so that it does not turn together with the locknut 1 Locknut 2 Adjusting bolt 1 2 a b 1 Locknut...

Page 113: ...enance and lu brication chart The brake light switch for the brake pedal can be adjusted as follows but the other brake light switches should be adjusted by a Yamaha dealer NOTE The brake light switch is properly adjusted when the brake light comes on just before braking takes effect Turn the adjusting nut while holding the brake light switch in place To make the brake light come on earlier turn t...

Page 114: ...dealer check the internal clutch mechanism EBU24851 Drive chain slack The drive chain slack should be checked before each ride and adjusted if necessary To check the drive chain slack 1 Place the ATV on a level surface NOTE When checking and adjusting the drive chain slack there should be no weight on the ATV and all tires must be touching the ground 2 Move the ATV back and forth to locate the tig...

Page 115: ...in turn the ad justing bolts in direction a To loosen the drive chain turn the adjusting bolts in direction b and push the wheels forward Turn each adjusting bolt exactly the same amount to maintain correct axle alignment NOTE There are alignment marks on each side of the swingarm and on the wheel hubs Use them to check for proper wheel axle alignment 1 Drive chain slack 1 1 Axle holding nut upper...

Page 116: ... to the specified torques EBU24880 Lubricating the drive chain The drive chain must be cleaned and lubricated at the intervals specified in the periodic maintenance and lubrication chart otherwise it will quickly wear out especially when riding in dusty or wet areas Service the drive chain as follows 1 Locknut 2 Drive chain slack adjusting bolt 3 Alignment marks 1 2 3 Tightening torques Locknut 16...

Page 117: ...y other lubricants for the drive chain as they may contain sub stances that could damage the O rings EBU24900 Checking and lubricating the cables The operation and the condition of all control ca bles should be checked before each ride and the cables and cable ends should be lubricated if nec essary If a cable is damaged or does not move smoothly have a Yamaha dealer check or replace it WARNING EW...

Page 118: ...gs must be checked at the intervals specified in the periodic maintenance and lubrication chart If there is play in a wheel hub or if a wheel does not turn smoothly have a Yamaha dealer check the wheel bearings EBU25001 Lubricating the rear suspension relay arm and connecting arm pivoting points The rear suspension relay arm and connecting arm pivoting points must be lubricated at the inter vals s...

Page 119: ... upper and lower arm pivots must be lubricated at the intervals specified in the periodic mainte nance and lubrication chart Lubricate the pivoting points using a grease gun Left side 1 Grease nipple 1 Grease nipple 1 1 Recommended lubricant Lithium soap based grease 1 Grease nipple 1 ...

Page 120: ... 10 11 Right side EBU26881 Replacing a headlight bulb If a headlight bulb burns out replace it as follows 1 Remove the headlight unit by removing the screw 2 Remove the headlight bulb holder cover 1 Grease nipple 1 1 Screw 1 ...

Page 121: ...b is hot when it is on and imme diately after it is turned off Wait for the bulb to cool before touching or removing it You can be burned or a fire could start if the bulb touches something flammable 5 Place a new bulb into position and then install the bulb holder by turning it clockwise 1 Headlight bulb holder cover 1 1 Headlight bulb holder 1 ...

Page 122: ...r prints on the headlight bulb using a cloth moistened with alcohol or thinner 6 Install the bulb holder cover CAUTION ECB00680 Make sure the bulb holder cover is securely fit ted over the bulb holder and seated against the reflector 7 Place the headlight unit in the original posi tion and then install the screw 8 Adjust the headlight beam if necessary 1 Do not touch the glass part of the bulb 1 1...

Page 123: ...ion a To lower a headlight beam turn the adjusting screw in direction b EBU25610 Replacing the tail brake light bulb If the tail brake light bulb burns out replace it as follows 1 Remove the bulb holder together with the bulb by turning it counterclockwise 2 Remove the defective bulb by pushing it in and turning it counterclockwise 1 Headlight beam adjusting screw 1 a b 1 Tail brake light bulb hol...

Page 124: ... holder push it in and then turn it clockwise until it stops 4 Install the bulb holder together with the bulb by turning it clockwise EBU25650 Removing a wheel 1 Loosen the wheel nuts Front 1 Tail brake light bulb holder 2 Tail brake light bulb 1 2 1 Wheel nut 1 1 ...

Page 125: ...sion or ignition systems for example can cause poor starting and loss of power The following troubleshooting charts represent quick and easy procedures for checking these vital systems yourself However should your ATV re quire any repair take it to a Yamaha dealer whose skilled technicians have the necessary tools expe rience and know how to service the ATV properly Use only genuine Yamaha replace...

Page 126: ...NG EWB02280 Do not smoke when checking the fuel system Fuel can ignite or explode causing severe inju ry or property damage Make sure there are no open flames or sparks in the area including pi lot lights from water heaters or furnaces ...

Page 127: ...ssion There is no compression Check the ignition Have a Yamaha dealer check the ATV Remove the spark plugs and check the electrodes 3 Ignition Wet Dry Wipe off with a dry cloth and correct the spark plug gaps or replace the spark plugs Have a Yamaha dealer check the ATV The engine does not start Have a Yamaha dealer check the ATV Open the throttle halfway and operate the kickstarter Check the comp...

Page 128: ...If coolant is not available tap water can be temporarily used instead provided that it is changed to the rec ommended coolant as soon as possible Wait until the engine has cooled Check the coolant level in the reservoir and radiator The coolant level is OK The coolant level is low Check the cooling system for leakage Have a Yamaha dealer check and repair the cooling system Add coolant See NOTE Sta...

Page 129: ...heel bearings brakes transmission seals and electrical de vices Many expensive repair bills have result ed from improper high pressure detergent applications such as those available in coin operated car washers 4 Once most of the dirt has been hosed off wash all surfaces with warm water and mild detergent type soap An old toothbrush or bot tle brush is handy for hard to reach places 5 Rinse the AT...

Page 130: ...leaning section of this chapter 2 Turn the fuel cock lever to OFF 3 Drain the carburetor float chamber by loosen ing the drain bolt this will prevent fuel deposits from building up Pour the drained fuel into the fuel tank 4 Fill up the fuel tank and add fuel stabilizer if available to prevent the fuel from deteriorat ing 5 Perform the following steps to protect the cyl inders piston rings etc from...

Page 131: ... all levers and pedals 7 Check and if necessary correct the tire air pressure and then block up the ATV so that all of its wheels are off the ground Alternative ly turn the wheels a little every month in order to prevent the tires from becoming degraded in one spot 8 Cover the muffler outlet with a plastic bag to prevent moisture from entering it NOTE Make any necessary repairs before storing the ...

Page 132: ...d parallel 2 cylinder Displacement 347 0 cm3 Bore stroke 64 0 54 0 mm 2 52 2 13 in Compression ratio 6 50 1 Starting system Kickstarter Lubrication system Premix Type YAMALUBE 2 R Castrol R30 A545 A747 Engine oil quantity Mixing ratio YAMALUBE R 24 1 Transmission oil Type SAE10W30 type SE motor oil EUR YAMALUBE 4 10W30 or SAE10W30 type SE motor oil AUS NZL Quantity 1 5 L 1 59 US qt 1 32 Imp qt Coo...

Page 133: ...Clutch type Wet multiple disc Transmission Primary reduction system Helical gear Primary reduction ratio 66 23 2 869 Secondary reduction system Chain drive Secondary reduction ratio 41 14 2 929 Transmission type Constant mesh 6 speed Operation Left foot operation 1st 32 13 2 461 2nd 29 16 1 812 3rd 27 18 1 500 4th 25 20 1 250 5th 23 22 1 045 6th 21 24 0 875 Chassis Frame type Steel tube frame Cast...

Page 134: ...2 Maximum Front 33 0 kPa 4 8 psi 0 330 kgf cm2 Rear 33 0 kPa 4 8 psi 0 330 kgf cm2 Front wheel Wheel type Panel wheel Rim size 10 x 6 0AT Rear wheel Wheel type Panel wheel Rim size 9 x 8 5AT Front brake Type Dual disc brake Operation Right hand operation Recommended fluid DOT 4 Rear brake Type Single disc brake Operation Right foot operation Recommended fluid DOT 4 Front suspension Type Double wis...

Page 135: ...0 11 Wheel travel 220 mm 8 7 in Electrical system Ignition system CDI Charging system AC magneto Headlight Bulb type Krypton bulb Bulb voltage wattage x quantity Headlight 12 V 30 0 30 0 W 2 Tail brake light 12 V 5 0 21 0 W 1 ...

Page 136: ...rts from a Yamaha dealer or for ref erence in case the ATV is stolen KEY IDENTIFICATION NUMBER VEHICLE IDENTIFICATION NUMBER MODEL LABEL INFORMATION EBU26020 Key identification number The key identification number is stamped into the key Record this number in the space provided and use it for reference when ordering a new key EBU26030 Vehicle identification number The vehicle identification number...

Page 137: ... fy your ATV EBU26050 Model label The model label is affixed at the location in the il lustration Record the information on this label in the space provided This information will be need ed when ordering spare parts from a Yamaha deal er 1 Vehicle identification number 1 1 Model label 1 ...

Page 138: ...ricating 8 41 Carburetor settings changing 8 21 Chassis fasteners 5 8 Cleaning 9 1 Clutch lever 4 4 Clutch lever free play adjusting 8 37 Coolant 5 4 8 11 D Drive chain 5 5 Drive chain lubricating 8 40 Drive chain slack 8 38 E Engine break in 6 4 Engine cold start 6 1 Engine idling speed 8 28 Engine starting a warm 6 2 Engine stop switch 4 2 F Fuel 4 8 Fuel and 2 stroke engine oil mixing ratio 5 4...

Page 139: ... 13 Spark arrester cleaning 8 19 Spark plugs checking 8 7 Specifications 10 1 Speed limiter 4 3 Starter choke 4 10 Storage 9 2 Suspension lubricating the upper and lower arm pivots 8 43 Suspension relay arm and connecting arm pivoting points lubricating the rear 8 42 T Tail brake light bulb replacing 8 47 Throttle cable free play adjusting 8 30 Throttle lever 4 2 5 5 Throttle OverRide System 4 3 T...

Page 140: ...PRINTED IN JAPAN 2006 07 0 7x1 E YAMAHA MOTOR CO LTD PRINTED ON RECYCLED PAPER ...

Reviews: