background image

Mi Smart Fan

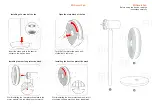
Installing of a stand of the fan

Insert the stand pole to the special 

socket on the device base.

Open the main block of the fan

Turn the front protective mesh anti-

clockwise to remove it.

Installing the rear fan protective mesh

While installing the rear protective mesh to fan 

motor module, two red triangles must match.

Installing the front fan protective mesh

While installing the front protective mesh, turn it 

clockwise until two marks on lower side match. 

Mi Smart Fan

Before using the device, read the 

instructions carefully

Summary of Contents for Mi Smart Fan

Page 1: ...sh anti clockwise to remove it Installing the rear fan protective mesh While installing the rear protective mesh to fan motor module two red triangles must match Installing the front fan protective me...

Page 2: ...ive mesh fixing screw 6 Hex wrench 7 Basis screw 8 Main block screws 1 more 9 Power cable 10 Battery Overview Mode indicators Stand Base Fan tilt adjustment button Wi Fi indicator Power cable slot Mod...

Page 3: ...nsert 7 screw of stand into slot Using 6 hex wrench screw 7 up to the limit Open the main fan block Unpack the main fan unit Turn the front protective mesh anti clockwise to remove it and remove a pad...

Page 4: ...it Installing the propeller Install the propeller on motor shaft Then set securing screw 4 on shaft and scroll counterclockwise to the limit Installation of the front protective mesh To install the fr...

Page 5: ...nnect it to power supply The corresponding beep indicates successful connection of the device to a power supply After inserting the battery into a battery compartment connect the fan to a power supply...

Page 6: ...ected from the power supply after 1 hour in standby mode the device can automatically disable Wi Fi After turning on the fan or connect it to a power supply Wi Fi is turned on again Blinking lights on...

Page 7: ...t If your smartphone is not connected to the fan please simultaneously press the regulation of wind speed and fan tilt adjustment buttons and hold for 5 seconds until you hear a beep indicating succes...

Page 8: ...mended to perform an installation of the device following the instructions so as not to injure by electric shock fire and prevent occurrence of other accidents If the fan is not assembled do not conne...

Page 9: ...eatures of this technique to control the fan Do not disassemble the unit by yourself unless performing maintenance If necessary contact and consult with a specialist of Zhimi company Do not turn on th...

Reviews: