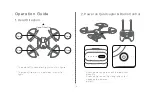
background image

Quadcopter Manual

Please read and keep this manual carefully

before using.

Summary of Contents for FXQ01FM

Page 1: ...Quadcopter Manual Please read and keep this manual carefully before using ...

Page 2: ...such as airports railways high ways tall buildings or electric wires etc According to relevant laws and regulations the flying height of this Quadcopter should be below 120m and the distance between the operator should be under 500m Users should take responsibility for any damage of components or system causing by not following this user guide Scan Install Quadcopter App Beginners Guide Online Map...

Page 3: ...3 Motor Undercarriage Undercarriage Lock Auxillary Positioning Module Pro Only Battery Compartment Light Products Accessories 1 Quadcopter ...

Page 4: ...ight Auto Return Mode Switch Antenna Right Roller Button B Button A Left Roller Power Battery Indicator Auto Take off Landing Button Right Stick Micro USB Charging Port USB Port Connect Radio Control and Cellphone Products Accessories 2 Radio Control ...

Page 5: ...5 TF Card Port Micro USB Port Camera Lens Connection Indicator Shock Absorbing Frame Shooting Indicator Rotate Upwards Products Accessories 3 Integrated Gyro Stabilized Gimbal Camera Pro Only ...

Page 6: ...tening Propellers Clockwise Anti Clockwise USB Cable 1 wrench 1 screwdriver and screws Protective Frame x 4 x 2 x 12 Quadcopter Battery Battery Charger 5 Tool Box 4 Accessories for Quadcopter Products Accessories ...

Page 7: ...Charge the Radio Control 5V 2A High Low Indicator Both port of battery on the sides could be used Low High Indicator Power Prepare 1 Charge the Quadcopter Battery Connect charger to power to charge the battery After charging is completed indicator will be turned off ...

Page 8: ... 1 Assemble the Quadcopter a Undercarriage Turn the undercarriage till it clicks Undercarriage will be locked automatically Turn and hold the undercarriage lock to unlock position Pull up the undercarriage Undercarriage Lock ...

Page 9: ...e b Integrated Gimbal Camera Pro Only c Protective Frame Rotate the camera upwards Plug in TF Card Keep the Gimbal Assemble Switch and assemble the gimbal Turn and keep the Gimbal Assemble Switch Please choose TF cards of mainstream brands Class 10 and 16G at least Gimbal Assemble Switch TF Remove the gimbal cover ...

Page 10: ...copter Battery hard into the Battery Compartment till it clicks Push the Battery Assemble Switch then the Battery could be pulled out Battery Assemble Switch Put propellers on the motors by different Color Marks Rotate propellers by assemble directions Propellers will tighten automatically during flying ...

Page 11: ... antennas upside down and keep parallel The rotatable angle of antennas is as this figure Turn antennas 90 degree to Radio Control a Put Down the Antennas Assemble Disassemble 1 Connect Radio Control Cellphone ...

Page 12: ...ontrol Cellphone Pull out Cellphone Holder the lower edge of holder will pop up Set cellphone on the holeder Be careful not to hit the power of cellphone Open the cover on bottom of Radio Control Use the USB Cable to connect Radio Control and Pull out Cellphone Holder ...

Page 13: ... Quadcopter Radio Control The color of Quadcopter Lights is as this figure The Head Direction is in between two white lights Press power once to check the electrical quantity Green Red White White Press power once then long press for 2 seconds to power on on off ...

Page 14: ...p and down a k a American Way The way of control could be changed in App Left Stick Up Anti Clockwise Clockwise Left 向右 Right Stick Forwar Down Backwar Operation Guide 3 Radio Control Sticks Up Forward Head Direction Anti Clockwis Clockwise Left Right Backward Down ...

Page 15: ...stick after propellers rotating 3 Push left stick upward slowly and steadily over half 1 Pull left stick downwards slowly and steadily Quadcopter will start to land 2 Hold the stick downwards after the undercarriages touch the ground Propellers will stop in 5 seconds Push left stick upward slowly and steadily Left Stick Right Stick Left Stick Right Stick Pull Slowly ...

Page 16: ...ck the Switch to left Quadcopter will hover When the Light of Auto Take off Landing Button is white the Button could be used for making the Quadcopter take off or land When the Quadcopter is stopping at a flat surface press the button once then long press for 2 seconds Quadcopter will take off automatically When the Quadcopter is flying press the button once then long press for 2 seconds Quadcopte...

Page 17: ...d Turn up and down the left roller of Radio Control the camera lens will turn up and down in between the range as the figure Release the left roller camera lens will stay at the position After turning on camera the Butto A on Radio Control could be used to take a photo and the Button B could be used to take a video 90 快捷按钮 B 快捷按钮 A ...

Page 18: ...ter Head Lights Brightness At any moment during Quadcopter flying release two stick of Radio Control Quadcopter will hover 9 Operation Tips 1 Propellers Propellers are fragile Replace propellers with new ones immediately when it abrases to prevent affecting the flying performance Maintain Calibrate 2 Self Test Compass Calibration Quadcopter and Radio Control will self test after power on Check sel...

Page 19: ... Notice for Users in EU Hereby Fimi declares that the wireless equipment is in compliance with the essential requirements and other relevant provisions of Directive 1999 5 EC WEEE Disposal and Recycling Information ...

Page 20: ...ser is encouraged to try to correct the interference by one or more of the following measures Reorient or relocate the receiving antenna Increase the separation between the equipment and receiver Connect the equipment into an outlet on a circuit different from that to which the receiver is connected Consult an authorized dealer or service representative for help Fimi is not responsible for any rad...

Page 21: ...ed to provide a separation distance of at least 20 cm from all persons and must not be co located or operating in conjunction with any other antenna or transmitter End users and installers must be provide with antenna installation instructions and transmitter operating conditions for satisfying RF exposure compliance SAR Statement only apply to FCC ID 2AG53YKQ01FM IC 21054 YKQ01FM Name Radio Contr...

Page 22: ...ccept any interference including interference that may cause undesired operation of the device Le présent appareil est conforme aux CNR d Industrie Canada applicables aux appareils radio exempts de licence L exploitation est autorisée aux deux conditions suivantes 1 l appareil ne doit pas produire de brouillage et 2 l utilisateur de l appareil doit accepter tout brouillage radioélectrique subi mêm...

Page 23: ...lled and operated with minimum distance 20cm between the radiator your body Déclaration d exposition aux radiations Cet équipement est conforme aux limites d exposition aux rayonnements IC établies pour un environnement non contrôlé Cet équipement doit être installé et utilisé avec un minimum de 20 cm de distance entre la source de rayonnement et votre corps ...

Reviews: