Whirlpool 207, Manual
The Nokia 207 is a reliable and user-friendly mobile phone that caters to your communication needs. With its sleek design, durable construction, and user-friendly interface, this device is perfect for those seeking simplicity and efficiency. Enhance your experience with the free user manual available for download at manualshive.com.
Share
Download


Reviews:
No comments
Related manuals for 207

12 series
Brand: Tappan Pages: 20

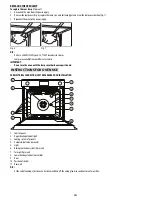
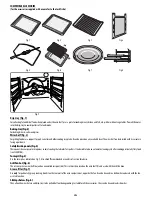
OVEN
Brand: Fagor Pages: 40

YSD-1A-BQ
Brand: Adexa Pages: 7

Built-in ovens
Brand: GE Pages: 44

Advantium CSB9120
Brand: GE Pages: 32

Profile PT920
Brand: GE Pages: 24

PSB9120
Brand: GE Pages: 20

Profile PT920
Brand: GE Pages: 3

JBP15
Brand: GE Pages: 28

CWB7030
Brand: GE Pages: 32

PSB9120
Brand: GE Pages: 64

Monogram Advantium ZSC1202
Brand: GE Pages: 32

Advantium SCA1000
Brand: GE Pages: 48

JKP86
Brand: GE Pages: 12

JKP35
Brand: GE Pages: 2

Appliances CGS990
Brand: GE Pages: 2

JKS06
Brand: GE Pages: 3

JRP20
Brand: GE Pages: 4


