background image


ICC 

INDUSTRIAL CONTROL COMMUNICATIONS, INC. 

Madison Office 

Houston Office 

1600 Aspen Commons, Suite 210 

12300 Dundee Court, Suite 212 

Middleton, WI USA 53562-4720 

Cypress, TX USA 77429-8364 

Tel: [608] 831-1255   Fax: [608] 831-2045 
 
http://www.iccdesigns.com 

Printed in U.S.A 


NETWORK GATEWAY SERIES 

ICC 

INDUSTRIAL CONTROL COMMUNICATIONS, INC. 


XLTR-200 

SERIAL MULTIPROTOCOL NETWORK GATEWAY 


September 2006 
ICC #10604-1.101-000


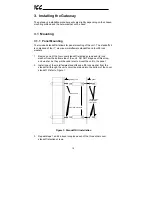
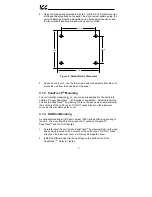
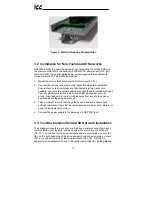
Summary of Contents for XLTR-200

Page 1: ...12300 Dundee Court Suite 212 Middleton WI USA 53562 4720 Cypress TX USA 77429 8364 Tel 608 831 1255 Fax 608 831 2045 http www iccdesigns com Printed in U S A NETWORK GATEWAY SERIES ICC INDUSTRIAL CONTROL COMMUNICATIONS INC XLTR 200 SERIAL MULTIPROTOCOL NETWORK GATEWAY September 2006 ICC 10604 1 101 000 ...

Page 2: ... FLN RS485 slave Johnson Controls Inc Metasys N2 RS485 slave New network drivers are continuously being added and can be downloaded for free from our web site Before using the XLTR 200 network gateway please familiarize yourself with the product and be sure to thoroughly read the instructions and precautions contained in this manual In addition please make sure that this instruction manual is deli...

Page 3: ...RITICAL COMPONENTS IN LIFE SUPPORT DEVICES OR SYSTEMS Life support devices or systems are devices or systems intended to sustain life and whose failure to perform when properly used in accordance with instructions for use provided in the labeling and user s manual can be reasonably expected to result in significant injury No complex software or hardware system is perfect Bugs may always be present...

Page 4: ... capacitors and therefore touching these areas may result in an electrical shock Always turn all drive input power supplies OFF and wait at least 5 minutes after the CHARGE lamp has gone out before connecting communication cables To avoid misoperation do not connect any gateway terminals to either the ASD s E GND terminals the motor or to any other power ground When making common serial connection...

Page 5: ... VF nC1 ASDs 15 4 RS485 Port Electrical Interfaces 17 5 Environmental Specifications 18 6 Maintenance and Inspection 19 7 Storage and Warranty 20 7 1 Storage 20 7 2 Warranty 20 8 LED Indicators 21 8 1 Toshiba ASD Common Serial Port Indicators 21 8 2 RS485 Port Indicators 21 9 Configuration Switches 21 10 Auxiliary Power Supply 22 11 Unit Configuration Concepts 23 11 1 Port and Protocol Configurati...

Page 6: ...orted Subpoints 59 13 6 3 Subpoint Details 60 13 7 Toshiba 3 Series ASD Protocol 63 13 7 1 Command Parameters 64 13 7 2 Monitor Parameters 65 13 7 3 Fundamental Parameters 1 69 13 7 4 Fundamental Parameters 2 70 13 7 5 Panel Control Parameters 70 13 7 6 Terminal Selection Parameters 71 13 7 7 Special Control Parameters 75 13 7 8 Frequency Setting Parameters 76 13 7 9 Protection Function Parameters...

Page 7: ...6 14 2 Connection 92 14 3 Using the RFU Utility 93 14 3 1 Required Files 93 14 3 2 First Time Configuration 93 14 3 3 Transmitting Firmware Files 94 14 4 Wrap Up 96 15 Notes 97 ...

Page 8: ...rovides the mapping information that allows requests from the various supported networks to be interpreted and stored in a common format This allows data to be routed from any supported network to any other supported network Additionally the point database provides the added benefit of data mirroring whereby current copies of point values populated by a source port designation are maintained local...

Page 9: ...needs to be performed to connect the unit to the drives Just plug it in it s that simple Power Supply When connected to Toshiba ASDs via the ASD1 ASD2 ASD3 ports can be either powered directly from the attached ASDs or from the auxiliary power AUX PWR input jack All other non Toshiba applications require the use of the AUX PWR input to supply power to the unit When more than one power source is co...

Page 10: ...ogrammed that allows each internal point to have its own unique fail safe condition in the event of a network interruption Indicators 1 bicolor red green MS LED that indicates module status information 1 bicolor red green NS LED that indicates network status information 1 green TX and 1 red RX LED on each RS485 port 1 green and 1 red LED on each of the Toshiba common serial ASD ports Refer to sect...

Page 11: ...cover standoff retention screws and its lock washer from the bottom side of the unit DO NOT dispose of this screw and washer as they will be used later to mount the unit to the panel 2 Install one of the male female standoffs and a 6 lock washer from the standoff kit through the unit s circuit board and into the bottom of the cover standoff Refer to Figure 1 aluminum standoffs lock washers lock wa...

Page 12: ...existing 4 Augat SnapTrackTM 6TK series or equivalent Carefully insert the unit into the SnapTrackTM by pressing firmly on the pan head screws located at the 4 corners of the unit s cover DO NOT press directly on the aluminum cover as this may damage the cover 3 1 3 DIN Rail Mounting An optional mounting kit ICC part number 10581 allows DIN rail mounting of the unit The mounting kit is comprised o...

Page 13: ...ch as ASD input power or motor wiring Also take care to route all cables away from any sharp edges or positions where they may be pinched 3 Take a moment to verify that the gateway and all network cables have sufficient clearance from electrical noise sources such as drives motors or power carrying electrical wiring 4 Connect the power supply to the gateway s AUX PWR jack 3 3 Toshiba Common Serial...

Page 14: ...operation of the connected drives To install the gateway complete the steps outlined in the following sections related to your specific drive 3 3 1 Installation for G7 ASDs 1 Mount the unit via the desired method refer to section 3 1 2 CAUTION Verify that all input power sources to the drives to be connected have been turned OFF and are locked and tagged out 3 DANGER Wait at least 5 minutes for th...

Page 15: ...eated into the modular connectors and route the cable such that it is located well away from any drive input power or motor wiring Also take care to route the cable away from any sharp edges or positions where it may be pinched 8 Reinstall the drive s front cover close the drive s cabinet door 9 Repeat steps 2 8 to connect other drive s as needed 10 Connect the other various networks to their resp...

Page 16: ... connection standard 24 AWG category 5 CAT5 unshielded twisted pair UTP 8 conductor cables found in Ethernet networks in most office environments can be used The maximum allowable length for these cables is 5 meters Although there are many varieties and styles of CAT5 UTP cables available ICC strongly recommends using only high quality cables from reputable manufacturers to guarantee optimal noise...

Page 17: ...function properly If the drives do not appear to power up or do not function properly immediately turn power OFF Repeat steps 2 and 3 to remove all power from the drives Then verify all connections Contact ICC or your local Toshiba representative for assistance if the problem persists ...

Page 18: ...5 interface circuitry Note that the Shield terminal has no internal connection its purpose is simply to provide a cable shield chaining location between devices The shield is then typically connected to ground at one location only Figure 4 RS485 Interface Circuitry Schematic Figure 5 details the specific network connections to the RS485 terminal block This connection scheme applies equally to both...

Page 19: ...evel do not expose to direct sunlight or corrosive explosive gasses Operating Temperature 10 50 C 14 122 F Storage Temperature 40 85 C 40 185 F Relative Humidity 20 90 without condensation Vibration 5 9m s 2 0 6G or less 10 55Hz Grounding Non isolated referenced to power source ground Cooling Method Self cooled ...

Page 20: ...able terminal blocks are fully seated in their headers Reseat if necessary Check that there are no defects in any attached wire terminal crimp points Visually check that the crimp points are not damaged or loose Visually check all wiring and cables for damage Replace as necessary Clean off any accumulated dust and dirt If use of the gateway is discontinued for extended periods of time apply power ...

Page 21: ...re the unit in a well ventilated location When not using the unit for an extended period of time apply power at least once every two years and confirm that it still functions properly 7 2 Warranty The gateway is covered under warranty by ICC Inc for a period of 12 months from the date of installation but not to exceed 18 months from the date of shipment from the factory For further warranty or ser...

Page 22: ...way is transmitting data on the port Red LED Lights when the gateway is receiving data on the port note that this does not indicate the validity of the data with respect to a particular protocol only that data exists and is being detected 9 Configuration Switches There are two configuration DIP switches marked CFG located on the unit near the RS232 port Switch 1 Firmware update switch Place in OFF...

Page 23: ... providing your own auxiliary power supply ensure that it adheres to the following specifications Connection diagram Voltage rating 9 40VDC Current rating 500mA 9VDC The gateway s AUX PWR input uses the CUI Inc PJ 002A 2 1mm x 5 5mm or equivalent DC power jack which mates with the PP 002A 2 1mm x 5 5mm or equivalent power plug ...

Page 24: ... slave s address assignment must be in the range 1 247 to comply with the Modbus specification Also note that certain protocols may not make use of all available configuration options e g certain protocols operate only at one specified baudrate regardless of the baudrate selection value The protocol specific sections of this manual will document these cases 11 2 Timeout Configuration The gateway s...

Page 25: ...ng information However because both of these protocols act as master protocols only one of them can be allowed to continuously update the point s value If both master protocols could simultaneously update the point s internal value it would erratically alternate back and forth between the values designated by the Toshiba parameter and Modbus holding register objects Any slave protocol Modbus RTU s...

Page 26: ...ll automatically cause a write holding register transaction to occur on the RS485A Modbus master port updating the value of holding register 14 on remote Modbus station 8 causing the conveyor to accelerate or decelerate to the new speed Note that it is also perfectly acceptable to have a point s source port assigned to NONE All this means that this point will not be autonomously updated i e that i...

Page 27: ...course it is possible to simplify or even eliminate some of these steps by starting your configuration from a pre existing point database file either downloaded from the internet or previously created by the user and then simply modifying those elements necessary to match your application ...

Page 28: ...ial extension cable Belkin part F2N209 06 Refer to Figure 6 for a representative example cable Any communications software and PC will work provided they support ASCII communications at 38 4kbaud Figure 6 A Typical Serial Extension Cable 12 1 2 Connection Connect one end of the serial cable to the gateway s RS232 port and connect the other end to the computer s serial port Make sure that CFG DIP s...

Page 29: ...municating via COM1 Figure 7 shows the Connect To tab of the properties window for COM1 Figure 8 shows the window that appears when Configure is selected in the Connect To tab Figure 9 shows the Settings tab of the properties window Most of these settings are their default values usually the only change needed is the Bits per second setting shown in Figure 8 Figure 7 HyperTerminal Properties Conne...

Page 30: ...29 Figure 8 HyperTerminal Properties Connect To Configure Figure 9 HyperTerminal Properties Settings ...

Page 31: ...ed practice to download a configuration file to your PC for backup purposes so that the original configuration can be restored if any unintended changes are made To enter the console simply type menu and press the Enter key You will then be notified that all communication tasks will be terminated for the duration of the editing refer to Figure 10 It is important to ensure that all connected device...

Page 32: ... will be provided enclosed in quotation marks to delineate them from the description text whenever actually entering the console strings however do not include the quotation marks When additional data fields are required with a data entry command they will be indicated by square brackets after the menu selection number All data entry commands and data fields must be separated by spaces Because dat...

Page 33: ...2 Only 10 points are shown at a time of 100 total available in the unit Menu selection 2 More Points allows the next 10 points to be viewed Figure 12 View Edit Points Entering 1 with a point s number such as 1 1 as shown at the bottom of Figure 12 at the Edit Points submenu will display and allow editing of that point s mapping and definition information Refer to Figure 13 for an example When edit...

Page 34: ...n number 2 allows you to change the point s timeout enable selection Refer to section 11 2 for more information about timeout processing Edit Timeout value Menu selection number 3 allows you to change the point s timeout data value Refer to section 11 2 for more information about timeout processing Edit Source Port Menu selection 4 allows you to change the point s source port Refer to section 11 3...

Page 35: ...mon serial port connections are point to point and therefore do not require targeting a drive at a specific address Edit Parameter Menu selection 2 allows you to edit the Toshiba ASD parameter that this point will access Figure 14 shows an example of how to change the current setting of FA00 to FA04 which would be a typical change if the Toshiba RS485 protocol were to be used with this point Note ...

Page 36: ...u selection 1 allows you to edit the network address of the Mitsubishi ASD that this point refers to Edit Parameter Menu selection 2 allows you to edit the Mitsubishi ASD parameter that this point will access Figure 15 shows an example of how to change the current setting of 1 to 1001 ...

Page 37: ...ows you to choose the Modbus read function code that will be used to read from the designated register The default setting of function code 03 read holding registers will access a holding register on the remote device By selecting function code 04 read input registers a Modbus input register will be accessed instead Write FC Menu selection 4 allows you to choose the Modbus write function code that...

Page 38: ...Point Attributes Figure 17 Edit Modbus Slave Attributes Edit Register Menu selection 1 allows you assign a Modbus holding register to this point Figure 17 shows an example of how to change the current setting of 1 to 8 ...

Page 39: ...t point 1 is configured to be AI 1 Edit Multiplier Menu selection 3 allows modification of the multiplier to be used with analog AI or AO objects This setting has no effect when the point is configured to be a binary BI or BO object Edit Bit Mask Menu selection 4 allows modification of the bit mask to be used with binary BI or BO objects This setting has no effect when the point is configured to b...

Page 40: ... current protocol selected for each port in order to access more detailed port information select the menu number corresponding to the desired port Menu selections 1 3 correspond to the Toshiba ASD ports and these contain no other port configuration other than enable disable The syntax used to disable port ASD1 is shown at the bottom of Figure 19 Figure 19 View Edit Ports ...

Page 41: ...hat the baudrate for some protocols is determined by the specification and these will therefore ignore this setting Edit Parity Menu selection 3 allows you to change the parity for the selected port Note that the parity for some protocols is determined by the specification and these will therefore ignore this setting Edit address Menu selection 4 allows you to edit the network address that the sel...

Page 42: ...nsferred between the gateway and a PC Whenever unit configuration is completed it is strongly recommended that a backup copy of the configuration file be downloaded from the unit to a PC One reason for this is in case it becomes necessary to restore a previous configuration at a later time Another reason is that it may be desirable to load multiple units with the same configuration Configuration f...

Page 43: ...de Once the message The XLTR 200 is ready to send its configuration file via Xmodem Download the file now appears the user has 30 seconds to start the Xmodem download This can be performed in HyperTerminal by clicking the receive button on the tool bar Figure 23 shows the dialog box that will appear after clicking the receive button Specify the folder in which to place the received file select Xmo...

Page 44: ...rTerminal and initiate the Xmodem upload transaction Upon successful completion of the Xmodem upload the integrity of the file will be checked and if valid will be copied to both the unit s working memory and flash file system The previous configuration cannot be recovered unless a corresponding configuration file exists of course 12 3 5 XLTR 200 Information Main menu selection 5 provides some bas...

Page 45: ...e 1 Table 1 Supported Modbus Slave Functions Function Code Function 1 Read coils 3 Read multiple registers 5 Write coil 6 Write single register 15 Force multiple coils 16 Write multiple registers Register number entry radix is decimal e g 10 1010 Configuration tip Improved network utilization may be obtained by appropriately grouping points into blocks having contiguous holding register assignment...

Page 46: ...or any given coil the holding register in which that coil resides can be determined by 16 15 coil register holding Equation 1 Where the bracket symbols indicate the floor function which means that any fractional result or remainder is to be discarded with only the integer value being retained Also for any given coil the targeted bit in the holding register in which that coil resides can be determi...

Page 47: ...us Master Functions Function Code Function 3 Read multiple registers 4 Read input registers 6 Write single register 16 Write multiple registers The slave response timeout in seconds is assigned via the designated port s Timeout selection If 0 is chosen an invalid timeout time the gateway will use a 2s timeout by default Network characteristics selections o Baud rate 2400 4800 9600 19200 38400 bps ...

Page 48: ...es all internal ASD parameters using addressed as values This means that in addition to the required conversion from Toshiba s native hexadecimal radix to the Modbus protocol s natural decimal radix these parameter values must have 1 added to them when they are to be accessed via an ICC gateway executing the Modbus RTU master protocol e g VF AS1 command 1 parameter is documented to be FA00 in the ...

Page 49: ...ing discrete digital status items BI objects support COS alarm enabling and normal alarm status indications A BI object will accept an override command but will not change its actual value or indicate override active A bit mask is associated with the object and is used to determine the current state of the BI by inspecting the point s data at the bit location s indicated in the bit mask If all of ...

Page 50: ...to the NCU upon the next COS poll request The gateway can be configured to perform a specific set of actions for each AO or BO point when Metasys communications are lost Metasys communications are said to be lost when the gateway does not receive any Metasys packets for a specified period of time causing a network timeout Refer to section 11 2 for more information about configuring network timeout...

Page 51: ...50 Gateway RS 485 Terminals N2 Network Devices SHIELD A B N2 N2 SHIELD SG GND Figure 25 N2 Bus Cable Connection ...

Page 52: ... the gateway s network from 2 wire half duplex to 4 wire half duplex via an external repeater such as the 485OPIN from B B Electronics http www bb elec com Note that Toshiba 7 series drives configured for 2 wire mode F821 0 shipped prior to early 2006 may exhibit an issue that can cause their RS485 ports to stop communicating after a certain amount of time Please contact Toshiba technical support ...

Page 53: ...s available for the various Toshiba drives please refer to the relevant Toshiba documentation for your drive A B Signal Ground Shield Figure 27 G7 Q7 H7 W7 RS485 Terminal Block CN3 Connections All parameter writes use the drive s RAM EEPROM data write W command For all writes that target the drive s EEPROM be sure to follow Toshiba s guidelines regarding the number of times a specific parameter ca...

Page 54: ...ection If 0 is chosen an invalid timeout time the gateway will use a 1s timeout by default Network characteristics selections o Baud rate 2400 4800 9600 19200 38400 bps o Parity odd even none 1 stop bit none 2 stop bits Point parameter number entry radix is hexadecimal e g 10 0x0010 or 1610 ...

Page 55: ...at i e connecting SDA RDA and SDB RDB When Using an FR A5NR Card Connect as shown in Figure 28 A TB 1 Signal Ground TB 3 B TB 2 Figure 28 FR A5NR Connections When Using the PU Port Connecting to the drive s RJ 45 PU port will likely require building a custom cable For simplicity a standard 8 conductor Ethernet patch cable can be used as a starting point There are two standard color schemes for the...

Page 56: ...can connect to the ASD via either the PU panel connector as indicated in Figure 30 or via the on board RS 485 terminals Because both of these ports externally present a 4 wire RS 485 network connecting them to the gateway requires jumpering the network wires for 2 wire format i e connecting SDA RDA and SDB RDB When using the on board RS 485 terminals connect as shown in Figure 31 ...

Page 57: ...ristics are dictated by parameters 117 124 PU port and 331 341 RS 485 port Most of these parameters can be set as desired by the user However the following parameters must be set as indicated to successfully connect to the gateway Parameter 119 333 stop bits data bits Must be set for 8 data bits Parameter 123 337 wait time setting Must be set to 9999 Parameter 124 341 CR LF selection Must be set t...

Page 58: ...uency command EEPROM 1003 Frequency monitor 1004 Output current monitor 1005 Output voltage monitor 1006 Special monitor 1007 Special monitor selection number 1008 Most recent 1 and 2 alarms alarm clear 1009 Most recent 3 and 4 alarms 1010 Most recent 5 and 6 alarms 1011 Most recent 7 and 8 alarms 1014 Inverter status monitor operation command 1015 Operation mode acquisition 1016 All parameter cle...

Page 59: ...de address which has a valid address range of 0 98 NOTE that the factory default value is 99 The baudrate and parity settings of the Mitsubishi port RS485B port B must be configured to match the serial settings of the connected ASD NOTE that the factory default values for these settings are 9600 baud no parity 8 data bits 1 stop bit The ASD connected to RS485 port B must be configured as address 1...

Page 60: ...SELECT 0 1 0 08 LAO ACCEL TIME 50 SEC 0 1 0 09 LAO DECEL TIME 100 SEC 0 1 0 10 LDO CMD FWD STOP STOP 1 0 FWD STOP 11 LDO CMD REV STOP STOP 1 0 REV STOP 12 LAO FREQ CMD 0 HZ 0 01 0 13 LAO MIN FREQ 0 HZ 0 01 0 14 LAO FREQ JUMP A 32767 HZ 0 01 0 15 LAO FREQ JUMP B 32767 HZ 0 01 0 16 LDI ALARM OUTPUT 0 1 0 ALARM 17 LDI RUNNING STOP 1 0 RUN STOP 18 LAO PID SET PNT 0 PCT 0 01 0 19 LDO RESET CMD 0 1 0 RE...

Page 61: ...oltage of the drive in Volts Corresponds to drive parameter 1005 6 SPECIAL MON This is the point which allows monitoring of a selected special monitor item The meaning of the value scaling and engineering units displayed here depends on the setting of the MON SELECT item point 7 Corresponds to drive parameter 1006 7 MON SELECT This point allows a selection of data codes to be written to it Each de...

Page 62: ...1 An FLN object value of 32767 for this point corresponds to an internal drive value of 9999 disabled Corresponds to drive parameter 32 16 ALARM OUTPUT Indicates whether or not the drive is in an alarm condition Corresponds to drive status parameter 1014 bit 7 17 RUNNING Indicates whether or not the drive is running Corresponds to drive status parameter 1014 bit 0 18 PID SET PNT PID set point Note...

Page 63: ...outage 22 OPER MODE Drive operation mode Corresponds to drive parameter 1015 29 DAY NIGHT This is a mandatory FLN point required for compatibility with Siemens control systems It has no effect in this application 99 ERROR STATUS This is a mandatory FLN point required for compatibility with Siemens control systems It has no effect in this application ...

Page 64: ... whenever communication related parameters are changed in order to activate the change All parameter writes use the drive s RAM EEPROM data write W command For all writes that target the drive s EEPROM be sure to follow Toshiba s guidelines regarding the number of times a specific parameter can be written without risk of EEPROM damage Point parameter number entry radix is hexadecimal e g 10 0x0010...

Page 65: ... DC injection braking mode 0 No compulsory DC injection braking 1 Compulsory DC injection below DC INJECTION START FREQUENCY A Fundamental parameter switching 0 V F 1 1 V F 2 B Gate block command coast stop command 0 Normal 1 Gate block C Emergency off command 0 Does nothing 1 Emergency off D Reset command trip clear 0 Does nothing 1 Reset E Reserved F Reserved 0003 word RS232 command frequency se...

Page 66: ...st to stop C Emergency off command 0 Normal 1 Emergency off D Reserved E Reserved F Reserved 0007 word Output current monitor 0 00FF 0 255 1 0008 word Output voltage monitor Note 1 0 FFFF 0 232 0 1 0009 word IV terminal analog input value 0 FFFF 0000 FFFF 0 100 1 000A word RX terminal analog input value 0 FFFF 0000 7FFF 100 0 7FFF FFFF 0 100 1 000B word Frequency command monitor 0 FFFF 0000 9C40 0...

Page 67: ...5 100 65535 0020 Reserved 0021 Reserved 0022 Reserved 0023 low byte Inverter typeform monitor 0 00FF Refer to Table 8 page 68 8 Input output power units 0 0100 0 0 01kW 1 0 1kW 9 A Command mode status 0 0600 00 terminal 01 panel 10 option 11 RS232C B C Frequency mode selection status 0 1800 00 terminal 01 panel 10 option 11 RS232C D E F Reserved 0024 Reserved 0025 word Output current amps FFFF 0 0...

Page 68: ... CC shorted 0020 bit 6 RES terminal CC open terminal CC shorted 0040 Upper Byte bit 7 ST terminal CC open terminal CC shorted 0080 Table 6 Output Terminal Status Monitor Inverter Status 2 parameter 000E Bit Output Terminal 0 1 Single Bit Read Mask bit 0 unused always 0 bit 1 unused always 0 bit 2 FAN OFF ON 0004 bit 3 FL FLB FLC shorted FLA FLC shorted 0008 bit 4 MS relay OFF ON 0010 bit 5 OUT opt...

Page 69: ...t 4 emergency off not in emergency off in emergency off 0010 bit 5 for inverter use bit 6 for inverter use Upper Byte bit 7 for inverter use Table 8 Inverter Typeform Codes 230v Class 460v Class 575v Class Inverter Model Typeform Data Hex Inverter Model Typeform Data Hex Inverter Model Typeform Data Hex G3 2010 21 G3 4015 42 G3 6060 65 G3 2015 22 G3 4025 43 G3 6120 67 G3 2025 23 G3 4035 44 G3 6160...

Page 70: ...NCY 0 1 FFFF 0000 UL Fmax 0 01 002D VOLTS PER HERTZ PATTERN 0 1 000F 0000 Constant torque 1 0001 Variable torque 2 0002 Auto torque boost 3 0006 3 w auto energy savings 4 000A Vector control 5 000E 5 w auto energy savings 6 002E 1 2 VOLTAGE BOOST 1 0 1 FFFF 0000 012C 0 0 30 0 0 1 002F ACCELERATION TIME 1 0 1 FFFF 0001 EA60 0 01 600 00 0001 EA60 0 1 6000 0 0 01 0 1 0030 DECELERATION TIME 1 0 1 FFFF...

Page 71: ... 0 1 6000 0 0001 EA60 0 01 600 00 0 1 0 01 003C ACC DEC PATTERN 2 SELECTION 0 1 0030 0000 Linear 0 0010 Self adjusting 1 0020 S Pattern 1 2 0030 S Pattern 2 3 003D ACC DEC 1 2 SWITCH FREQUENCY 0 1 FFFF 0000 Fmax 0 01 13 7 5 Panel Control Parameters Parameter Function Title Bank Mask Adjustment Range Multiplier 003E DIRECTION SELECTION FORWARD REV 0 1 0004 0000 Reverse 0 0004 Forward 1 003F STOP PA...

Page 72: ...MINAL RESPONSE TIME 0 1 00FF 0001 0064 1 100 1 0053 RES INPUT TERMINAL RESPONSE TIME 0 1 00FF 0001 0064 1 100 1 0054 ST INPUT TERMINAL RESPONSE TIME 0 1 00FF 0001 0064 1 100 1 0055 RCH CONTACTS FUNCTION 0 1 FFFF 0 FFFF 0 63 Refer to Table 10 page 74 0056 RCH CONTACTS DELAY TIME 0 1 00FF 0001 0064 1 100 1 0057 RCH CONTACTS HOLD TIME 0 1 00FF 0001 0064 1 100 1 0058 LOW CONTACTS FUNCTION 0 1 FFFF 0 F...

Page 73: ...0 Fmax 0 01 0065 COMMERCIAL POWER INV SWITCHING OUTPUT 0 1 00C0 0000 OFF 0 0040 Auto switch on trip 1 0080 At COMMERCIAL POWER INV SWITCH FREQ 2 00C0 Both 1 and 2 3 0066 2 3 COMMERCIAL POWER INV SWITCH FREQ 0 1 FFFF 0 Fmax 0 01 0067 FP OUTPUT TERMINAL PULSE FREQUENCY 0 1 0003 0000 48f 0 0001 96f 1 0002 360f 2 0068 RR INPUT SPECIAL FUNCTION SELECT 0 1 00E0 0000 Standard 0 0040 Fmax 1 0080 TACC TDEC...

Page 74: ...back control ON OFF 41 20C7 RUN 14 10CE Pattern run selection 1 42 30C9 Binary data write 15 20CE Pattern run selection 2 43 0198 LOCAL REMOTE key 16 40CE Pattern run selection 3 44 0298 MON key 17 80CE Pattern run selection 4 45 0498 PRG key 18 02CE Pattern run continue signal 46 0898 UP key 19 01CE Pattern run step trigger signal 47 1098 DOWN key 20 0AC9 JOG forward run 48 2098 READ WRITE key 21...

Page 75: ...ault other than earth fault or load end overcurrent 45 1700 Non severe fault overload overcurrent overvoltage 14 95B5 Overcurrent pre alarm 46 E5D8 Commercial power inverter switching output 1 15 9DB5 Overcurrent pre alarm 47 EDD8 Commercial power inverter switching output 1 16 85C5 Inverter overload pre alarm 48 F5D8 Commercial power inverter switching output 2 17 8DC5 Inverter overload pre alarm...

Page 76: ...LE JUMP FREQUENCIES 0 1 0080 0000 Function OFF 0 0080 Function ON 1 0074 JUMP FREQUENCY 1 0 1 FFFF 0000 Fmax 0 01 0075 JUMP FREQUENCY 1 BANDWIDTH 0 1 FFFF 0000 0BB8 0 00 30 00 0 01 0076 JUMP FREQUENCY 2 0 1 FFFF 0000 Fmax 0 01 0077 JUMP FREQUENCY 2 BANDWIDTH 0 1 FFFF 0000 0BB8 0 00 30 00 0 01 0078 JUMP FREQUENCY 3 0 1 FFFF 0000 Fmax 0 01 0079 1 JUMP FREQUENCY 3 BANDWIDTH 0 1 FFFF 0000 0BB8 0 00 30...

Page 77: ... 0004 0000 Standard 0 0004 Adjustable 1 008A IV REFERENCE SETTING POINT 1 0 1 00FF 0000 0064 0 100 1 008B IV REF POINT 1 FREQUENCY 0 1 FFFF 0000 Fmax 0 01 008C IV REFERENCE SETTING POINT 2 0 1 00FF 0000 0064 0 100 1 008D 1 IV REF POINT 2 FREQUENCY 0 1 FFFF 0000 Fmax 0 01 008E RX TERMINAL STANDARD OR ADJUSTABLE 0 1 0008 0000 Standard 0 0008 Adjustable 1 008F RX REFERENCE SETTING POINT 1 0 1 00FF 00...

Page 78: ...OPERATING MODE 1 040C 0004 0 0000 1 000C 2 0008 3 0404 4 0400 5 040C 6 0408 7 1 0103 PRESET SPEED 2 FREQUENCY 1 FFFF LL UL 0 01 0104 2 or higher PRESET SPEED 2 OPERATING MODE 1 040C Same as PRESET SPEED 1 OPERATING MODE 1 0105 PRESET SPEED 3 FREQUENCY 1 FFFF LL UL 0 01 0106 3 or higher PRESET SPEED 3 OPERATING MODE 1 040C Same as PRESET SPEED 1 OPERATING MODE 1 0107 PRESET SPEED 4 FREQUENCY 1 FFFF...

Page 79: ...FF LL UL 0 01 0116 11 or higher PRESET SPEED 11 OPERATING MODE 1 040C Same as PRESET SPEED 1 OPERATING MODE 1 0117 PRESET SPEED 12 FREQUENCY 1 FFFF LL UL 0 01 0118 12 or higher PRESET SPEED 12 OPERATING MODE 1 040C Same as PRESET SPEED 1 OPERATING MODE 1 0119 PRESET SPEED 13 FREQUENCY 1 FFFF LL UL 0 01 011A 13 or higher PRESET SPEED 13 OPERATING MODE 1 040C Same as PRESET SPEED 1 OPERATING MODE 1 ...

Page 80: ...8 EMERGENCY OFF MODE SELECTION 0 1 0030 0000 Coast stop 0 0010 Decelerated stop 1 0020 DC injection stop 2 0129 2 EMERGENCY OFF DC INJECTION TIME 0 1 00FF 0000 0064 0 0 10 0 0 1 012A NUMBER OF RETRY ATTEMPTS 0 1 00FF 0000 000A 0 10 1 012B Other than 0 TIME BETWEEN RETRY ATTEMPTS 0 1 00FF 0000 0064 0 0 10 0 0 1 012C REGENERATION POWER RIDE THROUGH 0 1 0008 0000 OFF 0 0008 ON 1 012D 1 REGENERATION R...

Page 81: ...0064 0 100 1 0139 LOW CURRENT DETECTION TIME 0 1 00FF 0000 00FF 0 255 1 0140 OUTPUT SHORT CIRCUIT DETECTION SELECT 0 1 0003 0000 Standard motor 0 0001 High speed motor 1 0002 Positioning use standard motor 2 0003 Positioning use high speed motor 3 0141 OVERTORQUE TRIP SELECTION 0 1 0040 0000 Trip disabled 0 0040 Trip enabled 1 0142 OVERTORQUE TRIP LEVEL 0 1 00FF 0000 00C8 0 200 1 0143 FAULT TRIP E...

Page 82: ...LES 0 1 00FF 0001 00FF 1 255 1 0157 PATTERN GROUP 2 SPEED 0 1 00FF 0000 Skip 0 1 0158 PATTERN GROUP 2 SPEED 1 0001 000F Speeds 1 15 0159 PATTERN GROUP 2 SPEED 2 015A PATTERN GROUP 2 SPEED 3 015B PATTERN GROUP 2 SPEED 4 015C PATTERN GROUP 2 SPEED 5 015D PATTERN GROUP 2 SPEED 6 015E PATTERN GROUP 2 SPEED 7 015F PATTERN GROUP 2 NUMBER OF CYCLES 0 1 00FF 0001 00FF 1 255 1 0160 PATTERN GROUP 3 SPEED 0 ...

Page 83: ...PEED 1 CONTINUE MODE 0175 4 SPEED 2 DRIVE TIME 1 FFFF 0000 1F40 0 8000 1 0176 SPEED 3 CONTINUE MODE 1 00FF Same as SPEED 1 CONTINUE MODE 0177 4 SPEED 3 DRIVE TIME 1 FFFF 0000 1F40 0 8000 1 0178 SPEED 4 CONTINUE MODE 1 00FF Same as SPEED 1 CONTINUE MODE 0179 4 SPEED 4 DRIVE TIME 1 FFFF 0000 1F40 0 8000 1 017A SPEED 5 CONTINUE MODE 1 00FF Same as SPEED 1 CONTINUE MODE 017B 4 SPEED 5 DRIVE TIME 1 FFF...

Page 84: ...NTINUE MODE 1 00FF Same as SPEED 1 CONTINUE MODE 0189 4 SPEED 12 DRIVE TIME 1 FFFF 0000 1F40 0 8000 1 018A SPEED 13 CONTINUE MODE 1 00FF Same as SPEED 1 CONTINUE MODE 018B 4 SPEED 13 DRIVE TIME 1 FFFF 0000 1F40 0 8000 1 018C SPEED 14 CONTINUE MODE 1 00FF Same as SPEED 1 CONTINUE MODE 018D 4 SPEED 14 DRIVE TIME 1 FFFF 0000 1F40 0 8000 1 018E SPEED 15 CONTINUE MODE 1 00FF Same as SPEED 1 CONTINUE MO...

Page 85: ...UENCY 0 1 FFFF 0 Fmax 0 01 0197 PID DEVIATION LIMIT SELECTION 0 1 0080 0000 No PID deviation limit 0 0080 PID deviation limited 1 0198 PID DEVIATION UPPER LIMIT 0 1 00FF 0000 0032 0 50 1 0199 1 PID DEVIATION LOWER LIMIT 0 1 00FF 0000 0032 0 50 1 019A PG INPUT NUMBER OF PULSES 0 1 FFFF 0001 270F 1 9999 1 019B PG INPUT NUMBER OF PHASES 0 1 0001 0000 Single phase input 1 0001 Two phase input 2 019C D...

Page 86: ...0018 6 0038 14 001C 7 003C 15 020A 2 TOSLINE F10 COMM ERROR MODE 1 0080 0000 Data cleared 0 0080 Data retained 1 020B TOSLINE S20 RECEIVE ADDRESS 1 FFFF 0000 03FF 0 1023 1 020C TOSLINE S20 TRANSMIT ADDRESS 1 FFFF 0000 03FF 0 1023 1 020D TOSLINE S20 COMMAND INPUT 1 001F 0000 001F 0 31 1 020E TOSLINE S20 MONITOR OUTPUT 1 001F 0000 001F 0 31 1 020F TOSLINE S20 FREQ REF ADDR SELECT 1 0001 0000 Disable...

Page 87: ...8 Output voltage 5 3684 Torque current 6 2688 Excitation current 7 7506 PID feedback value 8 0584 Motor overload ratio 9 0586 Inverter overload ratio 10 0588 DBR overload ratio 11 835C Input power 12 835E Output power 13 A000 Fixed output 14 2304 Peak output current 15 8302 Peak input voltage 16 0219 FREQUENCY METER ADJUSTMENT 0 1 FFFF 0000 FFFF 1 021A AM TERMINAL FUNCTION SELECTION 0 1 FFFF Same ...

Page 88: ...ND MODE SELECTION 0 1 0007 0000 Only RS232C valid 0 0001 Terminal input valid 1 0002 Panel input valid 2 0003 Communication interface input valid 3 0004 local remote valid 4 0220 FREQUENCY MODE SELECTION 0 1 0038 0000 Only RS232C valid 0 0008 Terminal input valid 1 0010 Panel input valid 2 0018 Communication 12 bit binary interface input valid 3 0020 local remote valid 4 0221 PANEL OPERATION MODE ...

Page 89: ...blind 1 0236 PROTECTION FUNCTION PARAMS BLIND 0 1 0008 0000 Blind 0 0008 Unblind 1 0237 PATTERN RUN CONTROL PARAMS BLIND 0 1 0010 0000 Blind 0 0010 Unblind 1 0238 FEEDBACK CONTROL PARAMS BLIND 0 1 0020 0000 Blind 0 0020 Unblind 1 0239 COMMUNICATION PARAMS BLIND 0 1 0040 0000 Blind 0 0040 Unblind 1 023A INDUSTRIAL APPL PUMP PARAMS BLIND 0 1 0080 0000 Blind 0 0080 Unblind 1 023B INDUSTRIAL APPL FAN ...

Page 90: ...TYPE 0 1 0030 0000 Toshiba EQPIII motor 0 0010 Toshiba STD motor 1 0020 Other 2 0245 MOTOR RATED VOLTAGE 230 460v units 0 1 00FF 0012 0078 90 600 5 0246 575v units 001A 00AC 130 860 0247 MOTOR RATED FREQUENCY 0 1 00FF 0000 00C8 0 400 2 0248 MOTOR RATED RPM 0 1 FFFF 0000 270F 0 9999 1 0249 2 AUTO TUNING ENABLE 0 0008 0000 Auto tuning disabled 0 0008 Auto tuning enabled 1 024A LOAD MOMENT OF INERTIA...

Page 91: ... PHASE PRESS CLEAR 09 Lost output phase option OVERVOLTAGE ACCEL PRESS CLEAR 0A Overvoltage during acceleration OVERVOLTAGE DECEL PRESS CLEAR 0B Overvoltage during deceleration OVERVOLTAGE RUN PRESS CLEAR 0C Overvoltage during constant speed run INVERTER OVERLOAD PRESS CLEAR 0D Inverter overload MOTOR OVERLOAD PRESS CLEAR 0E Motor overload DBR OVERLOAD TRIP PRESS CLEAR 0F Dynamic braking resistor ...

Page 92: ...ftware EARTH FAULT HARD PRESS CLEAR 22 Earth fault hardware OPEN FUSE TRIP PRESS CLEAR 23 Open fuse DBR OVERCURRENT TRIP PRESS CLEAR 24 Dynamic braking resistor overcurrent DC OVERCURRENT ACC PRESS CLEAR 25 Overcurrent in DC section during acceleration DC OVERCURRENT DEC PRESS CLEAR 26 Overcurrent in DC section during deceleration DC OVERCURRENT RUN PRESS CLEAR 27 Overcurrent in DC section during ...

Page 93: ... a serial port the RFU PC application refer to section 14 3 and an appropriate cable to connect the RS232 port of the unit to the PC Please be sure to read the firmware release notes and updated user s manual included with the BSP for any important notices behavior precautions or configuration requirements prior to updating your firmware For example upgrading to a new firmware version may affect u...

Page 94: ...ion file Create a folder such as c RFU place the distribution file in this folder and then execute it This will extract the compressed files into that same folder The distribution file is then unneeded and can be deleted if desired To run the RFU utility double click on the RFU EXE file icon 14 3 2 First Time Configuration The first time the RFU utility is run on a computer several configuration i...

Page 95: ...screen The Choose File Locations window shown in Figure 34 then appears Confirm that the correct paths to the referenced files are entered Enter the correct paths if necessary Figure 34 Choose File Locations Window 14 3 3 Transmitting Firmware Files When a board support package BSP has been downloaded and unzipped the flash firmware file will be the one with BIN as its file name extension ...

Page 96: ...ct the File Load Flash Image menu item refer to Figure 35 Figure 35 Load Flash Image Menu Selection The flash image BIN file selection window will then appear refer to Figure 36 Browse to the location of the flash image file and select it Clicking OK will then initiate the download process Figure 36 Flash File Selection Window While downloading the RFU utility will indicate the download status Onc...

Page 97: ...o the unit by either disconnecting the auxiliary power supply and or powering down all connected drives or momentarily removing all drive communication cables from the unit When the unit powers up again it will be running the new application firmware If the new firmware version release notes indicated that the configuration file might need to be reloaded then do so at this point ...

Page 98: ...97 15 Notes ...

Page 99: ...12300 Dundee Court Suite 212 Middleton WI USA 53562 4720 Cypress TX USA 77429 8364 Tel 608 831 1255 Fax 608 831 2045 http www iccdesigns com Printed in U S A NETWORK GATEWAY SERIES ICC INDUSTRIAL CONTROL COMMUNICATIONS INC XLTR 200 SERIAL MULTIPROTOCOL NETWORK GATEWAY September 2006 ICC 10604 1 101 000 ...

Reviews: