background image


E6581299


- 1 - 


USB-to-Serial Conversion Unit Instruction Manual (Detailed)


USB001Z


Contents 


Safety precautions································································································································· 1


1.


Introduction ······································································································································ 4


2.


Exterior features ······························································································································· 5


3.


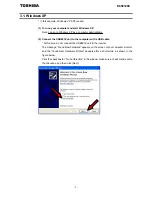
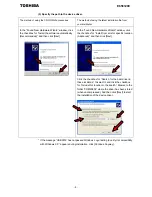
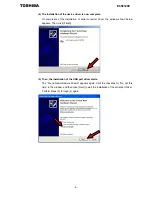
Installing the device driver ··············································································································· 6
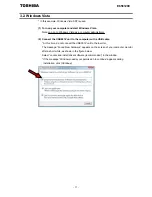
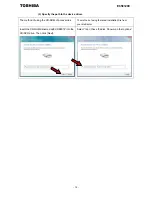
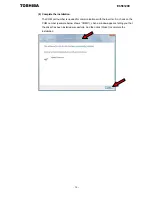
 

3.1.


Windows XP ····················································································································· 7


3.2.


Windows Vista················································································································ 11


3.3.


Windows 7 ······················································································································ 16


4.


Checking the COM port number ···································································································· 22


4.1.


Windows XP ···················································································································  22


4.2.


Windows Vista, 7 ··········································································································· 24


5.


Uninstalling the device driver ········································································································· 26


5.1.


Windows XP ···················································································································  26


5.2.


Windows Vista, 7 ··········································································································· 28


6.


Connecting and starting the USB001Z unit ···················································································· 30


7.


Outline drawing ······························································································································ 32


8.


Specifications ································································································································· 33


9.


Warranty ········································································································································ 33


NOTICE 

1.


Make sure that this instruction manual is delivered to the end user of 

USB-to-serial conversion unit. 

2.


Read this manual before installing or operating the USB-to-serial conversion 

unit. Keep it in a safe place for reference. 

3.


All information contained in this manual is subject to change without notice. 

Please confirm the latest information from your distributor. 


Summary of Contents for USB001Z

Page 1: ...device driver 26 5 1 Windows XP 26 5 2 Windows Vista 7 28 6 Connecting and starting the USB001Z unit 30 7 Outline drawing 32 8 Specifications 33 9 Warranty 33 NOTICE 1 Make sure that this instruction manual is delivered to the end user of USB to serial conversion unit 2 Read this manual before installing or operating the USB to serial conversion unit Keep it in a safe place for reference 3 All inf...

Page 2: ...s may cause damage to physical property 2 1 Such things as injury burns or shock that will not require hospitalization or long periods of outpatient treatment 2 Physical property damage refers to wide ranging damage to assets and materials Meanings of symbols Marking Meaning of marking Indicates prohibition Don t do it The prohibition detail will be described in or near the symbol in either text o...

Page 3: ...y other conditions will result in malfunction Provide your inverter or other equipment with safety devices to prevent a serious accident from resulting even if the unit malfunctions or fails to operate Usage without a safety device can result in an accident Do not connect a LAN cable or modular cable for telephones to the conversion unit Doing so will cause a failure or accident Do not connect mor...

Page 4: ...ction because of noise Do not connect the conversion unit to more than one inverter Connect the conversion unit to either the RS485 2 wire type port or the LOGIC port on your inverter depending on the type of the inverter Avoid connecting the conversion unit to a USB hub or extended USB port e g PCMCIA card Or else the conversion unit may become unstable depending on the environment in which it is...

Page 5: ... No cable USB option No USB option Accessories check The USB to serial conversion unit is composed of the items listed below Unpack the product and check for missing or damaged components 1 USB to serial conversion unit 1 USB001Z 2 USB to serial Conversion Unit Instruction Manual 1 E6581282 3 CD ROM 1 Device driver Uninstaller Instruction Manual Detailed version E6581298 Japanese manual E6581299 t...

Page 6: ... USB device side Point of connection in the above figure Use a commercially available USB cable Compliant with USB 1 1 2 0 A B connection type Recommended cable length 1 m or less RS485 2 wire type communication port Used to connect to the RS485 2 wire type port on the inverter Applicable model VF nC3 VF S15 VF FS1 VF AS1 VF PS1 and other models Common serial communication port Used to connect to ...

Page 7: ...SB001Z into the CD ROM drive Extract the files from the zip folder and place it in an appropriate location on your system The device driver version V208 or later does not correspond to Windows 98 so please be careful When the device driver of the previous version is already installed be sure to install after uninstalling a previous version Refer to Chapter 5 for the un installation method Since th...

Page 8: ...unit to the computer with a USB cable At this time do not connect the USB001Z unit to the inverter The message Found New hardware appears on the screen of your computer monitor and the Found New Hardware Wizard appears after a short while as shown in the figure below Click the checkbox for No not this time in the window make sure a check mark is put in the checkbox and then click Next ...

Page 9: ... click the checkbox for Install from a list or specific location Advanced and then click Next Click the checkbox for Search for the best driver in these locations to select it and click the checkbox for Include this location in the search Browse to the folder CDM20802 where the driver has been stored when uncompressed And then click Next to start the installation of the device driver If the messag...

Page 10: ...erter driver the window shown below appears Then click Finish 5 Then the installation of the USB port driver starts The Found New Hardware Wizard appears again Click the checkbox for No not this time in the window and then click Next to start the installation of the serial port driver Perform steps 2 through 4 again ...

Page 11: ...tallation The driver has been installed successfully click Finish to complete the installation The COM port number is needed for communications with the inverter So check on the COM number following the steps described in Chapter 4 ...

Page 12: ...01Z unit to the computer with a USB cable At this time do not connect the USB001Z unit to the inverter The message Found New hardware appears on the screen of your computer monitor after a short while as shown in the figure below Select Locate and install driver software recommended in the window If the message Windows needs your permission to continue appears during installation click Continue ...

Page 13: ...ver The method of using the CD ROM of accessories The method of using the latest installation file from your distributor Insert the CD ROM delivered with USB001Z into the CD DVD drive Then click Next Select I don t have the disk Show me other options ...

Page 14: ... your distributor Select Browse my computer for driver software advanced Browse to the folder CDM20802 where the driver has been stored when uncompressed and click Next If the message Windows can t verify the publisher of this driver software appears during installation click Install this driver software anyway ...

Page 15: ...mplete On completion of the installation the window shown below appears Then click Close 5 Then the installation of the USB port driver starts The Found New Hardware Wizard appears again The driver software is also in the folder CDM20802 So perform steps 3 again ...

Page 16: ...COM port number is needed for communications with the inverter So check on the COM number example below shows COM3 when a window appears telling you that the driver has been installed successfully And then click Close to complete the installation ...

Page 17: ... Connect the USB001Z unit to the computer with a USB cable At this time do not connect the USB001Z unit to the inverter The message Device driver software was not successfully installed is displayed 3 Execute Device manager Click Start button on Windows 7 RIGHT click Computer and select Properties from the menu that appears ...

Page 18: ...E6581299 17 Click Device Manager in Hardware and sound Right click Other Devices USB001Z in Device Manager and click Update Driver Software ...

Page 19: ...581299 18 4 Click Browse my computer for driver software 5 Browse to the folder CDM20802 where the driver has been stored and click Next The following figure shows the device driver is included in E drive ...

Page 20: ...ation The driver has been installed successfully click Close to complete the installation USB port driver is continuously installed 7 Execute Device manager refer 3 Right click Other Devices USB Serial Port in Device Manager and click Update Driver Software ...

Page 21: ...581299 20 8 Click Browse my computer for driver software 9 Browse to the folder CDM20802 where the driver has been stored and click Next The following figure shows the device driver is included in E drive ...

Page 22: ...the USB port driver installation The driver has been installed successfully click Close to complete the installation In the installation work the Windows Security dialog screen appears click Install this driver software anyway ...

Page 23: ...n how your computer is set up Perform this check with the USB001Z unit connected to your computer or else the port number cannot be checked Since the steps to be followed to check the number vary depending on the operation system used refer to the section that corresponds to the operating system used 4 1 Windows XP 1 Click Start button on Windows XP RIGHT click My Computer and select Properties fr...

Page 24: ...ware tab 4 Click the sign on the left side of Port COM LPT The number in parentheses next to USB Serial Port refers to the COM port number In the example shown below the COM port number is COM3 If the USB001Z unit is not connected no COM port number is shown ...

Page 25: ... button on Windows Vista RIGHT click Computer and select Properties from the menu that appears 2 Click the Device Manager of the System dialog box If the message Windows needs your permission to continue appears during installation click Continue ...

Page 26: ...n the left side of Port COM LPT The number in parentheses next to USB Serial Port refers to the COM port number In the example shown below the COM port number is COM3 If the USB001Z unit is not connected no COM port number is shown ...

Page 27: ... by step for using uninstaller on the CD ROM or in the downloaded files The method of using the CD ROM of accessories The method of using the latest installation file from your distributor Insert the CD ROM delivered with USB001Z into the CD ROM drive Click My Computer and then click your CD ROM drive Open the folder named USB001Z_V208 Extract the files from the zip folder and place it in an appro...

Page 28: ...ve the device click on the Remove Devices button 4 A message box will confirm successful removal from the system and the device will be removed from the device window Click OK 5 Click Cancel to complete the un installation ...

Page 29: ... USB cable At this time do not connect the USB001Z unit to the inverter 2 Open the Device Manager Click Start button on Windows Vista RIGHT click Computer and select Properties from the menu that appears And then click the Device Manager of the System dialog box For details refer to section 4 2 3 Click the sign on the left side of Port COM LPT Select USB001Z Serial Port right click on the mouse an...

Page 30: ...k OK 5 Click the sign on the left side of Universal Serial Bus Controllers Select USB001Z Serial Converter USB001Z right click on the mouse and select Uninstall 6 Click the checkbox for Delete the driver software for this device on the uninstall dialog box and then click OK 7 Disconnect the USB001Z unit from the computer ...

Page 31: ...the connection port of the inverter and choose either RS485 2 wire type side or LOGIC common serial side on the USB001Z At this time be careful not to apply force to the connectors RS 485 2 wire type side Connectable to such an RS485 2 wire type interface port as that of the VF nC3 S15 FS1 AS1 or PS1 LOGIC side Connectable to such a common serial interface port as that of the VF nC1 S9 S11 A7 or P...

Page 32: ...VF AS1 Inverter unit connection cable Optional Model number Cable length CAB0011 1 2m CAB0013 3 6m CAB0015 4 8m USB cable A B connection type Use a commercially available USB cable Compliant with USB 1 1 2 0 Recommended cable length 1m RS485 2 wire type USB LOGIC USB Option Unit ...

Page 33: ...E6581299 32 7 Outline drawing Here is an outline drawing of the USB001Z unit Unit mm Specifications ...

Page 34: ...Windows 7 are either a registered trademark or trademark of Microsoft Corporation in the United States and or other countries 3 No warranty as to the suitability of this product for any computer and any peripheral equipment is either made or implied 9 Warranty Any part of the unit that proves defective will be repaired free of charge under the following conditions 1 This product will be repaired f...

Reviews: