background image

尺寸:

148 x 210 mm

颜色:白底黑字

材质:

70g

白书纸

装钉方式:骑马订

详细见样板

MATESTAR DIGITAL DEVICE LTD.

A R T 

M K G 

IN CHARGE 

CHECKED DRAWN 

APPROVED 

M E 

E E 

IB

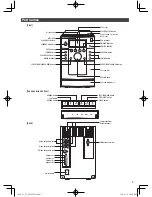
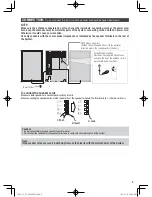
  CLIENT MODEL :  TY-AS100TW

REF. NO.:

PART NAME: 

JOB NO.:  /

BRAND NAME:    TOSHIBA

PART  

NO.: 

TO:  MKG

FROM:  Aiway

DATE:    28/08/2012

COMMENT: 

601-S10000-020

Scale: 65%

TY-AS100TW

Toshiba DVD MICRO COMPONENT SYSTEM

Operation Manual

Thank you for purchasing the DVD MICRO COMPONENT SYSTEM.

To use this product safely, read and understand this operation manual thoroughly 
before using it.
After reading this manual, keep it in a safe place so that it can be used when 
necessary.

Toshiba DVD微型元件系統

操作手冊

感謝您購買此DVD微型元件系統。

為安全使用本產品,請在使用之前通讀本操作手冊。
閱讀後請妥善保管本手冊,以便需要時使用。

5006900

120821̲TY̲AS100TW.indb   3

12.8.21   4:56:04 PM

Summary of Contents for TY-AS100TW

Page 1: ...000 020 Scale 65 TY AS100TW Toshiba DVD MICRO COMPONENT SYSTEM Operation Manual Thank you for purchasing the DVD MICRO COMPONENT SYSTEM To use this product safely read and understand this operation manual thoroughly before using it After reading this manual keep it in a safe place so that it can be used when necessary Toshiba DVD微型元件系統 操作手冊 感謝您購買此DVD微型元件系統 為安全使用本產品 請在使用之前通讀本操作手冊 閱讀後請妥善保管本手冊 以便需要時使...

Page 2: ...M To use this product safely read and understand this operation manual thoroughly before using it After reading this manual keep it in a safe place so that it can be used when necessary Toshiba DVD微型元件系統 操作手冊 感謝您購買此DVD微型元件系統 為安全使用本產品 請在使用之前通讀本操作手冊 閱讀後請妥善保管本手冊 以便需要時使用 5006900 120821 TY AS100TW indb 3 12 8 21 4 56 04 PM ...

Page 3: ...ivX DivX Certified and associated logos are trademarks of DivX LLC and are used under license DivX DivX Certified及相關標誌是DivX LLC的商標 經授權使用 Windows Media and the Windows logo are trademarks or registered trademarks of Microsoft Corporation in the United States and or other countries Windows Media和Windows徽標是Microsoft Corporation在美國和 或其他國家的商 標或註冊商標 120821 TY AS100TW indb 4 12 8 21 4 56 04 PM ...

Page 4: ... and 220 240 VAC please just insert the mains power plug s into the socket outlet with voltage within the setting of the selector The mains plug is used as disconnect device the disconnect device shall remain readily operable s Doing so may cause a fire or electric shock Do not insert or remove the power plug with a wet hand s Doing so may cause a fire or electric shock When removing the power plu...

Page 5: ...imer Toshiba shall not be responsible for any damage caused by an earthquake thunderstorm flood damage fire for which s Toshiba is not responsible acts of a third party other accidents or damages caused by the user s willful acts or negligence misuse or use in abnormal conditions Toshiba shall not compensate for recordings not recorded due to failure of this product s Toshiba shall not be responsi...

Page 6: ...LAY PAUSE button PLAY button Video Output terminal Speaker R STOP EJECT button TAPE button STANDBY ON button RECORD button S Video Output terminal Speaker R Power Supply PAUSE button LINE IN terminal DISC USB STOP button Push to open or close the DISC cover DISC cover PRESET SKIP SEACH FW button Cassette door VOLUME Knob Cassette button door PROGRAM button USB terminal REMOTE SENSOR FM LINE IN but...

Page 7: ...tes The remote control may not operate correctly in the following cases An obstacle exists between the main unit and the remote control s Strong light such as direct sunlight shines on the remote control light receiving section s Remote Control FM LINE IN POWER DISC USB TAPE CLOCK SLEEP CURSOR B OK ENTER EQ HBS REPEAT RANDOM TIMER MENU CURSOR C z PLAY PAUSE c W 0 9 ZOOM MUTE AUDIO STOP v TITLE SET...

Page 8: ...gardless of the letter case upper lower s MP3 WMA discs require a longer readout time than regular discs It depends on the complexity of the folder file s configuration Some MP3 WMA files cannot be played back and will be skipped This result from their recording processes and s conditions When making MP3 WMA discs use ISO 9660 Level 1 for the disc format s It is recommended to make the files at th...

Page 9: ... class device while using this unit s On cassette tapes Type I tape is recommended for playback on this unit You can also play back type II and type IV tapes s however the sound quality tone may not be reproduced properly REFERENCES License and trademark This product incorporates copyright protection technology that is protected by U S patents and other intellectual protection s technology must be...

Page 10: ...and firmly When connecting the speaker cords match the polarity of the speaker terminals The black cord to the red cord to Cautions Do not connect more than one speaker to each terminal s Do not allow the conductor of the speaker cords to be in touch with the metallic parts of the System s Note If the speaker cords are covered with vinyl remove the vinyl to with the metallic parts of the System FM...

Page 11: ...ress button Move the cursor to the right 4 Select PAL or NTSC 5 Press button Information Connect the unit directly to a TV or a monitor without routing through a video cassette recorder VCR or an HDD DVD recorder s Otherwise picture distortion may occur during playback Routing the connection through a VCR or an HDD DVD recorder however does not affect the audio quality This unit TV or monitor Dire...

Page 12: ...r set mode according to press the STOP button Setting the TIMER 1 Press POWER 1 button to turn on the unit 2 In standby mode press and hold 2 seconds the TIMER button to start the clock setting mode The ON TIME is flashing 3 Press TIMER button The Hour in flashing 4 Press the PRESET Z or z button to adjust the hour and press the TIMER button Press the PRESET button once to advance the time by 1 ho...

Page 13: ... SOUND ADJUSTMENT Muting To drop the volume in a moment Remote Control To restore the volume press again or adjust the volume s Hyper Bass Sound HBS To reinforce the bass sound Remote Control Sound Mode To select the sound mode suitable for your favorite music Remote Control N VOLUME ADJUSTMENT You can adjust the Volume level from level 0 VOL MIN to level 31 VOL MAX Remote Control Main Unit BASIC ...

Page 14: ...t to program You can also use the numeric keys on the remote control s 3 Press PROGRAM button to save 4 To program another track number repeat steps 2 and 3 steps You can program up to maximum 16 tracks you like s 5 Press PLAY PAUSE button to finish the program setting and start playback PROG WMA USB DVD PROG USB DISC USB 6 Pressv button to stop programmed playback Note In the program during playb...

Page 15: ...reset station Press preset or button Indicator lights up on the display s N TAPE You can play back type I tapes Playback operations on the main unit 1 Select TAPE as the source 2 Open the cassette door and insert a tape With the tape side facing down 3 Close the cassette door 4 Press c button Replay starts To play back Press To pause Press To stop Press To locate a particular portion While playing...

Page 16: ... tape reaches its end before playback of the DISC USB finishes the recording and playback pause In this case flip the tape and restart the recording by either of the following ways To restart the recording from the position where the s playback pauses press and buttons To restart the recording from the beginning of the current s track press button then press and buttons Recording from an external ...

Page 17: ...nas Coaxial type for FM Cassette deck Frequency response 100 Hz 8 000 Hz Wow flutter 0 35 WRMS Fast wind time Approx 170 sec C 60 cassette General Speakers 3 5 inch cone x 2 Speaker impedance 8 ȍ Output power 10 W 10 W 10 THD 8 ȍ Input terminal USB Playable files MP3 WMA JPEG Compatible device Mass storage class Bus power supply DC5V 500 mA LINE IN Stereo mini 3 5mm 500mV 47kȍ Output terminal LINE...

Page 18: ... 電壓選擇開關 用於調節額定輸入 110 127 VAC和220 240 VAC 請僅將電源插頭插入電壓與選擇開關設置 z 一致的插座 電源插頭作為未連接裝置使用 未連接裝置應該保持可操作狀態 z 否則可能會導致火災或觸電 切勿用濕手插入或拔出電源插頭 z 否則可能會導致火災或觸電 注意 從插座拔出電源插頭時 請抓住電源插頭 z 否則可能會導致火災或觸電 在雷電風暴或長時間不使用時 請拔下本裝置的電源插頭 z 使用 警告 切勿拆卸 修理或改動裝置 z 否則可能會導致火災或觸電 打開後聯動裝置失效時 有不可見的激光輻射 光盤驅動裝置中使用的是1級激光產品 蓋打開時 光盤驅動裝置停止運轉 請注 意以下事項 切勿直視激光或反射光 z 避免暴露在激光束下 z 激光會對眼睛或皮膚造成傷害 注意 切勿將手伸入CD卡槽中 z 切勿在本裝置上放置重物 z 切勿堵塞通風孔 z 否則可能會導致受傷或火災 Cl...

Page 19: ... 否則可能會導致火災或觸電 免責聲明 Toshiba 不對因地震 暴風雨 洪水 Toshiba不予負責的火災 第三方行為 其他事故而造成的任何損 z 失 或因用戶的故意行為或疏忽 錯誤使用或在異常條件下的使用而導致的損失承擔責任 Toshiba 不為因本產品故障而造成的錄音失敗提供賠償 z Toshiba 不對因沒有遵守操作手冊中的說明而導致的任何損失承擔責任 z 本裝置不承諾可以播放USB存儲設備內錄制的所有音頻文件 z 正確 通風注意事項 為避免發生觸電和火災以及避免造成損壞 請將本裝置如下放置 1 前面 無障礙物並且為開放空間 2 側面 頂部 背面 在下圖所示的尺寸中所指示的區域不能放置任何障礙物 3 底部 放置在平坦的表面上 通過放置一個10 cm或更高的支架 使氣流能夠順暢的流動 10 cm 15 cm 1 cm 15 cm 15 cm 1 cm 15 cm 15 cm 前面視圖...

Page 20: ...鐘 睡眠 按鈕 TIMER 定時器 按鈕 DISC USB c W 播放 暫停 按鈕 播放按鈕 視頻輸出端口 揚聲器 右 停止 彈開按鈕 TAPE 磁帶 按鈕 STANDBY 待机 按鈕 錄制按鈕 S 視頻輸出端口 揚聲器 右 電源 暫停按鈕 LINE IN端口 DISC USB v 停止 按鈕 按下可打開或關閉光盤蓋 光盤蓋 PRESET PRESET SKIP SEACH快進按鈕 卡帶盒蓋 音量旋鈕 卡帶按鈕蓋 PROGRAM 編程 按鈕 USB 端口 遙感器 FM LINE IN 按鈕 TUNING 調諧 按鈕 120821 TY AS100TW indb 19 12 8 21 4 57 14 PM ...

Page 21: ...之間存在障礙物 z 強光 如直射陽光 照射在遙控紅外線接收區 z 遙控器 FM LINE IN 電源 DISC USB TAPE 磁帶 CLOCK SLEEP 時鐘 睡眠 光標B OK 輸入 EQ BASS HBS REP RND 重復 隨機 TIMER 定時器 MENU 菜單 光標C z c W 播放 暫停 0 9 ZOOM 縮放 MUTE 靜音 AUDIO 音頻 v 停止 SUBTITLE 標題 SET UP 設置 DISPLAY 顯示器 A B 光標b 光標c Z VOL 音量 PROG ANGLE 程序 角度 GOTO 跳至 顯示器裝置 USB VCD 程序播放 隨機播放 MP3 磁帶錄制 定時器 頻率 DVD WMA 重復播放 單曲重復 REPEAT 1 所有曲目重復 REPEAT 組播放 文件夾 曲目 章節 文件編號 睡眠 搖滾 HBS POP 立体聲 爵士 古典 鋰離子電池離...

Page 22: ...的非DVD面不符合 數字音頻光盤 標準 因此 不建議在本產品上播放DualDisc的非DVD面 有關光盤 文件的說明 對於MP3 WMA播放 本裝置可以播放擴展名為 mp3 或 wma 忽略字母大小寫 的MP3 WMA文件 z MP3 WMA光盤的讀取時間比普通光盤更長 視文件夾 文件結構的複雜性而定 z 無法播放某些MP3 WMA文件 將會跳過這些文件 這是由於這些文件的記錄過程和條件導致的 z 製作MP3 WMA光盤時 請使用ISO 9660 Level 1光盤格式 z 建議以下列條件製作文件 z MP3 WMA文件 MP3 128kbps WMA 96kbps 採樣率 MP3 WMA文件 44 1 kHz MP3 WMA文件的播放順序可能與錄制時的順序不一致 如果文件夾不含MP3 WMA文件 將被跳過 z 本裝置無法播放 封包寫入 的光盤 z 如果已用其他格式錄制過CD RW 請在錄...

Page 23: ... 播放大傳輸速率的文件時 播放過程中可能會出現跳音 z 某些USB大容量存儲設備可能無法被識別或正常工作 z TOSHIBA不對使用本裝置時USB大容量存儲設備的數據丟失承擔責任 z 對於卡帶 建議在本裝置上播放I型磁帶 也可以播放II和IV型磁帶 z 但是 可能無法準確重現音質 音調 參考 許可和商標 本產品採用了受美國專利保護的版權保護技術 其他知識產權保護技術也獲得Macrovision的授權 若未 z 經Macrovision的特別授權 僅限家庭和其他有限的觀看用途 禁止反向工程或拆解 Microsoft和Windows Media是Microsoft Corporation在美國和 或其他國家的註冊商標或商標 z 注意事項 播放光盤 文件前 確認以下事項 打開電視機電源 在電視機上選擇適合觀看圖像或屏幕畫面的輸入模式 z 對於光盤 文件播放 可以將初始設置更改為所需設置 請參閱另...

Page 24: ...後面揚聲器端口所指示的揚聲器阻抗相同的揚聲器 連接揚聲器線纜 確保兩個揚聲器均正確和牢固連接 連接揚聲器線纜時 請如下匹配揚聲器端口的電極 黑色線纜連接至 紅色線纜連接至 注 意 每個端口僅可連接一個揚聲器 z 請勿使揚聲器線纜的導體與系統的金屬部件發生碰觸 z 備注 如果揚聲器線纜上包有薄膜 請將會與系統金屬部件碰觸的薄膜拆去 FM天線 隨附 展開天線並將其指向音質最好的方向 獲得更好FM收聽效果的方法 斷開隨附的FM天線 將天線電 纜的頭固定在靈敏度較好的位 置 連接至 牆壁插座 2 插入 1 推動 3 鎖定 120821 TY AS100TW indb 23 12 8 21 4 57 16 PM ...

Page 25: ...NTSC 1 按 按鈕 2 按 或 按鈕選擇 TV SYSTEM 3 按 按鈕 向右移動光標 4 選擇 PAL 或 NTSC 5 按 按鈕 信息 直接將本裝置連接至電視機 或顯示器 不通過錄像機 VCR 或HDD DVD錄像機 否則 可能會在播放過 z 程中出現圖像扭曲 但是 通過錄像機 VCR 或HDD DVD錄像機連接時 不會影響音頻質量 本裝置 電視機 或顯示器 直接連接 VCR或HDD DVD 藍光錄音機 如果將本裝置連接到內置VCR的電視機 也可能會導致播放過程中出現圖像扭曲 z 連接外部設備 將帶立體聲迷你插頭 3 5 mm 的外部設備連接至LINE IN端口 立體聲迷你插頭 3 5 mm 120821 TY AS100TW indb 24 12 8 21 4 57 16 PM ...

Page 26: ...SC USB播放 將DISC或USB插入設備內 3 對於收音機 設置預設存儲器 如果要退出定時器設置模式 請按STOP按鈕 設置定時器 1 按POWER 1 按鈕打開裝置 2 在待機模式中 按住 2秒 TIMER按鈕開啟時 鐘設置模式 ON TIME 開始閃爍 3 按TIMER按鈕 小時 開始閃爍 4 按PRESET Z 或 z 按按鈕調整小時然後按 TIMER按鈕 按一下PRESET按鈕可前進1小時 按住則可以持 續前進 5 按PRESET Z 或 z 按鈕調整分鐘然後按 TIMER按鈕 按一下PRESET按鈕可前進1分鐘 6 按PRESET Z 或 z 按鈕繼續設置關閉時間 然後按TIMER按鈕進行確認 7 按PRESET Z 或 z 按鈕調整小時然後按 TIMER按鈕 8 按PRESET Z 或 z 按鈕調整分鐘然後按 TIMER按鈕 9 按PRESET Z 或 z 按鈕繼續設置源 ...

Page 27: ...系統關閉所剩的時間 請按住 z CLOCK SLEEP 按鈕 如果反復按此按鈕 則可以更改關閉時間 z N 聲音調整 靜音 暫時降低音量 遙控器 若要恢復音量 請再次按此按鈕或調整音量 z 超低音音箱 HBS 增強低音 HBS 取消 無指示 遙控器 聲音模式 選擇適合您喜好的音樂的聲音模式 取消 無指示 CLASSIC POP ROCK JAZZ 遙控器 N 音量調整 可以在0級 VOL MIN 至31級 VOL MAX 之 間調整音量 遙控器 主機 基本操作 N 光盤 USB 開始播放 1 光盤 打開光盤蓋 將光盤以帶有打印內容一面 朝上裝入 然後關閉光盤蓋 按下 OPEN CLOSE 標簽側 USB 將USB 設備連接至USB 端口 USB设备 數字音頻 播放器 2 按遙控器上的DISC USB按鈕選擇光盤或USB功 能 3 按遙控器上的 或 按鈕開始播放 播放操作 遙控器 主機 播放...

Page 28: ...按PROGRAM 按鈕可啟動程序設置 遙控器 主機 按 按 會顯示 PROG 及 P01 PROG 2 按PRESET Z 或 z 按鈕選擇您要進行編程的 曲目編號 也可以使用遙控器上的數字鍵 z 3 按PROGRAM按鈕進行保存 4 若要編程另一個曲目編號 請重復步驟2和步驟3 您可以按需要編程至多16首曲目 z 5 按PLAY PAUSE按鈕完成編程設置並開始播 放 PROG WMA USB DVD PROG USB DISC USB 6 按 v 按鈕停止程序播放 備注 在播放的程序中 無法使用數字鍵選擇曲目 z N LINE IN 播放操作 1 使用帶有 3 5立體聲迷你插頭 另售 的連接線 將本裝置的LINE IN端口連接至外部設備的耳機 端口 立體聲迷你插頭 未隨附 2 按FM LINE IN按鈕 FM LINE IN 3 播放外部設備 4 調整音量 備注 連 接 或 斷 開 外...

Page 29: ...標電台 1 按PROGRAM按鈕 遙控器 主機 按 按 MHz 2 選擇一個預設編號 也可以使用 z 或 按鈕 3 按PROGRAM按鈕保存電台 調諧到預設電台 按PRESET 或 按鈕 顯示屏上的指示燈點亮 z N 磁帶 可以播放類型I磁帶 播放操作 主機上 1 選擇 磁帶 作為音源 2 打開卡帶盒蓋 放入磁帶 磁帶側朝下放置 3 關閉卡帶盒蓋 4 按 c 按鈕 播放開始 播放 按 暫停 按 停止 按 定位于 特定位置 播放磁帶 若要彈起 請按 備注 不建議使用C 120或更長的磁帶 此類磁帶容易夾 z 在壓輪和主動輪中 從而可能會導致性能下降 錄制操作 主機上 開始錄制前 請注意 未經聲音或視頻錄像 廣播或有線節目 z 以及其中包含的任何文學 戲劇 音樂或藝術作 品等的版權所有人的許可對預錄制磁帶 唱片或 光盤進行再次錄制是違法的 音量和聲音的調整不會對錄製造成影響 z 快退磁帶 快進...

Page 30: ... 按 或 按鈕選 擇您想要指定開始錄制的曲目 播放過程中可以開始錄制 然後返回至曲目的起 z 點進行錄制 如果磁帶在光盤 USB的播放完成前到達終 點 則錄制和播放會暫停 在這種情況下 通過以下方式翻轉磁帶然後重新開 始錄制 若要從播放暫停的位置開始進行錄制 請按 z 和 按鈕 若要從當前曲目的開始處重新開始錄制 請按 z 按鈕 然後按 和 按鈕 從外部設備錄制 若要連接外部設備 請參閱 LINE IN 錄制前 連接設備並插入一個可錄制的卡帶 1 選擇 LINE IN 作為錄制源 然後打開外部設 備 FM LINE IN 2 開始播放外部設備 請參閱外部設備隨附的說明書 3 開始錄制 同時 顯示屏上的 z REC指示燈點亮 若要停止錄制 按 z 按鈕 擦除磁帶 通過擦除磁帶的內容製作一個空白帶 1 選擇 磁帶 作為音源 2 開始擦除 同時 TAPE 若要手動停止錄制 按 按鈕 120821...

Page 31: ...度 0 35 WRMS 快速卷帶時間 約170秒 C 60卡帶 一般 揚聲器 3 5 inch 圓錐型x 2 揚聲器阻抗 8 Ω 輸出功率 10 W 10 W 10 THD 8 Ω 輸入端口 USB 可播放文件 MP3 WMA JPEG 兼容設備 大容量存儲設備 總線電源 DC5V 500 mA LINE IN 立體聲迷你 3 5mm 500mV 47kΩ 輸出端口 LINE IN 3 5 x 1 視頻輸出 x 1 音頻輸出 右 x 1 音頻輸出 左 x 1 Y 輸出 x 1 Pb Cb 輸出 x 1 Pr Cr 輸出 x 1 彩色制式 PAL NTSC 電源 AC 100 V 240 V 50 Hz 60 Hz 功率消耗 18 W 工作時 1 W 待機時 尺寸 140 mm x 209 mm x 208 mm 寬 高 深 重量 約4 1 kg 主機 1 7 kg 和揚聲器盒 2 4 kg...

Page 32: ...MEMO 120821 TY AS100TW indb 5 12 8 21 4 56 04 PM ...

Page 33: ...TOSHIBA LIFESTYLE ELECTRONICS TRADING CO LTD 5006900 120821 TY AS100TW indb 2 12 8 21 4 56 04 PM ...

Reviews: