All trademarks are acknowledged. Product design, specifications and colours are subject to change without
notice and may vary from those shown. Errors and omissions excepted.
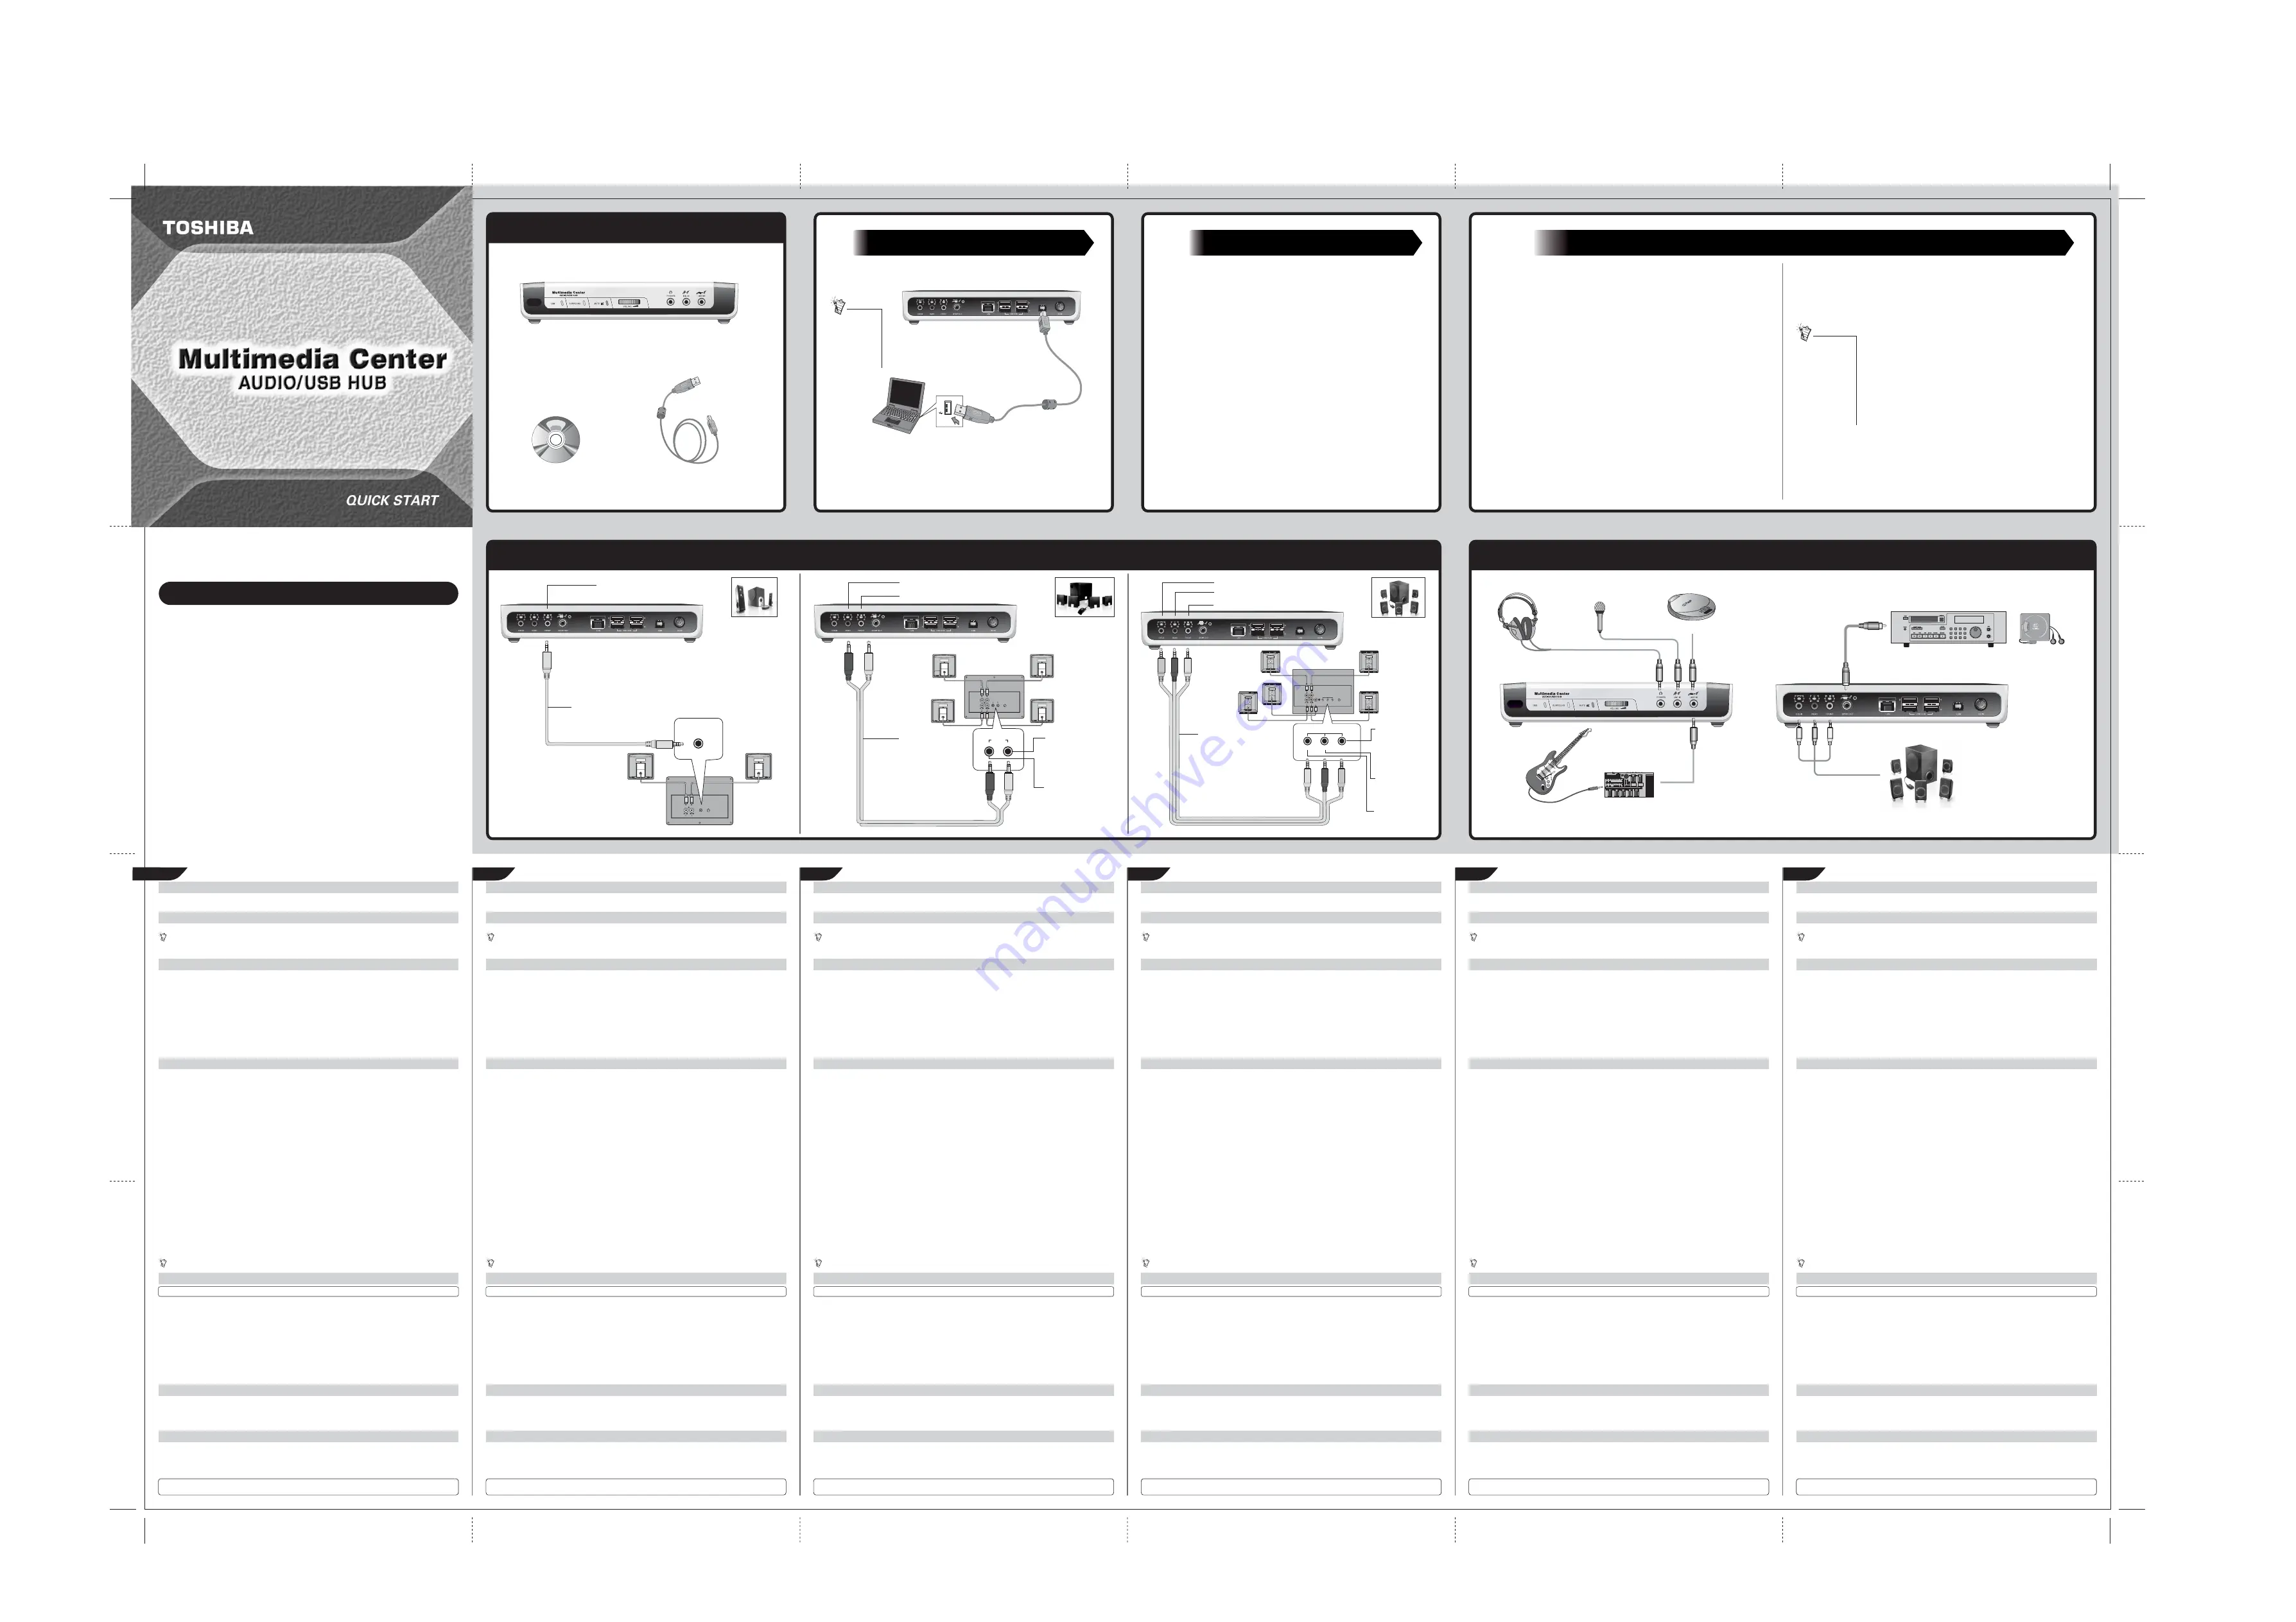
What you need
(b) Installation CD
(a) TOSHIBA Multimedia Center
(c) USB cable
1
Installing hardware
(b) USB port
(a) Notebook
computer
1
. Connect the USB cable to the USB port on your TOSHIBA Multimedia Center.
2
. Connect the other end of the USB cable to your computer.
USB port(s)
can be found
on the front,
side or back
panel of your
computer.
2
Installing software
Enabling Direct Memory Access and digital CD playback
You need to install device drivers and applications before
using your TOSHIBA Multimedia Center.
1. After you have installed your hardware, turn on your
computer. Windows automatically detects your audio device
and searches for device drivers.
2. When the
Found New Hardware Wizard
dialog box appears,
click the
Cancel
button.
3. Insert the TOSHIBA Multimedia Center Installation CD into
your CD-ROM/DVD-ROM drive. Your CD should start
automatically. If it does not, follow the steps below:
i. Start Windows Explorer.
ii. On the left pane, click the
My Computer
icon.
iii. Right-click the CD-ROM/DVD-ROM drive icon, and then
click
AutoPlay
.
4. Follow the instructions on the screen to complete the
installation.
5. When prompted, restart your computer.
3
For best performance, Direct Memory Access (DMA) needs to be
enabled for your storage devices. To enable DMA, follow the
instructions below. By default, DMA is already enabled in Windows XP.
To listen to audio CDs, digital CD playback must be enabled. To
enable digital CD playback follow the instructions below. CD
playback volume is controlled by the Wave/MP3 slider in the
Surround Mixer application. By default, digital CD playback is already
enabled in Windows XP.
1. Click
Start
→
Settings
→
Control Panel
or
Start
→
Control Panel.
2. In the
Control Panel
dialog box, double-click the
System
icon.
3. In the
System Properties
dialog box, click the
Hardware
tab.
4. Click the
Device Manager
button.
5. Double-click the
IDE ATA/ATAPI IDE Controllers
icon.
Your
IDE channels
will appear.
6. Right-click the
Primary IDE Channel
icon, and then click
Properties
.
7. In the
Properties
dialog box, click the
Advanced
Settings
tab.
8. Click the
Transfer Mode
box, and then click
DMA if
available
.
9. Click
the
OK
button.
10. Right-click the
Secondary IDE Channel
icon, click
Properties
, and then repeat steps 7 to 9.
1. Click
Start
→
Settings
→
Control Panel
or
Start
→
Control Panel.
2. In the
Control Panel
dialog box, double-click the
System
icon.
3. In the
System Properties
dialog box, click the
Hardware
tab.
4. Click the
Device Manager
button.
5. Double-click the
DVD/CD-ROM drives
icon. Your
computer drives will appear.
6. Right-click the
disk drive
icon, and then click
Properties
.
7. Click the
Properties
tab.
8. In the
Digital CD Playback
dialog box, click the
Enable
digital CD audio for this CD-ROM device
check box to
select it. Click the
OK
button.
To play CDs with
external CD-ROM/
DVD-ROM drives, the
analog audio out on
your external drive
needs to be
connected to the
Line In jack on your
TOSHIBA Multimedia
Center.
TOSHIBA Multimedia Center User's Guide
The TOSHIBA Multimedia Center User's Guide is full of useful information, tips and
instructions.
Go to
Start
→
Programs
or
All Programs
→
TOSHIBA
→
TOSHIBA Multimedia Center
→
Documentation
→
Online Manual
.
More Information
Connecting Analog Speakers
(e) Rear (Audio
Input)
jack
(b) 2 channel audio cable
(d) Front (Audio
Input)
jack
(c) 4 channel
audio
cable
(a) Front Out jack
(b) Front Out jack
(a) Rear Out jack
2.1 Speakers
4.1 Speakers
5.1 Speakers
(i) Gr
een
(i) Gr
een
(ii) Black
(ii) Black
(i) Gr
een
(i) Gr
een
(iii) Or
ange
(ii) Black
(iii) Or
ange
(ii) Black
front
rear
center/
subwoofer
audio
inputs
center
speaker
front
speakers
rear
speakers
din
(c) Front Out jack
(b) Rear Out jack
(a) Center/Subwoofer Out jack
(d) 5 channel
audio
cable
(f ) Rear (Audio
Input)
jack
(e) Center/
Subwoofer
(Audio Input)
jack
(g) Front (Audio
Input)
jack
Optional Connections
(b) Microphone
(a) Headphones
(d) Pre-amp FX box
(e) Electric guitar
(c) CD player
(f ) Digital Audio Tape recorder
(h) 5.1 Speakers
(g) MiniDisc
recorder
audio
inputs
speakers
din
audio
inputs
(i) Green
audio
inputs
front
speakers
rear
speakers
rear
front
din
rear
audio
inputs
front
(i) Gr
een
front
rear
center/
subwoofer
audio
inputs
FR
For best performance, Direct Memory Access (DMA) needs to be enabled for your storage devices. To enable DMA,
follow the instructions below. By default, DMA is already enabled in Windows XP.
1. Click
Start
→
Settings
→
Control Panel
or
Start
→
Control Panel.
2. In the
Control Panel
dialog box, double-click the
System
icon.
3. In the
System Properties
dialog box, click the
Hardware
tab.
4. Click the
Device Manager
button.
5. Double-click the
IDE ATA/ATAPI IDE Controllers
icon. Your
IDE channels
will appear.
6. Right-click the
Primary IDE Channel
icon, and then click
Properties
.
7. In the
Properties
dialog box, click the
Advanced Settings
tab.
8. Click the
Transfer Mode
box, and then click
DMA if available
.
9. Click
the
OK
button.
10. Right-click the
Secondary IDE Channel
icon, click
Properties
, and then repeat steps 7 to 9.
To listen to audio CDs, digital CD playback must be enabled. To enable digital CD playback follow the instructions
below. CD playback volume is controlled by the Wave/MP3 slider in the Surround Mixer application. By default,
digital CD playback is already enabled in Windows XP.
1. Click
Start
→
Settings
→
Control Panel
or
Start
→
Control Panel.
2. In the
Control Panel
dialog box, double-click the
System
icon.
3. In the
System Properties
dialog box, click the
Hardware
tab.
4. Click the
Device Manager
button.
5. Double-click the
DVD/CD-ROM drives
icon. Your computer drives will appear.
6. Right-click the
disk drive
icon, and then click
Properties
.
7. Click the
Properties
tab.
8. In the
Digital CD Playback
dialog box, click the
Enable digital CD audio for this CD-ROM device
check box to
select it. Click the
OK
button.
To play CDs with external CD-ROM/ DVD-ROM drives, the analog audio out on your external drive needs to be
connected to the Line In jack on your TOSHIBA Multimedia Center.
What you need
(a) TOSHIBA Multimedia Center
(c)
USB cable
(b) Installation CD
1 Installing your hardware
2 Installing software
3 Enabling Direct Memory Access and digital CD playback
(a) Notebook computer
(b) USB port
USB port(s) can be found on the front, side or back panel of your computer.
1. Connect the USB cable to the USB port on your TOSHIBA Multimedia Center.
2. Connect the other end of the USB cable to your computer.
You need to install device drivers and applications before using your TOSHIBA Multimedia Center.
1. After you have installed your hardware, turn on your computer. Windows automatically detects your audio
device and searches for device drivers.
2. When the
Found New Hardware Wizard
dialog box appears, click the
Cancel
button.
3. Insert the TOSHIBA Multimedia Center Installation CD into your CD-ROM/DVD-ROM drive.
Your CD should start automatically. If it does not, follow the steps below:
i. Start Windows Explorer.
ii. On the left pane, click the
My Computer
icon.
iii. Right-click the CD-ROM/DVD-ROM drive icon, and then click
AutoPlay
.
4. Follow the instructions on the screen to complete the installation.
5. When prompted, restart your computer.
Optional Connections
(a) Headphones
(e) Electric Guitar
(b) Microphone
(g) Digital Audio Tape recorder
(c)
CD player
(h) MiniDisc recorder
(d) Pre-amp FX box
(i)
5.1 speakers
Other Information
TOSHIBA Multimedia Center User's Guide
The TOSHIBA Multimedia Center User's Guide is full of useful information, tips and instructions.
Go to
Start
→
Programs
or
All Programs
→
TOSHIBA
→
TOSHIBA Multimedia Center
→
Documentation
→
Online Manual
.
All trademarks are acknowledged. Product design, specifications and colours are subject to change without notice and may
vary from those shown. Errors and omissions excepted.
Connecting Speakers
(i) Green
(ii) Black
(iii) Orange
2.1 channel analog speakers
(a) FRONT jack
(b) 2 channel audio cable
4.1 channel analog speakers
(a)
REAR jack
(d) Front (Audio Input) jack
(b) FRONT jack
(e) Rear (Audio Input) jack
(c)
4 channel audio cable
5.1 channel analog speakers
(a) C/SUB jack
(e) 5 channel audio cable
(b) REAR jack
(f)
Center/Subwoofer (Audio Input) jack
(c) FRONT jack
(g) Rear (Audio Input) jack
(d) 9-pin DIN cable
(h) Front (Audio Input) jack
DE
For best performance, Direct Memory Access (DMA) needs to be enabled for your storage devices. To enable DMA,
follow the instructions below. By default, DMA is already enabled in Windows XP.
1. Click
Start
→
Settings
→
Control Panel
or
Start
→
Control Panel.
2. In the
Control Panel
dialog box, double-click the
System
icon.
3. In the
System Properties
dialog box, click the
Hardware
tab.
4. Click the
Device Manager
button.
5. Double-click the
IDE ATA/ATAPI IDE Controllers
icon. Your
IDE channels
will appear.
6. Right-click the
Primary IDE Channel
icon, and then click
Properties
.
7. In the
Properties
dialog box, click the
Advanced Settings
tab.
8. Click the
Transfer Mode
box, and then click
DMA if available
.
9. Click
the
OK
button.
10. Right-click the
Secondary IDE Channel
icon, click
Properties
, and then repeat steps 7 to 9.
To listen to audio CDs, digital CD playback must be enabled. To enable digital CD playback follow the instructions
below. CD playback volume is controlled by the Wave/MP3 slider in the Surround Mixer application. By default,
digital CD playback is already enabled in Windows XP.
1. Click
Start
→
Settings
→
Control Panel
or
Start
→
Control Panel.
2. In the
Control Panel
dialog box, double-click the
System
icon.
3. In the
System Properties
dialog box, click the
Hardware
tab.
4. Click the
Device Manager
button.
5. Double-click the
DVD/CD-ROM drives
icon. Your computer drives will appear.
6. Right-click the
disk drive
icon, and then click
Properties
.
7. Click the
Properties
tab.
8. In the
Digital CD Playback
dialog box, click the
Enable digital CD audio for this CD-ROM device
check box to
select it. Click the
OK
button.
To play CDs with external CD-ROM/ DVD-ROM drives, the analog audio out on your external drive needs to be
connected to the Line In jack on your TOSHIBA Multimedia Center.
What you need
(a) TOSHIBA Multimedia Center
(c)
USB cable
(b) Installation CD
1 Installing your hardware
2 Installing software
3 Enabling Direct Memory Access and digital CD playback
(a) Notebook computer
(b) USB port
USB port(s) can be found on the front, side or back panel of your computer.
1. Connect the USB cable to the USB port on your TOSHIBA Multimedia Center.
2. Connect the other end of the USB cable to your computer.
You need to install device drivers and applications before using your TOSHIBA Multimedia Center.
1. After you have installed your hardware, turn on your computer. Windows automatically detects your audio
device and searches for device drivers.
2. When the
Found New Hardware Wizard
dialog box appears, click the
Cancel
button.
3. Insert the TOSHIBA Multimedia Center Installation CD into your CD-ROM/DVD-ROM drive.
Your CD should start automatically. If it does not, follow the steps below:
i. Start Windows Explorer.
ii. On the left pane, click the
My Computer
icon.
iii. Right-click the CD-ROM/DVD-ROM drive icon, and then click
AutoPlay
.
4. Follow the instructions on the screen to complete the installation.
5. When prompted, restart your computer.
Optional Connections
(a) Headphones
(e) Electric Guitar
(b) Microphone
(g) Digital Audio Tape recorder
(c)
CD player
(h) MiniDisc recorder
(d) Pre-amp FX box
(i)
5.1 speakers
Other Information
TOSHIBA Multimedia Center User's Guide
The TOSHIBA Multimedia Center User's Guide is full of useful information, tips and instructions.
Go to
Start
→
Programs
or
All Programs
→
TOSHIBA
→
TOSHIBA Multimedia Center
→
Documentation
→
Online Manual
.
All trademarks are acknowledged. Product design, specifications and colours are subject to change without notice and may
vary from those shown. Errors and omissions excepted.
Connecting Speakers
(i) Green
(ii) Black
(iii) Orange
2.1 channel analog speakers
(a) FRONT jack
(b) 2 channel audio cable
4.1 channel analog speakers
(a)
REAR jack
(d) Front (Audio Input) jack
(b) FRONT jack
(e) Rear (Audio Input) jack
(c)
4 channel audio cable
5.1 channel analog speakers
(a) C/SUB jack
(e) 5 channel audio cable
(b) REAR jack
(f)
Center/Subwoofer (Audio Input) jack
(c) FRONT jack
(g) Rear (Audio Input) jack
(d) 9-pin DIN cable
(h) Front (Audio Input) jack
IT
For best performance, Direct Memory Access (DMA) needs to be enabled for your storage devices. To enable DMA,
follow the instructions below. By default, DMA is already enabled in Windows XP.
1. Click
Start
→
Settings
→
Control Panel
or
Start
→
Control Panel.
2. In the
Control Panel
dialog box, double-click the
System
icon.
3. In the
System Properties
dialog box, click the
Hardware
tab.
4. Click the
Device Manager
button.
5. Double-click the
IDE ATA/ATAPI IDE Controllers
icon. Your
IDE channels
will appear.
6. Right-click the
Primary IDE Channel
icon, and then click
Properties
.
7. In the
Properties
dialog box, click the
Advanced Settings
tab.
8. Click the
Transfer Mode
box, and then click
DMA if available
.
9. Click
the
OK
button.
10. Right-click the
Secondary IDE Channel
icon, click
Properties
, and then repeat steps 7 to 9.
To listen to audio CDs, digital CD playback must be enabled. To enable digital CD playback follow the instructions
below. CD playback volume is controlled by the Wave/MP3 slider in the Surround Mixer application. By default,
digital CD playback is already enabled in Windows XP.
1. Click
Start
→
Settings
→
Control Panel
or
Start
→
Control Panel.
2. In the
Control Panel
dialog box, double-click the
System
icon.
3. In the
System Properties
dialog box, click the
Hardware
tab.
4. Click the
Device Manager
button.
5. Double-click the
DVD/CD-ROM drives
icon. Your computer drives will appear.
6. Right-click the
disk drive
icon, and then click
Properties
.
7. Click the
Properties
tab.
8. In the
Digital CD Playback
dialog box, click the
Enable digital CD audio for this CD-ROM device
check box to
select it. Click the
OK
button.
To play CDs with external CD-ROM/ DVD-ROM drives, the analog audio out on your external drive needs to be
connected to the Line In jack on your TOSHIBA Multimedia Center.
What you need
(a) TOSHIBA Multimedia Center
(c)
USB cable
(b) Installation CD
1 Installing your hardware
2 Installing software
3 Enabling Direct Memory Access and digital CD playback
(a) Notebook computer
(b) USB port
USB port(s) can be found on the front, side or back panel of your computer.
1. Connect the USB cable to the USB port on your TOSHIBA Multimedia Center.
2. Connect the other end of the USB cable to your computer.
You need to install device drivers and applications before using your TOSHIBA Multimedia Center.
1. After you have installed your hardware, turn on your computer. Windows automatically detects your audio
device and searches for device drivers.
2. When the
Found New Hardware Wizard
dialog box appears, click the
Cancel
button.
3. Insert the TOSHIBA Multimedia Center Installation CD into your CD-ROM/DVD-ROM drive.
Your CD should start automatically. If it does not, follow the steps below:
i. Start Windows Explorer.
ii. On the left pane, click the
My Computer
icon.
iii. Right-click the CD-ROM/DVD-ROM drive icon, and then click
AutoPlay
.
4. Follow the instructions on the screen to complete the installation.
5. When prompted, restart your computer.
Optional Connections
(a) Headphones
(e) Electric Guitar
(b) Microphone
(g) Digital Audio Tape recorder
(c)
CD player
(h) MiniDisc recorder
(d) Pre-amp FX box
(i)
5.1 speakers
Other Information
TOSHIBA Multimedia Center User's Guide
The TOSHIBA Multimedia Center User's Guide is full of useful information, tips and instructions.
Go to
Start
→
Programs
or
All Programs
→
TOSHIBA
→
TOSHIBA Multimedia Center
→
Documentation
→
Online Manual
.
All trademarks are acknowledged. Product design, specifications and colours are subject to change without notice and may
vary from those shown. Errors and omissions excepted.
Connecting Speakers
(i) Green
(ii) Black
(iii) Orange
2.1 channel analog speakers
(a) FRONT jack
(b) 2 channel audio cable
4.1 channel analog speakers
(a)
REAR jack
(d) Front (Audio Input) jack
(b) FRONT jack
(e) Rear (Audio Input) jack
(c)
4 channel audio cable
5.1 channel analog speakers
(a) C/SUB jack
(e) 5 channel audio cable
(b) REAR jack
(f)
Center/Subwoofer (Audio Input) jack
(c) FRONT jack
(g) Rear (Audio Input) jack
(d) 9-pin DIN cable
(h) Front (Audio Input) jack
ES
For best performance, Direct Memory Access (DMA) needs to be enabled for your storage devices. To enable DMA,
follow the instructions below. By default, DMA is already enabled in Windows XP.
1. Click
Start
→
Settings
→
Control Panel
or
Start
→
Control Panel.
2. In the
Control Panel
dialog box, double-click the
System
icon.
3. In the
System Properties
dialog box, click the
Hardware
tab.
4. Click the
Device Manager
button.
5. Double-click the
IDE ATA/ATAPI IDE Controllers
icon. Your
IDE channels
will appear.
6. Right-click the
Primary IDE Channel
icon, and then click
Properties
.
7. In the
Properties
dialog box, click the
Advanced Settings
tab.
8. Click the
Transfer Mode
box, and then click
DMA if available
.
9. Click
the
OK
button.
10. Right-click the
Secondary IDE Channel
icon, click
Properties
, and then repeat steps 7 to 9.
To listen to audio CDs, digital CD playback must be enabled. To enable digital CD playback follow the instructions
below. CD playback volume is controlled by the Wave/MP3 slider in the Surround Mixer application. By default,
digital CD playback is already enabled in Windows XP.
1. Click
Start
→
Settings
→
Control Panel
or
Start
→
Control Panel.
2. In the
Control Panel
dialog box, double-click the
System
icon.
3. In the
System Properties
dialog box, click the
Hardware
tab.
4. Click the
Device Manager
button.
5. Double-click the
DVD/CD-ROM drives
icon. Your computer drives will appear.
6. Right-click the
disk drive
icon, and then click
Properties
.
7. Click the
Properties
tab.
8. In the
Digital CD Playback
dialog box, click the
Enable digital CD audio for this CD-ROM device
check box to
select it. Click the
OK
button.
To play CDs with external CD-ROM/ DVD-ROM drives, the analog audio out on your external drive needs to be
connected to the Line In jack on your TOSHIBA Multimedia Center.
What you need
(a) TOSHIBA Multimedia Center
(c)
USB cable
(b) Installation CD
1 Installing your hardware
2 Installing software
3 Enabling Direct Memory Access and digital CD playback
(a) Notebook computer
(b) USB port
USB port(s) can be found on the front, side or back panel of your computer.
1. Connect the USB cable to the USB port on your TOSHIBA Multimedia Center.
2. Connect the other end of the USB cable to your computer.
You need to install device drivers and applications before using your TOSHIBA Multimedia Center.
1. After you have installed your hardware, turn on your computer. Windows automatically detects your audio
device and searches for device drivers.
2. When the
Found New Hardware Wizard
dialog box appears, click the
Cancel
button.
3. Insert the TOSHIBA Multimedia Center Installation CD into your CD-ROM/DVD-ROM drive.
Your CD should start automatically. If it does not, follow the steps below:
i. Start Windows Explorer.
ii. On the left pane, click the
My Computer
icon.
iii. Right-click the CD-ROM/DVD-ROM drive icon, and then click
AutoPlay
.
4. Follow the instructions on the screen to complete the installation.
5. When prompted, restart your computer.
Optional Connections
(a) Headphones
(e) Electric Guitar
(b) Microphone
(g) Digital Audio Tape recorder
(c)
CD player
(h) MiniDisc recorder
(d) Pre-amp FX box
(i)
5.1 speakers
Other Information
TOSHIBA Multimedia Center User's Guide
The TOSHIBA Multimedia Center User's Guide is full of useful information, tips and instructions.
Go to
Start
→
Programs
or
All Programs
→
TOSHIBA
→
TOSHIBA Multimedia Center
→
Documentation
→
Online Manual
.
All trademarks are acknowledged. Product design, specifications and colours are subject to change without notice and may
vary from those shown. Errors and omissions excepted.
Connecting Speakers
(i) Green
(ii) Black
(iii) Orange
2.1 channel analog speakers
(a) FRONT jack
(b) 2 channel audio cable
4.1 channel analog speakers
(a)
REAR jack
(d) Front (Audio Input) jack
(b) FRONT jack
(e) Rear (Audio Input) jack
(c)
4 channel audio cable
5.1 channel analog speakers
(a) C/SUB jack
(e) 5 channel audio cable
(b) REAR jack
(f)
Center/Subwoofer (Audio Input) jack
(c) FRONT jack
(g) Rear (Audio Input) jack
(d) 9-pin DIN cable
(h) Front (Audio Input) jack
PT
For best performance, Direct Memory Access (DMA) needs to be enabled for your storage devices. To enable DMA,
follow the instructions below. By default, DMA is already enabled in Windows XP.
1. Click
Start
→
Settings
→
Control Panel
or
Start
→
Control Panel.
2. In the
Control Panel
dialog box, double-click the
System
icon.
3. In the
System Properties
dialog box, click the
Hardware
tab.
4. Click the
Device Manager
button.
5. Double-click the
IDE ATA/ATAPI IDE Controllers
icon. Your
IDE channels
will appear.
6. Right-click the
Primary IDE Channel
icon, and then click
Properties
.
7. In the
Properties
dialog box, click the
Advanced Settings
tab.
8. Click the
Transfer Mode
box, and then click
DMA if available
.
9. Click
the
OK
button.
10. Right-click the
Secondary IDE Channel
icon, click
Properties
, and then repeat steps 7 to 9.
To listen to audio CDs, digital CD playback must be enabled. To enable digital CD playback follow the instructions
below. CD playback volume is controlled by the Wave/MP3 slider in the Surround Mixer application. By default,
digital CD playback is already enabled in Windows XP.
1. Click
Start
→
Settings
→
Control Panel
or
Start
→
Control Panel.
2. In the
Control Panel
dialog box, double-click the
System
icon.
3. In the
System Properties
dialog box, click the
Hardware
tab.
4. Click the
Device Manager
button.
5. Double-click the
DVD/CD-ROM drives
icon. Your computer drives will appear.
6. Right-click the
disk drive
icon, and then click
Properties
.
7. Click the
Properties
tab.
8. In the
Digital CD Playback
dialog box, click the
Enable digital CD audio for this CD-ROM device
check box to
select it. Click the
OK
button.
To play CDs with external CD-ROM/ DVD-ROM drives, the analog audio out on your external drive needs to be
connected to the Line In jack on your TOSHIBA Multimedia Center.
What you need
(a) TOSHIBA Multimedia Center
(c)
USB cable
(b) Installation CD
1 Installing your hardware
2 Installing software
3 Enabling Direct Memory Access and digital CD playback
(a) Notebook computer
(b) USB port
USB port(s) can be found on the front, side or back panel of your computer.
1. Connect the USB cable to the USB port on your TOSHIBA Multimedia Center.
2. Connect the other end of the USB cable to your computer.
You need to install device drivers and applications before using your TOSHIBA Multimedia Center.
1. After you have installed your hardware, turn on your computer. Windows automatically detects your audio
device and searches for device drivers.
2. When the
Found New Hardware Wizard
dialog box appears, click the
Cancel
button.
3. Insert the TOSHIBA Multimedia Center Installation CD into your CD-ROM/DVD-ROM drive.
Your CD should start automatically. If it does not, follow the steps below:
i. Start Windows Explorer.
ii. On the left pane, click the
My Computer
icon.
iii. Right-click the CD-ROM/DVD-ROM drive icon, and then click
AutoPlay
.
4. Follow the instructions on the screen to complete the installation.
5. When prompted, restart your computer.
Optional Connections
(a) Headphones
(e) Electric Guitar
(b) Microphone
(g) Digital Audio Tape recorder
(c)
CD player
(h) MiniDisc recorder
(d) Pre-amp FX box
(i)
5.1 speakers
Other Information
TOSHIBA Multimedia Center User's Guide
The TOSHIBA Multimedia Center User's Guide is full of useful information, tips and instructions.
Go to
Start
→
Programs
or
All Programs
→
TOSHIBA
→
TOSHIBA Multimedia Center
→
Documentation
→
Online Manual
.
All trademarks are acknowledged. Product design, specifications and colours are subject to change without notice and may
vary from those shown. Errors and omissions excepted.
Connecting Speakers
(i) Green
(ii) Black
(iii) Orange
2.1 channel analog speakers
(a) FRONT jack
(b) 2 channel audio cable
4.1 channel analog speakers
(a)
REAR jack
(d) Front (Audio Input) jack
(b) FRONT jack
(e) Rear (Audio Input) jack
(c)
4 channel audio cable
5.1 channel analog speakers
(a) C/SUB jack
(e) 5 channel audio cable
(b) REAR jack
(f)
Center/Subwoofer (Audio Input) jack
(c) FRONT jack
(g) Rear (Audio Input) jack
(d) 9-pin DIN cable
(h) Front (Audio Input) jack
NL
For best performance, Direct Memory Access (DMA) needs to be enabled for your storage devices. To enable DMA,
follow the instructions below. By default, DMA is already enabled in Windows XP.
1. Click
Start
→
Settings
→
Control Panel
or
Start
→
Control Panel.
2. In the
Control Panel
dialog box, double-click the
System
icon.
3. In the
System Properties
dialog box, click the
Hardware
tab.
4. Click the
Device Manager
button.
5. Double-click the
IDE ATA/ATAPI IDE Controllers
icon. Your
IDE channels
will appear.
6. Right-click the
Primary IDE Channel
icon, and then click
Properties
.
7. In the
Properties
dialog box, click the
Advanced Settings
tab.
8. Click the
Transfer Mode
box, and then click
DMA if available
.
9. Click
the
OK
button.
10. Right-click the
Secondary IDE Channel
icon, click
Properties
, and then repeat steps 7 to 9.
To listen to audio CDs, digital CD playback must be enabled. To enable digital CD playback follow the instructions
below. CD playback volume is controlled by the Wave/MP3 slider in the Surround Mixer application. By default,
digital CD playback is already enabled in Windows XP.
1. Click
Start
→
Settings
→
Control Panel
or
Start
→
Control Panel.
2. In the
Control Panel
dialog box, double-click the
System
icon.
3. In the
System Properties
dialog box, click the
Hardware
tab.
4. Click the
Device Manager
button.
5. Double-click the
DVD/CD-ROM drives
icon. Your computer drives will appear.
6. Right-click the
disk drive
icon, and then click
Properties
.
7. Click the
Properties
tab.
8. In the
Digital CD Playback
dialog box, click the
Enable digital CD audio for this CD-ROM device
check box to
select it. Click the
OK
button.
To play CDs with external CD-ROM/ DVD-ROM drives, the analog audio out on your external drive needs to be
connected to the Line In jack on your TOSHIBA Multimedia Center.
What you need
(a) TOSHIBA Multimedia Center
(c)
USB cable
(b) Installation CD
1 Installing your hardware
2 Installing software
3 Enabling Direct Memory Access and digital CD playback
(a) Notebook computer
(b) USB port
USB port(s) can be found on the front, side or back panel of your computer.
1. Connect the USB cable to the USB port on your TOSHIBA Multimedia Center.
2. Connect the other end of the USB cable to your computer.
You need to install device drivers and applications before using your TOSHIBA Multimedia Center.
1. After you have installed your hardware, turn on your computer. Windows automatically detects your audio
device and searches for device drivers.
2. When the
Found New Hardware Wizard
dialog box appears, click the
Cancel
button.
3. Insert the TOSHIBA Multimedia Center Installation CD into your CD-ROM/DVD-ROM drive.
Your CD should start automatically. If it does not, follow the steps below:
i. Start Windows Explorer.
ii. On the left pane, click the
My Computer
icon.
iii. Right-click the CD-ROM/DVD-ROM drive icon, and then click
AutoPlay
.
4. Follow the instructions on the screen to complete the installation.
5. When prompted, restart your computer.
Optional Connections
(a) Headphones
(e) Electric Guitar
(b) Microphone
(g) Digital Audio Tape recorder
(c)
CD player
(h) MiniDisc recorder
(d) Pre-amp FX box
(i)
5.1 speakers
Other Information
TOSHIBA Multimedia Center User's Guide
The TOSHIBA Multimedia Center User's Guide is full of useful information, tips and instructions.
Go to
Start
→
Programs
or
All Programs
→
TOSHIBA
→
TOSHIBA Multimedia Center
→
Documentation
→
Online Manual
.
All trademarks are acknowledged. Product design, specifications and colours are subject to change without notice and may
vary from those shown. Errors and omissions excepted.
Connecting Speakers
(i) Green
(ii) Black
(iii) Orange
2.1 channel analog speakers
(a) FRONT jack
(b) 2 channel audio cable
4.1 channel analog speakers
(a)
REAR jack
(d) Front (Audio Input) jack
(b) FRONT jack
(e) Rear (Audio Input) jack
(c)
4 channel audio cable
5.1 channel analog speakers
(a) C/SUB jack
(e) 5 channel audio cable
(b) REAR jack
(f)
Center/Subwoofer (Audio Input) jack
(c) FRONT jack
(g) Rear (Audio Input) jack
(d) 9-pin DIN cable
(h) Front (Audio Input) jack