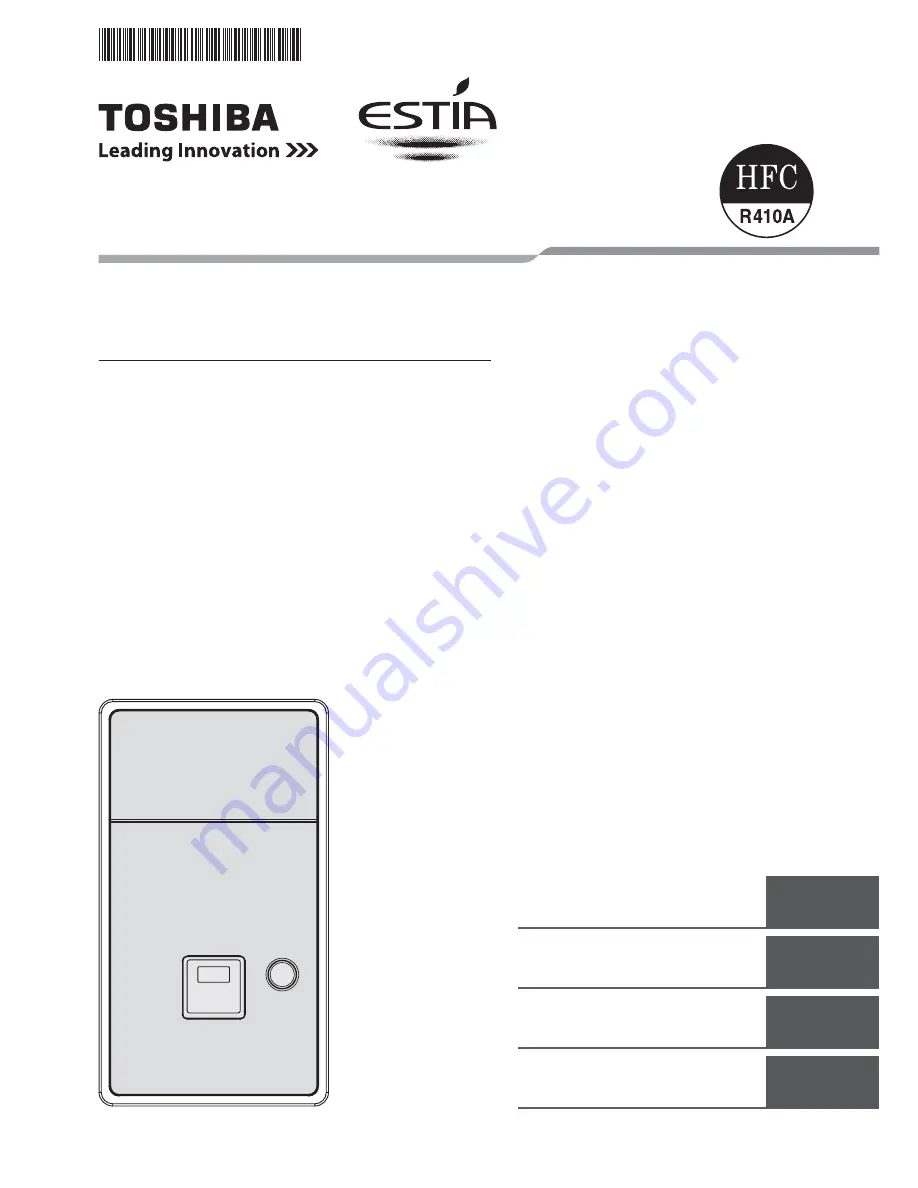
background image

Installation manual
Hydro Unit 

(Air to Water Heat Pump)

2

English

AIR TO WATER HEAT PUMP

Hydro Unit

Model name:

HWS-802XWHM3-E
HWS-802XWHT6-E
HWS-1402XWHM3-E
HWS-1402XWHT6-E
HWS-1402XWHT9-E

Manuel d’installation
Unité hydroélectrique

(Pompe à chaleur air/eau)

44

Français

Installations-handbuch
Hydrogerät

(Luft-Wasser-Wärmepumpe)

86

Deutsch

Installationshandbok
Hydroenhet

(Luft-till-vatten-värmepump)

128

Svenska

Installation manual

Summary of Contents for ESTIA HWS-1402XWHM3-E

Page 1: ... 802XWHM3 E HWS 802XWHT6 E HWS 1402XWHM3 E HWS 1402XWHT6 E HWS 1402XWHT9 E Manuel d installation Unité hydroélectrique Pompe à chaleur air eau 44 Français Installations handbuch Hydrogerät Luft Wasser Wärmepumpe 86 Deutsch Installationshandbok Hydroenhet Luft till vatten värmepump 128 Svenska Installation manual ...

Page 2: ...OR TEMPERATURE MONITORING FUNCTION 39 12 TROUBLESHOOTING 40 Please read this Installation Manual carefully before installing the Air to Water Heat Pump This Manual describes the installation method of the hydro unit For installation of the outdoor unit follow the Installation Manual attached to the outdoor unit ADOPTION OF NEW REFRIGERANT This Air to Water Heat Pump is a new type which adopts a ne...

Page 3: ...0 10 0 11 0 Input kW 2 13 3 52 4 08 EER 2 82 2 84 2 69 Power supply 230 V Refrigerant R410A Dimension HxWxD mm 890 x 900 x 320 1 340 x 900 x 320 Hydro Unit HWS 802XWHM3 E HWS 802XWHT6 E HWS 1402XWHM3 E HWS 1402XWHT6 E HWS 1402XWHT9 E Back up heater capacity 3 kW 6 kW 3 kW 6 kW 9 kW Power supply for backup heater 230 V 400 V 3N 230 V 400 V 3N 400 V 3N for hot water cylinder heater option 230 V Leav...

Page 4: ...t name Prescribed specification Heating Radiator s Fan coil s Under floor heating Heating Cooling all rooms Fan coil s Heating Cooling partly heating only Motorized 2 way valve for cooling Refer to Control parts specifications on page 23 Hot water supply Hot water cylinder Motorized 3 way valve Earth leakage breaker Refer to Control parts specifications on page 23 150 L HWS 1501CSHM3 E HWS 1501CSH...

Page 5: ...e of a recharge of refrigerant ask service personnel for details of the leak and confirmation of the repairs completed The refrigerant used in the system is harmless Generally the refrigerant does not leak however if the refrigerant should leak into a room and a heater or stove burner in the room is lit toxic gas may be generated Do not install the system in a location subject to a risk of exposur...

Page 6: ... of the unit To avoid personal injury with sharp edges be careful when handling parts Perform installation work properly in accordance with the installation manual Inappropriate installation may result in water leaks electric shock or fire Tighten all flare nuts with a torque wrench in the specified manner Excessive tightening of the flare nut may result in cracking of the pipe work or flare nut w...

Page 7: ...ig 5 01 TTW M M M Fan Coil Units Cooling or Heating Isolating Ball Valves Strainer 40 mesh 0 4 mm Diverting 3 Way Valve for Sanitary Hot Water Tank Radiators Heating Only 2 Way Valve Control 2 Way Valve 2 Way Valve Alternative to Radiators Under floor Heating Heating Only 2 Way Valve Control Indirect Sanitary Hot Water Tank Drain Cock for water Charge and Drain Use it when do not operate cooling U...

Page 8: ... Valves Service Strainer 40 mesh 0 4 mm Diverting 3 Way Valve for Sanitary Hot Water Tank Drain Cock for water Charge and Drain Zone 1 Fan Coil Unit Heating or Cooling Temperature Regulating Valve Mechanical Hi Pressure By Pass Valve Indirect Sanitary Hot Water Tank Mixing 3 Way Valve for Under Floor Heating External Pump for Under Floor Heating Motorized 2 Way Valve is required if fan coil units ...

Page 9: ...erature sensor for refrigerant TC 8 Temperature sensor for water inlet TWI 9 Drain nipple 10 Water inlet connection 11 Refrigerant liquid connection 12 Air relief valve 13 Pressure relief valve 0 3 MPa 3 bar 14 Thermal protector auto 15 Temperature sensor for water outlet THO 16 Thermal protector Single operation 17 Water pump 18 Backup heater 3 kW 3 kW x 2 3 kW x 3 19 Manometer 20 Water outlet co...

Page 10: ...ayout Fig 6 02 Relay P C board MCC 1217 Option Relay P C board MCC 1217 Option Relay P C board MCC 1431 MG SW RY04 MG SW RY02 Relay P C board MCC 1214 Option P C board MCC 1511 Trans former Relay RY06 MG SW RY05 Relay RY01 Relay RY03 Fuse 9 EN ...

Page 11: ... place where combustible gas may leak Do not install the Hydro Unit in a place exposed to rain or water Do not install the Hydro Unit near equipment which generates heat Do not install the Hydro Unit to a movable object Do not install the Hydro Unit in a place exposed to vibration Handling Unpacking and Checking the Hydro Unit The unit should be checked when it is delivered and any damage reported...

Page 12: ...7 on page 19 The height of the pipe must be 7 m or less Service space Secure a service space for the Hydro Unit Do not install the Hydro Unit in a place where heat stagnates Mounting Install M10 bolts at the positions shown below and secure them with nuts Fig 7 02 H 7 m Fig 7 03 200 mm 100 mm 500 mm 350 mm 500 mm Fig 7 04 380 mm 960 mm M10 11 EN ...

Page 13: ...he Hydro Unit can be highly heated therefore the installing surface must be heat resistant Install the Hydro Unit so that its tilting angle falls within the range below Fig 7 05 380 860 M10 M10 Remove the M5a screws to detach the fixing angles Secure the Hydro Unit with plain washers and nuts Fig 7 06 Fig 7 07 1 Fig 7 08 1 Fig 7 09 12 EN ...

Page 14: ...nvasion of dust and water Ensure all pipe work connections are tightened to the required torque settings detailed in this section Perform an air tight using Oxygen Free Nitrogen OFN only Evacuate the air in the pipe work using a vacuum pump Check for refrigerant gas leaks at all connections throughout the pipe work NOTE The Air to Water Heat Pump system uses R410A refrigerant It is important that ...

Page 15: ...ers to tighten the flare nut connections to the required torque Water Pipe WARNING Install water pipes according to the regulations of respective countries Install water pipes in a freeze free place Make sure that water pipes have sufficient pressure resistance The setting value of the pressure relief valve is 0 3 MPa CAUTION Do not use zinc plated water pipes When steel pipes are used insulate bo...

Page 16: ... Hydro Unit Make the piping route a closed circuit An open water circuit may cause a failure Fig 7 11 Hot water outlet connection 1 1 4 Water inlet connection 1 1 4 Attention To avoid water leak exchange the seal tapes to new one Attention Water used at test in factory before shipping may be found in the caps Fig 7 12 Local arrangement Isolating Ball Valve Strainer 30 to 40 meshes Drain cock for w...

Page 17: ...he motorized mixing valve Refer to Control parts specifications on page 23 Checking water volume and initial pressure of expansion vessel The expansion vessel of the Hydro Unit has a capacity of 12 liters The initial pressure of the expansion vessel is 0 1 MPa 1 bar The pressure of the safety valve is 0 3 MPa 3 bar Verify whether the capacity of the expansion vessel is sufficient using the followi...

Page 18: ...ssure value abs is obtained by adding the atmospheric pressure 0 1 MPa 1 bar to the gauge pressure Tank selection method Install an external expansion vessel when the capacity of the expansion vessel is insufficient Water temperature and expansion coefficient Hot water temperature C Expansion rate Hot water temperature C Expansion rate 0 0 0002 50 0 0121 4 0 0000 55 0 0145 5 0 0000 60 0 0171 10 0 ...

Page 19: ...50 60 65 SW1 SW2 SW3 Fig 7 16 Flow rate min Hydraulic heat exchanger 14 kW QH characteristics Pump head m Out of Operation Range Minimum flow rate 0 1 2 3 4 5 6 7 8 10 15 25 20 30 SW1 SW2 SW3 Flow rate min Pump head m Hydraulic heat exchanger 8 kW QH characteristics Minimum flow rate Out of Operation Range Fig 7 17 18 EN ...

Page 20: ...ll out air in the pump and tighten again Loosen the cap of the pressure relief valve to release air Water may come out of the pressure relief valve Release the air completely from the water circuit Failure to do so may disable correct operation Water quality The water used must satisfy EN directive 98 83 EC Piping insulation It is recommended that insulation treatment be applied to all pipes To pe...

Page 21: ...and an earth leakage protection device The Hydro Unit must be connected to the mains power supply using a isolating switch which disconnects all poles and has a contact separation of at least 3 mm The cord clamps attached to the Hydro Unit must be used to secure the electrical cables Wrong connection of electrical cables may result in electrical component failure or fire Ensure the electrical cabl...

Page 22: ...oiler operation local Defrost output local Compressor operation output local Max 12 m non voltage 0 75 mm or more Temp sensor for 2 zone control Max 5 m shield wire 0 75 mm or more 2Way Valve for cooling stop 3Way Valve for hot water cylinder Fig 7 20 6B 6A 6D 6C TF1 TB 06 11 12 13 TB 01 Don t apply 220 240V or breakdown will occur TTW 31 32 L TB 03 HOT WATER CYLINDER L TB 02 N 1 3 2 L2 L1 L3 N WP...

Page 23: ...3 line 100 mA 12 m 0 75 mm or more or TB04 2 zone thermo sensor 2 line 100 mA 5 m 0 75 mm or more TB06 Cylinder thermo sensor 2 GND shield wire 100 mA 5 m 0 75 mm or more TB06 Second remote controller 2 line 50 mA 50 m 0 75 mm or more TB07 Power Maximum current Type Motorized 3 way valve for hot water AC 230 V 100 mA Spring return type Note 3 wire SPST and SPDT type can be used by changing DIP swi...

Page 24: ... commencing work The Outdoor Unit to Hydro Unit interconnecting cable must be sized in accordance with refer to Electrical supply cable specifications Connect the Outdoor Unit to Hydro Unit interconnecting cable as shown in the diagram above Defrost Output Non voltage contacts 0 5 A AC230 V 12 m 1 A DC24 V 12 m Description Input Maximum length Emergency stop control Non voltage 12 m Cylinder therm...

Page 25: ...e the external booster heater is installed and set up in accordance with all Local National and International regulations Connect the external booster heater to the Hydro Unit in accordance with the diagram shown below Connect the coil of the field supplied contactor to terminals 5 6 on Terminal Block 05 The contactor will energize in the event of low ambient conditions A separate dedicated electr...

Page 26: ...heating Connect the 3 way diverter valve to terminals 7 8 and 9 on Terminal Block 05 Connect the 3 way diverter valve in accordance with the diagram below SW13 1 Type 1 2 wire spring return OFF Type 2 3 wire SPST OFF Type 3 3 wire SPDT ON 7 8 9 Fig 7 25 7 8 9 Fig 7 26 7 8 9 Fig 7 27 Type 1 SPRING RETURN Type 2 SPST Type 3 SPDT port A to Hot water cylinder port AB to Hydro unit port B to Room heati...

Page 27: ...l Block 03 Neutral conductor Terminal N on Terminal Block 03 Earth Conductor Earth terminal on Terminal Block 03 Connect the hot water cylinder heater to the Hydro Unit as shown below Live conductor to hot water cylinder Terminal 1 on Terminal Block 03 Neutral conductor to hot water cylinder Terminal 2 on Terminal Block 03 Earth conductor to hot water cylinder Earth terminal on Terminal Block 03 E...

Page 28: ...PERATION on MCC 1217 TB Refer to Fig 7 32 Boiler Control Output L2 Boiler drive permission output Output enabled when outdoor ambient temperature 10 C Volt free contact specification shown below AC230 V 0 5 A maximum DC24 V 1 A maximum Connection details Terminals 3 and 4 EMG on MCC 1217 TB Refer to Fig 7 32 Fig 7 31 Hydro unit PJ20 CN208 TCB PCIN3E 4 3 L2 2 1 L1 Fig 7 32 Local Supply Power Supply...

Page 29: ...fer to Fig 7 33 Compressor operation output Display relay is ON with outdoor unit compressor operation Volt free contact AC230 V 0 5 A maximum DC24 V 1 A maximum Connection details Terminals 3 and 4 EMG on MCC 1217 TB Refer to Fig 7 33 PJ20 CN209 TCB PCIN3E 4 3 L2 2 1 L1 Fig 7 33 Local Supply Power Supply Power Supply Display Relay K1 Display Relay K2 Connection Cable OPERATION EMG Defrost output ...

Page 30: ...pplied Volt free contacts Connection details Cooling Connection Terminals 3 COM and 2 COOL on TCB PCMO3E Refer to Fig 7 34 Heating Connection Terminals 3 COM and 1 HEAT on TCB PCMO3E Refer to Fig 7 34 Thermostat operation CAUTION Be sure to prepare a non voltage continuous contact for each terminal Supplementary Insulation must be added to user touchable part of switches Emergency Shutdown input S...

Page 31: ...l safety checks should be completed by a qualified electrician All results measured should comply with your local national electrical installation regulations Earth continuity test On completion of the electrical installation a resistance test should be completed on the earth conductor to ensure continuity between all pieces of equipment on the earth conductor Insulation resistance test This test ...

Page 32: ...ot operate 2 Hot water cylinder heater operation Operate OFF ON Not operate 3 Booster heater operation Operate OFF ON Not operate SW12 Description Switch mode Default setting 1 Hot water supply operation Valid OFF ON Invalid 2 Zone 1 operation Valid OFF ON Invalid 3 Zone 2 operation Invalid OFF ON Valid SW13 Description Switch mode Default setting 1 Type of motorized 3 way valve 2 wire spring retu...

Page 33: ...ttons CODE No 01 to 91 3 Set data DATA with the TIME buttons 4 Press the SET button to determine the settings 5 The CL button is enabled only before the SET button is pressed and the function code is changed 6 Press the TEST button to end the settings Setting Remote Controller Function Code 1 Press the TEST CL TEMP buttons for four seconds or more to enter the remote controller function code setti...

Page 34: ...on and target temperature retention period Make this control setting according to regulations and rules of respective countries 6 Setting Priority Mode Temperature Set the outside air temperature that changes the preferred operation mode Hot Water Heating Switching Temperature Heating operation takes precedence when the temperature lowers the set temperature Boiler HP Switching Temperature When th...

Page 35: ...rts A and B of the 3 way valve are wrongly attached and it cannot be rectified on site 13 Mixing valve types and setting Set the time period from full close to full open of the 2 zone control mixing valve Set a value that is 1 10 of the actual time 14 Setting Heating Hot Water Switching when Boiler Is Used function code 3E When boiler is used make this setting to operate the Hydro Unit by the inst...

Page 36: ...re compensation start outside air temperature 24 0 20 to 10 C 1 02 Compensation temperature 25 3 0 to 15 Degree 1 4 Hot Water Boost 01 Operation time x 10 min 08 6 3 to 18 Minute 1 x10 02 Setting temperature 09 75 40 to 80 C 1 5 Anti bacteria 01 Setting temperature 0A 75 70 to 80 C 1 02 Operation cycle 0D 7 1 to 10 Day 1 03 Start time 0C 22 0 to 23 Hour 1 04 Operation time 0B 30 0 to 60 Minute 1 6...

Page 37: ...way valve operation control Activating 2 way valve for cooling 01 0 Activated during cooling 1 Not activated during cooling 3C 0 0 1 Select 13 2 zone mixing valve drive time Previous drive time x 10 seconds 0C 6 60 sec 3 to 24 30 to 240 sec 1 x10 14 Boiler operates synchronized with heat pump 01 0 Synchronized 1 Not synchronized 3E 0 0 1 Select 15 Maximum operation time of hot water heat pump 01 M...

Page 38: ...e Hydro Unit board to OFF Refer to page 32 Connect the power supply unit for the hot water cylinder heater to terminals TB03 L and N of the Hydro Unit Connect cables between the Hydro Unit and the hot water cylinder as follows Hydro Unit terminals TB03 1 2 and earth Hot water cylinder 1 2 and earth TB06 A B and earth Hot water cylinder A B and earth Settings for 2 zone temperature control Procure ...

Page 39: ...Check that the air bite sound disappears Check that the hydraulic pressure has become the predetermined pressure 0 1 to 0 2 MPa 1 to 2 bar If the hydraulic pressure is insufficient replenish water Heating operation starts Check that the hydro unit starts heating Press the OPERATE MODE button and select cooling Cooling operation starts Check that the hydro unit starts cooling and that the floor hea...

Page 40: ...tion The sensor sensing temperature is displayed on the remote controller This function allows you to make sure whether the sensor is installed properly Press the TEST CL buttons for four seconds or more Select the function code with the TEMP buttons Press the TEST button to exit the test mode Function code Location Indication 06 Hydro unit Return water temperature C 08 Hot water temperature C 09 ...

Page 41: ... tank capacity compared to total water amount If it is insufficient install another expansion tank Expansion tank failure Check the air pressure Alarm indication Alarm description and generation reset conditions E03 Regular communication error between hydro unit and remote controller system controller If there is no regular communication from the remote controller for three minutes the hydro unit ...

Page 42: ... be reset F30 Onboard expansion IC defect This alarm is not reset automatically L07 Group line in an hydro unit This alarm is checked during initial communication immediately after power on This alarm occurs immediately after operation start This alarm is not reset automatically This alarm is inhibited while the unit is not working but occurs again after the unit operates L09 Hydro unit capacity h...

Page 43: ... or phase loss is detected H06 Low pressure system defect Ps pressure sensor defect or low pressure protective operation L29 Other outdoor unit faults Other outdoor unit faults 1 Inter MCU communication error between IPDU and CDB 2 abnormal GBT heatsink temperature L31 Phase sequence error etc When phase sequence of 3 phase power supply is incorrect thermostat OFF operation continued etc P03 Abnor...

Page 44: ...EF99804301 3 ...

Reviews: