background image

‡§√◊ËÕß´—°ºâ“Õ—µ‚π¡—µ‘

AW-8

5

70S

S

‡§√◊ËÕß´—°ºâ“Õ—µ‚π¡—µ‘

AW-8

5

70S

M

Thank you for purchasing TOSHIBA Fully Automatic
Washing Machine.

Please read this manual carefully in order to operate
the machine properly.

Sometimes you may find some water remaining in

the drainage hose at your first operation. This is
caused by the production-line test and nothing to
worry about.

CONTENTS

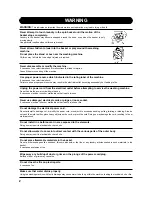
WARNING ................................................................ 2

CAUTION ................................................................ 3

DESCRIPTION OF PARTS ...................................... 3

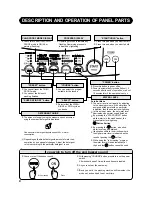
DESCRIPTION AND OPERATION

OF PANEL PARTS ................................................... 4

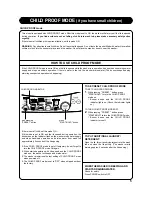
CHILD PROOF MODE ............................................ 5

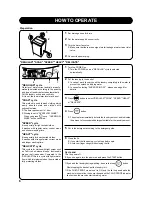
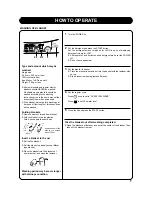
HOW TO OPERATE ............................................ 6~7

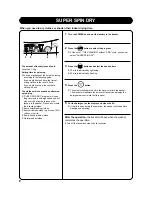
SUPER SPIN DRY ................................................... 8

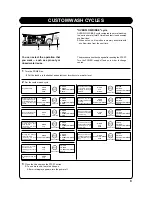
CUSTOM WASH CYCLES ....................................... 9

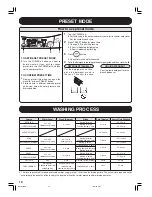
PRESET MODE ..................................................... 10

WASHING PROCESS ............................................ 10

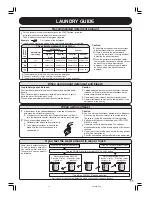
LAUNDRY GUIDE .................................................. 11

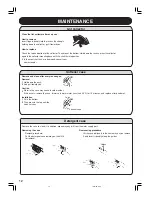
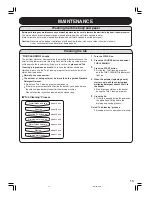
MAINTENANCE ..................................................... 13

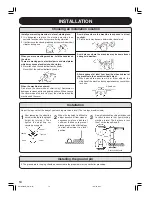
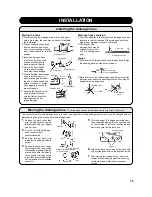
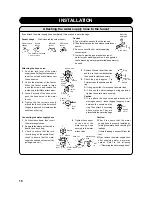
INSTALLATION ............................................... 14~17

BEFORE CALLING THE SERVICEMAN ........ 18~19

HANDLING METHOD FOR EMERGENCY ........... 19

SPECIFICATIONS .................................................. 19

Thank you for purchasing TOSHIBA Fully Automatic
Washing Machine.

Please read this manual carefully in order to operate
the machine properly.

Sometimes you may find some water remaining in

the drainage hose at your first operation. This is
caused by the production-line test and nothing to
worry about.

FULLY AUTOMATIC

WASHING MACHINE

‡§√◊ËÕß´—°ºâ“Õ—µ‚π¡—µ‘

OWNER'S MANUAL

‡§√◊ËÕß´—°ºâ“Õ—µ‚π¡—µ‘

Summary of Contents for AW-8570SM

Page 1: ...NEL PARTS 4 CHILD PROOF MODE 5 HOW TO OPERATE 6 7 SUPER SPIN DRY 8 CUSTOM WASH CYCLES 9 PRESET MODE 10 WASHING PROCESS 10 LAUNDRY GUIDE 11 MAINTENANCE 13 INSTALLATION 14 17 BEFORE CALLING THE SERVICEMAN 18 19 HANDLING METHOD FOR EMERGENCY 19 SPECIFICATIONS 19 Thank you for purchasing TOSHIBA Fully Automatic Washing Machine Please read this manual carefully in order to operate the machine properly ...

Page 2: ...ck or malfunctions that lead to injuries Never use damaged electrical cords or plugs or loose socket It can cause electrical shock or malfunctions that lead to injuries or fire Do not damage the electrical power cord Do not attempt to damage cut or modify the power cord or subject it to excessive bending pulling twisting or binding Also do not yank the metal portion place heavy objects on the cord...

Page 3: ...out the power plug if you do not plan to use the machine for a long time Failure to do so may result in electrical shock or shorts due to deterioration of the insulation Do not place the hands or other objects under the washing machine while in operation Moving parts may cause injury Before use make sure the faucet in open and the connection with water supply hose is not loose or leakage water Loo...

Page 4: ...n select the program suitable for the laundry SELECT button Select either the WASH RINSE or SPIN cycle as you desire POWER button Press this button to power off on Power is automatically turned off about 15 seconds after the end of operation or about 10 minutes later if the operation is not on SUPER SPIN DRY button WATER LEVEL Auto Set Mode The water level is set linearly by adjusting to the washi...

Page 5: ... to ON and the lid opened during operation the buzzer beeps the indicator flashes the washer stops water supply and stops wash spin operation and drains water from wash tub approximately 5 seconds of the lid opening If the CHILD PROOF mode is set off temporary do not forget to turn the CHILD PROOF mode ON again When started operation with lid opened and the CHILD PROOF mode on the washer will beep...

Page 6: ... blouse fashionable dress or soft jeans wear Compared to the REGULAR this is a cycle with lighter water flow which is implemented on the principle of fully protecting clothes 1 Turn the POWER on Turn the POWER on and REGULAR cycle is selected automatically 2 Put the laundry in the basket In case of much laundry soak the laundry completely in the water to prevent the splash on feeding water In case...

Page 7: ...e the blanket into the blanket net hem side first and close the fastener Washing period may become longer with drainage condition 1 Turn the POWER on 2 Put the detergent and press the START button Put the detergent amount matches for HIGH in spite of displaying detergent volume for LOW After operate 3 and 4 minutes and a detergent melts cut the POWER off Do not use soap powder 3 Put the blanket in...

Page 8: ...operation the washer will stop before washing and spinning After the operation the buzzer will beep when the washer completes the operation Turn off the faucet and clean the lint collector 4 1 2 3 The amount of laundry once of spin Less than 1 5 kg Setting time for spinning You can manually set the time of spinning according to the following guide If you would like to shorten the time of drying cl...

Page 9: ... SPIN WASH RINSE OVERFLOW RINSE SPIN WASH RINSE OVERFLOW RINSE SPIN WASH RINSE OVERFLOW RINSE SPIN WASH RINSE OVERFLOW RINSE SPIN WASH RINSE OVERFLOW RINSE SPIN WASH RINSE OVERFLOW RINSE SPIN WASH RINSE OVERFLOW RINSE SPIN WASH only RINSE only RINSE OVERFLOW RINSE SPIN only DRAIN only WASH and RINSE WASH RINSE OVERFLOW RINSE WASH SPIN RINSE and SPIN RINSE OVERFLOW RINSE SPIN WASH RINSE OVERFLOW RI...

Page 10: ...PEED HEAVY OVERFLOW RINSE DELICATE TUB CLEANING Water Level 23L 48L stepless auto setting 23L 48L stepless auto setting 23L 48L stepless auto setting 23L 48L stepless auto setting 38L No indicator Depend on water level exceeding 48L Wash Approx 9 13 min 69 73 min Soaking 60 min 2 6 min 12 15 min 6 min Supply of water and rotation 5 min Soaking in water 20 min Rinse Rinsing 2 times Rinsing 2 times ...

Page 11: ...Pour liquid detergent into the bleach dispenser with watered down double Pour it into the bleach dispenser slowly being careful not to split it while the water fills for the wash cycle When using powered bleach add it directly into the basket Caution Colored and dyed fabrics may lose their color if washed in bleach so be sure to consult the instructions on the bleach container before washing Do no...

Page 12: ...er every ten usages Removal 1 Hold down the each 2 And pull toward you Installation 1 Fit in the bottom 2 Then press in the top until the catch catches Caution Water in the case may freeze in cold weather If this occurs remove the case immerse in warm water less than 40 C for 10 minutes and replace after dried well Softener case Catch 12 12 06 9 55 12 Detergent case Remove the case to clean it In ...

Page 13: ...e soap powder The amount of detergent must be more than the guided Standard Detergent Amount Do not use Tub Cleaning program continuously If there is a great amount of dirt inside the basket you had better use the chlorine type basket cleaner for the washing machine Please follow the instruction labeled on the cleaner bag L Tub Cleaning Process 1 Turn the POWER on 2 Press the COURSE button and sel...

Page 14: ... weather Allow a space of at least 5 cm from the sides and rear of the machine to the nearest vertical object When placed too near to walls or other objects the vibration of the machine during operation may cause them to shake Installation Adjust the legs so that the body of your washing machine is level The two legs are adjustable After loosening the adjusting nut adjust the leg to the proper hei...

Page 15: ... a wash pan or onto a drain pipe the hook may be moved to facilitate the installation When hooking the hose hook into the slot provided on the body of your washing machine move the hook back to its initial position Insert the drainage hose in as far as it will go then use the accessory hose band to secure it tightly Secure the hose tightly An improperly secured hose may cause leakage When attachin...

Page 16: ...ding above methods They are preventable the water leakage Connecting the water supply hose 1 Pull the sleeve down then insert the water supply hose 2 Separate the sleeve until a click is heard then push it up 3 Check to ensure that the lock lever is hung on the nozzle Next check to ensure that the water supply hose does not come off by pulling down on it 4 Tighten the hose nut on the end of the wa...

Page 17: ...is frozen 1 Remove the water supply hose and pour in warm water under 40 C 2 Fill warm water under 40 C into the basket until the pulsator is completely covered Leave it for 30 minutes Then check to see whether the pulsator can be turned by hand under 40 C Water intake valve Filter INSTALLATION Installing the bottom cover Put the bottom cover into the bottom of the washing machine and fix the bott...

Page 18: ...gged Is there not the inclination of the laundry Is your washing machine installed on an incline or uneven surface Is the water faucet turned on Is the water supply frozen or shut Is the inlet net of the water intake valve choked with dust Is the lid opened Pull out power supply plug and call serviceman for repair Open and close the lid once and then press the START button Please repair the inclin...

Page 19: ...by water retained by the machine for the purpose of maintaining balance and do not indicate malfunction Spinning rate of fully automatic washing machine is lower than that of twin tub washing machine Sometimes spinning is uneven like thick parts of blanket There are a short pause before the machine begins to spin as the drainage valve opens sufficienty You may hear intermittent motor sound coon so...

Page 20: ...6248085701 MANUFACTURED BY TOSHIBA CONSUMER PRODUCTS THAILAND CO LTD ...

Reviews: