background image

Owner's Record
You will find the model number and serial 
number on the back of the TV. Record these 
numbers in the spaces provided below. Refer 
to them whenever you call upon your TOSHIBA 
dealer regarding this product.

Model number:

Serial number:

24L3965
32L3965 

HTTEMK721020

Summary of Contents for 24L3965

Page 1: ...del number and serial number on the back of the TV Record these numbers in the spaces provided below Refer to them whenever you call upon your TOSHIBA dealer regarding this product Model number Serial number 24L3965 32L3965 HTTEMK721020 ...

Page 2: ... Connecting with an HDMI ARC cable 9 Connecting with an HDMI cable 9 Common Interface 9 Connecting with an USB cable 9 Remote Control 10 Buttons on the Remote Control 10 Installing Batteries in the Remote Control 11 Remote Control Operation Range 11 General Operation 12 Turning the TV on for the First Time 12 Selecting the Input Source 12 Using the Live TV 12 Guide 12 Schedule List 13 PVR T Shift ...

Page 3: ...slots and openings in the cabinet Never place the TV so that it is facing upward or on its side Never place the TV in a closet bookcase or other similar area where the ventilation is poor Never drape a newspaper tablecloth or curtain on the TV When installing the TV against a wall always keep the TV at least 10cm away from the wall Never place the TV on a soft unstable surface such as a carpet or ...

Page 4: ...ling the TV to prevent an injury Contact a service technician for inspection and repair 4 When the TV reaches the end of its useful life ask a qualified service technician to properly dispose of the TV Cleaning CAUTION Avoid using chemicals such as air refreshers cleaning agents etc on or near the TV pedestal Studies indicate that plastics may weaken and crack over time from the combination effect...

Page 5: ...er the TV s main board is exchanged during service If the time information is incorrect programmeed recording may not be performed properly Furthermore if the time information differs according to the currently viewed channel programmeed recording may not be performed properly depending on tuning operations Exemptions Toshiba is not liable for any damage caused by fires natural disaster such as th...

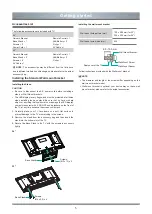
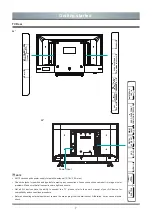
Page 6: ...ket Installing the Stand or Wall mount bracket Wall mount hole pattern mm 100 x 200 mm for 32 200 x 200 mm for 24 Wall mount screw size mm M6 Rear cover of the TV Wall Mount Spacer Wall Mount Screw Wall Mount Bracket 8 0 10 0 mm Follow instructions provided with the Wall mount bracket NOTE The diameter and length of the screws differ depending on the wall mount bracket model Wall mount bracket is ...

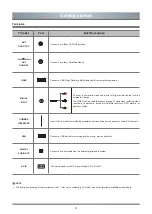
Page 7: ...joystick button forward and backward to control the channel TV Front 24 Joystick button Remote sensor Power indicator Standby Single button Standby Source Remote sensor Power indicator Item Description Remote sensor Receive remote signals from the remote control Do not put anything near the sensor as its function may be affected Power indicator The light is red in standby mode the light is green i...

Page 8: ...a TV please refer to the user s manual of your A V device for compatibility and connections procedure Before connecting external equipment remove the mains plug from the wall socket Otherwise it may cause electric shock 32 24 13 18V 500mA ARC HDMI 1 HDMI 2 ANT 2 DVB S S2 ANT 1 DVB T T2 C MINI AV INPUT CARD FACE FRONT COMMON INTERFACE AC IN DIGITAL AUDIO OUT USB 5V 500mA DVB T T2 C DVB S S2 COMMON ...

Page 9: ...o connect a range of equipment including video recorders camcorders decoders satellite receivers DVD players or games consoles COMMON INTERFACE Insert the CI module for watching scrambled services like pay tv channels or some HD channels USB Connect a USB device for browsing photos music movies and texts DIGITAL AUDIO OUT Connect an optical cable from an external digital audio system AC IN Connect...

Page 10: ... broadcast may be recordable After programming the TV to record digital broadcasting do not disconnect the power plug before recording starts Should video or audio recording fail due to malfunction of the TV or poor reception no compensation shall be paid Connecting with an HDMI ARC cable Connect an HDMI cable from an external digital audio system ARC enables the TV to directly output the digital ...

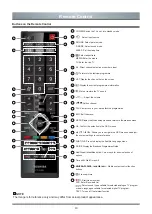
Page 11: ...e TV sound 10 Adjust the volume 11 P Switch channel 12 FAV Fast access to your saved favorite programmes 13 EXIT Exit the menu 14 MENU Display the Quick setup menu and returns to the previous menu 15 OK Confirm the selection in the OSD menus 16 Allows you to navigate the OSD menus and adjust the system settings to your preference 17 SUBTITLE Press to display the Subtitle Language menu 18 GUIDE Dis...

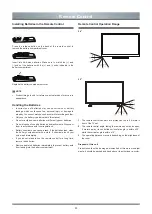
Page 12: ...dispose of used batteries as domestic waste Dispose of them in accordance with local regulations Battery chemicals can cause a rash If the batteries leak clean the battery compartment with a cloth If chemicals touch your skin wash immediately If you do not intend to use the remote control for a long time remove the batteries Remove depleted batteries immediately to prevent battery acid from leakin...

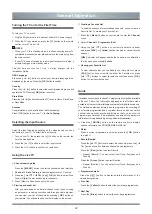
Page 13: ... button on your remote You will see the channel list display on the screen Creating a Favorite List To quickly access your most watched channels you can create a Favorite List To create your Favorite List 1 Press the Menu button on your remote to enter the Channel menu 2 Select Channel Programme Edit 3 Using the button on your remote select a channel and press FAV or Yellow button can add or cance...

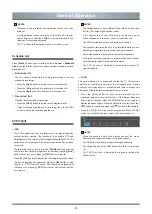
Page 14: ...to delete record programme list Select recorded programme in recording list press OK button to watch the recorded programme NOTES The storage space of your USB device should be no less than 2G for 15 minutes high definition video If the transfer rate of your hard disk is too slow a pop up notice will appear in this case you can try another one The PVR function doesn t support analogue channels The...

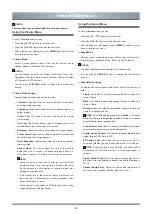
Page 15: ... selected format is different from the one of the TV transmission or video programme it can cause a difference in vision When using PC connected via HDMI terminal the moving image quality may be deteriorated Using the Sound Menu In each of Sound menu you can Press the button to select an item Press the OK button to enter the sub menu After finishing your adjustment press MENU button to return back...

Page 16: ...nu View the main menu list which connected to CEC device Using the Channel Menu Press the Menu button on your remote to enter the channel setting menu In each menu you can Press the button to select an item Press the OK button to enter the sub menu After finishing your adjustment press MENU button to return back to the previous menu Auto Tuning Automatically scan for channels to view programmes fr...

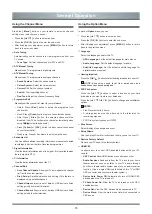
Page 17: ...ve any operation it will clear auto standby and reset the time Auto Sleep Select the TV standby time Off 3H 4H 5H This feature will vary by country Auto Sync Time Synchronization setting when Auto Sync is set to on the time provided by the programme is automatically synchronized each time you switch to the DTV programme And clock time cannot be modify manually Time Zone Select your location time z...

Page 18: ...ng of a DTV programme the transfer rate of the USB storage device must not be less than 5MB s File formats that may be supported NOTES Due to differences in programming tools and other factors some of the file formats that are listed may or may not be supported The format of the storage disk must be either FAT32 or NTFS Browsing Content To browse through content based on the type that you wish to ...

Page 19: ...TV set Turn off any appliances if interference goes away move appliance farther away from TV Insert the power plug of the TV set into another power outlet Sound and picture is blurry or cuts out momentarily If using an external antenna check the direction position and connection of the antenna Adjust the direction of your antenna or reset or fine tune the channel Horizontal vertical stripe on pict...

Page 20: ...ve Screen Size Diagonal 23 6 inches 32 inches Screen resolution 1366 768 1366 768 Audio power 4 W 4 W 8 W 8 W Power consumption 40 W 50 W Power supply AC 100V 240V 50 60Hz Standby Power 0 5W Receiving systems Analog PAL SECAM NTSC Digital DVB T T2 DVB C DVB S S2 Environmental conditions Temperature 5 C 45 C Humidity 20 80 RH Atmospheric pressure 86 kPa 106 kPa HDMI Input YUV 60 Hz 480 I 480 P 720 ...

Page 21: ...s 10Mbps N 9 MKV Mpeg1 2 4 mkv 1080P 30fps 20Mbps MPEG2 MP HL MPEG4 Simple Profile and Advanced Simple Profile Level 5 Y 10 H 264 mkv 1080P 30fps 20Mbps Main Profile and High Profile Level 4 0 Y 11 Motin JPEG mkv 680X480 30fps 10Mbps N 12 AVI Mpeg2 4 divx avi 1080P 30fps 20Mbps MPEG2 MP HL MPEG4 Simple Profile and Advanced Simple Profile Level 5 avi Y divx not support this container 13 H 264 divx ...

Page 22: ...HEAAC 48k 44 1k 32k 24k 22 05k 16k 4 WMA wma Bitrate 128bps 320Kbps Sampling Rate 8KHz 48KHz N supported bit rate 32 192 kbits s supported sampling frequency 48k 44 1k 32k 22 05k 16k 11 025k 8k Hz 5 WMA Pro wma 768Kbps Bit rate Sampling Rate 96KHz N supported bit rate 48 384 kbits s supported sampling frequency 48k 44 1k 32k 22 05k 16k 6 LPCM N A work with video files only Bitrate 64Kbps 1 5Mbps S...

Page 23: ...e 1024x768 6 00 6291456 Y Max Resolution 1024x768 3 jpg Base line 15360x8640 1920X8 1080X8 3 96 414720 Y Max Resolution 15360 8640 4 Progressive 1024x768 6 00 6291456 Y Max Resolution 1024x768 5 PNG png non interlace 9600x6400 3 66 3840000 Y Max Resolution 9600x6400 6 interlace 1200x800 3 66 3840000 Y Max Resolution 1280x800 7 BMP bmp 9600x6400 3 66 3840000 Y Max Resolution 9600x6400 Pixel Depth 1...

Page 24: ...NDER THE AVC PATENT PORTFOLIO LICENSE FOR THE PERSONAL AND NONCOMMERCIAL USE OF ACONSUMERTO I ENCODE VIDEO IN COMPLIANCE WITH THE AVC STANDARD AVC VIDEO AND OR II DECODE AVC VIDEO THAT WAS ENCODED BY A CONSUMER ENGAGED IN A PERSONAL AND NON COMMERCIAL ACTIVITY AND OR WAS OBTAINED FROM A VIDEO PROVIDER LICENSED TO PROVIDE AVC VIDEO NO LICENSE IS GRANTED OR SHALL BE IMPLIED FOR ANY OTHER USE ADDITIO...

Page 25: ...ssed out wheeled dust bin symbol By participating in separate collection of batteries you will help to assure the proper disposal of products and batteries and thus help to prevent potential negative consequences for the environment and human health For more detailed information about the collection and recycling programmes available in your country region please visit our website www toshiba eu r...

Reviews: