background image

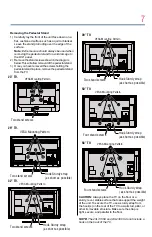
Note: To display a High Definition 

picture, the TV must be receiving a 

High Definition signal (such as an 

over-the-air High Definition TV 

broadcast, a High Definition digital 

cable program, or a High Definition 

digital satellite program). For details, 

contact your TV antenna installer, 

cable provider, or satellite provider

Leading Innovation


GMA300018011

06/13

Integrated High Definition 

LED Television User’s Guide:

23L1350U 23L2300U

29L1350U 32L2300U

32L1350U 39L2300U

39L1350U 50L2300U

50L1350U

58L1350U

If you need assistance:
Toshiba’s Support Web site 

support.toshiba.com

For more information, see 

“Troubleshooting” on page 108

 in this guide.

Owner’s Record

The model number and serial number are on the back and side of your 

TV.
Record these numbers in the spaces below. Refer to these numbers 

whenever you communicate with your Toshiba dealer about this TV
Model number: ___________________________________
Serial number: ___________________________________

Summary of Contents for 23L1350U

Page 1: ...inition LEDTelevisionUser sGuide 23L1350U 23L2300U 29L1350U 32L2300U 32L1350U 39L2300U 39L1350U 50L2300U 50L1350U 58L1350U If you need assistance Toshiba s Support Web site support toshiba com For more information see Troubleshooting on page 108 in this guide Owner s Record The model number and serial number are on the back and side of your TV Record these numbers in the spaces below Refer to thes...

Page 2: ... S NEC which provides guidelines for proper grounding and in particular specifies that the cable ground shall be connected to the grounding system of the building as close to the point of cable entry as practical For additional antenna grounding information see 33 on page 5 and 34 on page 5 Safety Precautions WARNING TO REDUCE THE RISK OF FIRE OR ELECTRIC SHOCK DO NOT EXPOSE THIS APPLIANCE TO RAIN...

Page 3: ...nal installation if you have any doubts about your ability to safely mount your television ALWAYS use a mount that has been recommended by the television manufacturer and has a safety certification by an independent laboratory such as UL CSA ETL ALWAYS follow all instructions supplied by the television and mount manufacturers ALWAYS make sure that the wall or ceiling where you are mounting the tel...

Page 4: ...ic shock or fire NEVER allow your body to come in contact with any broken glass or liquid from the damaged television The LCD panel inside theTV contains glass and a toxic liquid If the liquid comes in contact with your mouth or eyes or your skin is cut by broken glass rinse the affected area thoroughly with water and contact your doctor immediately ALWAYS contact a service technician to inspect t...

Page 5: ...from overheating and to help maintain reliable operation of theTV Leave a space of at least 4 four inches around theTV 29 Always leave a space of at least 4 four inches around theTV The slots and openings are provided to protect theTV from overheating and to help maintain reliable operation of theTV 30 Never allow anything to rest on or roll over the power cord and never place theTV where the powe...

Page 6: ...o follow this WARNING may result in death or serious injury Refer all servicing not specified in this manual to aToshibaAuthorized Service Provider 46 If you have theTV serviced Ask the service technician to use only replacement parts specified by the manufacturer Upon completion of service ask the service technician to perform routine safety checks to determine that theTV is in safe operating con...

Page 7: ... Pattern Four stand screws VESA Mounting Pattern CAUTION Always place the TV on the floor or a sturdy level stable surface that can support the weight of the unit To secure the TV use a sturdy strap from the hook s on the rear of the TV to a wall stud pillar or other immovable structure Make sure the strap is tight secure and parallel to the floor NOTE The 23L1350U and 23L2300U do not include a ho...

Page 8: ...n Changes or modifications to this equipment not expressly approved by Toshiba could void the user s authority to operate this equipment ENERGYSTAR UserInformation ENERGY STAR User Information Statement the factory default settings of this television meet ENERGY STAR requirements Changing Picture Settings may increase energy consumption possibly beyond the limits required for ENERGY STAR qualifica...

Page 9: ...following copyright Copyright 2003 by Bitstream Inc All Rights Reserved Bitstream Vera is a trademark of Bitstream Inc All other brand and product names are trademarks or registered trademarks of their respective companies Copyright This guide is copyrighted by ToshibaAmerica Information Systems Inc with all rights reserved Under the copyright laws this guide cannot be reproduced in any form witho...

Page 10: ...1 Chapter2 ConnectingYourTV 23 Overview of cable types 23 Coaxial F type cable 23 Standard A V cables red white yellow 24 Component video cables red green blue 24 HDMITM cable with HDMI Logo 24 Optical audio cable 25 Analog RGB 15 pin computer cable 25 3 5mm Stereo to RCA Y cable 25 About the connection illustrations 25 Connecting a VCR antenna cable TV or camcorder 26 ...

Page 11: ...theRemoteControl 42 Installing batteries 42 Remote control effective range 43 Learning about the remote control 44 Chapter4 MenuLayoutandNavigation 47 Main menu layout 47 Navigating the menu system 49 Chapter5 SettingupyourTV 50 Initial Setup 50 Installation setup selection 51 Storing channels in memory optional 52 Auto Tuning 52 Manual Tuning 54 Setting channel skip 54 Setting the AV input mode 5...

Page 12: ...g Channel Return 66 Switching between two channels using SurfLock 66 Selecting the picture size 67 Full 68 TheaterWide 1 68 TheaterWide 2 68 TheaterWide 3 69 Native 69 4 3 70 Normal 70 Dot by Dot 70 Scrolling the TheaterWide picture TheaterWide 2 and 3 only 71 Using the Auto Aspect feature 71 Using the 4 3 Stretch 72 Using the FREEZE feature 72 Adjusting the picture 73 Selecting the picture mode 7...

Page 13: ...rols for USA region 82 Blocking TV programs and movies by rating V Chip 82 Downloading an additional rating system 83 Displaying ratings 85 Unlocking programs temporarily 86 Using the input lock feature 86 Locking channels 87 Using the GameTimer 87 Using the panel lock feature 88 Using the PC settings feature 89 Setting the PC Audio 90 Using the Media Player 91 Auto Start function 92 To open the M...

Page 14: ...Using the advanced picture settings 104 ColorMaster 104 Base Color Adjustment 104 Color Temperature 105 Static Gamma 105 Brightness Sensor for 39 50L2300U and 39 50 58L1350U 105 DynaLight 106 Dynamic Contrast 106 Cinema Mode except for 58L1350U 106 ClearScan for 58L1350U 106 Noise Reduction 107 Chapter8 Troubleshooting 108 General troubleshooting 108 Picture problems 109 Sound problems 110 Remote ...

Page 15: ...ption 115 Audio power 115 Speaker type 116 Video audio terminals 116 Video audio input 116 ColorStream component video HD input 116 HDMITM input 116 Digital audio output 117 PC input 117 Dimensions 117 Weight Mass 117 Operating conditions 118 Supplied accessories 118 Acceptable signal formats for PC IN HDMITM 118 PC IN signal formats 118 HDMITM signal formats 119 AppendixB LicenseAgreement 120 ...

Page 16: ...hlighttheseinstructionsasfollows Indicates an imminently hazardous situation which if not avoided will result in death or serious injury Indicates a potentially hazardous situation which if not avoided could result in death or serious injury Indicates a potentially hazardous situation which if not avoided may result in minor or moderate injury Indicates a potentially hazardous situation which if n...

Page 17: ...ith Dolby Digital optical output form See Connecting a digital audio system on page 34 v Audyssey EQ andABXTM Audio technologies for clear well balancedsound see Audyssey technologies onpage80 v ColorMasterTM Allows you to adjust the TV s standard colors see ColorMaster on page 104 v Cinema Mode Shows film like quality movies see Cinema Mode except for 58L1350U on page 106 v DNR Dynamic Noise Redu...

Page 18: ...ngs are provided to protect the TV from overheating and to help maintain reliable operation of the TV 3 Do not plug in any power cords until after you have connected all cables and devices to your TV 4 Before connecting cables or devices to the TV learn the functions of the TV s connections and controls see Overview of cable types on page 23 5 Connect your other electronic device s to the TV see C...

Page 19: ...n when the TV power is On 2 Remote sensor embedded Point the remote control toward this remote sensor 3 POWER Turns the TV On Off If the TV stops responding to the buttons on the remote control or TV control panel and you cannot turn off the TV press and hold the POWER button on the TV control panel for a few seconds to reset the TV 4 ARROWS Adjust the volume level change the channel or change the...

Page 20: ...e POWER button on the TV control panel for a few seconds to reset the TV 4 ARROWS Adjust the volume level change the channel or change the input or source you are viewing depending on the mode which is selected by the CH INPUT button 5 CH INPUT Switches the function of the VOL buttons to select the volume channel or input mode In Volume mode the arrow buttons increase or decrease the volume In Cha...

Page 21: ...nals 2 ColorStream HD High resolution component video input and shared composite video input see Connecting a Blu ray DVD player satellite receiver with ColorStream or VCR on page 27 3 ANT CABLE Antenna input that supports analog NTSC and digital ATSC off air antenna signals and analog and digital cable TV QAM signals 4 ANALOGAUDIO OUT Analog audio outputs for connecting an audio amplifier 5 PC IN...

Page 22: ...site video input see Connecting a Blu ray DVD player satellite receiver with ColorStream or VCR on page 27 2 ANT CABLE Antenna input that supports analog NTSC and digital ATSC off air antenna signals and analog and digital cable TV QAM signals 3 PC IN Connects a personal computer 4 FIXEDAUDIO OUT Analog audio outputs for connecting an audio amplifier 5 PC HDMI 1 Audio IN PC audio input terminal is...

Page 23: ...You can purchase cables from most stores that sell audio video devices Coaxial F type cable Sample Illustration Coaxial cable Coaxial F type cable connects your antenna cable TV service and or cable converter box to theANT CABLE input on your TV Please tighten this connection by hand Using tools may damage the connection ...

Page 24: ...Component video cables come in sets of three and connect with video devices with component video output ColorStream is Toshiba s brand of component video These cables are typically color coded red green and blue Separate audio cables are required for a complete connection Component video cables provide better picture quality than composite video cables HDMITM cable withHDMILogo Sample Illustration...

Page 25: ...ts a computer to the to the TV s PC IN terminal see Connecting a computer on page 37 Separate audio cables are required 3 5mmStereotoRCAY cable Sample Illustration 3 5mm Stereo to RCA Y cable 3 5mm Stereo to RCAY cable connects an audio signal from DVI device to TV Abouttheconnectionillustrations You can connect different types and brands of devices to your TV in several different configurations T...

Page 26: ...ation 58L1350U Connecting to a VCR antenna or cable TV or camcorder Items needed v Coaxial cables v StandardAV cables If you have a mono VCR connect L MONO on the TV to your VCR s audio out terminal using the white audio cable only v Standard audio cable When you use a cable box you may not be able to use the remote control to program or access certain features on the TV When you use ColorStream H...

Page 27: ...utton on the remote control see Selecting the video input source on page 58 The unauthorized recording use distribution or revision of television programs videotapes DVDs and other materials is prohibited under the Copyright Laws of the United States and other countries and may subject you to civil and criminal liability ConnectingaBlu ray DVDplayer satellitereceiverwith ColorStream orVCR IN from ...

Page 28: ...eceiver to the COLOR STREAM HD terminal in the TV The COLOR STREAM HD terminal can be used to display Progressive 480p 720p and Interlaced 480i 1080i scan systems Please note that 1080p is not supported Check the User s Guide of the DVD player in order to determine the best output signal available v If your DVD player or satellite receiver does not have component video connect a standardA V cable ...

Page 29: ...ew the VCR or view and record antenna channels Turn on the VCR Tune the VCR to the channel you want to watch Select the VIDEO video input source on the TV To record a TV program while watching a DVD Turn on the VCR Tune the VCR to the channel to record Select the COLORSTREAM HD input source on the TV to view the DVD To select the video input source press the INPUT button on the remote control see ...

Page 30: ...lay various signal formats For detailed signal specifications see HDMITM signal formats on page 119 SupportedAudio format Linear PCM sampling rate 32 44 1 48 kHz To connect a computer to the HDMITM input see Connection to the TV s HDMITM terminal on page 39 To connect an HDMITM device you will need one HDMITM cable typeAconnector per HDMITM device v For proper operation it is recommended that you ...

Page 31: ...ource on page 58 To connect a DVI device you will need v HDMITM to DVI adapter cable For proper operation the length of an HDMITM to DVI adapter cable should not exceed 9 8 ft 3m The recommended length is 6 6 ft 2m v 3 5mm Stereo to RCAY cable An HDMITM to DVI adapter cable transfers video only Separate analog audio cables are required see illustration For more information see Setting the HDMITM a...

Page 32: ...tion 58L1350U DVI connections To ensure that the HDMITM or DVI device is reset properly v When turning on your electronic components turn on the TV first and then the HDMITM or DVI device v When turning off your electronic components turn off the HDMITM or DVI device first and then the TV Connecting an HDMITM or DVI device to the HDMITM input TV back panel VIDEO AUDIO L R R L OUT IN DVI HDCP OUT I...

Page 33: ...e TV HDMITM CECconnection You can control the basic functions of connected audio video devices using the TV s remote control if you connect a HDMITM CEC compatible audio receiver or playback device The HDMITM CEC Control feature uses CEC technology as regulated by the HDMITM standard TV back panel Audio Receiver Playback device HDMI CEC DVD Player etc TM Playback device HDMI CEC DVD Player etc TM ...

Page 34: ...ing up HDMITM CEC on page 101 v The connected devices must also be configured For details see the operation manual for each device v This feature uses the CEC technology as regulated by the HDMITM standard v This feature is limited to models incorporating Toshiba s HDMITM CEC However Toshiba is not liable for those operations Refer to the individual instruction manuals for compatibility informatio...

Page 35: ... Illustration L1350U L2300U Series except 58L1350U Connecting a digital audio system Sample Illustration 58L1350U Connecting a digital audio system To control the audio 1 Turn on the TV and the digital audio device 2 Press the MENU button on the remote control and open the Sound menu 3 Press the arrow buttons to select DigitalAudio Output and then press the ENTER button 4 Press the arrow buttons t...

Page 36: ...evel that may damage speakers or headphones THIS DAMAGE IS NOT COVERED BY YOUR WARRANTY v The DIGITAL AUDIO OUT terminal may not output some digital audio sources because of copy restrictions Connectingananalogaudiosystem This connection allows you to use external speakers with an external analog audio amplifier to adjust the sound level You will need standard audio cables TV back panel Audio syst...

Page 37: ...akers ConnectingacomputertotheTV sPCINterminal When connecting a computer to the PC IN terminal on the TV use an analog RGB 15 pin computer cable and a PC audio cable For more information see Overview of cable types on page 23 PC audio cable PC audio output Conversion adapter if necessary TV back panel Computer Sample Illustration L1350U L2300U Series except 58L1350U Connecting a computer through ...

Page 38: ...orrectly To display the optimum picture use the computer setting feature see Using the PC settings feature on page 89 v The PC audio input terminals on the TV are shared with the HDMI 1 analog audio input terminals For configuration information see Setting the PC Audio on page 90 v Some computer models cannot be connected to this TV v If the computer has a compatible mini D sub15 pin terminal an a...

Page 39: ... terminal use an HDMITM to DVI adapter cable and analog audio cables When connecting a computer with an HDMITM terminal use an HDMITM cable typeAconnector Separate analog audio cables may not be necessary depending on computer hardware and setup see Connecting an HDMITM or DVI device to the HDMITM input on page 30 PC audio cable PC audio output Conversion adapter if necessary TV back panel Compute...

Page 40: ...puter to the TV through the HDMITM terminal Sample Illustration L1350U L2300U Series except 58L1350U Connecting DVI to HDMITM terminal TV back panel Conversion adapter if necessary Computer PC audio cable PC audio output Conversion adapter if necessary TV back panel Side panel Computer ...

Page 41: ...ceptable signal formats for PC IN HDMITM on page 118 v The edges of the picture may be hidden v If receiving a 480i HDMITM 480p HDMITM 720p 1080i or 1080p signal program Native mode scales the video to display the entire picture within the borders of the screen i e no overscan Side panel Conversion adapter if necessary Computer HDMITM ...

Page 42: ...he remote control Squeeze tab and lift cover Sample Illustration Removing the remote back cover 2 Insert twoAAAbatteries corresponding to the and markings on the battery compartment Sample Illustration Installing the batteries 3 Replace the battery cover Do not expose batteries to excessive heat such as sunshine fire etc ...

Page 43: ...eries v Always replace both batteries with new ones Never mix battery types or use new and used batteries together v Always remove batteries from the remote if they are dead or if the remote control is not to be used for an extended period of time This prevents battery acid from leaking into the battery compartment Remotecontroleffectiverange For optimum performance aim the remote control directly...

Page 44: ... for operating the TV are described below For the HDMITM CEC remote control functions see HDMITM CEC playback device DVD player etc control on page 99 Sample Illustration Remote control overview The error message NOT AVAILABLE may appear if you press a button for a function that is not available HDMITM ...

Page 45: ...100 button allows you to enter two part channel numbers see Storing channels in memory optional onpage52ortoedittheFavoritesList see Favorites browser on page 62 8 The FAV button accesses the Favorites List in the Channel Browser see Favorites browser on page 62 9 The RECALL button displays TV status information 10 The CH arrow buttons cycle through programmed channels when no on screen menu is pr...

Page 46: ... HDMITM CEC compatible devices via HDMITM connection See Using HDMITM CEC on page 98 21 The STOP button stops playback of the loaded playback device 22 The PLAY button begins playback of the loaded playback device 23 The SKIP forward button skips forward to locate later DVD chapters 24 The FF button fast forwards the playback device Press during play mode to view the picture moving rapidly forward...

Page 47: ...is set to Store Mode at initial setup This option is hidden in the Home Mode NOTE When the TV is set to Store in the initial menu or Store in the Installation Menu the set will always reset to Store Picture Mode Reset Reverts to the factory defaults for the selected picture mode Backlight Adjusts Backlight Contrast Adjusts Contrast Brightness Adjusts Brightness Color AdjustsColor Tint AdjustsTint ...

Page 48: ...tup menu HDMI CEC Control Setup Opens HDMI CEC Control Setup menu HDMI CEC Player Control Opens HDMI CEC Player Control menu Input Options Opens Input Options menu Channel Browser Setup Opens Channel Browser Setup menu Power Management Opens Power Management menu Panel Lock On Off HDMIInformationDisplay On Off ParentalPINSetup OpensParentalPINSetupmenu ParentalControlandLocks OpensParentalControla...

Page 49: ...u system 1 Press the MENU button to open the menu system Sample Image Navigating the menu system 2 When a menu is open use the arrow buttons on the remote control to move in the corresponding direction in the menu 3 Press the ENTER button to save your menu settings or select a highlighted item Ahighlighted menu item appears in a different color in the menu 4 All menus close automatically if you do...

Page 50: ... Store Home Mode settings window appears 3 For normal home use press the arrow buttons to select Home and then press the ENTER button The ANT CABLE In setup window appears 4 Press the arrow buttons to select the input source Cable or Antenna and then press the ENTER button 5 Press the ENTER button to select Start Scan and continue with theAuto Tuning You must select a Language either Home Store mo...

Page 51: ...your preferred language Picture Options Installation Timers Get Help Installation Menu Language Time Zone Daylight Saving Time Store Home Mode Channel Turning Quick Setup Reset TV English Eastern Off Home English Français Español Sound Sample Image Selecting the menu language 3 PresstheEXITbuttontoclosetheInstallationmenu ANT CABLEIN This setting configures the input source for the ANT CABLE termi...

Page 52: ...e Cable or Antenna and then press the ENTER button to save your new settings Storingchannelsinmemory optional To make sure your TV stops only on the channels you want when you press the arrow buttons on the remote control or the control panel store those channels in the TV s memory AutoTuning You can set up the TV to detect all active channels in your area and store them in its memory Then you can...

Page 53: ... is normal however once channel programming is finished you should not have to repeat the programming process again unless your Cable TV service lineup changes significantly To program channels automatically 1 Configure the antenna input source if you have not already done so see ANT CABLE IN on page 51 2 PresstheMENUbuttonandopentheInstallationmenu 3 Highlight Channel Tuning and then press the EN...

Page 54: ... the programmed channels ManualTuning After storing channels in memory you can manually enter channels if the physical channel is known 1 PresstheMENUbuttonandopentheInstallationmenu 2 Highlight Channel Tuning and then press the ENTER button 3 Highlight Manual Tuning and then press the ENTER button the Manual Tuning form will appear 4 Use buttons 0 9 on the remote control to enter the channel numb...

Page 55: ...il you unlock them For information see Locking channels on page 87 To manually add digital sub channels on a physical channel v Use the Channel Numbers and the Dash 100 on the remote control to enter the channel number for example 56 1 If the channel is found the number will be added to the list and the box will be unchecked If the channel is not found a message appears Skipped channels cannot be ...

Page 56: ...Options and then press the ENTER button 3 Highlight PC HDMI 1Audio and then press the ENTER button 4 Press the arrow buttons and then press the ENTER button to set the HDMI 1 audio mode PC HDMI 1 See Connecting an HDMITM or DVI device to the HDMITM input on page 30 Sample Image HDMITM Audio mode selection Mode Description HDMI When viewing the HDMI 1 input digital audio from the HDMI input will be...

Page 57: ... select On or Off and then press the ENTER button Viewingthesystemstatus 1 In the Get Help menu highlight System Information and then press the ENTER button The related information appears To close the screen and return to the Get Help menu v Highlight Done in the Support Information screen and then press the ENTER button To return to normal viewing press the EXIT button ResettingFactoryDefaults T...

Page 58: ...he remote control or TV control panel 2 Do one of the following v Press 0 5 v Repeatedly press the arrow buttons on the remote control and then press the ENTER button to change the input setting v Repeatedly press the INPUT button to cycle through all the inputs Stop pressing the INPUT button when the desired input is selected ...

Page 59: ...TM input the HDMITM CEC icon appears If a HDMITM CEC device with HDMITM switching capability e g Audio Receiver is connected to the HDMITM input press the INPUT button on the remote control repeatedly to highlight HDMI 1 HDMI 2 or HDMI 3 If the connected CEC device has any connected devices a separate device selection pop up window appears Audio Receiver Player Recorder Sample Illustration HDMITM ...

Page 60: ...unused input in the Input Selection screen and in the Channel Browser Inputs list If you select PC in the Input Selection screen you can choose only Game or Hide as the label To label the video input sources 1 InOptions menu highlight Input Options and then press the ENTER button 2 Highlight Input Labeling and then press the ENTER button 3 Pressthe arrow buttons to highlight the video source you w...

Page 61: ... inputs if you connected a VCR to ColorStream HD a video recorder to HDMI 1 and a DVD player to HDMI 2 VCR Recorder DVD HDMI 3 PC No inputs labeled All inputs labeled Sample Image L1350 L2300U Input selection screens To clear the input labels 1 InOptionsmenu highlightInputOptionsandthenpressthe ENTERbutton 2 Highlight Input Labeling and then press the ENTER button 3 Highlight Reset and then press ...

Page 62: ...rite channel input 1 Tune to the channel or input 2 Press and hold the FAV button for a few seconds The channel or input is added to the beginning of the Favorites list on the left side of the Channel Browser To delete a favorite channel input 1 Press the FAV button to open the Favorites browser list 2 Highlight the channel or input to delete by pressing BACK CB or NEXT CB arrow buttons 3 Press an...

Page 63: ...the remote control v Press the BACK CB arrow button to surf backward through the previously tuned channels in the History list the channels in theANT CABLE channel list the inputs in the Inputs list the favorite channels inputs in the Favorites list or the HDMITM CEC devices in the HDMITM CEC List v Press the NEXT CB arrow button to surf forward through the channel History theANT CABLE channel lis...

Page 64: ...o tune to a channel or input in Browse mode 1 While watching TV press BACK CB or NEXT CB arrow buttons to display the Channel Browser and surf back to a previous item or surf forward to the next item in the list In Browse mode when you stop on an item in the Channel Browser it is highlighted and the TV automatically tunes to the channel or input 2 Press the EXIT button to close the Channel Browser...

Page 65: ...for various reasons the TV will automatically tune to the previously viewed channel or input Clearing channels from the History List v Reconfiguring theANT CABLE input will clear the History List see ANT CABLE IN on page 51 v Turning off the TV will clear the History List Tuningtothenextprogrammedchannel To tune to the next programmed channel press the arrow buttons on the remote control or TV con...

Page 66: ...u press the CH RTN button from a non antenna input the TV will return to the last viewed input SwitchingbetweentwochannelsusingSurfLock The SurfLock feature temporarily memorizes one channel to the CH RTN button so you can return to that channel quickly from any other channel by pressing the CH RTN button To memorize a channel to the CH RTN button 1 Tune the TV to the channel you wish to program i...

Page 67: ... press the PIC SIZE button v Press the corresponding number button 0 5 while the Picture Size menu is displayed v Press the arrow buttons while the Picture Size menu is displayed Some of the picture sizes may not be available depending on the receiving signal format those will be grayed out in the Picture Size screen Using these functions to change the picture size i e changing the height width ra...

Page 68: ...wing in 1080i 1080p and 720p program source Sample Illustration Picture size Full The edges of the picture may be hidden TheaterWide1 This setting is for viewing 4 3 format programs Sample Illustration Picture size TheaterWide 1 The center of the picture remains close to its original proportion but the left and right edges are stretched horizontally to fill the screen TheaterWide2 This setting is ...

Page 69: ... viewing in 480i HDMITM 480p HDMITM 720p 1080i and 1080p signal programs Sample Illustration Picture size Native v If receiving a 1080i 1080p 720p 480i HDMITM or 480p HDMITM signal program the video is scaled to display the entire picture within the borders of the screen i e no over scanning v This is especially useful for external HD sources such as DVD movies Video Games or computer graphics v T...

Page 70: ...ample Illustration Picture size Normal This size is a non stretched display Some input signal formats will display with sidebars and or bars at the top and bottom DotbyDot This setting is for viewing VGA SVGA XGA WXGA and SXGAsources Sample Illustration Picture size Dot by Dot Dot by Dot is a non scaling display Depending on the input signal format VGA for example the picture may appear with sideb...

Page 71: ...lection 3 The Picture Position screen will appear press arrow button to scroll the picture up and down as needed 4 To save the new settings highlight Done and then press the ENTER button To revert to the factory defaults highlight Reset and then press the ENTER button The adjustment range is from 5 to 10 When receiving a signal at 480i resolution the picture scroll function may have limited adjust...

Page 72: ...Settings and then press the ENTER button 3 In the AutoAspect field press the ENTER button and then select On To turn off theAutoAspect ratio feature Select Off in step 3 above Usingthe4 3Stretch When 4 3 Stretch is activated the TV displays 4 3 programs as a full screen picture 1 From the Picture menu highlight Display Settings and then press the ENTER button 2 Press the arrow buttons to select 4 ...

Page 73: ...ode You can select your desired picture settings from the modes described below Mode Description Dynamic MaximizesContrast ColorSaturation Sharpness GrayScale and Brightnesstocreatemorevividanddynamicimages Standard Standardpicturesettings Movie Lowercontrastfordarkenedroom Game Reducescontrollerdelayforfastervideogamingaction PC Optimizedforviewingyourpersonalcomputer Store Mode is only available...

Page 74: ...arpness to your personal preferences Selection Pressing Pressing Backlight darker lighter Contrast lower higher Brightness darker lighter Color paler deeper Tint reddish greenish Sharpness softer sharper Backlight adjusts the brightness of the entire screen When in video mode and no signal is input this selection is automatically set to 0 Settings are stored in memory To adjust the picture quality...

Page 75: ...reen display of information not related to the current program such as weather or stock data when provided by individual stations To view captions or text 1 In Options menu highlight Closed Captions and then press the ENTER button 2 In the Closed Caption Display field select On 3 In the Analog CC Mode field select the desired closed caption mode and then press the ENTER button To view captions hig...

Page 76: ... v When the signal reception is non standard DigitalCCsettings You can customize the closed caption display characteristics by changing the background color opacity text size type edge and color v These settings are available for digital channels only v You cannot set Caption Text and Background as the same color To customize closed captions 1 InOptionsmenu highlight ClosedCaptions andthenpressthe...

Page 77: ...kgroundColor Auto Black White Red Green Blue Yellow Magenta Cyan Magenta Cyan TextBackgroundOpacity Auto Transparent Translucent Flashing Solid CaptionTextEdgeColor Auto Black White Red Green Blue Yellow Magenta Cyan Adjustingtheaudio Mutingthesound Press the MUTE button to partially reduce 1 2 Mute or turn off Mute the sound Each time you press the MUTE button the mute mode changes in the followi...

Page 78: ...Audio Selection and then press the ENTER button Audyssey ABX Sample Image Sound menu Digital Audio Selector selection 3 Press the arrow buttons to select the desired service 4 Press the EXIT button Selectingstereo SAPbroadcasts The multi channel TV sound MTS feature allows you to output high fidelity stereo sound MTS also can transmit a second audio program SAP containing a second language music o...

Page 79: ...d audio program If you have SAP on you will see the current program on the screen but hear the other language instead of the program s normal audio v If you have SAP on and the station you are watching is not broadcasting a second audio program the station s normal audio will be output However occasionally there is no sound at all in SAP mode If this happens set the MTS feature to Stereo mode Adju...

Page 80: ...n 3 Press the arrow buttons to select On and then press the ENTER button StableSound The Stable Sound feature limits high volume levels and prevents the extreme changes in volume that can occur when channels are changed or a program switches to a commercial To turn on Stable Sound 1 PresstheMENUbuttonandopentheSoundmenu 2 HighlightStableSound andthenpresstheENTERbutton 3 Pressthe arrow buttonstose...

Page 81: ...v The Dolby Digital Dynamic Range Control will function in relation to Optical Output Format PCM mode SelectingthePINcode APIN code is necessary for some menus v The Parental Control and Locks menu is grayed out if no PIN has been set EnteranewPINcode 1 PresstheMENUbuttonandopentheOptionsmenu 2 HighlightParentalPINSetup andthenpresstheENTERbutton 3 Usethenumberbuttonstoentera4 digitnumber Confirmt...

Page 82: ...dpressENTERbutton 5 Press the arrow buttons to select On and then press the ENTER button Picture Installation Parental Control and Locks Options Timers Get Help Sound Enable Rating Blocking Edit Rating Limits Input Lock On Off Sample Image Locks menu Enable Rating Blocking selection 6 Press the arrow button to highlight Edit Rating Limits and then press the ENTER button The Edit Rating Limits scre...

Page 83: ...n 6 Pressthe arrow buttontohighlightEditRatingLimits and thenpresstheENTERbutton TheEditRatingLimitsscreenappears 7 HighlightAltRS andthenpresstheENTERbutton TheEditAlternateRatingsscreenappears v The ALT RS button will only be available if an additional rating system is currently available v It may take several minutes for the TV to download the additional rating system v The information displaye...

Page 84: ...reAudienceOnly Thisprogramisspecificallydesignedtobeviewed byadultsandthereforemaybeunsuitableforchildrenunder17 L Crudeorindecentlanguage S Explicitsexualactivity V Graphicviolence TV 14 ParentsStronglyCautioned Thisprogramcontainssomematerialthatmany parentswouldfindunsuitableforchildrenunder14yearsofage D Intenselysuggestivedialogue L Strong coarselanguage S Intensesexualsituations V Intensevio...

Page 85: ...s Indication other than rating system Display Description TV NONE TVNone MPAAN A MovieNotApplicable NOTRATE MovieNotRated Noratingappears Noratinginformationisprovided If you place an X in the box next to None Rated programs rated None or Not Rated will be blocked Programs that do not provide any rating information will not be blocked Displayingratings To display the rating of the program you are ...

Page 86: ...bled again when you change the channel Usingtheinputlockfeature You can use the Input Lock feature to lock the video inputs Video ColorStream HD HDMI 1 HDMI 2 HDMI 3 and PC and channels 3 and 4 You will not be able to view the input sources or channels until you unlock the inputs To lock unlock the video inputs 1 In the Options menu highlight the Parental Control and Locks and then press the ENTER...

Page 87: ...hannel in the lock column 3 Press the ENTER button PIN code entry will be required to set a locked channel If the PIN code has not yet been set a warning message appears 4 Acheck appears in the box 5 To remove the check press the ENTER button 6 Press the EXIT button UsingtheGameTimer You can use the GameTimer to set a time limit for playing a video game 30 120 minutes When the GameTimer expires th...

Page 88: ... as if the GameTimer had been activated To resume use you must deactivate the Input Lock see Using the input lock feature on page 86 Usingthepanellockfeature You can lock the control panel to prevent your settings from being changed accidentally by children for example When Panel Lock is set to On none of the controls on the control panel operate except the POWER button To lock the control panel 1...

Page 89: ...is affected by interference readjust the Clock Phase and Sampling Clock To adjust the PC settings 1 Repeatedly press the INPUT button to select PC Input mode see Selecting the video input source on page 58 2 In the Picture menu highlight Display Settings and then press the ENTER button 3 Press the arrow buttons to select PC Settings and then press the ENTER button 4 3 Stretch Picture Position PC S...

Page 90: ...presstheENTERbuttontogetan optimumadjustmentautomatically The default settings and or adjustment ranges may vary depending on the input signal format SettingthePCAudio You can output or mute sound from your computer when connecting it to your TV using the PC IN terminal and an analog RGB cable see Connecting a computer to the TV s PC IN terminal on page 37 To set the PCAudio 1 Press the MENU butto...

Page 91: ...tions v Data type JPEG EXIF ver 2 1 v File format JPEG v Maximum photo size 6 MB v Maximum number of files 500 folder v Maximum photo resolution 4096 x 4096 pixels Music Player specifications v File format MP3 v Sampling frequency 16 kHz 22 05 kHz 24 kHz 32 kHz 44 1 kHz 48 kHz v Bit rate from 8 to 320 kbps v Maximum number of files 500 folder Supported file system FAT16 and FAT32 ...

Page 92: ...es of U3 USB device are supported Therefore it is suggested that you not use U3 USB with Media Player v Non supported characters will be replaced with a square AutoStartfunction WhenAuto Start is enabled you will be asked if you want to start the Media Player when a USB device is inserted IfAuto Start is disabled you must manually start the Media Player from the menu To change theAuto Start settin...

Page 93: ...Media Player manually Manual Start 1 IntheOptionsmenu highlightMediaShareSetup andthenpress theENTERbutton 2 Press the arrow buttonsto highlightPhotoorMusic and thenpresstheENTERbutton Sample Image Media Play screen v The viewer will open even if there are no photo or music files v While the Media Player is active the main menus cannot be displayed Viewingphotofiles There are three types of view m...

Page 94: ...hotos than will fit on one screen 2 When you select a folder press the ENTER button to move to the next layer or press the CH RTN button to return to the previous layer 3 Press the ENTER button to view the selected photo in Single View mode Singleview In this view mode only files located in the selected directory will be displayed This view allows you to change the photo content manually When you ...

Page 95: ...nel or external input Playingmusicfiles You can listen to music from a list of available files When listening to music files you can select music lists play pause stop skip repeat play and adjust sound settings Sample Image Media Play music list 1 AfteropeningMediaPlayerandselectingMusic see Toopenthe MediaPlayer onpage92 pressthe arrow buttonstoselectafile orfolder Youcanusethe arrow buttonstopag...

Page 96: ...n to open the Quick Menu 2 Press the arrow buttons to select Repeat 3 Press the arrow buttons to select Off All or 1 4 Press CH RTN To close the Music Player press EXIT Viewingphotofilesandplayingmusicfilesatthesametime While viewing photo files you can listen to music from a list of available files 1 While viewing photos in the Single View or Slide Show mode press the MENU button to open the Quic...

Page 97: ...time when the picture was taken During playback you can adjust the Sound menu functions from the Quick Menu Sorting Total Time display may not be available in all cases Settingthesleeptimer You can set the sleep timer to turn off the TV after a set length of time maximum of 12 hours To set the sleep timer using the remote control 1 Press the SLEEP button on the remote control to set the length of ...

Page 98: ...connected to external input to listen to music through the TV speakers To change the no signal power down setting 1 From the Options menu highlight Power Management and then press the ENTER button 2 Highlight No Signal Power Down and then press the ENTER button 3 Press the arrow buttons to highlight the item you want to change and press the arrow buttons to select On or Off v Default setting for t...

Page 99: ...ecordmode SKIP Forward SkipForward SKIP Reverse Skipbackward FF Fastforward REW Rewind reverse Navigatesmenuoptions ENTER Entersmenuoptions EXIT Returntothepreviousmenu These functions depend on the devices connected HDMITM CECPlayerControlmenufunctions To control the HDMITM CEC player from the menu 1 From the Options menu highlight HDMI CEC Player Control and then press the ENTER button Sample Im...

Page 100: ... device is not a playback or recording device HDMITM CECinputsourceselection If a HDMITM CEC device with HDMITM switching capability e g Audio Receiver is connected to the HDMITM input you can select another HDMITM CEC device that is connected to the master HDMITM device using the TV s INPUT button see Selecting the video input source on page 58 VOLUMEandMUTEcontrolsofAudioReceiver With your TV s ...

Page 101: ...Thisitemwill begrayedoutwhenAmplifierControlissettoOff When you turn on the Audio Receiver change its input source or adjust the sound volume the sound will be output from the audio receiver s speakers even if TV Speakers has been selected Turn the TV off and on again to output the sound from the TV speakers SettingupHDMITM CEC To set the HDMITM CEC Setup 1 From the Options menu highlight HDMI CEC...

Page 102: ...TM source devices If your HDMITM source device does not support these features the TV may not work properly when this feature is enabled HDMITM InformationDisplay Viewing the HDMITM signal information 1 From the Options menu highlight HDMI Information Display and then press the ENTER button 2 Press the arrow buttons to select On or Off and then press the ENTER button 3 Press the INFO button The no...

Page 103: ... screen press the RECALL button again To display TV status information using INFO press the INFO button The following additional information will display for digital channels if applicable v Title v Duration v Detailed description ANT 69 1 ABCD 720p TV PG 16 9 Now Next The ABCD Show ABCD New at 5 00pm 05 00pm 06 00pm EST 08 00pm 09 00pm Sample Illustration Info banner To close the INFO screen pres...

Page 104: ...t When ColorMaster is set to On the list of base colors appears You can select a base color to adjust 1 From the Picture menu highlight Advanced Picture Settings and then press the ENTER button 2 Highlight Base ColorAdjustment and then press the ENTER button 3 Press the arrow buttons to select a color Press the ENTER button 4 Press the arrow buttons to select Hue Saturation or Brightness 5 Press t...

Page 105: ...ton The Red Green and Blue level settings are connected to the Color Temperature settings and will change based on which preset color temperature Cool Medium or Warm is selected StaticGamma The static gamma feature lets you adjust the levels of black in the picture 1 From the Picture menu highlight Advanced Picture Settings and then press the ENTER button 2 Highlight Static Gamma and then press th...

Page 106: ...tureSettings and thenpresstheENTERbutton 2 HighlightDynamicContrastandthenpresstheENTERbutton 3 Pressthe arrow buttonstoselectHigh Middle Low or Off PresstheENTERbutton CinemaMode exceptfor58L1350U When you view a DVD 3 2 pulldown processed from a DVD player connected to the VIDEO ColorStream HD component video or HDMITM inputs on the TV smoother motion can be obtained by setting the Cinema Mode t...

Page 107: ... Press the arrow buttons to select High Middle Low or Off and then press the ENTER button DNR DNR lets you soften the screen representation of a weak signal to reduce the noise effect 1 FromthePicturemenu highlightAdvancedPictureSettings and thenpresstheENTERbutton 2 Highlight Noise Reduction and then press the ENTER button 3 Press the arrow buttons to select DNR and then press the ENTER button 4 ...

Page 108: ...aption feature to Off see Using closed captions on page 75 TV stops responding to controls If the TV stops responding to the buttons on the remote control or TV control panel and you cannot turn off the TV press and hold POWER button on the TV control panel for several seconds to reset the TV If the TV does not power off using this method unplug the TV from theAC wall outlet and plug it back in If...

Page 109: ... select a valid video input source see Selecting the video input source onpage58 IfnodeviceisconnectedtoaninputontheTV no picture appears when you select that particular input source For device connection details see Connecting Your TV on page 23 Antenna reception may be poor Use a highly directional outdoor antenna if applicable The station may be having broadcast difficulties Try another channel...

Page 110: ...n instead Picture and sound are out of sync As with all products that contain a digital display this may occur in rare instances when viewing certain content e g television broadcasts video games DVDs The cause may include without limitation video processing within the TV video processing in an attached gaming system and video processing or different compression rates used by broadcasters in their...

Page 111: ...tain features on your external devices Refer to the User s Guide for your other device to determine its available features If your TV remote control does not operate a specific feature on another device use the remote control that came with the device see Learning about the remote control on page 44 If the TV still does not act as expected perform the Reset Factory Defaults procedure see Resetting...

Page 112: ...Forgotten PIN code When the PIN code screen appears press the INFO button 4 times within approximately 5 seconds The old PIN code is cleared see Forgotten PIN code on page 81 The V Chip feature is available for U S V Chip systems only see Using parental controls for USAregion on page 82 NoHDMITM CECoperation The HDMITM CEC feature is available for Toshiba HDMITM CEC compatible devices Ensure that ...

Page 113: ...ection Photo files that were processed and edited using the computer s application software may not be viewable The TV may select one format automatically and play it when contents that support two or more formats are played Confirm that the contents of the USB storage device are in formats that are supported by this TV see Using the Media Player on page 91 Iftheproblempersistsaftertryingthesoluti...

Page 114: ...ls may not be compatible with features and or specifications that may be added in the future Televisionsystem NTSCstandard ATSCstandard 8VSB DigitalCable 64QAM 256QAM in the clear unencrypted Channelcoverage VHF 2 through 13 UHF 14 through 69 CableTV Midband A 8throughA 1 AthroughI Superband JthroughW Hyperband AAthroughZZ AAA BBB Ultraband 65through94 100through135 ...

Page 115: ...L2300U 1 9A Powerconsumption 23L1350U 0 3WinStandbymode 29L1350U 0 3WinStandbymode 32L1350U 0 3WinStandbymode 39L1350U 0 3WinStandbymode 50L1350U 0 3WinStandbymode 58L1350U 0 3WinStandbymode 23L2300U 0 3WinStandbymode 32L2300U 0 3WinStandbymode 39L2300U 0 3WinStandbymode 50L2300U 0 3WinStandbymode Audiopower 23L1350U 6 5W 29L1350U 6 7W 32L1350U 6 7W 39L1350U 6 7W 50L1350U 6 7W 58L1350U 6 7W 23L230...

Page 116: ...3L2300U Two3 59x1 38x1 32L2300U Two5 98x1 57x1 42 39L2300U Two5 98x1 57x1 42 50L2300U Two5 98x1 57x1 42 Video audioterminals Video audioinput Video 1 V p p 75 ohm negative sync Audio 200 mV rms 20dBFS 47K ohm or greater ColorStream componentvideo HDinput Video Y 1V p p 75ohm PR 0 7V p p 75ohm PB 0 7V p p 75ohm Suggestedformats 1080i 720p 480p 480i Audio 200mV rms 20dBFS 47Kohmorgreater HDMITM inpu...

Page 117: ... Depth 6 3 8 162 8mm 29L1350U Width 2 2 1 8 665 1mm Height 1 6 1 4 464mm Depth 7 1 8 180mm 32L1350U L2300U Width 2 4 7 8 733 7mm Height 1 7 7 8 503 5mm Depth 7 1 8 179 7mm 39L1350U 2300U Width 2 11 889mm Height 1 11 1 4 591mm Depth 7 7 8 199 7mm 50L1350U 2300U Width 3 8 3 4 1138 08mm Height 2 5 1 4 742 55mm Depth 9 1 2 239 75mm 58L1350U Width 4 3 3 8 1305 9mm Height 2 9 3 8 847 7mm Depth 1 1 1 8 3...

Page 118: ...v Remote control with two size AAA batteries v Resource Guide v Quick Start Guide v Pedestal and hardware v Warranty information AcceptablesignalformatsforPCIN HDMITM PCINsignalformats DependingontheconnectedPC thefollowingconditionsmayoccur incorrectdisplay falseformatdetection picturepositionfailure blur or judder ThisisnotamalfunctionofyourTV Format Resolution V Frequency H Frequency PixelClock...

Page 119: ...z 47 776kHz 79 500MHz 1360 x 768 60 015Hz 47 712kHz 85 500MHz SXGA 1280x1024 60 020Hz 63 981kHz 108 000MHz 480i 720x480i 59 940Hz 15 734kHz 27 000MHz 480p 720x480p 59 940Hz 31 469kHz 27 000MHz 720p 1280x720p 60 000Hz 45 000kHz 74 250MHz 1080i 1920x1080i 60 000Hz 33 750kHz 74 250MHz 1080p 1920x1080p 24 000Hz 27 000kHz 74 250MHz 60 000Hz 67 500kHz 148 500MHz v Some illustrations in this User s Guide...

Page 120: ...warethataremadeordevelopedoriginallybyTOSHIBA Thesesoftwareand accompanieddocumentsarecopyrightedbyTOSHIBA andprotectedbyCopyrightAct an internationaltreaty sarticlesandothergoverninglaws Thesoftwarecomponentswhichare madeordevelopedoriginallybyTOSHIBAandnotsubjecttoEULAsarenotatargetof sourcecodeoffering TheToshibawarrantyprovidedinrespectoftheDigitalTVistheonlywarrantyprovidedand noadditionalwar...

Page 121: ...LAsareexhibitedintheiroriginal text English asexactlywrittenbytherespectivepartiesotherthanTOSHIBA Foratleastthree 3 yearsfromthedateofdistributionofthethisproduct Toshibawillgive toanyonewhocontactsToshibaConsumerSolutionsat 800 631 3811 forachargeofno morethanourcostofphysicallyperformingsourcecodedistribution acompletemachine readablecopyofthecompletecorrespondingGPLandLGPLsourcecodefortheversi...

Page 122: ...mityoumorethantheforegoing paragraphsdo TheUnixconfigurationscript configure wasproducedwithGNUAutoconf Itiscopyright bytheFreeSoftwareFoundationbutisfreelydistributable Thesameholdsforitssupporting scripts config guess config sub ltmain sh Anothersupportscript install sh iscopyright byXConsortiumbutisalsofreelydistributable TheIJGdistributionformerlyincludedcodetoreadandwriteGIFfiles Toavoid enta...

Page 123: ...mmercialproducts WedisclaimallwarrantiescoveringTheFreeType ProjectandassumenoliabilityrelatedtoTheFreeTypeProject Finally manypeopleaskedusforapreferredformforacredit disclaimertousein compliancewiththislicense Wethusencourageyoutousethefollowingtext Portionsofthissoftwarearecopyright 1996 2002TheFreeType Project freetype org Allrightsreserved ExhibitC scalfact cScalefactorsforlayerIandIIThisprog...

Reviews: