background image

Combustion Controls

Global Siemens Headquarters 
Siemens AG 
Berliner Ring 23 
76437 Rastatt  
Germany

SCC, Inc. 
1250 Lunt Avenue  
Elk Grove Village, IL  60007  
USA 
Telephone: 1-224-366-8445

www.scccombustion.com

Printed in USA

© Siemens Industry, Inc. • (05/2015)

LMV5... 
Linkageless Burner 
Management System

Technical Instructions    November 21, 2016

Summary of Contents for LMV 5 Series

Page 1: ...liner Ring 23 76437 Rastatt Germany SCC Inc 1250 Lunt Avenue Elk Grove Village IL 60007 USA Telephone 1 224 366 8445 www scccombustion com Printed in USA Siemens Industry Inc 05 2015 LMV5 Linkageless Burner Management System Technical Instructions November 21 2016 ...

Page 2: ...Intentionally Left Blank ...

Page 3: ...Commissioning Section 5 VSD Section 6 O2 Trim Section 7 Troubleshooting Section 8 Modbus Section 9 ACS450 Section 10 Revision History Appendix A Application Guide Appendix B Complimentary Products Guide Can be found at www scccombustion com GP 2 FUEL TRAIN ERROR CODES ...

Page 4: ...Commissioning Section 5 VSD Section 6 O2 Trim Section 7 Troubleshooting Section 8 Modbus Section 9 ACS450 Section 10 Revision History Appendix A Application Guide Appendix B Complimentary Products Guide Can be found at www scccombustion com GP 2 FUEL TRAIN ERROR CODES ...

Page 5: ...r Fuel air ratio control Load control full PID control for pressure or temperature Integrated O2 trim Variable Frequency Drive VFD control Fuel usage monitoring Efficiency monitoring Simultaneous operation of up to 5 rotary actuators up to 6 connected Dual setpoints Modbus communication Remote setpoint or remote firing rate from building automation or external controller Flue gas recirculation hol...

Page 6: ... Requires an external PID controller LMV51 140C1 Same features as LMV51 040C1 Includes a PID load controller capable of temperature and or pressure control and a programmable analog output LMV52 240B1 Same features as LMV51 140C1 for up to 5 actuators 6 connected Includes a closed loop VFD control integrated O2 trim fuel meter reading gas and oil and temperature time based FGR hold LMV52 440B1 Sam...

Page 7: ...52 display to the LMV5 Base Plug Set Qty 1 Required The terminal plug sets for the LMV5 are sold separately Each LMV5 needs one base plug set Additional plug sets are available see Control Panel Spare Parts AGG5 720 Plug set containing all terminals for a typical LMV5 system Will accommodate a system with O2 trim three actuators one transformer and no fuel meters AGG5 7COMPLETE Plug set containing...

Page 8: ...t terminals and optional PLC LMV5 Mounting Brackets Qty 2 Recommended But Not Required Recommended brackets for mounting the LMV5 in an electrical enclosure to offset the base unit from the subpanel allowing easy access to plugs Two brackets are needed per LMV5 BR LMV5 Brackets for mounting an LMV5 in an electrical enclosure Control Panel Spare Parts Not Required The LMV5 has three replaceable fus...

Page 9: ...395 5 5 pack of spare 5 pin green connectors 1840405 3 3 pack of spare 6 pin green connectors An extra set of transformer terminals is required if using a second transformer AGG5 2PLUGS Extra set of terminals for a second transformer PRI SEK1 SEK2 An optional spark quencher is available to reduce voltage spikes typically caused by closing a normally open vent valve XEB0471 Spark quencher for reduc...

Page 10: ...ories section for more information SQM45 295B9 27 in lb torque 10mm D shaft 10 120 seconds SQM48 497B9 177 in lb torque 14mm keyed shaft 30 120 seconds SQM48 697B9 310 in lb torque 14mm keyed shaft 60 120 seconds SQM91 391A9 600 in lb torque 25mm keyed shaft 30 120 seconds Coupling Qty 1 Required Provided With Some Mounting Brackets See Below Zero lash flexible couplings are available for each act...

Page 11: ... are needed with these retrofit kits Refer to Document No CPBK 4000 for technical information or Document No CPBK 4100 for installation instructions BR 48CBAIR Bracket for mounting an SQM48 actuator to a Cleaver Brooks rotary air damper BR 3345CBAIR Bracket for mounting an SQM45 actuator to a Cleaver Brooks rotary air damper When using a Lucoma air damper the following actuator mounting kits are a...

Page 12: ... 4 full port firing rate valve VA45 2 NM 125 SQM45 to 1 1 4 medium port firing rate valve VA45 2 NF 150 SQM45 to 1 1 2 full port firing rate valve VA45 2 NM 150 SQM45 to 1 1 2 medium port firing rate valve VA45 2 NR 150 SQM45 to 1 1 2 reduced port firing rate valve VA45 2 NF 200 SQM45 to 2 full port firing rate valve VA45 2 NM 200 SQM45 to 2 medium port firing rate valve VA45 2 NR 200 SQM45 to 2 r...

Page 13: ... Valve Valve Actuator Assemblies Qty 1 Required if Firing Oil Not Using a Cleaver Brooks Oil Valve Pre built valve actuator assemblies are available to mount an SQM45 or SQM48 actuator to a Hauck S AS B F G or K series oil valve For more information about valve actuator assemblies using Hauck oil valves refer to Document No VA 4000 VA Valve actuator assemblies mounting an SQM45 or SQM48 actuator t...

Page 14: ... assembly Actuator Accessories CANbus Cable Qty 1 Required Special cable is used to connect the actuators and O2 module to the LMV5 This cable may be purchased in 100 or 500 rolls AGG5 643 100 100 roll of CANbus cable AGG5 643 500 roll of CANbus cable Electrical Cable Cord Grips and Conduit Adapters Qty 2 Required Per Actuator SQM45 SQM48 and SQM91 actuators come with two M16 threaded electrical c...

Page 15: ...ers Infrared Flame Scanners Qty 1 Required Unless Using a QRA75 A17 Flame Scanner Two infrared flame scanners are available one side viewing and one forward viewing For technical information about QRI flame scanners refer to Document No N7719 QRI2A2 B180B Self check infrared flame scanner forward viewing QRI2B2 B180B Self check infrared flame scanner side viewing Ultraviolet Flame Scanners Qty 1 R...

Page 16: ...ounting accessories are available for both the forward viewing and side viewing QRI flame scanners For more information refer to Document No N7719 AGG2 110 Kit for mounting forward viewing scanner QRI2A2 B180B on a flame tube Comes with clamp mounting sleeve thermal barrier with 3 4 NPSM connection and heat insulation glass AGG2 120 Pg9 thread to 1 2 NPSM conduit connection adapter for use with an...

Page 17: ...canner Comes with a 1 NPSM female thread connection THERMAL 1X75 Thermal barrier for use with the QRA75 flame scanner along with accessory AGG16 U Adapts a 1 NPSM thread to a female 3 4 NPT connection AGG02 Heat insulating glass with spring washer and O ring for applications where the temperature at the scanner will exceed 176 F to be mounted inside thermal barrier THERMAL 1X75 AGG03 Magnifying le...

Page 18: ...or change the underlined digit to a 1 The 0 100 PSI sensor is only available with a 4 20 mA signal For more information on 7MF pressure sensors refer to Document No SEN 2000 7MF1565 4BB00 5EA1 0 15 PSI range 4 20 mA signal 7MF1565 4BE00 5EA1 0 30 PSI range 4 20 mA signal 7MF1565 4BF00 5EA1 0 60 PSI range 4 20 mA signal 7MF1565 4BG00 5EA1 0 100 PSI range 4 20 mA signal 7MF1565 4CA00 5EA1 0 150 PSI ...

Page 19: ...ensors refer to Document No SEN 1000 QAE2020 001 100 Ohm 3 wire platinum RTD used to measure water temperature on hot water boilers Range 4 to 374 F QAE2012 001 1000 Ohm 2 wire platinum RTD used to measure water temperature for low fire hold or hot standby on steam boilers Also recommended to measure ambient air temperature for LMV52 4 applications Range 4 to 374 F QAE2012 9002 1000 Ohm 2 wire pla...

Page 20: ...ack when using a VFD one of the following speed sensor kits is required if a VFD is present AGG5 305 Speed sensor and associated mounting kit with connections available for mounting directly to or conduit Includes speed sensor 6 foot cable 3 finger speed wheel O ring for a watertight seal and necessary mounting hardware Range 300 6300 RPM AGG5 310 Speed sensor and associated mounting kit Includes ...

Page 21: ...nally heated zirconium dioxide measuring cell supplied with 2 M16 to 1 2 NPT conduit adapters compatible with liquid tight fittings Max flue gas temperature 575 F Flue Gas Collector Qty 1 Required for O2 Trim A flue gas collector is required to mount the O2 sensor in the stack Four options are available as described below AGO20 001SDS KT Weldless flue gas collector 7 25 long to be mounted into sta...

Page 22: ...p Optional The ACS450 software for the LMV5 offers many features including parameter backups startup reports AZL software updates and trending The software may be downloaded at www scccombustion com Cables Optional To use the ACS450 software cables are necessary to connect the AZL display to a PC P454 006 Null modem cable 6 feet long 9 pin male to 9 pin female DB9 connection connects AZL to PC ser...

Page 23: ...5B9 Actuator 27 in lb torque 10mm D shaft 10 120 sec running time 1 BR 45CBOIL CB fuel oil controller bracket retrofit kit for SQM45 actuator Actuator Accessories 1 AGG5 643 100 100 roll of CANbus cable 1 1 ADP M16XE500 5 ADP M16XE500 LONG 5 5 pack of M16 to 1 2 NPSM metal conduit adapters 5 pack of long M16 to 1 2 NPSM metal conduit adapters Flame Scanner 1 QRI2A2 B180B Self check infrared flame ...

Page 24: ...umber see Doc No TS 1000 LMV5 Mounting Brackets Qty 2 Recommended For electrical enclosure BR LMV5 Control Panel Spare Parts Optional 120V main fuse FUSE6 3A SLOW 12V CANbus fuse FUSE4 0A SLOW 5 pack of 4 pins 1840382 5 5 pack of 5 pins 1840395 5 3 pack of 6 pins 1840405 3 Transformer plugs AGG5 2PLUGS Spark quencher XEB0471 RS 232 to RS 485 converter kit TS 5X KT Air Damper Assembly Actuator Qty ...

Page 25: ...LMV Series Technical Instructions Document No LV5 1000 SCC Inc Page 21 Section 1 Intentionally Left Blank HOME ...

Page 26: ...5 12 cable AGM23U QRI Accessories Optional Mount for forward view AGG2 110 1 2 conduit adapter AGG2 120 Mount for side view AGG90 U Explosion proof housing LMV5 XPR QRI QRA Accessories Optional Mount for side view AGG16 U Thermal barrier THERMAL 1X75 Heat insulating lens AGG02 Magnifying lens AGG03 Sensors Pressure Sensors Qty 1 Required for Steam Boilers Write in part number see Doc No SEN 2000 T...

Page 27: ...LMV Series Technical Instructions Document No LV5 1000 SCC Inc Page 23 Section 1 Intentionally Left Blank HOME ...

Page 28: ...ng screws do not have excessive play so the spacing of the mounting holes must be accurate This can be achieved by clamping or securing the LMV5 in the desired position Then use the captive screws to score 4 circles into the panel Do this by turning each of the mounting screws clockwise while applying pressure to the screwdriver During the mounting process consideration should also be given to the...

Page 29: ...and increase clearance before tightening The tab will pinch the sheet metal of the enclosure door between itself and the AZL5 gasket This facilitates easy removal and replacement of the AZL5 since it is designed to be taken out of the enclosure face and held in the hands for setup and commissioning The AZL5 connects via the CANbus port on its bottom end to the LMV5 at terminal X50 with CANbus cabl...

Page 30: ... for each LMV5 base unit Depending upon how many devices are connected to the CANbus actuators PLL52 module etc two AGG5 210 transformers may be necessary Note If a second transformer is used locate it as close as possible to the actuators PLL52 module that it powers Do not connect 12VAC1 and 12VAC2 from each transformer together Figure 1 3 3 gives the dimensions of an AGG5 210 transformer Slotted...

Page 31: ...rea of the LMV5 disconnect the unit from the main supply all polar disconnection Protection against electrical shock hazard on the LMV5 and all other connected electrical components must be ensured through good wiring and grounding practices Fall or shock can adversely affect the safety functions of an LMV5 Such units must not be put into operation even if they do not exhibit any apparent damage T...

Page 32: ...Technical Instructions LMV Series Document No LV5 1000 Section 1 Page 28 SCC Inc 1 5 Approvals The LMV5 and its various system components have the following standards and approvals HOME ...

Page 33: ...Commissioning Section 5 VSD Section 6 O2 Trim Section 7 Troubleshooting Section 8 Modbus Section 9 ACS450 Section 10 Revision History Appendix A Application Guide Appendix B Complimentary Products Guide Can be found at www scccombustion com GP 2 FUEL TRAIN ERROR CODES ...

Page 34: ...Commissioning Section 5 VSD Section 6 O2 Trim Section 7 Troubleshooting Section 8 Modbus Section 9 ACS450 Section 10 Revision History Appendix A Application Guide Appendix B Complimentary Products Guide Can be found at www scccombustion com GP 2 FUEL TRAIN ERROR CODES ...

Page 35: ... they will only fit into one socket of the LMV5 eliminating the possibility of inserting a plug into an incorrect socket Each plug is designed to connect one external device or a small group of external devices such as gas valves to the LMV5 Each group of plugs on the front of the LMV5 provides line voltage and grounds so that an additional terminal strip is not necessary Note All protective earth...

Page 36: ...he CANbus terminals as well as other low voltage connections The sole purpose of the FE is for termination of low voltage cable shields The FE is bonded to the Reference Ground through capacitors on the LMV5 circuit board with the exception of the CANbus where it is bonded directly Reference Ground The last type of ground is the Reference Ground 0 These are found on the low voltage connections The...

Page 37: ...ighter gauge 24 AWG wires are a shielded twisted pair to help reduce noise on the line They carry the digital CANbus data signals and are labeled CANL and CANH The signal on these wires consists of 5 VDC pulses Note These data wires should never contact the 12VAC wires when the system is powered LMV5 damage may result The termination jumper located on each actuator and PLL52 module is used to term...

Page 38: ...le total CANbus cable length including AZL5 feet Single Transformer Actuators at 100 rated torque Actuators at 80 rated torque 2 SQM45 0 SQM48 115 125 3 SQM45 85 95 4 SQM45 70 80 5 SQM45 2nd Transformer Req 2nd Transformer Req 1 SQM45 1 SQM48 85 95 2 SQM45 70 80 3 SQM45 2nd Transformer Req 30 4 SQM45 2nd Transformer Req 1 SQM45 2 SQM48 2nd Transformer Req 30 2 SQM45 2nd Transformer Req 3 SQM45 1 S...

Page 39: ...lation via a 4 20mA source wired into terminals X62 3 and X62 4 back to IntLC local using LMV5 load controller for modulation of the burner The load controller also provides power for 4 20 mA or 0 10 VDC sensors or 4 20 mA or 0 10 VDC externally powered sensors The wiring of these sensors is covered in Section 2 3 Floating Bumping and Multistage Oil Terminals X5 03 2 and X5 03 3 can be used for fl...

Page 40: ...criptions Top Front Bottom General notes 1 Total combined load of all 120VAC outputs cannot exceed 5 Amps 2 All Line fused terminals are internally connected 3 All Neutral terminals are internally connected 4 All PE terminals are internally connected 5 All 0 terminals are internally connected HOME ...

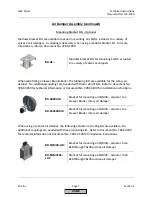
Page 41: ...LMV Series Technical Instructions Document No LV5 1000 SCC Inc Page 7 Section 2 HOME ...

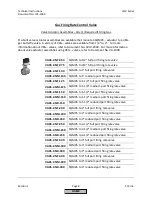
Page 42: ...Technical Instructions LMV Series Document No LV5 1000 Section 2 Page 8 SCC Inc HOME ...

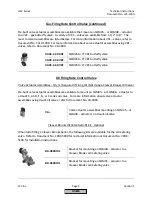
Page 43: ...LMV Series Technical Instructions Document No LV5 1000 SCC Inc Page 9 Section 2 HOME ...

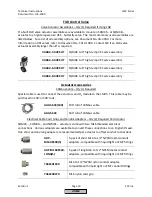
Page 44: ...Technical Instructions LMV Series Document No LV5 1000 Section 2 Page 10 SCC Inc HOME ...

Page 45: ...LMV Series Technical Instructions Document No LV5 1000 SCC Inc Page 11 Section 2 HOME ...

Page 46: ...Technical Instructions LMV Series Document No LV5 1000 Section 2 Page 12 SCC Inc HOME ...

Page 47: ...LMV Series Technical Instructions Document No LV5 1000 SCC Inc Page 13 Section 2 HOME ...

Page 48: ...Technical Instructions LMV Series Document No LV5 1000 Section 2 Page 14 SCC Inc HOME ...

Page 49: ...LMV Series Technical Instructions Document No LV5 1000 SCC Inc Page 15 Section 2 HOME ...

Page 50: ...Technical Instructions LMV Series Document No LV5 1000 Section 2 Page 16 SCC Inc HOME ...

Page 51: ...LMV Series Technical Instructions Document No LV5 1000 SCC Inc Page 17 Section 2 HOME ...

Page 52: ...Technical Instructions LMV Series Document No LV5 1000 Section 2 Page 18 SCC Inc HOME ...

Page 53: ...LMV Series Technical Instructions Document No LV5 1000 SCC Inc Page 19 Section 2 HOME ...

Page 54: ...Technical Instructions LMV Series Document No LV5 1000 Section 2 Page 20 SCC Inc HOME ...

Page 55: ...LMV Series Technical Instructions Document No LV5 1000 SCC Inc Page 21 Section 2 HOME ...

Page 56: ...Technical Instructions LMV Series Document No LV5 1000 Section 2 Page 22 SCC Inc Intentionally Left Blank HOME ...

Page 57: ...Commissioning Section 5 VSD Section 6 O2 Trim Section 7 Troubleshooting Section 8 Modbus Section 9 ACS450 Section 10 Revision History Appendix A Application Guide Appendix B Complimentary Products Guide Can be found at www scccombustion com GP 2 FUEL TRAIN ERROR CODES ...

Page 58: ...Commissioning Section 5 VSD Section 6 O2 Trim Section 7 Troubleshooting Section 8 Modbus Section 9 ACS450 Section 10 Revision History Appendix A Application Guide Appendix B Complimentary Products Guide Can be found at www scccombustion com GP 2 FUEL TRAIN ERROR CODES ...

Page 59: ...pe structure This structure is thoroughly illustrated with the LMV5 Parameter List in Section 3 2 An explanation of how to use the LMV5 Parameter List is shown below LMV51 0 is not shown in the Parameter List It has the same parameters as the LMV51 1 with the exception that the LMV51 0 has no load controller parameters Figure 3 1 1 LMV5 Parameter List Legend Section 3 3 shows the sequence diagrams...

Page 60: ...lPumpStart 10 MaxTmeStage 32 O2SensServTimRes 40 Autom Manual Off 7 21 Ext MinSetpoint 34 InputController 13 MaxTmeStartRel 10 O2TrimBehavior 24 B ExtranLightTest 14 InterfacePC 6 MeasureRangePtNi 33 43 OEM Password 45 Baudrate 36 F Interval1Gas 8 MinActuatorStep 30 OilPressureMax 13 BurnerID 6 45 Factor FGR Gas Oil 42 Interval1Oil 8 MinLoadGas Oil 19 OilPressureMin 13 C FanRunupTme 7 Interval2Gas...

Page 61: ...m 27 Weekday 5 PostpurgeT3Oil 9 SafetyTme2Oil 8 Standardization 39 Time EU US 36 P Part 29 Scale 0 4mA 35 Standardize 15 Time O2 Alarm 22 PreIgnitionTGas 8 Scale20mA angle 35 StandardizedSp 39 TimeNoFlame 21 PreIgnitionTOil 8 Scale20mA perc 35 StandardParam 29 TimeOfDay 5 45 PrepurgePos 18 Scale20mA press 35 Standby Error 10 Timeout 36 PrepurgePt1Gas 8 Scale20mA temp 35 Start PS Valve 14 TL_SD_On ...

Page 62: ...store 46 cold start thermal shock 31 32 start point 20 Burner ID 6 45 configuration 33 34 43 Repetition Counter 16 C on off limits 30 31 S Clock PID 29 35 Setpoint 5 30 daylight savings 36 Load Limits 5 19 20 Software Version set 5 Lockout History 5 AZL 37 Cold Start see Load Controller M burner control LMV 17 Computer Interface ACS450 6 Manual Operation 7 21 load controller 35 F Modbus O2 trim mo...

Page 63: ...ring rate without a password For staged burners CurrentFuel U Gas Gas Oil Displays the fuel that is currently selected via hardwire AZL52 or Modbus FuelSelect U Gas Gas Oil If INPUT X4 01 1 and INPUT X4 01 2 are not energized fuel selection is internal soft and can be set here or via Modbus Energize hard X4 01 1 for gas or X4 01 2 for oil Powering both terminals at the same time will cause a locko...

Page 64: ...t Date Oil U Displays the date when the volume of oil was last reset Cannot be changed Operation LockoutCounter U Displays the total number of lockouts that have occurred x x x Current O2 Value U Current O2 sensor reading Wet basis will be lower than dry O2 reading O2 Setpoint U O2 target value for the current load can be viewed here SupplyAirTemp U Current combustion air temperature if equipped w...

Page 65: ...rams Display BurnerControl Times TimesStartup1 NOTE There are numerous prepurge time parameters to provide options for purging FGR piping For boilers without FGR these times should be set the following way PrepurgeTmeGas Oil should be set for the desired prepurge time after a normal shutdown PrepurgeSafeGas Oil should be set for the desired prepurge time after a safety shutdown PrepurgePt1Gas Oil ...

Page 66: ...mesStartup2 Sets the maximum allowable time for SafetyTme1Gas Oil and SafetyTme2Gas Oil above x When a fuel train with a pilot is used this defines the overlap of the pilot OUTPUT X9 01 2 and the main fuel valves After this time expires the pilot is de energized if continuous pilot is not selected Shorter times are more safe No effect for fuel trains having direct spark ignition of main fuel This ...

Page 67: ...hase 12 DelayLackGas S 10s MinTmeHome Run 63s If there is a lack of gas pressure low gas pressure switch open then the LMV5 will wait this period of time before attempting to relight provided that the repetition counter RepetitCounter for gas is set for more than one not done in the US This time period will double after the first relight attempt This doubling would occur if RepetitCounter were set...

Page 68: ...Start DirectStart Enables the LMV5 to skip postpurge T3 time and go directly into prepurge if there is a call for heat during postpurge T1 If set to DirectStart a 3 way valve on OUTPUT X4 03 3 must be used to check the air pressure switch OilPumpCoupling S Magnet coupl Magnetcoupl Directcoupl Combined with IgnOilPumpStart determines the behavior of OUTPUT X6 02 3 1 Magnetcoupl the output will ener...

Page 69: ...sp Gas pilot ignition for light oil 4 HO w Gasp Gas pilot ignition for heavy oil FuelTrainGas O FuelTrainOil O ContPilotGas O deact ContPilotOil O deact MainsFrequency O 60 Hz 50 Hz 60 Hz Set to the freqency of the local AC power grid For North America select 60 Hz x x x x Params Display BurnerControl Configuration ConfigGeneral LowfireP54 LowfireP50 Params Display BurnerControl Configuration Conf...

Page 70: ...deactInStby Activates or deactivates INPUT X3 02 1 the combustion air pressure switch Activate for forced or induced draft burners Can also be set to deactInStby so that the status of the air pressure switch is not evaluated in standby However the burner will not start until INPUT X3 02 1 is de energized x x x Config_PS VP CPI O CPI Gas PS VP CPI Gas CPI Gas Oil CPI Oil Sets the function of INPUT ...

Page 71: ...2 3 staged oil functionality 3 DeaO2 Stp36 energizing terminal X5 03 2 disables O2 trim and de energizing enables O2 trim LMV52 only Also energizing terminal X5 03 3 allows the LMV5 to progress past phase 36 de energizing stops the LMV5 in phase 36 indefinitely 4 CoolFctStby only used on an LMV50 5 AutoDeactO2 energizing X5 03 2 will deactivate the O2 trim by setting the O2 trim mode to auto deact...

Page 72: ...lve used to check the action of combustion air pressure switch and is necessary if direct start is used Energizing vents the combustion air pressure switch to atmosphere during phase 79 3 PS Reli_Inv the action is opposite of PS Relief mode thus de energizing vents the combustion air pressure switch to atmosphere during phase 79 and the 3 way valve is energized during operation x x x ReacExtranLig...

Page 73: ...ng the period when the fuel valves are closed gas firing The choices for supervision during this phase are as follows 1 1 Sensor Either a flame rod ION or scanner can be connected and used Both cannot be connected 2 QRI_B ION Both sensors can be connected A flame signal on either will cause a signal to be registered 3 QRI_B ION Both sensors can be connected Flame must be detected by QRI_B and not ...

Page 74: ...out will occur A setting of 16 indicates unlimited repetitions x x x SafetyLoop S 1 1 16 Sets how many times the LMV5 will attempt to restart without manual reset when the safety loop is opened This parameter should always be set to 1 A setting of 16 indicates unlimited repetitions x x x ValveProvingType O No VP No VP VP startup VP shutdown VP stup shd This determines if gas valve proving leak tes...

Page 75: ... U Date LMV5 unit was produced x x x SerialNumber U Serial number of unit x x x ParamSet Code U Parameter set code x x x ParamSet Vers U Version revision of the tagged parameter set x x x Params Display BurnerControl SW Version U LMV5 software version x x x Read Only Read Only Read Only 0 deg 0 90 deg 0 90 deg 0 0 100 Params Display BurnerControl ProductID Params Display RatioControl Gas Oil Setti...

Page 76: ...e aware of mechancial stops IgnitionPosAux1 S Sets the postpurge position of the air actuator Be aware of mechancial stops PostpurgePosAux1 S Sets ignition position of the aux1 actuator Setting is independent of the low fire position Be aware of mechancial stops PostpurgePosAir S 0 90 deg Sets ignition position of the aux2 actuator Setting is independent of the low fire position Be aware of mechan...

Page 77: ...ams Display RatioControl OilSettings CurveParams Go into parameter then press Enter to reset Params Display RatioControl Gas Oil Settings SpecialPositions ResetlgnitPos deact See Description For gas or oil firing this parameter will stop the sequence in the selected phase Useful for commissioning and service work The LMV5 can be held in the following phases 24 Prepurge 32 Prepurge FGR 36 Ignition ...

Page 78: ...nt is 15 or the highest point that is set x x x Params Display RatioControl Gas Oil Settings Load mask out VSD S AuxActuator 1 O AuxActuator 2 O AuxActuator 3 O These settings allow a masking of a particular load range This is useful for combustion resonances that occur at a particular load firing rate For example if LoadMaskLowLim is set to 32 and LoadMaskHighLim is set to 42 the LMV5 will modula...

Page 79: ... are closed Higher numbers are slower ramps Set for slowest actuator SQM45 10s SQM48 4 30s SQM9 30s SQM48 6 60s x x x NumFuelActuators O 2 1 2 Setting is avalable so that a single fuel actuator could be used for a gas and oil valve on a common shaft Also useful if firing 2 gaseous fuels with the same firing rate control valve x x x ShutdownBehav S HomePos HomePos PostpurgeP Unchanged Controls the ...

Page 80: ...ate x x Params Display O2Contr Alarm Gas Oil Settings O2 Control S Not Set Points 2 15 This is where the O2 ratio control and the O2 control curves are input An O2 ratio contol point and O2 control point must be set for every point on the position control curve except for point 1 See Section 6 for more detail x x O2 Alarm S Not Set Points 1 15 This is where the low O2 alarm curve is input A low O2...

Page 81: ...and and integral component for O2 trim response Automatically set based on the Tau delay time measured at the LowfireAdaptPtNo Both the P and the I can be manually adjusted but this is typically not necessary This is the delay time that is automatically measured at LowfireAdaptPtNo Delay time is the amount of time that a fuel air ratio change at the burner takes to reach the O2 sensor in the stack...

Page 82: ...ed O2 during a load change After active trim is resumed the offset will be dissolved O2ModOffset S 0 5 0 25 LowfireAdaptPtNo S O2 CtrlThreshold S 2 15 0 0 0 100 5 x x Sets the point that Tau Low Fire is automatically measured Tau and PI for low fire will be based on this point A low fire adapt point must be defined before setting up the O2 trim curves Typically the low fire adapt point is chosen a...

Page 83: ...urve commissioning which is preferred NOTE like theory is typical for oil and like P air is typical for gas NOTE The burner behavior discussed above can only be observed if a fuel flow meter is used during commissioning These settings limit the amount of positive or negative O2 trim that can take place by limiting how much the manipulated variable can be changed O2MaxManVariable limits how much th...

Page 84: ...x NumberTauSuspend has passed or the measured O2 is within 0 2 of setpoint See Section 6 for more detail x Load of Ignition O 0 0 100 When Startmode is set to IgnLoadTC this defines the load at which the burner will be ignited If another start mode is selected parameter has no effect x O2InitOffset O 0 2 2 For start modes other than standard this will bias the manipulated variable so that the tran...

Page 85: ...vated COx Control COx Limiter Future functionality Does nothing at this time 9 1 20 x x x x x x x x x x x x Defines the O2 content of the combustion air The LMV52 must see this value 2 during prepurge This value can be adjusted if O2 enriched air is used For user defined fuels this represents the volumetric fuel air ratio needed for stoichiometric combustion of the fuel For user defined fuels this...

Page 86: ...ngage after lightoff See NumberTauSuspend 4 InitContr controller is being initialized preparing to trim and is still locked 5 LockTLoad the O2 trim is engaged but locked due to a load change See parameter LoadControlSuspend 6 active the O2 trim is active and adjusting the air rate in small steps to achieve the O2 setpoint 7 LockTCAct the O2 trim is engaged but locked due to an excursion from O2 se...

Page 87: ...on 14 5 PSIG or 212 F depending upon if the LMV5 is set for pressure or temperature Low values 2 give an aggressive response and higher values 100 give a weak response Setting this parameter too aggressively will cause the load firing rate to hunt x x x I Part U 120s 0 2000s I part of the PID loop I is the integral reset function This component serves to eliminate steady state error by looking at ...

Page 88: ...itched to W2 from W1 by closing a contact between X62 1 and X62 2 x x x SD_ModOn U 1 50 50 Determines what temp press a modulating burner will cycle on when LMV5 is in any internal load controller mode Ignored in external load controller modes Can be set at a positive or negative either above or below the current setpoint respectively Percentage based on current setpoint x x x SD_ModOff U 10 0 50 ...

Page 89: ... Creates a negative deadband for the temperature limiter function If the temperature reaches the threshold off value TL_ThreshOff the burner will shut off with an alarm This setting controls what temperature under the threshold off value the burner can be restarted Not applicable to steam boilers x x x ColdStartOn S deact activated deactivated Activates or deactivates cold start thermal shock prot...

Page 90: ...sengages The value is a percentage of the current setpoint x x x AdditionalSens S deact deactivated Pt100 Pt1000 Ni1000 If an additional temp sensor is used on a steam boiler for cold start recommended the type of sensor must be selected Sensor to be wired to INPUT terminal X60 Pt1000 and Ni1000 temperature is updated continuously PT100 temperature only updated when thermal shock protection is act...

Page 91: ...nd 3 thru 6 can be switched back to mode 2 by closing a contact between X62 1 and X62 2 When in mode 2 contact closure can be used to switch between setpoint W1 and W2 x x x Sensor Select S Pt100 Pt100 Pt1000 Ni1000 TempSensor PressSensor Pt100Pt1000 Pt100Ni1000 NoSensor Defines the type of sensor that will be used for the internal load controller 1 Pt100 Pt1000 Ni1000 Temperature sensor RTD wired...

Page 92: ...hes the minimum external setpoint that can be input via terminals X62 or via Modbus This is a percentage of the range of the attached sensor x x x Ext MaxSetpoint S 60 0 100 Establishes the maximum external setpoint that can be input via terminals X62 or via Modbus This is a percentage of the range of the attached sensor x x x Params Display LoadController Configuration Analog Output OutValuSelect...

Page 93: ...to 4mA Scale20mA angle is set to 90 deg and Scale 0 4mA is set to 0 then 12 mA will be output when the air actuator is at 45 degrees and 20mA will be output at 90 degrees If all other values are unchanged and Scale 0 4mA is now set to 50 then 4 mA will be output when the air actuator is 45 degrees and 20mA will be output when the actuator is at 90 degrees x x x StartAdaption U This starts the adap...

Page 94: ... x Address U 1 1 247 Sets the LMV5 address for Modbus job specific x x x Baudrate U 19200 bit s 9600 bit s 19200 bit s Sets the baud rate of the Modbus port which is an RJ45 jack located on the underside of the AZL Also affects data output NOTE To use Modbus it must be activated at Operation OptgModeSelect x x x Parity U no no odd even This sets the parity of the Modbus port Also affects data outp...

Page 95: ...ing of the actuators Select one of the actuators and press Enter The AZL will then serve as a guide through the rest of the procedure This procedure involves pressing a red button hold about 1s on the selected actuator The actuators can be wired and addressed in any order The green LED will be on when the actuator is powered and not addressed and it will blink after it has been addressed NOTE Hold...

Page 96: ... x 1 AirActuator U x x x 2 GasActuat Oil U x x x 3 OilActuator U x x x 4 AuxActuator U x x x 5 AuxActuator2 U x x 6 AuxActuator3 U x x Information concerning the currently addressed aux1 actuator Read Only Params Display Actuators ProductID 5 AuxActuator2 Information concerning the currently addressed aux2 actuator Params Display Actuators ProductID 6 AuxActuator3 Information concerning the curren...

Page 97: ...ng this time the LMV52 will correlate a milliamp signal to the peak motor RPM x x StandardizedSp S 1 RPM 1 6300 RPM Shows the motor speed corresponding to a 95 input signal to the VSD motor combination This is automatically set when the VSD motor is standardized It can be set manually but this is not recommended in most circumstances x x Absolute Speed U This displays the real time speed of the bl...

Page 98: ...Module SW Version U Software version of the VSD control x x O2 Sensor S no sensor no sensor QGO20 QGO21 Configures the PLL module for the connected O2 sensor x x O2SensServTim S 0 days 0 65535 days Sets the service interval for the O2 sensor The time set here is compared against the total hours run counter See Operation HoursRun Upon expiration of service interval different actions will be taken b...

Page 99: ... If the O2 sensor is deactivated this number will not be displayed Also the flue and ambient temperatures are needed for this number to display x x QGO SensorTemp U This displays the current O2 sensor internal temperature Absolute minimum operating temperature 1202 F Normal operating temperature for QGO20 is approximately 1292 F x x QGO HeatingLoad U This displays the current heating load for the ...

Page 100: ...2 4 only 6 deactMinpos after ignition position Aux 3 actuator is held closed LMV52 4 only 7 auto deact do not select this option It is displayed if the FGR hold was deactivated due to a sensor issue LMV52 4 only x FGR sensor S X86PtNi 1000 X86PtNi1000 X60 Pt1000 X60 Ni1000 Selects the type and wiring location of the flue gas sensor for the FGR functions x x actTmpFGR sensor U The actual temperatur...

Page 101: ...lso be changed at Params Display LoadController Configuration LC_OptgMode If Load Controller not active message was seen under Params Display LoadController Configuration LC_OptgMode adjust this parameter to IntLC and return to Params Display LoadController Configuration LC_OptgMode x x x Ext Inp X62 U I S 4 20 mA 4 20 mA 2 10 V 0 10 V 0 20 mA See Params Display LoadController Configuration Ext In...

Page 102: ...x x x OilStage1 Mod U Hours run on modulating or stage 1 oil Can be reset here See Operation HoursRun x x x OilStage2 U Hours run on stage 2 oil Can be reset here See Operation HoursRun x x x OilStage3 U Hours run on stage 3 oil Can be reset here See Operation HoursRun x x x TotalHoursReset U Hours run on all fuels Can be reset here See Operation HoursRun x x x GasStartCount U Number of starts for...

Page 103: ...parameter set x x x Date U This displays the date of the last backup x x x TimeOfDay U This displays the time of day of the last backup x x x BU included U This states if the basic unit LMV5 was included in the last backup x x x AZL included U This states if the AZL was included in the last backup x x x LC included U This states if the LC load controller was included in the last backup x x x ACT1 ...

Page 104: ...x x Access w out PW U Access without password Also called user level x x x Access Serv U 9876 3 to 8 characters Access with service level password x x x Access OEM U START 4 to 8 characters Access with OEM level password x x x Access SBT U Access level not used x x x PW Logout PW Logout S Deactivates all passwords thus reducing access to user level x x x LossFlameTest U Enables testing of the flam...

Page 105: ...uators are expected to achieve at each phase and outlines the method that is used to check the actuators position Notes 1 Only one fuel select terminal can be energized at a time If both terminals are energized the LMV5 will go into lockout If neither terminal is energized fuel selection is internal through the AZL5 FuelSelect or via Modbus 2 The external burner on off switch can be disabled with ...

Page 106: ...eactInStby the air pressure switch is not checked in phase 10 or 12 but the switch must be open or the LMV5 will not start when it receives a call for heat 9 The LMV5 can be configured for different reactions to extraneous light a flame signal when there should not be one Depending on how parameters ReacExtranLight and ExtranLightTest are configured the LMV5 can lockout block the startup sequence ...

Page 107: ...g this parameter to FGR PS If parameter FGR PS FCC is set for PS VSD input X4 01 3 must be energized anytime the VSD speed is higher than RotSpeed PS on and de energized anytime the VSD speed is lower than RotSpeed PS off 16 Depending on how parameter HeavyOilDirStart is set input X6 01 3 has varying sequences If this parameter is set for activ 38 44 input X6 01 3 must be energized in phase 44 If ...

Page 108: ...past phase 36 If X5 03 3 is de energized the LMV5 will remain in phase 36 indefinitely CoolFctStby This setting has no effect LMV50 only AutoDeactO2 Energizing input X5 03 3 will deactivate O2 trim by setting O2 trim OptgMode to auto deact O2 trim OptgMode must be set to ConAutoDeac for this function to work De energizing X5 03 3 sets the O2 trim OptgMode back to ConAutoDeac Terminal X5 03 2 has n...

Page 109: ...CPI F X X X M POC SW Oil CPI POC SW Gas Oil CPI F X X X M Start Release Gas M X9 03 3 High Gas Pressure SW X6 01 3 External Flame Safeguard Note 9 X X X X X X X X X X X M F X X X X X X X X X X6 01 1 Ext Flame SG Red Contact Note 9 F X X X X X M X3 01 1 Fan Note 12 X4 02 3 Ignition X X X X X X X X X X X X X X X X X X X X X X X X X X X Start Signal X X X X X 3 Way Valve APS checking Note 10 X X X X ...

Page 110: ...SW Gas Oil CPI F X X X M Start Release Gas M X9 03 3 High Gas Pressure SW X6 01 3 External Flame Safeguard Note 9 X X X X X X X X X X X M F X X X X X X X X X X6 01 1 Ext Flame SG Red Contact Note 9 F X X X X X X X M X3 01 1 Fan Note 12 X4 02 3 Ignition X X X X X X X X X X X X X X X X X X X X X X X X X X X X X Start Signal X X X X X 3 Way Valve APS checking Note 10 X X X X X X X X X X X X X X X X X...

Page 111: ...W Gas Oil CPI F X X X M Start Release Gas M X9 03 3 High Gas Pressure SW X6 01 3 External Flame Safeguard Note 9 X X X X X X X X X X X M F X X X X X X X X X X6 01 1 Ext Flame SG Red Contact Note 9 F X X X X X X X M X3 01 1 Fan Note 12 X4 02 3 Ignition X X X X X X X X X X X X X X X X X X X X X X X X X X X X X Start Signal X X X X X 3 Way Valve APS checking Note 10 X X X X X X X X X X X X X X X X X ...

Page 112: ...l Press SW M Low Oil Press SW activated M Low Oil Press SW act from ts M X6 01 3 External Flame Safeguard Note 9 X X X X X X X X X X X M F X X X X X X6 01 1 Ext Flame SG Red Contact Note 9 F X X X X X M X3 01 1 Fan Note 12 X4 02 3 Ignition Note 14 X X X X X X X X X X X X X X X X X X6 02 3 Oil Pump Motor Starter Note 6 X X X X X X X X X X X X Start Signal X X X X X 3 Way Valve APS checking Note 10 ...

Page 113: ...SW act from ts M X6 01 3 External Flame Safeguard Note 9 X X X X X X X X X X X M F X X X X X X6 01 1 Ext Flame SG Red Contact Note 9 F X X X X X X X M X3 01 1 Fan Note 12 X4 02 3 Ignition X X X X X X X X X X X X X X X X X X X X X X X X X X6 02 3 Oil Pump Motor Starter Note 6 X X X X X X X X X X X X Start Signal X X X X X 3 Way Valve APS checking Note 10 X X X X X X X X X X X X X X X X X X X X X X ...

Page 114: ...Note 16 External Flame Safeguard Note 9 X X X X X X X X X X X M F X X X X X X5 02 2 High Oil Press SW M Low Oil Press SW activated M Low Oil Press SW act from ts M X3 01 1 Fan Note 12 X4 02 3 Ignition X X X X X X X X X X X X X X X X X X X X X X X X X X6 02 3 Oil Pump Motor Starter Note 6 X X X X X X X X X X X X Start Signal X X X X X 3 Way Valve APS checking Note 10 X X X X X X X X X X X X X X X X...

Page 115: ... T T T M T S T Position Required to Proceed Note 13 Dynamic Position Checking Note 13 Run Time Position Checking Note 13 Expected Position Note 7 T T M T S T Position Required to Proceed Note 13 Dynamic Position Checking Note 13 Run Time Position Checking Note 13 Expected Position Note 7 T PrP T T M T S T Position Required to Proceed Note 13 Dynamic Position Checking Note 13 Run Time Position Chec...

Page 116: ...Technical Instructions LMV Series Document No LV5 1000 Section 3 Page 58 SCC Inc Intentionally Left Blank HOME ...

Page 117: ...Commissioning Section 5 VSD Section 6 O2 Trim Section 7 Troubleshooting Section 8 Modbus Section 9 ACS450 Section 10 Revision History Appendix A Application Guide Appendix B Complimentary Products Guide Can be found at www scccombustion com GP 2 FUEL TRAIN ERROR CODES ...

Page 118: ...Commissioning Section 5 VSD Section 6 O2 Trim Section 7 Troubleshooting Section 8 Modbus Section 9 ACS450 Section 10 Revision History Appendix A Application Guide Appendix B Complimentary Products Guide Can be found at www scccombustion com GP 2 FUEL TRAIN ERROR CODES ...

Page 119: ...sites for LMV52 Systems with O2 Trim 5 Configuring Parameterization of an LMV5 with a Default Parameter Set 6 Transferring Parameter Sets Using the AZL Display 14 Suggested Initial Light off for LMV5 Systems 15 Suggested Ratio Control Curve Commissioning 17 Suggested Load Control Setup 22 Suggested Cold Start Thermal Shock Protection Setup 24 Additional Tips for Commissioning 28 Special Features a...

Page 120: ...ew and Appendix B LMV5 Accessories Guide for mounting details Particular attention should be paid to the following a Actuator shaft couplings must accomplish the following i Compensate for both angular and parallel shaft misalignment generated by the mounting bracket ii Have little or no backlash iii Be robust enough to absorb the stall torque of the actuator without damage Solid rigid shaft coupl...

Page 121: ... same time a second transformer AGG5 210 will be required h CANbus wire AGG5 643 must be used to wire between actuators Plain shielded cable is not adequate and is not permitted i Ensure that the last device and only the last device on the CANbus has the termination jumper in the Bus Termination position See Section 2 Wiring for more details The AZL has built in termination 4 Fuel gas supply must ...

Page 122: ...erently more precise motor speed control Volt Hz VFDs are not recommended due to less precise speed control 4 Proper grounding between the LMV5 the VFD and the motor must be installed See Section 2 Wiring for more details 5 VFD parameters must be set correctly to be compatible with both the LMV52 and the blower motor See Section 5 VSD for more details Particular attention should be paid to the fol...

Page 123: ... must be wired to the PLL52 correctly See Section 2 Wiring for more details Particular attention should be paid to the following a The PLL52 module must be within 30 feet of the O2 sensor b Two conduits must be run between the QGO20 O2 sensor and the PLL52 module One conduit must contain the low voltage signals while the other conduit must contain the high voltage for the sensor heater 4 The furna...

Page 124: ...the LMV5 in a state of alarm until the key parameters are set 1 Log in at the OEM password level From the factory the OEM password for the LMV5 is START 2 Set the Burner ID This can be found in the main menu under Updating The OEM password will be required when the Updating menu is entered The Burner ID is a unique number which matches the burner to the parameter set in the LMV5 Typically the seri...

Page 125: ...t Spark Ignition Pilot Ignition Pilot From Between Main Gas Valves V1 and V2 Pilot Ignition Pilot Before Main Gas Valves V1 and V2 Legend ACT Actuator SV Shutoff safety valve V1 Upstream gas valve main PS Pressure switch V2 Downstream gas valve main VP Valve proving PV Pilot valve HOME ...

Page 126: ...01 4 Gas valve V1 main valve upstream X9 01 3 Gas valve V2 main valve downstream Pilot Gp1 X4 02 3 Ignition X9 01 1 Gas valve SV safety valve usually outdoors X9 01 2 Gas valve PV pilot valve X9 01 4 Gas valve V1 main valve upstream X9 01 3 Gas valve V2 main valve downstream Pilot Gp2 X4 02 3 Ignition X9 01 1 Gas valve SV safety valve usually outdoors X9 01 2 Gas valve PV pilot valve X9 01 4 Gas v...

Page 127: ...i stage other trains possible Gas Pilot Ignition for Light Oil Staged or Modulating other trains possible Gas Pilot Ignition for Heavy Oil Modulating other trains possible Legend ACT Actuator SV Shutoff safety valve V1 Oil valves main PS Pressure switch V2 Stage 2 oil valve PV Pilot valve V3 Stage 3 oil valve TS Temperature switch HOME ...

Page 128: ...ition X8 02 1 Oil valve V1 main valve X8 03 1 Oil valve V1 main valve LO w Gasp X4 02 3 Ignition X9 01 1 Gas valve SV safety valve usually outdoors X9 01 2 Gas valve PV pilot valve X8 02 1 Oil valve V1 main valve X8 03 1 Oil valve V1 main valve Safety Time 2 HO ONLY HO w Gasp X4 02 3 Ignition X9 01 1 Gas valve SV safety valve usually outdoors X9 01 2 Gas valve PV pilot valve X8 02 1 Oil valve V1 m...

Page 129: ...lips Pozidriv head screws on the cover and setting the cover aside b On the AZL the menu path will be Params Display Actuators Addressing Note that when the Params Display menu is entered it may be necessary to enter the OEM or service level password c Select the actuator to be addressed When prompted press the Enter key to begin the addressing assignment d Press the red button on the appropriate ...

Page 130: ...flat at B when in ome from the Key or flat t A when ind Page 12 rectly powere ndicates pow the LED shoul dicates how t 3 O ed by holding d FGR functio r actuators V f O2 trim is to equipped to e done for b ol Configura sed and activ DirectionRot ard and Reve is at A when dicated actua e factory is at B when icated actuat ed up and no wer and CANb ld blink a set the actuator i Oil 4 g the red butt ...

Page 131: ...y when formed or welded mounting brackets are used Couplings should have little to no backlash and are a safety relevant part of a linkage less system NOTE Make absolutely certain that when the actuators are at or near 0 degrees as indicated on the AZL display that the valve damper the actuator is coupled to is in the CLOSED minimum flow position An exception to this is some back flow type oil bur...

Page 132: ...osed Transferring Parameter Sets Using the AZL Display This procedure will detail how to transfer a parameter set from one burner to another burner In this example the parameter set will originate from Burner 1 B1 and will be copied to Burner 2 B2 Naturally using a similar procedure the parameter set from Burner 1 can be copied to Burners 3 4 5 etc The ACS450 PC software can also be used for this ...

Page 133: ...this is complete B2 can be powered down The AZL from B1 can be returned to B1 and the AZL from B2 can be reconnected to B2 Power B2 LMV5 back on 8 If the burner ID on B2 was changed to allow the backup then return the burner ID to what it was previously If the burner ID was blank before the download change the burner ID on B2 to a unique value different than B1 Typically the burner serial number i...

Page 134: ...ne the pilot by adjusting the ignition position of the air actuator and or adjusting the pilot gas pressure regulator if necessary Pilot flame should be stable and return a flame signal of 85 or greater Ignition positions can be adjusted at this time using the following menu path Params Display RatioControl GasSettings SpecialPositions IgnitionPos 9 Once a satisfactory pilot flame is established s...

Page 135: ... delete the point Change should be selected Next the AZL will prompt for Followed or Not followed Followed should be selected All actuators and or VSD that have been activated should show up on this screen If more than one Aux actuator or VSD are activated the screen may need to be scrolled down to show the other actuators If an O2 sensor is being used and is activated the O2 reading will also be ...

Page 136: ... positions and gas pressure regulator s are set record actuator VSD positions burner head pressure high fire fuel flow and gas pressure upstream of the firing rate control valve After this is recorded the burner can be shut down 7 With the burner off go back to Point 1 When Point 1 is entered the AZL will prompt to change or delete the point Delete should be selected and Point 1 should be deleted ...

Page 137: ...LMV Series Technical Instructions Document No LV5 1000 SCC Inc Page 19 Section 4 Figure 4 6 LMV5x Curves Spreadsheet Used on a 600 BHP Boiler with FGR and a VSD HOME ...

Page 138: ...ould be achieved for each point on the Ratio Control Curve For standard burners LMV51 or LMV52 without O2 trim a Safe efficient combustion as verified by a calibrated stack gas analyzer b The load matching the fuel flow within 5 c Emissions compliance d Smooth Ratio Control Curves no sharp peaks and valleys For standard nozzle mixing burners no or low FGR and O2 trim LMV52 e All points a thru d ab...

Page 139: ...target O2 Record this as the saved value for each curve point NOTE This information will be needed to commission the O2 trim and it is convenient to obtain this information when commissioning the Ratio Control Curve When probing the fuel rich limit it is not recommended to exceed 200 ppm CO dry basis or less than 1 0 O2 wet or dry basis for any point When probing the fuel lean limit it is not reco...

Page 140: ...ge to IntLC setpoint W1 External load control staged oil IntLC Internal load control setpoint set locally on LMV5 W1 W2 Remain in IntLC change to setpoint W2 IntLC Bus Internal load control setpoint from Modbus command W3 Modbus Change to IntLC setpoint W1 IntLC X62 Internal load control setpoint from analog signal on terminal X62 Remote setpoint ExtLC X62 External load control firing rate from an...

Page 141: ... parameter MRange PressSens to the high range of the pressure sensor This is typically printed on the side of the pressure sensor 4 Configure setpoint W1 the local setpoint through the following menu path Operation BoilerSetpoint 5 Set the turn on point SD_ModOn and the turn off point SD_ModOff for the boiler These are percentages based on the current setpoint W1 The menu path for these parameters...

Page 142: ...p has been adjusted it is possible that the load will still move up and down by a small amount 1 2 load If this is the case adjusting parameter MinActuatorStep may help eliminate this micro hunting This parameter can be found in the following menu Params Display LoadController ControllerParam MinActuatorStep is basically a dead band for the output of the PID loop Typical setting 1 to 4 Values abov...

Page 143: ...that the cold start can be set These are a Basic Low Fire Hold The LMV5 will be held at low fire until the ThresholdOff temperature is reached and then the LMV5 will be released to modulate This hold will re engage when the temperature falls below the ThresholdOn value Parameter StageLoad must be set to 0 b Temperature based Stepping Start The LMV5 will be held at low fire until a certain temperat...

Page 144: ... to the ThresholdOff temperature This is due to the more rapid rise in boiler temperature at higher firing rates 5 After parameters are set for one of the methods above set parameter ColdStartOn to activated The next time the burner is started and the water temperature is below the ThresholdOn temperature cold start should engage Below are typical settings for each of the four ways cold start can ...

Page 145: ...t go below ThresholdOn to engage cold start ThresholdOff of current setpoint 80 240o F Cold start will not disengage until ThresholdOff is met StageSetp_Mod of current setpoint 80 240o F Defines the necessary temperature change required to trigger a load step StageLoad 5 N A Determines the size of the load step MaxTmeMod N A 10 min Determines the max time between load steps Figure 4 9 Example of a...

Page 146: ...portions For CO to be explosive in air it must reach a concentration of at least 12 5 125 000 ppm with an ignition source present If a burner is commissioned properly actuator curves should increase smoothly with increasing load firing rate One exception to this would be the FGR actuator Aux1 or Aux3 which commonly decreases closes as firing rate increases Curves should always be smooth with no sh...

Page 147: ...reen SD positions i nter buttons valves and lo ation screen t s or right m Page 29 Enter can n real time R s on the AZL ckout the AZL contr ore arrow ke be pressed o Real time loa L at the same rast can be ad ey Tec Docum once to go to d and O2 ar e time will c djusted by pr chnical Instruc ment No LV5 Sec a hidden s re also display ause the LM ressing the E ctions 1000 tion 4 screen yed V5 to Ent...

Page 148: ...er air pressure switch must be checked by using a 3 way solenoid valve The solenoid valve is configured under parameter StartSignal ForcedIntermit Shuts the burner down once every 24 hours to cycle and check flame scanner air pressure switch POC and other safety devices DriveLowFire Starts driving to low fire StartPointOp immediately after main fuel valves open Enables less air to be put on the pi...

Page 149: ...ors Permits the LMV5 to run dual fuel with a single actuator two fuel valves on one actuator ProgramStop Stops the LMV5 at a particular phase in the start up or shutdown sequence This is particularly useful when set to Phase 44 for tuning the pilot FGR Mode On an LMV52 this setting enables only the Aux 3 actuator to be held from modulating until a certain temperature or time after light off is met...

Page 150: ...Technical Instructions LMV Series Document No LV5 1000 Section 4 Page 32 SCC Inc Intentionally Left Blank HOME ...

Page 151: ...Commissioning Section 5 VSD Section 6 O2 Trim Section 7 Troubleshooting Section 8 Modbus Section 9 ACS450 Section 10 Revision History Appendix A Application Guide Appendix B Complimentary Products Guide Can be found at www scccombustion com GP 2 FUEL TRAIN ERROR CODES ...

Page 152: ...Commissioning Section 5 VSD Section 6 O2 Trim Section 7 Troubleshooting Section 8 Modbus Section 9 ACS450 Section 10 Revision History Appendix A Application Guide Appendix B Complimentary Products Guide Can be found at www scccombustion com GP 2 FUEL TRAIN ERROR CODES ...

Page 153: ...on Motor Fundamentals 2 Line Reactors 3 Output Wiring Load Reactors 4 Shaft Current 5 Braking Resistors 5 Types of VFDs Vector and Volt Hz 7 Centrifugal Blower Fundamentals 7 Configuring VFDs for use with the LMV52 8 Standardizing the LMV52 9 Blower Speed Monitoring 13 Suggested Setup Procedure for the VFD Control 15 Additional Tips for Burners with VFD Control 16 HOME ...

Page 154: ...t DC for the DC bus The AC power is typically rectified to DC with banks of diodes The DC bus feeds a bank of Insulated Gate Bipolar Transistors IGBTs and a microprocessor is used to fire the IGBTs in a way that the voltage and frequency of the modified sine waves can be controlled This is done for each of the three phases on the VFD output The microprocessor varies the voltage and frequency of th...

Page 155: ...n the input side of the drive is typically low when a relatively small VFD is being fed by a relatively large transformer In this situation the supply side of the drive is stiff meaning that an instantaneous current draw by the drive will be met very quickly by the large transformer think square wave form causing voltage and current distortions in the power distribution system feeding the drive In...

Page 156: ...ctor will be necessary for this application The same conclusion can also be arrived at by using Figure 5 1 Example 2 A 10 HP drive is fed by a 400 kVA transformer Is a line reactor required Using the same assumptions and calculation as example 1 the kVA ratio is 53 7 but the transformer is smaller than 600 kVA so a line reactor is not necessary The same conclusion can also be arrived at by using F...

Page 157: ... some of which are detailed on the previous pages This fast switching of the IGBTs can also cause shaft current on the motor When this happens a voltage charge builds up on the motor s shaft When this voltage gets high enough it will arc to ground through the path of least resistance The path of least resistance is typically the ball bearings that support the rotor of the motor When this arcing oc...

Page 158: ...he VFD as electrical energy 2 Fast ramp times The faster the ramp times the faster the blower wheel must be accelerated and decelerated Just like a car more energy is required to accelerate quickly bigger engine and more energy is required to be dissipated when decelerating quickly bigger brakes Decelerating a given blower wheel more quickly will push more electrical energy back to the VFD 3 Mostl...

Page 159: ... accuracy Vector VFDs are typically run in Open Loop Vector OLV mode In this mode the VFD uses a mathematical model of the motor combined with extremely accurate fast scanning of the current and other data taken from the rotating motor In reality Open Loop Vector mode does have feedback but the Vector VFD itself does not require a separate encoder to achieve this Since Vector VFDs use a mathematic...

Page 160: ...ilor the VFD to a specific application As mentioned earlier there are also at least a hundred different manufacturers of VFDs each of which have their own unique parameter list Due to these two factors SCC Inc offers pre programmed VFDs that can be purchased with the VFD parameters set up for use with an LMV52 If a VFD for use with an LMV52 is purchased and programmed independently the following p...

Page 161: ...plate data must be entered for the motor that the VFD is connected to 10 Some VFDs have a feature that will stop ramping the drive if a critical limit in the drive is approached On some VFDs this feature is referred to as stall prevention Two common limits are the maximum amperage drawn and the DC bus voltage Stall prevention while protecting the drive can cause speed faults with the LMV52 due to ...

Page 162: ... pre purge position 2 The run stop dry contact in the LMV52 is closed 3 An analog signal of 19 5 mA is applied to the VFD 4 The VFD blower ramp up to speed After the speed has stabilized the actual peak RPM is recorded by the LMV52 5 The analog signal is returned to minimum typically 4 mA 6 The run stop dry contact in the LMV52 is opened 7 The air damper is returned to home position A typical stan...

Page 163: ...LMV Series Technical Instructions Document No LV5 1000 SCC Inc Page 11 Section 5 Figure 5 3 Standardization Process for a 2 Pole Blower Motor values are approximate HOME ...

Page 164: ... LMV52 which establishes the linear relationship between the analog signal and the blower RPM This relationship is shown in Figure 5 4 Figure 5 4 Result of Standardization 2 pole blower motor and Analog Signal Correction Limits When the burner is in operation the LMV52 has active closed loop control of the blower motor speed and can compensate for motor slip and other factors within limits The ana...

Page 165: ...n To help ensure that the burner is either operated at a safe fuel air ratio or is shut down the blower speed is constantly monitored while a flame is present in the boiler The speed is monitored so that nuisance shutdowns are eliminated but fast shutdowns will occur if the speed deviation is large To do this the LMV52 evaluates the magnitude of the speed deviation in combination with how long the...

Page 166: ... time ramping from low fire to high fire when the burner is operating The black line is the standardized speed line the same line as shown in Figure 5 4 The lines surrounding the black line are the different speed monitoring bands The width of each band in and the time permitted in each band is shown in Figure 5 5 Figure 5 5 Blower Speed Monitoring Bands HOME ...

Page 167: ...ms Display RatioControl Gas Oil Setting VSD 2 Set the air actuator to be air influenced This is done so that the air damper will open to pre purge position when the LMV52 is standardized This can be done using the following menu path Params Display RatioControl Gas Oil Settings AirActuator air influen 3 Set or check the LMV52 ramp times Both of these must be at least 5 seconds longer than the ramp...

Page 168: ...ion and the VFD blower should ramp up to approximately 60 Hz 100 VFD After a few seconds at 60 Hz the VFD blower should ramp back down to 0 Hz The air damper should also drive back to home position 12 Check the standardized speed which is the product of the standardization using the following menu path Params Display VSD Module Configuration Speed StandardizedSp For 2 pole blowers the standardized...

Page 169: ...tc the speed should be steady not deviating by more than 10 RPM This can be viewed at Params Display VSD Module Configuration Speed Absolute Speed The combustion air pressure switch should be set by taking the VFD to 10 below the lowest anticipated low fire speed if low fire is 50 take the VFD to 40 and setting the switch to open at that point This should maximize the safety potential of the combu...

Page 170: ...Technical Instructions LMV Series Document No LV5 1000 Section 5 Page 18 SCC Inc Intentionally Left Blank HOME ...

Page 171: ...Commissioning Section 5 VSD Section 6 O2 Trim Section 7 Troubleshooting Section 8 Modbus Section 9 ACS450 Section 10 Revision History Appendix A Application Guide Appendix B Complimentary Products Guide Can be found at www scccombustion com GP 2 FUEL TRAIN ERROR CODES ...

Page 172: ...Commissioning Section 5 VSD Section 6 O2 Trim Section 7 Troubleshooting Section 8 Modbus Section 9 ACS450 Section 10 Revision History Appendix A Application Guide Appendix B Complimentary Products Guide Can be found at www scccombustion com GP 2 FUEL TRAIN ERROR CODES ...

Page 173: ... Commissioning Traditional Nozzle Mixing Burner with No or Low Percentage FGR Typically LMV52 240 9 Suggested O2 Trim Commissioning Premix Mesh Burner or Nozzle Mixing Burner with High Percentage of FGR Typically LMV52 440 14 Post Commissioning Tuning 20 Observing the Behavior of the O2 Trim 24 Using the O2 Alarm Functionality without O2 Trim 25 How the O2 is Measured with the QGO20 Sensor and PLL...

Page 174: ...t be in place and working correctly to enable the advanced system to work correctly For example if the gas pressure supply is not repeatable upstream of the firing rate control valve fundamental system then the O2 trim advanced system is likely to deactivate The fundamental systems on the burner boiler that must be working correctly are outlined in detail in the Pre Requisites listed in Section 4 ...

Page 175: ...iring rate decreases This enables the Tau time to be automatically calculated at every point from Point 2 to high fire Once the Tau time is calculated for every point from Point 2 to high fire the PI proportional integral response for the O2 trim can be automatically calculated for every point between Point 2 and high fire Another place where the Tau time must be accounted for is at startup Immedi...

Page 176: ... that the Lambda Factor is correct and accurate for each point Pre control uses the Lambda Factor so that the burner can be modulated while keeping the O2 close to the O2 setpoint even though the setpoint changes with the firing rate and the O2 trim is using old O2 readings Once the burner stops modulating or only modulates a small amount 5 the O2 trim will change modes back to active and perform ...

Page 177: ...r seen during Ratio Control Curve commissioning For a 10 to 1 turndown burner high fire would be 100 and low fire would be 10 For a 4 to 1 turndown burner high fire would be 100 and low fire would be 25 For O2 trim systems it is very important that the fuel rate load number matches the actual fuel flow to the burner within 3 9 Air Rate When no O2 trim is taking place running on Ratio Control Curve...

Page 178: ...an urves seen in lope for the b n the boiler ex peak efficienc e meeting em re 6 2 O2 Co eter O2 MaxV oundary for th burner is not m and cause n discussed lat m a O2 stand Page 6 nd parameter Figure 6 2 w burner xhaust with c cy lowest O missions requi ntrol and O2 Value sets the he burner Th permitted H nuisance dea ter in this sec dpoint rs must be set will achieve the changing amb O2 and excess...

Page 179: ...d to a burner boiler the burner boiler OEM may have already changed the parameters from the default setting and parameterized the LMV52 for the application This procedure also assumes that all O2 trim components are installed and wired correctly and that the O2 trim will be commissioned on natural gas Section 3 gives a detailed explanation of all of the parameters in the LMV52 as well as highlight...

Page 180: ...ersized exhaust stacks with high turndown burners are encountered which may make gas velocity in the stack too low at low fire For these applications setting this parameter to a higher point than Point 2 will increase the gas velocity past the O2 sensor and yield a more responsive O2 reading This can be set through the following menu path Params Display O2Contr Alarm Gas Settings Control Param Low...

Page 181: ...ly and easily is contained in the Ratio Control Curves Specifically the following must be achieved for each point on the Ratio Control Curves as paraphrased from Section 4 of this literature a Safe efficient combustion as verified by a calibrated stack gas analyzer b The load matching the fuel flow within 3 c Emissions compliance d Smooth Ratio Control Curves no sharp peaks or valleys e VSD speed ...

Page 182: ...rm O2 Alarm 6 With the burner off Phase 12 set the fuel lean limit O2 MaxValue based on the values that have already been found and recorded for Point 1 and Point 10 during Ratio Control Curve commissioning see above To set the fuel lean limit use the following menu path Params Display O2 Contr Alarm Gas Settings O2 Alarm O2 MaxValue 7 If the LMVx Curves spreadsheet is not being used take the reco...

Page 183: ...en increased enough to get the O2 into the target band at least 0 5 O2 above the O2 Alarm and 1 below the O2 Ratio Control Curve point the point can be stored This is done by pressing Enter Escape and then Enter again 14 After the point is stored the delay time at Point 2 Tau Low Fire will be measured This should occur and the AZL52 should state Measurement Successful Control Parameters Stored 15 ...

Page 184: ...g burners These are Wide stability band 8 O2 or more between the rich and lean limits Curves decrease in O2 from low fire to high fire 1 O2 or more between the O2 Ratio Control Curve and the O2 Control Curve accurate Lambda Factor O2 Control Curve close to rich limit minimize O2 to maximize burner efficiency Curves are set up for efficiency NOx emissions are not a priority LMV52 240 O2 trim system...

Page 185: ...n general the Lambda Factor curve should be as constant or flat as possible The actual numerical value is not important but the consistency between points is An approximate guide for evaluation of the Lambda Factor Difference in Lambda Factor between adjacent points lower numbers are better Max 0 35 Higher numbers may lead to O2 trim deactivations on some burners during modulation Standard Deviati...

Page 186: ...t 3 The key to commissioning the O2 curves quickly and easily is contained in the Ratio Control Curves Specifically the following must be achieved for each point on the Ratio Control Curves as paraphrased from Section 4 of this literature a Safe combustion as verified by a calibrated stack gas analyzer b The load matching the fuel flow within 3 c Emissions compliance d Smooth Ratio Control Curves ...

Page 187: ...ve already been found and recorded during Ratio Control Curve commissioning see above Once into the O2 Alarm curve simply enter in the recorded value for each point and save each point To access the O2 Alarm curve use the following menu path Params Display O2 Contr Alarm Gas Settings O2 Alarm O2 Alarm 6 With the burner off Phase 12 set the fuel lean limit O2 MaxValue based on the values that have ...

Page 188: ...may take 10 15 seconds or more for a change in the StandardVal number to be seen in the O2 reading 13 Once the StandardVal number has been increased enough to get the O2 at least 0 5 below the O2 Ratio Control Curve the point can be stored This is done by pressing Enter Escape and then Enter again NOTE If the Ratio Control Curve point was saved 0 5 O2 above the target O2 see step 3 above then lowe...

Page 189: ...tmode NOTE Air temperature compensation requires an air temperature sensor wired to the LMV52 440 See O2 Trim Configuration Parameterization Before Commissioning above for more information 19 The O2 trim can now be activated in one of two modes Mode conAutoDeac allows the O2 trim to work as long as the measured O2 does not exceed the rich limit O2 Alarm or the lean limit O2 MaxValue If either of t...

Page 190: ... mesh burners These are Narrow stability band typically 3 5 or less Curves are flat or nearly flat from low fire to high fire 0 5 O2 between the O2 Ratio Control Curve and the O2 Control Curve minimum to learn Lambda Factor O2 Control Curve close to lean limit high O2 to cool combustion Curves are set up for low NOx efficiency is lower due to high O2 LMV52 440 O2 trim systems are typically require...

Page 191: ... general the Lambda Factor curve should be as constant or flat as possible The actual numerical value is not important but the consistency between points is An approximate guide for evaluation of the Lambda Factor Difference in Lambda Factor between adjacent points lower numbers are better Max 0 45 Higher numbers may lead to O2 trim deactivations on some burners during modulation Standard Deviatio...

Page 192: ... OperatRampMod is set to 30 seconds 3 The delay time Tau time of the boiler is slow Tau Low Fire is set for more than 7 seconds O2TrimBehavior If parameter Startmode is set to standard this setting controls how the O2 trim responds if the measured O2 value starts to move away from the O2 setpoint significantly Menu path Params Display O2Contr Alarm Gas Settings Control Param 1 A setting of ForcedA...

Page 193: ...t in a way that allows the burner to run at an unsafe fuel air ratio Ideally the O2 trim system must compensate for two main environmental conditions These conditions are ambient air temperature and barometric pressure Figure 6 8 illustrates how much the manipulated variable needs to change to compensate for these environmental conditions The chart in Figure 6 8 and the example in Figure 6 9 serve...

Page 194: ...xpected air temperature 30 F 50 F compared to commissioning Maximum expected barometric pressure 31 5 inHg 1 5 inHg compared to commissioning Minimum expected barometric pressure 28 0 inHg 2 0 inHg compared to commissioning Using Figure 6 8 and the information above the following values can be found O2MaxManVariable 13 O2MinManVariable 16 Since other small factors exist that can change heating val...

Page 195: ...rd Burner will modulate right after light off not waiting for the O2 trim to engage O2 trim will engage after the time defined by NumberTauSuspend expires at the burner s current load 2 Ign Load TC This will vary the ignition positions special positions of the actuators based on the combustion air temperature and also based on a defined load number parameter Load of Ignition This also will drive t...

Page 196: ...oint and actual value should be slightly more when the burner is transitioning between firing rates and less when not transitioning As a guideline the difference should be less than 0 2 O2 when not transitioning and less than 0 4 O2 when transitioning ManVar O2 Ctrl Menu path Params Display O2 Contr Alarm Process Data This parameter shows the amount of trim The value shown is defined below 1 A val...

Page 197: ...Settings The available operating modes are 1 Man deact deactivates all O2 trim and O2 alarm functionality O2 value can still be viewed 2 O2 Limiter Only the O2 alarm is active This means that a lockout will occur if the lean limit O2 MaxValue is exceeded for a time longer than what is set for parameter Time O2 Alarm Likewise a lockout will occur if the rich limit O2 alarm curve is exceeded for a t...

Page 198: ...uced for a given O2 is dependent on the concentration of oxygen and the temperature of the Zirconium cell The PLL52 module reads both the Nernst Voltage and the temperature of the Zirconium cell With this information the O2 can be accurately determined and sent back to the LMV52 over CANbus As well as taking the milli volt signals and converting these to CANbus data the PLL52 also serves as the co...

Page 199: ...LMV Series Technical Instructions Document No LV5 1000 SCC Inc Page 27 Section 6 Figure 6 10 Cut Away View of the QGO20 Sensor shown without collector HOME ...

Page 200: ...ll As one would expect the raw milli volt signal varies with sensor temperature but this variance is compensated by the PLL52 module so the LMV52 is fed an accurate compensated O2 value O2 Wet O2 Dry Natural Gas Output Voltage mV 1292 F Output Voltage mV 1320 F 0 1 0 1 111 79 113 59 1 1 3 63 61 64 63 1 5 1 9 55 12 56 01 2 2 5 49 10 49 90 2 5 3 1 44 43 45 15 3 3 8 40 62 41 27 3 5 4 4 37 39 38 00 4 ...

Page 201: ... In addition to the cycle of intensification that is inherent to many FGR burners the mechanical design of the burner boiler influences the repeatability of the FGR flow The repeatability of the FGR flow has a large influence on how well the O2 trim system can work Obviously non repeatability in the FGR flow will cause non repeatability in the O2 read in the stack and therefore the operation of th...

Page 202: ...ment shown in Figure 6 12 even small pressure changes can cause the FGR flow to be non repeatable A few examples are given below Example At low fire the differential pressure across the FGR control valve is 0 2 WC Some external change increases P1 by 0 2 WC This represents a very small absolute change in pressure but a 100 change in the differential pressure across the FGR control valve which will...

Page 203: ...ssibilities a If only the air damper is trimmed set to air influenced trimming closed and reducing air flow will increase the vacuum at P2 and increase FGR flow relative to air flow b If only the VFD is trimmed set to air influenced trimming slower and reducing air rate will reduce the vacuum at P2 and reduce the FGR flow relative to the air flow c If both the air damper and VFD are trimmed set to...

Page 204: ...nd Air Damper on Blower Inlet In summary the arrangement shown in Figure 6 13 is preferable for the following reasons 1 Better repeatability of FGR flow with slight pressure changes from P1 to P2 2 Greater adjustability of the FGR to air ratio when trimming 3 The ability to draw more FGR at lower firing rates HOME ...

Page 205: ...t is changed on the O2 Ratio Control Curve then the O2 Ratio Control Curve and the O2 Control Curve should be redone so that the Lambda Factor at each point is known to be based on the same ambient conditions Setting the O2 Ratio Control Curve and the O2 Control Curve in a piecemeal fashion typically does not yield reliable O2 trim operation The LMV52 240 can only decrease the air influencing actu...

Page 206: ...d lean limits will be active as long as there is a valid O2 signal This deactivation via X5 03 2 occurs without a notification being displayed on the AZL52 Pre purge must be set so that 20 9 2 0 O2 is read by the QGO20 sensor If this is not met a lockout or deactivation will occur depending on the setting of parameter OptgMode When using the LMV52 440 on low or ultra low NOx mesh burners a StartMo...

Page 207: ...mmissioning Section 5 VSD Section 6 O2 Trim Section 7 Troubleshooting Section 8 Modbus Section 9 ACS450 Section 10 Revision History Appendix A Application Guide Appendix B Complimentary Products Guide Can be found at www scccombustion com HOME ERROR CODES GP 2 FUEL TRAIN ...

Page 208: ...mmissioning Section 5 VSD Section 6 O2 Trim Section 7 Troubleshooting Section 8 Modbus Section 9 ACS450 Section 10 Revision History Appendix A Application Guide Appendix B Complimentary Products Guide Can be found at www scccombustion com HOME ERROR CODES GP 2 FUEL TRAIN ...

Page 209: ...ode 25 or 26 8 Open Circuit Short Circuit Sensor Faults Error Code A6 Diagnostics 50 5A 9 Open Safety Loop Error Code 21 10 LMV5 Will Not Start Stays in Phase 12 11 LMV5 Will Not Modulate Properly 12 O2 Trim O2 Sensor is Not Reading 13 O2 Sensor Reading Grossly High or Low 14 O2 Sensor Reads But Responds Very Slowly 14 Ambient or Stack Temperature Sensor Reading Incorrectly 15 AZL says O2 Module n...

Page 210: ...e wiring of the CANbus network The CANbus network includes the following components LMV5 controller AGG5 210 transformer s One main fuse FU1 and two 12VAC fuses FU2 FU3 AZL display AGG5 643 special CANbus cable SQM45 48 91 actuators PLL52 O2 module if equipped An illustration of the CANbus network with a single transformer is shown below in Figure 7 2 1 Figure 7 2 1 Illustration of the LMV5 CANbus...

Page 211: ...d GND it is ok to have anywhere from 10 2 13 2 VAC as long as both measurements are the same For example it is okay to have 11 VAC between pins 12VAC1 and GND as long as there is also 11 VAC between pins 12VAC2 and GND In addition the voltage between pins 12VAC1 and 12VAC2 must be exactly double the other two measurements If these three voltage measurements are correct skip to step 3 2 If one or m...

Page 212: ...with the AZL the LMV5 or the cable between them Check the wiring and terminations on the cable Though unlikely the AZL or the LMV5 might be damaged and need to be replaced If a spare AZL is available try it If no spare AZL is present check for any noticeable damage to either the AZL or the LMV5 to determine which component to replace 5 To find the wiring issue with the actuators or O2 module plug ...

Page 213: ...thing and encircles all five conductors The shielding on all segments of the CANbus cable must have continuity with terminal X51 1 This can be checked with a multi meter by connecting one probe on the AGG5 110 shielding clip attached to terminal X51 1 and the other probe on the last actuator or O2 module on the CANbus network If everything else checks out and every time one of the actuators is plu...

Page 214: ...ly If the actuator is constantly moving improve the PID settings and or adjust parameter MinActuatorStep 4 Flutter This typically occurs on air or FGR dampers Highly turbulent flow across a damper blade can cause an alternating torque to be applied to the damper shaft This in turn puts an alternating torque on the actuator shaft For example let s say that the LMV5 is commanding the air actuator to...

Page 215: ...actuator shaft can wear down the shaft bearings of the actuator Since the potentiometers are mounted directly onto the back of the shaft they will disagree more and more as the shaft bearings wear Excessive vibration can also cause potentiometer wear and lead to an error code 19 3 It is imperative that proper couplings are used when mounting actuators It is highly recommended to use an SCC flexibl...

Page 216: ...onfigFlameDet FlameSignal Parameter FlameSig QRI_B can be used to view the flame signal when using an infrared scanner QRI2 or an ultraviolet scanner QRA7 Parameter FlameSig ION can be used to view the flame signal when using a flame rod A flame failure occurs below a 20 flame signal If the flame signal reads 0 when using a flame source check the wiring of the scanner See Section 2 for wiring assi...

Page 217: ...tion on how these parameters should be set 2 If all of the above parameters are set correctly check the wiring of the attached sensors See Section 2 for information on how to wire sensors to the LMV5 3 On a steam boiler a temperature sensor can be used in addition to the pressure sensor for the cold start function If this is the case check the setting of parameter AdditionalSens See Section 3 for ...

Page 218: ... in the safety loop Operating cycling switches should not be wired into the safety loop If a cycling switch is placed in this loop and it cycles off the LMV5 will lockout The cycling switch should be relocated in series with the burner on off switch wired to X5 03 1 If the LMV5 is in any external load controller mode ExtLC this is used to cycle the burner on and off If the LMV5 is in any internal ...

Page 219: ...erminals X3 03 1 and X3 04 1 3 Verify that there is 120 VAC at burner switch input terminal X5 03 1 4 Verify that the LMV5 is not in alarm If so correct the issue causing the alarm and reset the fault 5 Verify that ignition positions are defined for all activated actuators including the VSD This can be done through the following menu path Params Display RatioControl Gas Oil Settings SpecialPositio...

Page 220: ...t Typical setting 80 sec to 300 sec A setting of 0 deactivates the feature but this is not recommended D Part This is the derivative part which serves to eliminate overshoot and allows a more aggressive integral setting Larger values cause a more aggressive response D Part is not needed on many steam boilers If needed small values of less than 20 typically work well A setting of 0 deactivates the ...

Page 221: ...ngLoad The maximum QGO heating load is 60 If the heating load is at or near 60 the QGO20 sensor temperature should be increasing If it is the O2 sensor will begin reading once the temperature is over 1202 F If the temperature is not increasing check the following The stack velocity may be too high thus cooling the sensor The maximum stack velocity is 33 ft second The wiring between the O2 sensor a...

Page 222: ...MV52 and removing the QGO20 from the stack Be careful as the sensor is likely to be very hot After the QGO20 is removed from the stack let it cool for at least an hour After the sensor has cooled it can be blown out using low pressure compressed air less than 15 PSIG through the top of the sensor and out the front If this is done when the QGO20 sensor is hot the ceramics inside the sensor will mos...

Page 223: ...arams Display O2 Module Configuration FlueGasTempSens Note The ambient and stack temperature sensors are not necessary for O2 trim However if one or both inputs are configured for a sensor and either sensor is not reading the O2 trim will not activate AZL Says O2 Module not active or not Available If the AZL displays the message O2 Module not active or not Available when trying to access one of th...

Page 224: ...ntrol curve is at least 0 1 O2 above the O2 alarm curve and 0 1 O2 below the O2 ratio control curve Note 1 In most cases the O2 gap between the curves should be larger than the absolute minimum Depending on the burner characteristic doing this may also lead to more trouble free operation See Section 6 for more information on these curves It is preferable to have a 1 to 1 5 gap between the O2 alarm...

Page 225: ...o 2 combustion curve point 2 or higher if desired By default this parameter is set to X undefined The menu path for this parameter is Params Display O2Contr Alarm Gas Oil Settings Control Param LowfireAdaptPtNo 3 If both of the above parameters are set correctly then it is possible that the O2 readings on the ratio control curve were set incorrectly When setting each point on the O2 control curve ...

Page 226: ...urve and the O2 Alarm Curve at and around the point where the fault occurred can be determined by the load listed in the fault history Also parameter O2ModOffset can be increased in 0 5 increments Parameter LoadCtrlSuspend can be decreased in 1 increments See Section 3 for more information on these parameters 2 Error code AB diagnostic code 15 or 16 Check the configuration of the ambient and stack...

Page 227: ...or wiring between the VSD and the motor is correct 6 Verify that the VSD is set up properly for the motor it is driving Specifically check the following The VSD should be spanned so that 0 4mA equals 0Hz and 20mA 62Hz on a 60 Hz grid frequency See Section 5 for more information The VSD is in remote mode so that it looks for a 0 4 20mA signal and a run stop contact Closing the run stop contact shou...

Page 228: ...s installed on the blower motor correctly and the gap between the speed sensor and the speed wheel is correct about 1 16 Also use Section 2 to verify that the wiring from the speed sensor to the LMV52 is correct The yellow LED on the back of the speed sensor should blink every time a speed wheel finger passes by the nose of the sensor If it does not blink the sensor is wired incorrectly the sensor...

Page 229: ...ime speed can be read using the following menu path Params Display VSD Module Speed Absolute Speed During standardization the absolute speed should rise up to a peak value and hold steady at that value for a few seconds Then the value should drop back down to zero or near zero The peak value that is seen should be recorded as the standardized speed If this doesn t happen it s likely that there s a...

Page 230: ...nal as far as possible Control Range Limitation VSD Module indicates that the blower speed is too high even though the LMV52 has decreased the 0 4 20mA signal as far as possible If either of these messages appears do the following 1 Increase the ramp times of both the VSD and LMV52 Shorter ramp times on the VSD and LMV52 create a more demanding application for the VSD Simply put a shorter ramp tim...

Page 231: ...a transmission 03 CRC error during data transmission 05 Timeout during program run synchronization with initialization 10 Error counter Flame intensity outside tolerance has elapsed Check flame detector signal If ok and fault re occurs replace LMV5 11 Error counter Target phase unequal has elapsed 12 Error counter Reset lockout input unequal has elapsed 40 Fuel train unequal 41 Relay control word ...

Page 232: ...07 Pressure switch oil minimum 08 Pressure switch valve proving 09 Safety valve oil feedback 0A Fuel valve 1 oil feedback 0B Fuel valve 2 oil feedback 0C Fuel valve 3 oil feedback 0D Safety valve gas feedback 0E Fuel valve 1 gas feedback 0F Fuel valve 2 gas feedback 10 Pilot valve gas feedback Fault with Base Unit LMV5 Internal Fault Basic Unit 1 Check connections of the neutrals to all of the con...

Page 233: ... greater than permitted by parameter TolQuickShutdown If error occurs on one actuator only 1 Ensure torque requirements of dampers valves are less than actuator output Actuators running over rated 50 duty cycle may have significantly reduced torque output 2 Verify that no damper valve is bound 3 If 1 and 2 do not solve the problem replace actuator If error occurs on multiple actuators 01 3F 1 Veri...

Page 234: ...e been entered for the standardized values Readjust O2 trim control if required or repeat the settings 20 With hysteresis compensation Permissible target positioning range exceeded 21 The load point number predefined by the AZLI lies outside the permissible range 22 Unplausible program branch 23 Unplausible fuel air ratio phase 40 Unplausible target positions 16 LMV5 If fault occurs sporadically r...

Page 235: ...tor the fault occurred See diagnostic code 01 2F The diagnostic value is made up of the following faults or their combinations the individual diagnostic codes are added up in hexadecimal format 01 Air Actuator 02 Active Fuel Actuator 04 Aux 1 Actuator 08 Aux 2 Actuator 20 Aux 3 Actuator Fault with Actuator Internal Fault Actuator If fault occurs sporadically reduce electrical noise If fault occurs...

Page 236: ...e of the internal temperature limiter can trigger this same fault However the curve point currently being set can still be stored in standby or lockout Any Ignition positions for activated actuators or VSD have not been set See diagnostic code to indicate the faulted actuator 01 3F The diagnostic value is made up of the following faults or their combinations the individual diagnostic codes are add...

Page 237: ...ator 3 40 VSD Module VSD quick shutdown as the difference between the speed setpoint and the actual speed exceeds the value permitted in the TolQuick Shutdown parameter Fault with Positioning an Actuator or VSD Speed Actuator VSD LMV5 Fault Running Time 1D 1E 1 Check parameters TimeNoFlame and OperatRampMod These should be set to values greater than the ramping time of the attached actuators or VS...

Page 238: ...he LMV5 5 Check the CANBus power supply blue or black transformer terminal SEK2 Pin 1 and pin 4 should have 12VAC to reference ground which is pin 2 Voltage between pin 1 and pin 4 should be 24VAC 06 Speed Test was not successfully completed Internal VSD module speed test was not successful Set parameter Settling Time to 16 If fault occurs sporadically reduce electrical noise If fault occurs conti...

Page 239: ...heck for flame signal decay as burner refractory heats up If this happens a UV scanner may be needed 3 Increase setting of ReacTmeLossFlame Basic unit has detected extraneous light during shutdown 1 Ensure that the source of extraneous light is not a flame If it is a flame take corrective action immediately 2 If the QRI scanner is used ambient light can cause an extraneous light error Ensure senso...

Page 240: ...f but should have been on 1 Check setpoint on FGR pressure switch Adjust if necessary 2 If a FGR PS fault occurs in Phase 70 call a siemens representitve A spark killer may be necessary Valve not open Closed Position Indicator CPI off but should have been on 1 Check wiring to the fuel valves Ensure fuel valves are wired to the correct terminal see wiring diagram With manual shutoff valves closed e...

Page 241: ...ch when the oil pump is running Adjust pressure reg if needed 2 Check to ensure switch is wired Normally Open Check setpoint of switch 35 Oil Pressure above Maximum High oil pressure switch is open 1 Ensure excess oil pressure is not present at the switch Adjust pressure reg if needed 2 Check to ensure switch is wired Normally Closed Check setpoint of switch 36 No Start Release for Oil Switches wi...

Page 242: ...l See section on settings 03 Variable Train not defined 04 Variable Fuel not defined 05 Operating mode with load controller not defined 06 Prepurge time gas too short 07 Prepurge time oil too short 08 Safety time 1 gas too long 09 Safety time 1 oil too long 0A Ignition off time TSA1 gas 0B Ignition off time TSA1 oil LMV5 42 1 Check to see if any source is feeding back voltage onto the output If so...

Page 243: ...l Pressure max connected but deactivated High oil pressure switch connected but deactivated terminal X5 02 2 08 Start Signal Oil connected but deactivated Start release oil connected but deactivated terminal X6 01 1 09 HO Start connected but deactivated HO start connected but deactivated terminal X6 01 3 0A Start Signal Gas connected but deactivated Start release gas connected but deactivated term...

Page 244: ...ternal flame safeguard See corrective action based on diagnostic code 01 Parallel operation of external flame safeguard via contact and internal flame detector evaluation When using an external flame safegaurd via terminal X6 01 3 HeavyOilDirStart ext FlameGd there must not be a flame detector connected to the LMV5 02 Parallel operation of external high temperature safeguard via contact and intern...

Page 245: ...led for the LMV52 4 Setting FGR Mode to Temp comp TCautoDeact deactMinpos or auto deact is not permitted 07 The high temperature flame safeguard function is not permitted This function is only enabled for the LMV50 Setting HeavyOilDirStart to HTempGuard is not permitted 08 The external flame safeguard function is not permitted This function is only enabled for the LMV50 and LMV52 Setting HeavyOilD...

Page 246: ...ng initialization of EEPROM 02 Number of write attempts exceeded 10 EEPROM was busy when accessed 11 Comparison of EEPROM and RAM area revealed dissimilarity 12 Page area of EEPROM exceeded during write process 13 Access conflict µC1 µC2 arbitration Any Any Internal Fault Basic Unit Any 5B 1 Reset the LMV5 2 If fault occurred after changing a parameter check the parameters that were last changed 3...

Page 247: ...r max number Any Basic unit has detected wrong state of the gas actuator 01 CRC error 02 Key error main loop counter 03 No feedback for max number 80 81 82 1 This fault occurs when an un addressed actuator is connected to the CANBus Addressing the actuator should eliminate the fault 2 Check CANBus cabling Ensure that all cable shields screens which are located in the cable sheath are terminated co...

Page 248: ...ntly replace the defective unit see diagnostic code or the LMV5 Note The internal load controller and VSD module are part of the LMV5 Oil Actuator 83 84 Aux 2 Actuator 87 Fault with Connected Actuators 85 1 This fault occurs when an un addressed actuator is connected to the CANBus Addressing the actuator should eliminate the fault 2 Check CANBus cabling Ensure that all cable shields screens which ...

Page 249: ...r hold red button down about 10 seconds and re address 99 CANBus OFF A CANBus user actuators O2 module switches the CANBus to OFF mode 9A CAN warning level Fault probably occurred when connecting or disconnecting a CANBus user Any Overflow of CAN queue 01 Overflow of RX queue 02 Overflow of TX queue Fault with Base Unit LMV5 or AZL5 9B Internal Fault Basic Unit 1 Check CANBus cabling Ensure that a...

Page 250: ...rsion 13 Position Fault Air Actuator Actuator is outside the valid angular rotation 0 90 or linearization data are faulty Check to see if actuator is within the valid positioning range 0 90 When the actuator is not powered it could be moved out of the valid positioning range Take power off the actuator and position shaft back within the valid positioning range 15 CAN fault 16 CRC fault of a parame...

Page 251: ...cerning the load controller in the settings section 18 Timeout with Adaption Timeout during delivery of adaption rate and while process is being watched PV Process Varible is not changing in response to firing rate during the adaption time Adaption times out due to lack of change in the measured PV Check sensor and thermal system 22 Setpoint Temp Controller above maximum Limit The current setpoint...

Page 252: ...ty related page P_TW 42 Invalid phase during parameterization of the safety related page P_STATUS 43 Invalid phase during parameterization of the safety related page P_SYSTEM 44 Parameter Set damaged Page has been set to ABORT 45 Parameter Backup Restore Page has been set to RESTO 46 Page has an invalid status 4A CAN error 4B CAN error 4C CAN error 4D CAN error 4E CAN error 1 Reset the LMV5 2 If f...

Page 253: ...ed output value for analog output is not available in the current configuration Ensure parameter OutValueSelection is a valid selection based on the devices connected to the basic unit 5C Sensor already in use LC FGR or temp of the combustion air An invalid selection was made concerning the configuration of a temperature sensor Ensure the following five temperature sensor configuration parameters ...

Page 254: ...sured value varies too much Current measurement input 2 terminal X61 76 Measured value varies too much Voltage measurement input 3 terminal X62 77 Measured value varies too much Current measurement input 3 terminal X62 78 Excessive voltage value or wrong polarity PT100 sensor terminal X60 79 Excessive voltage value or wrong polarity PT100 line terminal X60 7A Excessive voltage value or wrong polar...

Page 255: ...ible selection of the auxiliary sensor When using the auxiliary temperature sensor for cold start a pressure sensor or temperature transmitter must be selected at input 2 terminal X61 via parameter Sensor Select PressSensor TempSensor B0 Red Inv fault with float variables B1 Red Inv fault of a Red Inv variable B2 Fault during key value check B4 Fault in fault routine B5 Unplausible software interr...

Page 256: ...anch in EEPROM module EC Invalid branch in EEPROM module ED Invalid branch in EEPROM module EE Invalid branch in EEPROM module EF Invalid branch in EEPROM module F0 Fault during ROM test F1 Fault during RAM test F2 Fault during RAM test register bank 0 F3 Fault during RAM test IDATA range F4 Fault during RAM test XDATA range F5 Stack pointer does not point at stack F6 Stack overflow FE Fault messa...

Page 257: ...E Menu for firing on gas Current Fuel is Oil Fuel changeover from gas to oil when a gas only menu is being viewed 15 CAN queue fault 16 CAN overflow fault 17 CANBus OFF A CANBus user actuators O2 module switches the CANBus to OFF mode 1 Check CANBus cabling Ensure that all cable shields screens which are located in the cable sheath are terminated correctly at each actuator O2 module and at the LMV...

Page 258: ...Fault in connection with eBUS communication Check wiring on RJ45 connector located on the underside of the AZL5 38 Internal Fault AZL Interface mode could not be terminated Reset the unit 40 Communication AZL with PC tool Parameterization fault PC tool Disclosed by key value check in AZL Check cable between AZL and PC A null modem adapter must be used on the 9 pin connector if the cable does not h...

Page 259: ...LMV5 Thus check the VSD error codes and take action based on those codes 2 Check VSD settings ramps motor settings increase ramp time on VSD and basic unit if necessary 3 Check motor and VSD for proper sizing 0D Control Range Limitation VSD Module VSD module could not offset speed differential within its control limits 1 This indicates that the LMV5 has decreased its signal to the VSD as much as p...

Page 260: ...settings in the drive commands In response the presettings will be ignored Check the special positions for valid value range 0 100 1F Internal plausibility fault This type of fault detects faults that cannot practically occur 1 If fault occurs sporadically reduce electrical noise 2 If fault occurs continuously replace LMV5 Any The O2 module has detected own fault and reported it to the basic unit ...

Page 261: ...onstantly replace O2 Sensor and or O2 Module 1 If fault occurs sporadically reduce electrical noise 2 If fault occurs continuously replace PLL5 Internal Fault O2 Module 1 Check the wiring between the O2 Module and the O2 sensor Ensure high and low voltage are in seperate conduits 2 Check the power supply to the O2 Module 3 Check fuse in the O2 Module 4 Check the heating control on the O2 Sensor 5 ...

Page 262: ...ult 1 If fault occurs sporadically reduce electrical noise 2 If fault occurs constantly replace PLL5 31 CRC fault of a parameter page 32 Page too long open 33 Page disrupted 34 Invalid access to parameters 38 Fault during copying of a parameter page 3E External plausibility fault This type of fault covers possible faults occurring due to invalid presettings in the drive commands In response the pr...

Page 263: ...2 Control Curve for each point set up on the ratio control curve except for point 1 12 points on ratio control 11 points on O2 setpoint curve 04 O2 Delay Time undefined Invalid O2 delay time The delay time has not been measured successfully at Point 2 or the highest curve point See O2 trim section for possible causes 05 Actual O2 Value invalid No valid actual O2 value in operation for 3 s 1 Check ...

Page 264: ... 01 O2 Sensor Test aborted O2 sensor test was not successful E g reset of O2 module during probe test 1 If fault occurs sporadically reduce electrical noise 2 If fault occurs continuously replace PLL5 BB 00 Service interval reached for O2 sensor test The O2 trim control is removed and the system moves along the set ratio control curves Fault occurs because the time set in parameter O2SensServTim h...

Page 265: ...y error main loop counter 03 No feedback for max number Any Basic unit has detected a wrong stage of the O2 module 01 CRC error 02 Key error main loop counter 03 No feedback for max number E1 Any LMV5 Fault Feedback VSD Module Basic unit has detected a ROM CRC fault in the VSD module when checking its feedback signal E3 Any PLL5 Fault Feedback O2 Module Basic unit has detected a ROM CRC fault in t...

Page 266: ... delivered invalid value If fault occurs constantly Replace LMV5 08 Flue Gas Temp too high Flue gas temperature outside the permissible value range Increase parameter MaxTempFlGasGas Oil or decrease flue gas temperature 0A QGO in Heating up Phase QGO probe not yet sufficiently heated up Check the temperature of the O2 Sensor via parameter QGO SensorTemp The sensor needs to be a minumum of 1202 F t...

Page 267: ...control curve O2 ratio control curve or O2 minimum value curve 05 Internal Fault Basic Unit If fault occurs constantly Replace LMV5 06 Faulty set temperature or supply air temperature There is no valid supply air temperature for initialization there was no valid set temperature when the O2 trim control curves were set For temp compensated start modes see parameter Startmode an ambient air temperat...

Page 268: ...h Feedback from Load Controller The Pt1000 Ni1000 on the load controller input X60 is selected but no response is registered on the CAN Check CAN wiring If fault occurs sporadically reduce electrical noise If fault occurs constantly replace the defective unit Any A fault occurred in connection with the flue gas recirculation function See diagnostic code 01 Flue gas recirculation automatically deac...

Page 269: ...Commissioning Section 5 VSD Section 6 O2 Trim Section 7 Troubleshooting Section 8 Modbus Section 9 ACS450 Section 10 Revision History Appendix A Application Guide Appendix B Complimentary Products Guide Can be found at www scccombustion com GP 2 FUEL TRAIN ERROR CODES ...

Page 270: ...Commissioning Section 5 VSD Section 6 O2 Trim Section 7 Troubleshooting Section 8 Modbus Section 9 ACS450 Section 10 Revision History Appendix A Application Guide Appendix B Complimentary Products Guide Can be found at www scccombustion com GP 2 FUEL TRAIN ERROR CODES ...

Page 271: ...ructure with the following four fields Slave Address Function Code Data Field Checksum CRC16 1 byte 1 byte x byte 2 bytes Slave Address Device address of a certain slave Function Code Function selection reading writing words Data Field Contains the following information Word address Number of words Word value Checksum Identification of transmission errors Checksum CRC16 The checksum CRC16 is used ...

Page 272: ...missible time between two successive characters is 3 5 times the time required for the transmission of one character The character transmission time is dependent on the Baud rate and the data format used Having a data format of 8 data bits no parity bit and one stop the character transmission time is calculated as follows Character transmission time ms 1000 9 bits Baud rate And with other data for...

Page 273: ...al data and on the number of data for more detailed information see below t2 t2 20 ms This time is required by the device to switch from transmitting back to receiving this time must be observed by the master before a new data query is made it must always be observed even if a new data query to some other device is made Communication during the slave s internal handling time During the slave s int...

Page 274: ... 1 Reading data from the LMV5 system 1 3 addresses 25 75 ms 4 9 addresses 75 125 ms 10 15 addresses 125 175 ms 16 20 addresses 175 225 ms These periods of time are defined from the complete writing of the message from the master to sending the first byte by the AZL 2 Writing data to the LMV5 system 1 address 25 75 ms 2 3 addresses 75 125 ms 4 5 addresses 125 175 ms 6 addresses 175 225 ms Modbus fu...

Page 275: ...4 13 1 Flame signal R U16 Percent 0 100 Medium 03 04 14 1 Current fuel throughput R U16 0 65534 Fast 03 04 15 1 Current O2 value LMV52 R U16 Percent 0 100 Fast 03 04 16 1 Volume unit of gas R U16 0 m 1 ft 0 1 Slow 03 04 17 1 Volume unit of oil R U16 0 l 1 gal 0 1 Slow 03 04 18 1 Unit of temperature R U16 0 C 1 F 0 1 Slow 03 04 19 1 Unit of pressure R U16 0 bar 1 psi 0 1 Slow 03 04 20 1 Sensor sele...

Page 276: ...nactive 1 active B15 B14 B13 B12 B11 B10 B9 B8 B7 B6 B5 B4 B3 B2 B1 B0 B8 Fuel valve SV oil B0 Alarm B9 Fuel valve V1 oil B1 B10 Fuel valve V2 oil B2 B11 Fuel valve V3 oil B3 B12 Fuel valve SV gas B4 Ignition B13 Fuel valve V1 gas B5 Start signal 3 way solenoid valve B14 Fuel valve V2 gas B6 Fan B15 Fuel valve PV gas B7 Oil pump magnetic coupling Function Address Number of words Data designation A...

Page 277: ...R 03 04 W 16 56 57 2 Hours run gas adjustable to zero only R W EEPROM S32 0 999999 h Slow R 03 04 W 16 58 59 2 Hours run oil stage 1 or modulating adjustable to zero only R W EEPROM S32 0 999999 h Slow R 03 04 W 16 60 61 2 Hours run oil stage 2 or modulating adjustable to zero only R W EEPROM S32 0 999999 h Slow R 03 04 W 16 62 63 2 Hours run oil stage 3 or modulating adjustable to zero only R W E...

Page 278: ...ZL5 R U16 Hexadecimal Constant 03 04 113 1 Software version burner control R U16 Hexadecimal Constant 03 04 114 1 Software version load controller R U16 Hexadecimal Constant 03 04 115 122 8 Burner identification R U8 16 String Upon reset 03 04 123 1 Min output gas R U16 Fire rate 0 100 Slow 03 04 124 1 Max output gas R U16 Fire rate 0 100 Slow 03 04 125 1 Min output oil R U16 Fire rate 0 100 1001 ...

Page 279: ...03 04 552 8 Error history current error 1 R U16 U32 Fast 03 04 704 8 Error history current error 20 R U16 U32 Fast These parameters do not need to be continually written since they are stored in EEPROM which only permits a limited number of write accesses over its lifecycle 100 000 Data structures Date U16 1 Year 2 Month 3 Day Time of day U16 1 Hour 2 Minute 3 Second Lockout history U16 1 Error co...

Page 280: ...ent 0 110 0 1100 0 1 10 Degrees 3 0 93 0 30 930 0 1 10 Process units 0 2000 32 3632 F 0 100 bar 0 1449 psi 0 2000 32 3632 0 1000 0 1449 1 C 1 F 0 1 bar 1 psi 1 1 10 1 Fire rate Modulating operation 0 100 Multistage operation 1001 stage 1 1002 stage 2 1003 stage 3 0 1003 Modulating operation 0 1 Multistage operation 1 Modulating operation 10 Multistage operation 1000 Adaption list 0 Undefined 1 Ide...

Page 281: ...counter total TotalStartCount 106 LMV5 parameter set code ParamSet Code 23 24 Hours run total TotalHours 107 LMV5 parameter set version ParamSet Vers 25 Current error code 108 110 LMV5 identification date ProductionDate 26 Current error diagnostic 111 LMV5 identification number SerialNumber 27 Current error class 112 AZL5software version SW Version 28 Current error phase 113 LMV5 software version ...

Page 282: ...n of the process the result can be read out via Adaption state To complete the adaption process prematurely the value at Start adaption must be changed from 2 to 2 Updating rate of AZL5 Fast System data that have already been updated automatically by the system process are available on request at a typical repetition rate of 200 ms Medium These data are cyclically queried in the system by the AZL ...

Page 283: ... Params Display AZL Modbus Address According to Modicon specifications addresses between 1 247 can be selected The slave address is filed in nonvolatile memory of the AZL Transmission parameters Transmission rate The setting is made via menu Params Display AZL Modbus Baudrate There is a choice of 9600 bit s or 19200 bit s Parity Using the AZL menu Params Display AZL Modbus Parity parity can be set...

Page 284: ...and a converter it is to be noted that PIN 5 and PIN 7 can deliver a current of 5 mA each Adequate insulation against other potentials must be ensured The maximum permissible data line length between COM2 and a converter is 3 m In exceptional cases this data line length can be exceeded depending on environmental conditions electrical interference and the type of cable used without Siemens assuming...

Page 285: ...ailable Converter SCC Part Number K3SC 10 AC100 240 RS 232 to Converter Wiring AZL COM2 RJ45 Connection RS 232 RS 485 Converter K3SC 10 AC100 240 Terminal Number Description Terminal Number Description 1 TxD 5 SD 3 RxD 6 RD 4 GND 3 SG Converter to RS 485 Wiring RS 232 RS 485 Converter K3SC 10 AC100 240 RS 485 Field Connection Terminal Number Description Description 12 SDB RS 485 9 SDA RS 485 7 SG ...

Page 286: ...since ExtLC Bus never uses internal load control Note AZL manual operation uses same set load register as Modbus manual operation Note This is the manual operation option from AZL Note IntLC Bus or ExtLC Bus may be selected for remote operation but ExtLC Bus will not revert to local upon a comm fault Note No function if in ExtLC Bus mode Note Setpoint displays as ext LC if in ExtLC Bus mode HOME ...

Page 287: ...LMV Series Technical Instructions Document No LV5 1000 SCC Inc Page 17 Section 8 W3 Setpoint Troubleshooting If setpoint W3 is not being displayed as the current setpoint check the following HOME ...

Page 288: ...hing to Auto via sequence control preselected output W3 will be used Default parameter settings Parameter Address Storage location Preselection Choices for making changes Setpoint W1 47 EEPROM See Basic Documentation Menu and parameter lists On the AZL menu Preselection via Modbus Setpoint W2 48 EEPROM See Basic Documentation Menu and parameter lists On the AZL menu Preselection via Modbus Externa...

Page 289: ... commanded state If the burner was firing it will restart at the firing rate in memory If the burner was commanded off operation will not resume unless communication is re established or the operating mode is changed Displayed Setpoint When in ExtLC Bus setpoint is displayed as ext LC since it is not used When in IntLC Bus and providing a remote firing rate the W3 setpoint is displayed even if it ...

Page 290: ...Technical Instructions LMV Series Document No LV5 1000 Section 8 Page 20 SCC Inc Intentionally Left Blank HOME ...

Page 291: ...Commissioning Section 5 VSD Section 6 O2 Trim Section 7 Troubleshooting Section 8 Modbus Section 9 ACS450 Section 10 Revision History Appendix A Application Guide Appendix B Complimentary Products Guide Can be found at www scccombustion com GP 2 FUEL TRAIN ERROR CODES ...

Page 292: ...Commissioning Section 5 VSD Section 6 O2 Trim Section 7 Troubleshooting Section 8 Modbus Section 9 ACS450 Section 10 Revision History Appendix A Application Guide Appendix B Complimentary Products Guide Can be found at www scccombustion com GP 2 FUEL TRAIN ERROR CODES ...

Page 293: ... Viewing a dashboard of the LMV5 inputs and outputs as well as the LMV5 operating state Sections 9 2 through 9 4 will cover the software installation communication setup and AZL5 software updates Sections 9 5 through 9 8 will explain how to utilize the basic capabilities of the ACS450 software including startup reports parameter sets trending and the dashboard Since most people prefer to use the A...

Page 294: ...MsiA exe InstMsiW exe setup exe setup ini Double click on the setup exe file This should start the installation Pick the desired options as the installation prompts 3 Once installed the files will be located on the computer s hard drive at one of the following locations C Program Files x86 ACS450 C Program Files x86 Siemens AG ACS450 4 Open these folders and check to make sure that all of the cod ...

Page 295: ...into InterfacePC mode This selection is found using the following menu path in the AZL5 Operation OptgModeSelect InterfacePC 4 Once the AZL5 is in InterfacePC mode attempt to connect with the ACS450 on the user level This is done by going to the System LMV5x dropdown menu and selecting Connect When the dialog box appears select User and press OK If the connection is successful proceed to step 5 If...

Page 296: ...ropdown menu and selecting Disconnect Remember that a password will be necessary to access the LMV5 on the service or OEM level and that the password is case sensitive Note If a fault window appears it is not necessary to close the fault window It can be moved to the side and temporarily ignored Most tasks can be performed with the fault window open If the fault window is closed and the fault is n...

Page 297: ... on the AZL5 The following steps outline the procedure for updating the software version of the AZL5 1 Ensure that ACS450 is installed on the computer being used to update the AZL5 software See Section 9 2 if necessary Note Prior to attempting an AZL5 software update deactivate the Modbus port RJ45 on the bottom of the AZL5 if it is being used The port can be deactivated under Operation OptgModeSe...

Page 298: ...ect bin file Once the bin file is opened press Enter on the AZL5 to begin the update Note It is important that steps 4 and 5 are completed as specified above Make sure to press Enter on the AZL5 immediately after opening the bin file on the computer If these steps are performed too far apart the update process could take a long time or not happen altogether 6 The AZL5 screen should say SW Update o...

Page 299: ...be viewed or printed with the ACS450 software Viewing and printing the mdb file contents 6 Ensure that the ACS450 software is open and not connected to the LMV5 Go to the File dropdown menu and select Show Parameters When this is selected a dialogue window will appear Select the mdb file to be opened The default location for the mdb files is C Program Files x86 ACS450 daten 7 Once the file is sele...

Page 300: ...dow will come up In this window type the file name a name containing the burner ID is recommended and select an appropriate folder to save the file The default location for par file storage is C Program files x86 ACS450 daten Click on Save 5 When being saved the message on the Backup LMV PC window should state Reading Parameters When saving is completed successfully the message should say Success ...

Page 301: ...D is Operation Burner ID Change the Burner ID in the dropdown menu ii If using the AZL5 Disconnect the PC Once disconnected the path through the AZL5 is Updating Burner ID A prompt will appear for the password when Updating is selected on the AZL5 B Reset and then initialize the LMV5 using the ACS450 i Connect to the LMV5 with the ACS450 at the Service or OEM level After connecting successfully go...

Page 302: ...t the correct par file is selected 11 Click on Store in LMV This will start the upload process 12 The following messages should appear on the Restore PC LMV window These messages are in order Function Succeeded Transferring Parameters Status 1 Status 2 Status 3 and Parameter Transfer Succeeded The upload process may take up to five minutes to complete Also an alarm may occur during the upload This...

Page 303: ...sion A valid file name would look like siemens tdb Notice that the is no longer in the file name 2 After the file name is typed in click on Open Click on Yes when the window appears asking if you would like to create the file The trending screen should now appear and will look similar to Figure 9 7 1 below Figure 9 7 1 The ACS450 Trending Screen 3 The trending screen will trend all of the variable...

Page 304: ... defined tbd file 7 Trends can be viewed when the ACS450 is disconnected from the AZL5 To view trends go to the File dropdown menu and select Show Trending A window will appear prompting for the correct tbd file 8 Select the trend to be viewed or exported If Ok is clicked the trend can be seen in ACS450 If Export is clicked a csv file can be created that can be opened with Microsoft Excel HOME ...

Page 305: ...well as the operating state of the LMV5 The following steps outline the procedure for viewing the ACS450 dashboard 1 Connect to the AZL5 at any password level This is covered in Section 9 3 2 Once connected go to the Parameters drop down menu followed by the Operating State menu Click on Normal Operation and the dashboard should appear detailing the operating state of the LMV5 The dashboard looks ...

Page 306: ...Technical Instructions LMV Series Document No LV5 1000 Section 9 Page 14 SCC Inc Intentionally Left Blank HOME ...

Page 307: ...Commissioning Section 5 VSD Section 6 O2 Trim Section 7 Troubleshooting Section 8 Modbus Section 9 ACS450 Section 10 Revision History Appendix A Application Guide Appendix B Complimentary Products Guide Can be found at www scccombustion com GP 2 FUEL TRAIN ERROR CODES ...

Page 308: ...Commissioning Section 5 VSD Section 6 O2 Trim Section 7 Troubleshooting Section 8 Modbus Section 9 ACS450 Section 10 Revision History Appendix A Application Guide Appendix B Complimentary Products Guide Can be found at www scccombustion com ERROR CODES GP 2 FUEL TRAIN ...

Page 309: ...r Version 0150 to 0160 7 Load Controller Version 0160 to 0180 7 Load Controller Version 0180 to 0210 8 Section 10 3 LMV52 Software Version Updates 9 LMV52 Version 0130 to 0410 9 LMV52 Version 0410 to 0420 10 LMV52 Version 0420 to 0450 11 LMV52 Version 0450 to 0480 11 LMV52 Version 0480 to 0510 12 LMV52 Version 0510 to 1020 13 LMV52 Version 1020 to 1030 13 Load Controller Version Updates 13 VSD Mod...

Page 310: ...ccurs 3 A low oil pressure switch can now be activated when firing oil 4 When firing oil the oil safety valve output X6 03 3 de energizes on completion of the afterburn time end of phase 70 The fan output de energizes after phase 79 Using parameter OilPumpCoupling it is now possible to choose between the described above when using the magnetic clutch or direct coupling of the oil pump In the case ...

Page 311: ...on To operate an LMV5 with the software versions listed above it is necessary to have AZL5 software version 0410 or higher installed Using this software all AZL5s can now be updated The passwords are now encoded The following other changes were made to the LMV5 basic units 1 Introduction of a preset load for testing the safety limit thermostat SLT Testload Mod SLT Testload Stg 2 Introduction of a ...

Page 312: ...purge for gas burners Skip Prepurge Gas As per EN 676 the prepurge time can be skipped if a valve proving system is installed 13 Changing the extraneous light test for OEMs Now the OEM is able to skip the extraneous light test in the start sequence ExtranLightTest 14 The curve points can now be adjusted without actually running the actuators to the adjusted positions 15 When running heavy oil the ...

Page 313: ... 36 driving to ignition position 10 Using an air actuator and gas control valve all modulating gas fuel trains can now also be used for burners with pneumatic or mechanical fuel air ratio control 11 Parameter StartPoint Op available for setting which curve point the LMV5 drives to after lighting off 12 Using parameter DriveLowfire Gas Oil drive to low fire may now start in phase 50 13 Phases 50 an...

Page 314: ...nging the tolerance of the actuator position and VSD speed Load Controller Software Update Version 0140 to 0150 The following updates were made with LMV5 load controller software version 0150 1 An auxiliary sensor can be added for cold start thermal shock protection 2 Straightforward changeover of operation to internal load controller mode IntLC Using a potential free contact at terminals X62 1 an...

Page 315: ... 12 mA with 0 5 mA hysteresis 3 75 Vdc and 6 25 Vdc with 0 25 Vdc hysteresis Load output multistage Burner off 4 mA Stage 1 5 mA Stage 2 10 mA Stage 3 15 mA Load Controller Software Update Version 0150 to 0160 The following updates were made with LMV5 load controller software version 0160 1 The plausibility check at inputs X61 and X62 is not made anymore This means that fast value changes at these...

Page 316: ... Update Version 0180 to 0210 The following updates were made with LMV5 load controller software version 0210 1 The starting point for ThermalShockProtection was increased from 0 output to minimum output At the deactivation of ThermalShockProtection the load controller is initiated with the current output Previously the LMV5 moved to low fire and then to the current load 2 At the end of the thermal...

Page 317: ...owing updates were made with LMV52 software version 0410 The product numbers of the LMV5 changed as follows LMV52 2x0Ax LMV52 2x0Bx To operate an LMV5 with the software versions listed above it is necessary to have AZL5 software version 0410 or higher installed Using this software all AZL5s can now be updated The passwords are now encoded The following other changes were made to the LMV5 basic uni...

Page 318: ...lation FGR To improve the burner s startup characteristics only this actuator can be driven from its ignition position to the adjusted curve either time delayed or depending on the flue gas temperature 12 A new option for no prepurge for gas burners Skip Prepurge Gas As per EN 676 the prepurge time can be skipped if a valve proving system is installed 13 Changing the extraneous light test for OEMs...

Page 319: ...n of load adjustment with ExtR X5 and the fuel actuator is deactivated 8 Response of start prevention changed when alarms are activated in standby and the QGO20 is not up to temperature LMV52 Software Update Version 0450 to 0480 The following updates were made with LMV52 software version 0480 1 Flame failure during safety time 2 TSA2 2 Message for flame failure during safety time 2 TSA2 changed fr...

Page 320: ...5 initially operates along the ratio control curves O2 trim control is only deactivated automatically once the NumMinUntilDeact repetition counter has elapsed The minimum O2 alarm remains active even once O2 trim control has been deactivated 6 Omission of the waiting time following interruptions to the power supply if the QGO20 cell temperature is greater than 1274 F 690 C on startup 7 O2 trim con...

Page 321: ...y a start prevention is triggered and a message appears in place of a shutdown PS VSD When using this setting the pressure switch for flue gas recirculation FGR must deliver an ON signal if the VSD speed lies above the speed set via parameter SP VSD PS on If the VSD speed lies below the speed set via parameter SP VSD PS off the pressure switch for flue gas recirculation FGR must deliver an OFF sig...

Page 322: ...rameter TolQuickShutdown VSD Module Software Update Version 0140 to 0150 The following updates were made with LMV5 VSD module software version 0150 1 To avoid error code A9 diagnostic 18 Page disrupted statistics data are now only stored in standby and operation 2 In some cases the correction offset for the speed setpoint was not reset after a safety shutdown This could lead to error messages The ...

Page 323: ... 1 2 4 the following new parameter names have been assigned Inp1 2 4Selection Sensor Select Inp1 4BerEnd MeasureRangePtNi Inp2TempBerEnd MRange TempSens Inp2PressBerEnd MRange PressSens Inp3Config_I U Ext Inp X62 U I Inp3MinSetpoint Ext MinSetpoint Inp3MaxSetpoint Ext MaxSetpoint 3 When reading fuel usage in liters a blank has been introduced between the value and the unit 4 The transfer of parame...

Page 324: ...50 to 0410 The following updates were made with AZL5 software version 0410 1 In the case of error code 16 and very flat or steep curves tolerances can occur in connection with the family of curves of the LMV5 This effect was eliminated from LMV52 controllers with software version 0120 and higher This effect was eliminated from LMV52 controllers with software version 0250 and higher 2 Monitoring of...

Page 325: ...nnel B LMV52 AZL5 Software Update Version 0420 to 0430 The following updates were made with AZL5 software version 0430 1 Introduction of the Cyrillic character set AZL5 Software Update Version 0430 to 0450 The following updates were made with AZL5 software version 0450 1 The load controller s switching thresholds now display absolute values as well but the setting values are still relative values ...

Page 326: ...atures during commissioning 4 Reading and display of the temperature currently acquired by the flue gas recirculation FGR sensor when the AZL5 is in interface mode This is provided because the value is not displayed by the PC tool ACS450 5 Support of the new flue gas recirculation FGR parameters 6 The AZL5 accepts backup data from older software versions both AZL5 and ACS450 backups 7 To avoid mis...

Page 327: ...SD_ModOn and SD_ModOff activation deactivation values for the load controller with the units F PSI are now displayed correctly 9 The text displayed on the AZL5 when parameters are being uploaded from the LMV5 to the AZL5 has been changed from Backup is made to Backup is being made in order to avoid misunderstandings 10 The text displayed on the AZL5 when parameters are being downloaded from the AZ...

Page 328: ...ModOff larger values are permitted for the switch off hysteresis 3 Parameter name corrections Dutch 1 4 Parameter name corrections Dutch 2 5 Parameter name corrections French 6 Additional display value Fahrenheit Temperature is calculated correctly displayed for the load controller from V02 20 7 The maximum value of the safety times can be changed on the OEM access level 8 New parameter Pos tolera...

Page 329: ...Commissioning Section 5 VSD Section 6 O2 Trim Section 7 Troubleshooting Section 8 Modbus Section 9 ACS450 Section 10 Revision History Appendix A Application Guide Appendix B Complimentary Products Guide Can be found at www scccombustion com GP 2 FUEL TRAIN ERROR CODES ...

Page 330: ...Commissioning Section 5 VSD Section 6 O2 Trim Section 7 Troubleshooting Section 8 Modbus Section 9 ACS450 Section 10 Revision History Appendix A Application Guide Appendix B Complimentary Products Guide Can be found at www scccombustion com GP 2 FUEL TRAIN ERROR CODES ...

Page 331: ...ns Document No LV5 8000 SCC Inc Page 1 Appendix A Appendix A LMV5 Application Guide Description The LMV5 Application Guide includes programming wiring and operation examples of the control system for the most common applications HOME ...

Page 332: ...rtant Notes 9 LMV5 with an RWF55 for Hot Standby and Load Control 10 Procedure 10 Operation 11 Important Notes 11 Hot Standby with a Temperature Switch Introduction 12 Procedure 13 Operation 13 Low Fire Hold with an RWF55 Introduction 14 Procedure 15 Steam Boiler with an RWF55 with Analog Output 15 Hot Water Boiler with an RWF55 with Analog Output 16 Steam Boiler with an RWF55 with 3 position Outp...

Page 333: ...ption 3 Pilot Valve Proving on Startup and Main Valve Proving on Shutdown 26 Sequence of Operation 27 Important Notes 27 Purge Proving Introduction 28 Procedure 28 Operation 29 Remote Setpoint Introduction 30 Procedure 30 Example Pressure Sensor Wired to Terminal X61 32 Example Temperature Sensor Wired to Terminal X60 33 Example Temperature Transmitter Wired to Terminal X61 34 Valve Proving with T...

Page 334: ... LMV5 skips the remainder of postpurge and proceeds to prepurge without turning the blower off On every startup the LMV5 tests the blower air switch for proper operation The switch contacts are required to open during standby of the boiler and close during blower operation With direct start the blower does not turn off before startup begins A 3 way solenoid valve must be installed using direct sta...

Page 335: ...t Start PS Valve 4 When using direct start the postpurge time of the boiler is split into two stages PostpurgeT1Gas Oil Defines the mandatory postpurge time phase 74 If the direct start option is selected and a call for heat exists the LMV5 will postpurge for this minimum amount of time PostpurgeT3Gas Oil Defines the optional postpurge time phase 78 If the direct start option is selected and a cal...

Page 336: ...phases 62 78 If either of these situations occurs the LMV5 1 Drives to low fire phase 62 and shuts the fuel valves 2 Ensures the flame signal drops out during the afterburn time phase 70 3 Drives to postpurge position phase 72 and performs its mandatory postpurge PostpurgeT1Gas Oil phase 74 4 Proceeds to phase 79 and either powers on or off the 3 way solenoid valve dependent upon the setting of pa...

Page 337: ...des Label Description Setpoint Upon X62 1 X62 2 Contact Closure ExtLC X5 03 External load control firing rate from 3 position input N A Change to IntLC setpoint W1 IntLC Internal load control setpoint set locally on LMV5 W1 Remain in IntLC setpoint W2 IntLC Bus Internal load control setpoint from Modbus command W3 Change to IntLC setpoint W1 IntLC X62 Internal load control setpoint from analog sig...

Page 338: ...rating mode ExtLC X5 03 through the following menu path Params Display LoadController Configuration LC_OptgMode ExtLC X5 03 3 Set the following parameters in the RWF5x controller For more information obtain Siemens Document No U7866 for the RWF50 or Document No U7867 for the RWF55 at www scccombustion com ConF Cntr SPL setpoint range lower limit ConF Cntr SPH setpoint range upper limit OPr SP1 hot...

Page 339: ...erminal X5 03 4 has been directly connected to the terminal that decreases the firing rate X5 03 2 the LMV5 will stay at low fire until the burner turns off based on the burner off point set in the RWF5x PArA HYS3 2 When the hot standby switch is closed the system is in normal operation and not in hot standby The contact between X62 1 and X62 2 will close causing the LMV5 to change to operating mo...

Page 340: ...e the RWF55 to the LMV5 as shown in Figure 3 Figure 3 LMV5 to RWF55 Hot Standby and Load Control Wiring 2 Set the LMV5 for load controller operating mode ExtLC X62 through the following menu path Params Display LoadController Configuration LC_OptgMode ExtLC X62 3 Set the load control input signal for 0 10 Vdc through the following menu path Params Display LoadController Configuration Ext Inp X62 U...

Page 341: ...r hot standby ConF OutP SiGn 2 Operation 1 When the hot standby switch is set for hot standby the LMV5 system is in hot standby mode The burner will turn on and off based on the temperature limits set in the RWF55 controller for hot standby ConF AF Since the signal to LMV5 terminal X62 is broken by the hot standby switch the LMV5 stays at low fire until the burner turns off based on the burner off...

Page 342: ...ription of LMV5 Load Controller Operating Modes Label Description Setpoint Upon X62 1 X62 2 Contact Closure ExtLC X5 03 External load control firing rate from 3 position input N A Change to IntLC setpoint W1 IntLC Internal load control setpoint set locally on LMV5 W1 Remain in IntLC setpoint W2 IntLC Bus Internal load control setpoint from Modbus command W3 Change to IntLC setpoint W1 IntLC X62 In...

Page 343: ...the LMV5 This needs to be a normally open contact that closes once the temperature of the boiler rises above the temperature setting on the temperature switch Operation 1 When the temperature of the boiler is below the temperature switch setting the contact between X62 1 and X62 2 will be open The LMV5 will be in operating mode ExtLC X5 03 waiting for a 3 position input for its firing rate command...

Page 344: ...g modes in the LMV5 Table 4 Description of LMV5 Load Controller Operating Modes Label Description Setpoint Upon X62 1 X62 2 Contact Closure ExtLC X5 03 External load control firing rate from 3 position input N A Change to IntLC setpoint W1 IntLC Internal load control setpoint set locally on LMV5 W1 Remain in IntLC setpoint W2 IntLC Bus Internal load control setpoint from Modbus command W3 Change t...

Page 345: ...ode ExtLC X62 Params Display LoadController Configuration Ext Inp X62 U I 0 20 mA 2 Set the following parameters in the RWF55 ConF Inp Inp1 SEn1 signal type of pressure sensor ConF Inp Inp1 SCL1 0 ConF Inp Inp1 SCH1 high end of the range of the pressure sensor ConF Inp Inp3 SEn3 type of RTD being used for a belly sensor ConF Cntr CtYP 2 ConF AF FnCt 11 ConF AF AL temperature to enable low fire hol...

Page 346: ...dController Configuration Ext Inp X62 U I 0 20 mA 2 Set the following parameters in the RWF55 ConF Inp Inp1 SEn1 type of RTD being used for temperature sensor ConF Cntr CtYP 2 ConF AF FnCt 7 ConF AF AL temperature to enable low fire hold ConF AF HYSt deadband around low fire hold temperature ConF OutP FnCt 4 ConF OutP SiGn 0 3 Wire the LMV5 and RWF55 as shown in Figure 5 Figure 5 Low Fire Hold via...

Page 347: ...ay LoadController Configuration LC_OptgMode ExtLC X5 03 2 Set the following parameters in the RWF55 ConF Inp Inp1 SEn1 signal type of pressure sensor being used ConF Inp Inp1 SCL1 0 ConF Inp Inp1 SCH1 high end of the range of the pressure sensor ConF Inp Inp3 SEn3 type of RTD being used for a belly sensor ConF Cntr CtYP 1 ConF AF FnCt 11 ConF AF AL temperature to enable low fire hold ConF AF HYSt ...

Page 348: ...iguration LC_OptgMode ExtLC X5 03 2 Set the following parameters in the RWF55 ConF Inp Inp1 SEn1 type of RTD being used for temperature sensor ConF Cntr CtYP 1 ConF AF FnCt 7 ConF AF AL temperature to enable low fire hold ConF AF HYSt deadband around low fire hold temperature 3 Wire the LMV5 and RWF55 as shown in Figure 7 Figure 7 Low Fire Hold via 3 position Output on a Hot Water Boiler See page ...

Page 349: ...tact K6 opens and prevents the LMV5 from increasing the firing rate This is the case for either analog or 3 position output from the RWF55 2 Once the boiler warms up above the low fire hold threshold AL 1 2 HYSt contact K6 closes and the burner modulates according to the PID settings of the RWF55 Example Low fire hold threshold settings AL 180 HYSt 10 Figure 8 Behavior of Contact K6 when Using an ...

Page 350: ...he boiler If pilot valve proving is added using Option 1 or Option 2 valve proving must be performed during startup of the boiler only If pilot valve proving is added using Option 3 valve proving must be performed during both startup and shutdown of the boiler Pilot valve proving can be performed on any LMV52 Pilot valve proving can be performed on any LMV51 with a date code of 140131xxxx Jan 31 2...

Page 351: ...ss is the time that both the upstream and downstream valves are closed to test the leakage rate of the upstream valve phase 81 VP_Tme_GasPress is the time that both the upstream and downstream valves are closed to test the leakage rate of the downstream valve phase 83 Both of these times should be set to the same value These times can be calculated using the following equation ௧ ௦௧ ௦ ௧ 3600 ௧ ttes...

Page 352: ...ions LMV Series Document No LV5 8000 Appendix A Page 22 SCC Inc Pilot Valve Proving continued Option 1 On Startup with SKP25 s on both the Pilot and Main Gas Trains Figure 9 Option 1 Piping and Electrical Schematics HOME ...

Page 353: ...n The ignition transformer output X4 02 3 energizes thereby energizing the CR 2 coil and latching the CR 1 coil from the power supplied from X9 01 1 At the same time one of the CR 1 contacts opens thereby closing the PVLT valve and closing the PVLT POC switch Note that the PVLT POC switch must be closed before the pilot valves open 5 The LMV5 continues light off and runs as normal with the CR 1 co...

Page 354: ...V Series Document No LV5 8000 Appendix A Page 24 SCC Inc Pilot Valve Proving continued Option 2 On Startup SKP25 on the Main Gas Train Solenoid Valves on the Pilot Train Figure 10 Option 2 Piping and Electrical Schematics HOME ...

Page 355: ...nlet pressure 4 The LMV5 drives to ignition position The ignition transformer output X4 02 3 energizes thereby energizing the CR 2 coil and latching the CR 1 coil from the power supplied from X9 01 1 At the same time one of the CR 1 contacts opens thereby closing the PVLT valve and closing the PVLT POC switch Note that the PVLT POC switch must be closed before the pilot valves open 5 The LMV5 cont...

Page 356: ...s LMV Series Document No LV5 8000 Appendix A Page 26 SCC Inc Pilot Valve Proving continued Option 3 Pilot Valve Proving on Startup and Main Valve Proving on Shutdown Figure 11 Option 3 Piping and Electrical Schematics HOME ...

Page 357: ...nsformer output X4 02 3 energizes thereby energizing the CR 2 coil and latching the CR 1 coil from the power supplied from X9 01 1 The main gas valve V1 terminal X9 01 4 is connected to main gas valve V1 and the main gas valve V2 terminal X9 01 3 is connected to main gas valve V2 The pilot valve terminal X9 01 2 is connected to both PV1 and PV2 Also PS VP1 is now connected to the valve proving ter...

Page 358: ...tch on the air damper Once the air damper has moved to its fully open position the end switch closes and the purge begins The following procedure for purge proving on the LMV5 uses an additional two pole relay with either a differential pressure switch or an air damper end switch NOTE Do not perform purge proving if using direct start on the LMV5 Procedure The following procedure uses either a dif...

Page 359: ...when using direct start purge proving cannot be used in conjunction with direct start on the LMV5 2 By the end of phase 24 the blower auxiliary contact input X4 01 3 must be energized or the LMV5 will lockout on a fan contactor contact FCC fault 3 Once the proving switch makes relay CR1 energizes and the two normally open contacts close 4 The contact wired in parallel with the proving switch latch...

Page 360: ...l which will be input to terminal X62 Four options are available 0 10 Vdc 2 10 Vdc 0 20 mA or 4 20 mA Use the following menu path to set the input type for terminal X62 Params Display LoadController Configuration Ext Inp X62 U I NOTE For the remainder of this section all examples will use a 4 20 mA signal 4 The analog input must be scaled appropriately depending on the desired setpoint limits for ...

Page 361: ... 302 F unless a setpoint over 302 F is desired Note that if MeasureRangePtNi is exceeded a temperature sensor fault will occur Parameter MesaureRangePtNi can be accessed through the following menu path Params Display LoadController Configuration MeasureRangePtNi Temperature Transmitter Wired to Terminal X61 When operating on temperature via an analog input on terminal X61 a 20 mA signal translates...

Page 362: ...utilized Example Pressure Sensor Wired to Terminal X61 LC_OptgMode IntLC X62 Ext Inp X62 U I 4 20 mA MRange PressSens 200 psi Desired remote setpoint range 100 150 psi A 4 20 mA signal on terminal X62 scales the setpoint from 0 200 psi Parameters Ext MinSetpoint and Ext MaxSetpoint need to be utilized to get the appropriate setpoint range 100 0 200 0 100 200 50 150 0 200 0 150 200 75 With these pa...

Page 363: ...oint range 180 270 F A 4 20 mA signal on terminal X62 scales the setpoint from 32 302 F Parameters Ext MinSetpoint and Ext MaxSetpoint need to be utilized to get the appropriate setpoint range 180 32 302 32 148 270 55 270 32 302 32 238 270 88 With these parameters set the following input signals will scale the setpoint accordingly 4 12 8 mA 180 F limited by Ext MinSetpoint 12 8 18 1 mA 180 270 F 1...

Page 364: ...tpoint range 200 240 F A 4 20 mA signal on terminal X62 scales the setpoint from 32 300 F Parameters Ext MinSetpoint and Ext MaxSetpoint need to be utilized to get the appropriate setpoint range 200 32 302 32 168 270 62 240 32 302 32 208 270 77 With these parameters set the following input signals will scale the setpoint accordingly 4 13 9 mA 200 F limited by Ext MinSetpoint 13 9 16 3 mA 200 240 F...

Page 365: ... mounted between the main gas valves is used to test for valve leaks However a more sensitive test can be performed using two pressure switches one switch to test the upstream valve and one switch to test the downstream valve To perform valve proving with two pressure switches both switches must be mounted between the main gas valves as shown below Wire the LMV5 pressure switches main valve POC sw...

Page 366: ...1 POC switch latches CR1 coil all CR1 contacts change state b The high SP switch will be open NO The low SP switch is essentially removed from the circuit 5 V1 closes and the waiting time begins a If V2 leaks by the high SP switch will close and the valve proving input will energize test fail b CR1 coil is still latched at this point 6 The burner lights off V1 and V2 are energized both POC switche...

Page 367: ...uel system it is desired to have the ability to run without the VFD typically in the event of a VFD malfunction On a dual fuel system it is desired to use the VFD with one fuel typically gas but not the other fuel typically oil The following pages provide the information to apply a VFD bypass on either a single or dual fuel system For the single fuel system the fuel is assumed to be gas For the du...

Page 368: ...un without the VFD For the rest of this procedure it will be assumed that a VFD is being used when running gas and not being used when running oil Since only one fuel gas is being operated on both gas and oil settings the AGM60 switching module will be used to change over all necessary inputs and outputs when the LMV52 switches between fuels Single Fuel Procedure 1 Wire the VFD and motor contactor...

Page 369: ...h fuels This parameter can be set using the following menu path Params Display RatioControl NumFuelActuators 1 4 Ensure the VFD is activated on gas and deactivated on oil This can be done through the following menu paths Params Display RatioControl Gas Settings VSD activated Params Display RatioControl Oil Settings VSD deactivated 5 Ensure the LMV52 is not set up for continuous purge This can be d...

Page 370: ...ower runs directly to the motor through bypass contactor K3 once the fan output X3 01 1 is energized in phase 22 The fuel select terminal X31 01 1 on the AGM60 is energized so the LMV52 runs oil All inputs and outputs are connected through the AGM60 to the LMV52 oil terminals 3 If the VFD Bypass Switch is switched during operation the LMV52 immediately loses its call for heat and goes through its ...

Page 371: ...D Bypass 2 Ensure the VFD is activated on gas and deactivated on oil This can be done through the following menu paths Params Display RatioControl Gas Settings VSD activated Params Display RatioControl Oil Settings VSD deactivated 3 Ensure the LMV52 is not set up for continuous purge This can be done through the following menu path Params Display BurnerControl Configuration ConfigGeneral Continuou...

Page 372: ...gized and no power flows to the VFD Power runs directly to the motor through bypass contactor K3 once the fan output X3 01 1 is energized in phase 22 An auxiliary contactor on K3 prevents motor contactors K1 and K2 from energizing The oil select terminal X4 01 2 on the LMV52 is energized and the LMV52 operates on oil 3 When the Fuel Select Switch is in off mode terminal X5 03 1 is de energized pre...

Page 373: ...Intentionally Left Blank ...

Page 374: ...Germany SCC Inc 1250 Lunt Avenue Elk Grove Village IL 60007 USA Telephone 1 224 366 8445 www scccombustion com Printed in USA Siemens Industry Inc 05 2015 Technical Instructions Document No LV5 1000 July 10 2015 Technical Instructions Document No LV5 1000 November 21 2016 ...

Reviews: