background image

  OPERATION & PARTS 

MANUAL 


LMV


Sharp Industries, Inc. 

3501 Challenger Street 

Torrance, CA 90503 

(310) 370-5990 Fax: (542-6162) 

www.sharp-industries.com


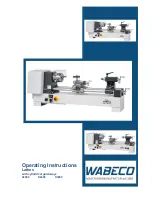
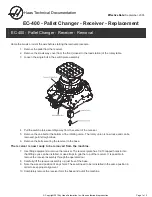
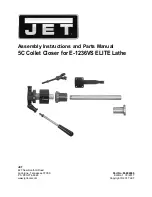
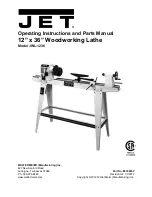
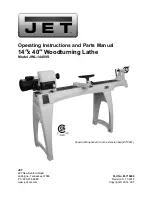
Summary of Contents for LMV Series

Page 1: ...OPERATION PARTS MANUAL LMV Sharp Industries Inc 3501 Challenger Street Torrance CA 90503 310 370 5990 Fax 542 6162 www sharp industries com ...

Page 2: ...e instructions below 2 After disconnecting the power remove cover on the motor The diagram below should appear on the inside If in doubt about the electrical wiring please consult a qualified electrician or Sharp Industries Inc for advice 3 After making the connections as illustrated below check that all connections are tight and properly isolated then replace cover and apply power ...

Page 3: ...ion Follow wiring instruction carefully 3 For trouble shooting use a meter to check the current Do not use the 440V current to check the fan individually 4 This method of connecting the fans in series to run on 440V current is only applicable to the Twin Fan model Do not use it on the Single Fan model ...

Page 4: ...ARIABLE SPEED MILL 2 Specifications 2 Uses 2 Machine Parts 3 Headstock Cooling System 7 Lubrication 8 Operation Instructions Headstock 10 Mill Body 15 Unpacking Moving and Floor Space 17 Alignment 21 Trouble Shooting 22 Maintenance 37 Feedrate Cutting Speeds 38 Remarks 39 ...

Page 5: ...e that operators maintenance and repair personnel read the manual thoroughly and follow the specific instructions in operating and maintaining the machine 2 Safety Rules and Regulations 1 Do not wear loose clothing when operating the machine 2 Operators shall wear goggles and safety boots 3 Do not disturb the operator when the machine is running 4 Caution should be taken when removing chips from w...

Page 6: ...m Working area of table 42 x 9 Machine Net Weight 1 01 kg Table Travel 30 Saddle Travel 12 Knee Travel 16 HEAD Motor 2HP 3HP Spindle Taper R8 or N S T 30 Quill Travel 5 127 Feed Rate per Revolution 0 0015 0 003 0 006 0 04 0 08 0 15 OPTIONAL Working Area of Table 49 x 9 1225 x 230 Table Travel Head 36 933 2 Machine uses 1 Drilling 2 Milling 3 Molding 4 Polishing 5 Boring ...

Page 7: ... Headstock Power Feed Engagement Crank I High Low Lever J Quill Feed Lever H Micrometer Adjustment Nut K Quill Lock L Feed Control Lever F Feed Handwheel E Feed Reverse Knob D Quill Feed Selector C Brake Speed Selector G ...

Page 8: ...4 DVS HEAD Emergency Stop Forward Reverse Switch Brake Speed Meter Speed Knob ...

Page 9: ...5 2 Machine Body 1 Columns Turret and Ram Adaptor Lock Bolts B Vertical Adjusting Worm Ram Lock Ram F Gib Bolt I Column Turret D Figure 4 ...

Page 10: ...s Saddle and Knee Figure 5 Ball Crank Handle I Knee Lock Lever G Knee L Saddle Lock Lever D Ball Crank Handle K Vertical Travel Stop A Work Table H Table Stop B Work Table Lock J Saddle C Knee Elevating Lever F ...

Page 11: ... with a unique cooling system Two fans have been installed outside of the cover between the front and rear speed change wheels The purpose of the fans are to dissipate the heat build up between the belt and the speed change wheel and prolong the life of the mill Figure 6 ...

Page 12: ...ction 1 Grease Shell Tonna 32 One Shot Every 3 Months Motor Shaft 2 Grease Shell Tonna 32 As Needed Bull Gear 3 Oil Cup Shell Tonna 32 Twice a Week Bull Gear Bearing Shaft 4 Oil Cup Shell Tonna 32 Daily Worm Gear Cradle 5 Oil Cup Shell Tonna 32 Twice a Day Quill ...

Page 13: ...Saddle and Knee Position The ways saddle knee and leadscrews are oiled by means of a manually operated pump located on the back side of knee Frequency 2 pumps 3 to 5 times daily Lubricant Shell Tonna 33 Figure 8 ...

Page 14: ...ling the brake lever Fig 10 Pulling the brake lever up after it is engaged can lock the brake Caution Be sure the brake is in neutral before starting the spindle c Installation of Collet 1 Raise the spindle all the way up 2 Insert collet being sure the keyway lines up with the pin in the spindle 3 To tighten turn the drawbar clockwise while brake is engaged To remove collet loosen the drawbar coun...

Page 15: ...al feed the feed control handle F Fig 11 must be in the F1 position e Manual Micro feed To use the manual micro feed the power feed transmission lever J Fig 11 must be placed at the OUT position and the feed reverse knob D Fig 11 must be in the neutral position To engage the overload clutch lever F Fig 11 must be moved to the F2 Fig 11 You can now turn handwheel E clockwise to lower the spindle co...

Page 16: ...th can be set by the use of micrometer adjustment nut K Fig 12 This adjusting nut is graduated in 0 001 and 0 02 mm increments To activate the auto feed pull the feed control lever F out It will disengage when the adjusting nut contacts the quill stop block I Fig 12 For manual trip you can push the feed control lever in manually Note 1 Maximum drilling capacity for automatic feed is 3 8 or 10 mm 2...

Page 17: ... To change from high to low a The spindle must be stopped b Moving the spindle slightly by hand when shifting from high to low makes it easier for the gears to engage You will feel a click when it engages c The direction of the spindle is reversed when in low gear This can be overcome by the use of FOR REV switch h Speed change handwheel a Do not change speed when spindle is stopped b Do not run s...

Page 18: ...ocking bolts P and move to desired angle using adjusting worm shaft Q Re tighten the adapter bolts NOTE do not remove adapter bolts Cross tilting the headstock Fig 15 Evenly loosen the four lock nuts R Using the worm shaft S move head to desired angle and retighten lock nuts Figure 14 15 S Q P R ...

Page 19: ...m movement Fig 17 a To move ram in or out loosen Ram lock levers A and move to desired position using handle B and retighten levers b To swivel ram loosen the four bolts C move to desired position and retighten bolts C Figure 17 A B C ...

Page 20: ...hten lock ring D 3 Locking the table saddle and knee To increase the stability of the mill and maintain a good workpiece finish all non feeding surfaces should be locked down See Fig 19 for location of locking levers Figure 18 Figure 19 Saddle Lock Lever Work Table Lock Lever Knee Lock Lever E D ...

Page 21: ...ea is clear of all personnel 2 Lifting machine by the use of eye bolt should be only when absolutely necessary 3 When lifting or moving the machine before unpacking or removing from the skid observe any precautions or instruction that may be printed on the crate 4 The machine can be balanced while being moved by changing the location of table and or saddle 5 Do not attempt to raise the machine too...

Page 22: ...18 ...

Page 23: ...our agent or the transporter 2 After unpacking make sure all tools and accessories are intact If not contact our agent 3 Restore headstock to its normal position Fig 3 Page 3 4 Do not move the sliding surfaces until all of the protective rustproof coating is removed and all surfaces are well oiled 5 Do not remove the oil wipers when cleaning the machine 6 Do not use gasoline or other flammable cle...

Page 24: ...20 ...

Page 25: ...21 7 Machine Alignment Maintaining close tolerances and proper alignment of the machine is critical to producing quality machining results Please see the following table of Precision Inspection ...

Page 26: ...speed Noise frequency follows the speed Noise frequency does not follow the speed Replace spindle pulleys and H522 bearings Replace motor bearings Motor Noise in High gear only Worn clutch Clutch out of adjustment Replace H561 H572 Adjust position of H L lever Noise in Low gear only Bull gear Timing belt Timing pulley Lubricate bull gear Hold brake turn spindle by hand If more than turn replace ti...

Page 27: ...overnight Normal High pitch shriek when start up over 2 500 RPM Motor shaft needs lubrication Lubricate motor shaft Do not over grease Excessive lubrication will cause belt to slip Vibration and noise in all speed and gears H531 key too tight Check key for proper clearance or replace Noise in H N L at any speed with a constant pitch Worn or defective motor bearings Replace motor bearings ...

Page 28: ... Wheel responds to feed reverse knob nut does not feed Damaged worm gear Replace worm gear H060 and check for alignment Auto feed only works in one direction Broken bevel gear Replace bevel gear H115 or H110 Feed select does not engage Broken gears Inspect H102 H104 H126 H324 and H327 Replace as needed ...

Page 29: ...rease fitting Use 2 of the screws to insert into the pulley spring washer plate D taking care to tighten evenly d Connect the power and increase the RPM to 3 000 which will raise the motor vari disc to gain access to the snap ring G e Disconnect the power f Remove snap ring G g Remove the two motor mounting bolts H You can now remove the motor The lower pulley and spring assembly will slide out an...

Page 30: ...26 Figure 25 ...

Page 31: ...g off of the housing T d Remove the 2 bolts L and sleeves M that hold the speed change plate e Remove N O and P Total of 6 bolts f Remove the 2 lower bolts S on the speed change housing Q g Separate the upper housing T because the housings are pinned together it may be necessary to use a soft mallet to separate them h After replacing the belt reverse the above order to re assemble ...

Page 32: ...28 Figure 26 ...

Page 33: ...n page 26 b Remove the four bolts V Fig 28 so housing T1 can be removed It may be necessary to use a soft mallet Housing T1 and R are pinned together c Remove vari disk assembly set E1 Fig 27 by removing bolt X Brake block Y can now be replaced d Reverse above order to re assemble Figure 27 ...

Page 34: ...ing Belt a Follow disassembling procedures outlined in steps a to g on page 24 and steps b to g on page 26 and steps b on page 28 b Change the timing belt as shown in Fig 28 c Reverse above order to re assemble Figure 28 ...

Page 35: ...ting tool fits into the space e Use the large end of the tool to loosen the lock nut J Counter clockwise f Turn adjusting nut K with the small end of the tool to reduce backlash Counter clockwise g Using the large end of the tool tighten lock nut J h To re assemble turn hand crank F counter clockwise to seat Bracket G to the knee being careful to align the pins and replace bolts I to complete the ...

Page 36: ...rge end of adjusting tool into the left side of the saddle and turn lock nut J counter clockwise approximately one turn c Using small end of tool tighten adjusting nut K d After adjusting nut K use large end of tool to re tighten lock nut J Resulting backlash should be 0 003 to 0 004 Figure 31 ...

Page 37: ...e dovetail a Loosen lock levers L b Clean and lubricate slideways c Using a screwdriver to adjust the gib screws M located on both sides of the saddle If moving the table and screws turn loose they can be adjusted by Slightly loosen the adjusting screw on the right then tighten the left screw After adjusting check movement of table If still loose repeat the process until desired fit is obtained Fi...

Page 38: ...e dovetail and it can be adjusted as follows a Loosen saddle lock A b Move saddle to the front of knee c Remove wiper holder B on saddle d Clean and lubricate sideways e Adjusting gib using the same method used on table f After adjusting replace wiper holder B Rear Front Light Loose Figure 33 ...

Page 39: ...and lubricate sideways d Raise knee to its uppermost position e Adjusting gib screw R using the same method used on table f After adjusting replace wiper holder Q D Ram Gib Fig 35 The ram gib is located between ram and turret dovetail a Loosen ram lock lever C b Clean and lubricate slideways c Loosen lock nuts on gib adjusting screw I adjust gib and retighten lock nuts Figure 34 Figure 35 I C ...

Page 40: ...an adjustable spanner in two holes in the bottom of nose piece c Remove set screw D insert a collet in the spindle and adjust set screw D First screw it in until it contacts the collet then back it off approximately turn to allow 0 25 mm 0 01 play d If collet fits properly replace set screw D and replace nose piece Be sure to tighten so that the mark made in step a line up Figure 36 ...

Page 41: ... to 3 min prior to operation This is to allow the belt to stabilize 4 At the close of each day a Workpiece should be removed if practical and work table should be cleaned and oiled b All machine locks should be loosened and sliding parts lubricated If practical remove cutter c Headstock should be returned to its normal position if it has been operated in a tilted position Monthly Maintenance a Che...

Page 42: ...Operator a Only authorized personnel should operate mill b If a problem is suspected stop mill immediately check for the problem and make any repair or adjustment that maybe required c Auto feed lever must be in neutral before starting mill d Stop machine when inspecting tool or workpiece e Be certain that workpiece is properly clamped prior machining f Spindle must be kept clean and lubricated at...

Page 43: ...39 PARTS LIST ...

Page 44: ...H 504 BELT HOUSING BOTTOM 1 7 H 505 BELT HOUSING UPPER 1 8 H 727 RPM DISPLAY HOUSING 1 9 H 728 SWITCH HOUSING 1 10 H 729 HOUSING PLATE 1 11 12 13 E 22S38B EVS FORWARD REVERSE SWITCH 1 14 E 22EB4R EMERGENCY STOP SWITCH 1 15 RPM 0000 RPM DISPLAY INDICTATOR 1 16 RPM 0 10 RPM DIAL 1 17 18CV H011 SWITCH HOUSING 1 18 18CV H011 SWITCH PLATE 1 19 20 21 22 23 D 150D B LIMIT SWITCH 1 24 A 33 V BELT 1 ...

Page 45: ...41 DVS HEAD PARTS 1 ...

Page 46: ...HER 1 8 H 517 BALL BEARING 1 9 H 522 BALL BEARING 1 10 H 527 KEY 1 11 H 528 MOTOR 1 12 H 529 HEX HEAD SCREW 2 13 H 530 SPRING WASHER 1 14 H 541 DRAWBAR VARIABLE SPEED 1 15 H 544 BRAKE BEARING CAP 1 16 H 559 KEY 1 17 H 658 COVER 2 18 H 669 REAR COVER 1 19 H 722 SPINDLE PULLEY 1 20 H 723 MOTOR PULLEY 1 21 H 727 RPM DISPLAY HOUSING 1 22 RPM 0000 RPM DISPLAY INDICATOR 1 23 24 25 RPM 0 10 RPM DIAL 1 26...

Page 47: ...43 DVS HEAD PARTS 2 ...

Page 48: ... 5 0 36 3 8 6 0 37 0 1 7 0 38 8 8 0 50 1 9 0 51 2 10 0 52 3 11 60 102 0 53 5 12 200 220 54 6 13 60 60 55 7 14 1 5 56 10 15 12 57 0 16 1 5 58 1 17 12 59 2 18 0 60 100 19 10 2 61 0 20 10 3 62 0 1 21 10 65 0 22 10 66 0 23 0 67 1 24 6 68 100 1 03 25 0 69 0 26 0 99 0 27 0 100 1 0 28 0 103 3 1 2 29 0 105 3 30 0 106 3 31 0 107 3 ...

Page 49: ...45 ...

Page 50: ...46 ...

Page 51: ...14 TM H032 1 DRAWBAR KNOB 15 TM H035 1 QUILL SKIRT 16 TM H036 1 QUILL STOP KNOB 17 TM H037 1 QUILL STOP MICRO SCREW IN 18 TM H038 1 MICROMETER NUT 19 TM H070 3 VERTICAL TEE BOLT 20 TM H071 3 VERTICAL TEE BOLT WASHER 21 TM H072 1 SPINDLE GEAR HUB 22 TM H074 1 SPINDLE BULL GEAR 23 TM H075 1 SPINDLE PULLEY HUB 24 TM H076 1 PULLEY COLLAR 25 TM H080 1 UPPER BEARING SPACER 26 TM H081 1 BEARING SPACER 27...

Page 52: ...1 BEARING SPACER R8 NT 30 48 TM H172 1 NOSE PIECE R8 49 TM H173 1 NOSE PIECE NT 30 50 TM H176 1 SLEEVE 51 TM H256 4 SPRING 52 TM H276 2 RONUD HD MACHINE SCREW M5 x 12 53 TM H278 1 SCREW 3 8 x 5 8 54 TM H284 8 BLACK PLASTIC BALL 55 TM H421 1 QUILL STOP MICRO SCREW mm 56 TM H422 1 MICRO METER NUT mm 57 TM H423 1 QUILL MICRO STOP NUT mm 58 TM H431 1 DRAWBAR KNOB NT 30 1 2 x W13 59 TM H470 1 BEARING S...

Page 53: ...49 PARTS NO PC DESCRIPTION REMARKS 69 18VH H090 1 QUILL NT 40 70 18VH H094 1 DRAWBAR KNOB NUT NT 40 71 18VH H096 1 DRAWBAR NT 40 72 18VH H097 1 DRAWBAR NT 40 ...

Page 54: ...INDLE CLUTCH CAM RING PIN 5 TM H087 1 BRAKE BLOCK 6 TM H088 2 BRAKE RING SCREW 7 TM H089 1 BRAKE LOCK STUD 8 TM H091 1 BRAKE LOCK WASHER 9 TM H092 1 BRAKE LOCK HANDLE 10 TM H093 1 BRAKE LOCK PIN 11 TM H284 1 BLACK PLASTIC BALL 12 TM H297 2 SPRING 13 TM H472 1 BRAKE RING SCREW 14 15 16 17 18 19 20 21 22 23 24 25 26 27 28 29 30 31 32 33 34 ...

Page 55: ...51 ...

Page 56: ...LOAD CLUTCH WASHER 16 TM H053 1 CLUTCH RING 17 TM H054 1 OVERLOAD CLUTCH SLEEVE 18 TM H055 1 PINION SHAFT HUB 19 TM H056 1 PINION SHAFT HUB HANDLE 20 TM H058 1 OVERLOAD CLUTCH 21 TM H059 1 OVERLOAD CLUTCH RING 22 TM H060 1 OVERLOAD CLUTCH WORM GEAR 23 TM H061 1 PINION SHAFT WORM GEAR SPACER 24 TM H062 1 QUILL PINION SHAFT BUSHING 25 TM H063 1 QUILL PINION SHAFT 26 TM H064 1 QUILL PINION OVERLOAD C...

Page 57: ...ENGAGE PIN 47 TM H130 1 SHIFT SLEEVE 48 TM H136 1 WORM CRADLE BUSHING 49 TM H146 1 FEED REVERSE BEVEL PINION 50 TM H147 1 CLUSTER GEAR SHAFT UPPER BEARING 51 TM H148 1 PINION SHAFT HUB SCREW 52 TM H154 2 CLUTCH RING SCREW 53 TM H155 4 1 2 T BOLT 54 TM H156 1 BOLT 55 TM H167 1 QUILL 56 TM H190 2 SPECIAL HEX NUT 57 TM H191 2 SPECIAL HEX NUT 58 TM H192 1 WASHER 59 TM H251 1 SOCKET SET SCREW 60 TM H26...

Page 58: ...54 PARTS NO PC DESCRIPTION REMARKS 69 TM H 1 SCREW 70 TM H 2 BLACK PLASTIC BALL HANDLE 71 TM H 1 BUSHING 72 73 74 75 TM C 4 TABLE LOCK BOLT HANDLE 76 77 78 79 90 91 92 93 94 95 96 97 98 99 ...

Page 59: ...55 ...

Page 60: ...RIP PLUNGER 15 TM H041 1 REVERSE TRIP BALL LEVER SCREW 16 TM H042 1 FEED TRIP LEVER 17 TM H043 1 FEED TRIP PLUNGER 18 TM H044 1 TRIP PLUNGER BUSHING 19 TM H045 1 TRIP PLUNGER 20 TM H046 1 FEED TRIP PLUNGER BUSHING 21 TM H047 1 CAM ROD SLEEVE ASSEMBLY 22 TM H048 1 CAM ROD 23 TM H049 1 TRIP HAND 24 TM H055 1 PINION SHAFT HUB 25 TM H056 1 PINION SHAFT HUB HANDLE 26 TM H067 1 QUILL LOCK BOLT 27 TM H09...

Page 61: ...S 35 TM H157 1 QUILL MICRO STOP NUT 36 TM H190 2 SPECIAL HEX NUT 37 TM H191 2 SPECIAL HEX NUT 38 TM H262 3 SPRING 39 TM H283 1 SPRING 40 TM H284 8 BLACK PLASTIC BALL 41 TM H322 1 MICROMETER SCALE 42 TM H333 2 BLACK PLASTIC BALL HANDLE ...

Page 62: ...58 ...

Page 63: ... BACK GEAR SHIFTER FORK 5 TM H014 3 SHIFT CRANK 6 TM H95 1 COUNTER SHAFT 7 TM H96 1 COUNTER SHAFT GEAR 8 TM H97 3 GEAR SHAFT PLUNGER 9 TM H152 1 BACK GEAR SHAFT BUSHING 10 TM H153 1 BACK GEAR SHAFT CRANK 11 TM H284 8 BLACK PLASTIC BALL 12 TM H334 1 SUB GEAR SHAFT 13 14 15 16 17 18 19 20 21 22 23 24 25 26 27 28 29 30 31 32 33 34 ...

Page 64: ...60 ...

Page 65: ...1 QUILL LOCK SLEEVE 2 TM H066 1 QUILL LOCK SLEEVE 3 TM H067 1 QUILL LOCK BOLT 4 TM H140 1 WORM GEAR 5 TM H141 1 WORM SHAFT 6 TM H143 1 SOCKET SET SCREW 7 TM H144 1 GEAR 8 9 10 11 12 13 14 15 16 17 18 19 20 21 22 23 24 25 26 27 28 29 30 31 32 33 34 ...

Page 66: ...62 ...

Page 67: ...TM C179 1 DIAL HOLDER 5 TM C080 3 HAND WHEEL 6 TM C108 2 LOCK SCREW 7 TM C109 2 SCREW ADJUSTING NUT 8 TM C110 1 FEED NUT BRACKET 9 TM C112 1 LONGITUDINAL FEED NUT 10 B311 A 1 LONGITUDINAL FEED SCREW 11 TM C117 1 BEARING SPACER 12 TM C118 1 RIGHT BEARING BRACKET 13 14 15 16 17 18 19 20 21 22 23 24 25 26 27 28 29 30 31 32 33 34 ...

Page 68: ...64 ...

Page 69: ...OLT HANDLE 8 TM C123 1 TABLE STOP BRACKET 9 TM C125 2 TABLE STOP PIECE 10 TM C126 2 STOP PIECE T BOLT 11 TM C129 2 LEFT HAND KNEE SADDLE WIPER HOLDER 12 TM C130 2 RIGHT HAND KNEE SADDLE WIPER 13 TM C131 1 SADDLE KNEE GIB 14 TM C132 1 SADDLE LOCK PLUNGER 15 TM C133 1 SADDLE LOCK BOLT 16 TM C134 2 UPPER KNEE SADDLE WIPER 17 30A 070B GIB ADJUSTING SCREW 18 19 20 21 22 23 24 25 26 27 28 29 30 31 32 33...

Page 70: ...66 ...

Page 71: ...RING BRACKET 11 TM C078 3 DIAL WITH 200 GRADUATIONS 12 TM C080 3 HANDWHEEL 13 TM C105 1 SADDLE 14 TM C108 2 LOCK SCREW 15 TM C109 2 SCREW ADJUSTING NUT 16 TM C110 1 FEED NUT BRACKET 17 TM C114 1 TABLE 18 TM C119 1 SADDLE TABLE GIB 19 TM C134 2 UPPER KNEE SADDLE WIPER 20 TM C268 1 CHIP GUARD COVER PLATE 21 TM C269 1 CHIP GUARD COVER PLATE 22 TM C271 1 COLUMN 23 TM C276 1 CHIP COVER PLATE 24 TM C277...

Page 72: ...68 ...

Page 73: ...TM C060 1 BEVEL PINION 6 TM C063 1 GEAR SHAFT FOR KNEE 7 TM C064 1 BEARING CUP 8 TM C065 1 BEARING RETAINER RING 9 TM C068 1 DIAL HOLDER 10 TM C069 4 DIAL LOCK NUT 11 TM C070 1 GEAR SHAFT CLUTCH INSERT 12 TM C071 1 ELEVATING CRANK 13 TM C336 1 DIAL WITH 100 GRADUATIONS 14 15 16 17 18 19 20 21 22 23 24 25 26 27 28 29 30 31 32 33 34 ...

Page 74: ...70 ...

Page 75: ...ER 2 TM C224 1 RAM 3 TM C225 1 RAM ADAPTER 4 TM C226 1 VERTICAL ADJUSTING WORM 5 TM C227 1 VERTICAL ADJUSTING WORM SHAFT 6 TM C232 1 WORM THRUST WASHER 7 TM C254 1 TURRET 8 9 10 11 TM H144 1 GEAR 12 13 14 15 16 17 18 19 20 21 22 23 24 25 26 27 28 29 30 31 32 33 34 ...

Page 76: ...72 ...

Page 77: ... PINION 8 TM C233 2 RAM LOCK BOLT HANDLE 9 TM C234 2 ADJUSTING BOLT GIB 10 TM C236 1 SCALE 11 TM C237 1 RAM PINION HANDLE 12 TM C238 1 RAM PINION SCREW 13 TM C254 1 TURRET 14 TM C270 4 TURRET CLAMP BOLTS 15 TM C271 1 COLUMN 16 TM C473 6 T BOLT 17 TM C217 1 SCALE 18 TM C272 1 SCALE 19 20 TM H091 10 BRAKE LOCK WASHER 21 TM H333 1 BLACK PLASTIC BALL HANDLE 22 23 24 25 2G H033 2 GRIP 26 27 28 29 30 31...

Page 78: ...74 ...

Page 79: ...ARI DISC 15 VH H534 1 SPRING 16 VH H535 1 SPRING WASHER 17 VH H539 1 MOTOR PULLEY COVER 18 VH H541 1 DRAWBAR R8 19 VH H544 1 BRAKE BRG CAP 20 VH H545 1 BRAKE SHOE 21 VH H558 1 SPINDLE PULLEY SPACER 22 VH H561 1 SPINDLE PULLEY HUB 23 VH H562 1 TIMING PULLEY CLUTCH SLEEVE 24 VH H563 1 TIMING BELT PULLEY 25 VH H564 1 BULL GEAR PINION COUNTER SHAFT 26 VH H565 1 BEARING CAP 27 VH H569 1 COUNTER SHAFT G...

Page 80: ... 10 VH H613 1 SPEED CHANGE HOUSING 11 VH H616 1 WORM 12 VH H658 2 COVER 13 14 15 16 TM H001 1 QUILL HOUSING 17 TM H008 2 TIMING BELT PULLEY FLANGE 18 TM H035 1 QUILL SKIRT 19 TM H036 1 QUILLL STOP KNOB 20 TM H037 1 QUILL STOP MICRO SCREW 21 TM H038 1 MICRO METER NUT 22 TM H126 1 FEED DRIVE WORM GEAR 23 TM H149 1 DRAWBAR WASHER R8 24 TM H150 2 SOCKET SET SCREW 25 TM H157 1 QUILL MICRO STOP NUT 26 T...

Page 81: ...77 ...

Page 82: ...NG FINGER 15 VH H551 1 BRAKE FINGER PIVOT STUD 16 VH H554 1 BRAKE LOCK CAM 17 VH H556 1 BRAKE LOCK SHAFT 18 VH H557 1 SLEEVE FOR BRAKE 19 VH H558 1 SPINDLE PULLEY SPACER 20 VH H561 1 SPINDLE PULLEY HUB 21 VH H562 1 TIMING PULLEY CLUTCH SLEEVE 22 VH H571 1 SPINDLE BULL GEAR ASSEMBLY 23 VH H572 1 SPINDLE GEAR HUB 24 VH H576 1 BULL GEAR BEARING SLEEVE 25 VH H579 1 BULL GEAR SHIFTER PINION 26 VH H580 ...

Page 83: ... HOUSING 3 TM H616 1 WORM 4 TM H617 1 SPEED CONTROL SHAFT 5 TM H621 1 BRONZE BEARING 6 TM H622 1 SPEED CHANGE HANDWHEEL 7 TM H624 1 HANDLE 8 9 10 11 TM H092 1 BRAKE LOCK HANDLE 12 TM H093 1 BRAKE LOCK PIN 13 TM H284 8 BLACK PLASTIC BALL 14 15 16 17 18 19 20 21 22 23 24 25 26 27 28 29 30 31 32 33 34 ...

Page 84: ...80 ...

Reviews: