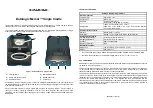
FUNCTION
CLOCK
SLEEP
ALARM
SNOOZ
E/
DIMME
R
VOL
DISPLA
Y
PLAY
MODE
TUNIN
G
MEMOR
Y
EQ
CLEAR
E SOUN
D
/DEMO
DISPLA
Y
PTY
ASPM
RDS
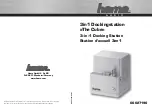
MUSIKSYSTEEM FÜR iPod
®
SYSTÈME MUSICAL POUR iPod
®
SISTEMA MUSICAL PARA iPod
®
MUSIKANLÄGGNING FÖR iPod
®
IMPIANTO MUSICALE PER iPod
®
MUZIEKSYSTEEM VOOR iPod
®
SISTEMA DE MÚSICA PARA iPod
®
MUSIC SYSTEM FOR iPod
®
MODELL
MODÈLE
MODELO
MODELL
MODELLO
MODEL
MODELO
MODEL
DK-A1H
BEDIENUNGSANLEITUNG
MODE D’EMPLOI
MANUAL DE MANEJO
BRUKSANVISNING
MANUALE DI ISTRUZIONI
GEBRUIKSAANWIJZING
MANUAL DE OPERAÇÃO
OPERATION MANUAL
iPod is a registered trademark of
Apple Computer, Inc.
Siehe Seiten i bis vi und D-1 bis D-26.
Se reporter aux pages i à vi et F-1 à F-26.
Consulte las páginas i a vi y S-1 a S-26.
DEUTSCH
Favor consultar as páginas i a vi e P-1 a P-26.
PORTUGUÊS
FRANÇAIS
ESPAÑOL
Hänvisa till sidorna i till vi och V-1 till V-26.
Leggere le pagine i a vi e I-1 a I-26.
Raadpleeg de bladzijden i t/m vi en N-1 t/m N-26.
SVENSKA
ITALIANO
NEDERLANDS
Please refer to pages i to vi and E-1 to E-26.
ENGLISH
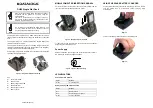
DK-A1H(BK)
Die Abbildungen in dieser Bedienungsanleitung sind für das Modell DK-A1H.
Les illustrations utilisées dans ce mode d’emploi sont pour le modèle DK-A1H.
Las ilustraciones impresas en este manual de manejo son del modelo DK-A1H.
Bilderna i denna bruksanvisning gäller för modelltypen DK-A1H.
Le illustrazioni stampate in questo manuale di istruzioni sono per il modello DK-A1H.
De afbeeldingen in deze gebruiksaanwijzing zijn gebaseerd op het DK-A1H model.
As ilustrações impressas neste manual de operações são para o modelo DK-A1H.
The illustrations printed in this operation manual are for the model DK-A1H.