Thank you for purchasing this SHARP product.
To obtain the best performance from this product, please read this
manual carefully. It will guide you in operating your SHARP product.
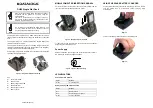
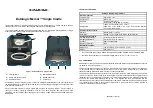
FUNCTION
CLOCK
SLEEP
ALARM
SNOOZ
E/
DIMME
R
VOL
DISPLA
Y
PLAY
MODE
TUNIN
G
MEMOR
Y
EQ
CLEAR
E SOUN
D
/DEMO
iPod is a registered trademark of
Apple Computer, Inc.
The illustrations printed in this operation manual are for the model DK-A1.
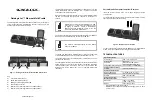
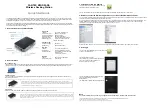
Accessories
Please confirm that the following accessories are included.
Remote control 1
RRMCGA106AWSA (DK-A1)
UACRTA007AW01 (DK-A1)
QACCD0025AW09 (DK-A1)
QACCD0025AWZZ (DK-A1BK)
UACRTA008AW01 (DK-A1BK)
RRMCGA107AWSA (DK-A1BK)
AM loop antenna 1
(QANTL0010AWZZ)
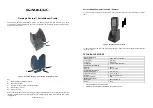
iPod adaptor 8
AC power cord 1
FM antenna 1
QANTW0004AW09 (DK-A1)
92LFANT1535A (DK-A1BK)
MUSIC SYSTEM FOR iPod
®
MODEL
DK-A1
OPERATION MANUAL
DK-A1BK
Note:
This product is not compatible with MTP and AAC file systems.
Note:
Only the above accessories are included.