background image

2

READ ALL INSTRUCTIONS CAREFULLY BEFORE USING THE OVEN.

  C O N T E N T S

•  For Customer Assistance .....  2
•  Precautions to Avoid Possible 
  Exposure to Excessive 
  Microwave Energy  ....................   3
•  Consumer Limited Warranty .......................  4
•  Important Safety Instructions .....................  5
•  Federal Communication Commission Radio 
  Frequency Interference Statement  ............          6
•  Grounding Instructions  ..............................  6
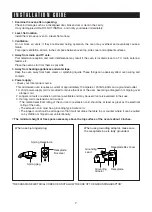
•  Installation Guide  ........................................         7 
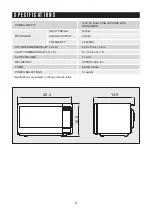
•  Specifications 

 ..............................................         8

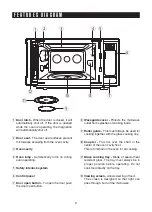
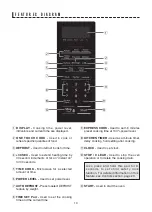
•  Features Diagram  ........................................      9-10
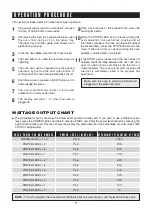
•  Operation Procedure  ..................................        11
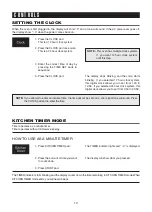
• Controls  .......................................................    12-20
•  Care of Your Microwave Oven  ...................    21-22
•  Questions and Answers  .............................        23
•  Cooking Instructions  ..................................    24-34

MODEL

SMC1132CS

M I C R O W A V E   O V E N
OPERATION MANUAL


Keep the waveguide cover clean at all times.

  Wipe the oven interior with a soft damp cloth after each use.
  If you leave grease or fat anywhere in the cavity it may  overheat, smoke or even catch fire 

when next using the oven.

24T746A

Summary of Contents for 24T746

Page 1: ...t 6 Grounding Instructions 6 Installation Guide 7 Specifications 8 Features Diagram 9 10 Operation Procedure 11 Controls 12 20 Care of Your Microwave Oven 21 22 Questions and Answers 23 Cooking Instructions 24 34 MODEL SMC1132CS M I C R O W A V E O V E N OPERATION MANUAL Keep the waveguide cover clean at all times Wipe the oven interior with a soft damp cloth after each use If you leave grease or ...

Page 2: ...How To Videos Æ Find or Request Service Æ Purchase an Extended Warranty Æ Downloads including the Installation Guide Spec Sheet and Owner s Manual CONTACT US If at any time you have questions or comments concerning your SHARP product please contact the SHARP Customer Assistance Center We are available to assist you through multiple contact methods for your convenience Scan this QR Code on your sma...

Page 3: ...rlocks b Do not place any object between the oven front face and the door or allow soil or cleaner residue to accumulate on sealing surfaces c Do not operate the oven if it is damaged It is particularly important that the oven door close properly and that there is no damage to the 1 door bent 2 hinges and latches broken or loosened 3 door seals and sealing surfaces d The oven should not be adjuste...

Page 4: ...d herein shall constitute complete fulfillment of all liabilities and responsibilities of Sharp to the purchaser with respect to the Product and shall constitute full satisfaction of all claims whether based on contract negligence strict liability or otherwise In no event shall Sharp be liable or in any way responsible for any damages or defects in the Product which were caused by repairs or attem...

Page 5: ...ing instructions on page 21 16 To reduce the risk of fire in the oven cavity a Do not overcook food Carefully attend appliance when paper plastic or other combustible materials are placed inside the oven to facilitate cooking b Remove wire twist ties from paper or plastic bags before placing bag in oven c If materials inside the oven ignite keep oven door closed turn oven off and disconnect the po...

Page 6: ...e responsibility of the user to correct such interference This appliance must be grounded In the event of an electrical short circuit the grounding plug reduces the risk of electric shock by providing an escape wire for electric current This appliance is equipped with a cord having a grounding wire with a grounding plug The plug must be plugged into an outlet that is properly installed and grounde...

Page 7: ...quires a current of approximately 13 amperes 120Volts 60Hz and a grounded outlet 1 A short power supply cord is provided to reduce the risks of the user becoming entangled in or tripping over a longer cord 2 Longer cord sets or extension cords are available and may be used if care is exercised in their use 3 If a long cord or extension cord is used The marked electrical rating of the cord set or e...

Page 8: ... INPUT POWER 1500 W ENERGY OUTPUT 1000 W FREQUENCY 2 450MHz OUTSIDE DIMENSIONS W x H x D 20 3 x 12 0 x 14 9 in CAVITY DIMENSIONS W x H x D 14 0 x 9 4 x 14 1 in CAVITY VOLUME 1 1 cu ft NET WEIGHT APPROX 29 8 lbs TIMER 59 min 99 sec POWER SELECTIONS 10 Levels Specifications are subject to change without notice ...

Page 9: ...tton 8 Waveguide cover Protects the microwave outlet from splashes of cooking foods 9 Roller guide This must always be used for cooking together with the glass cooking tray 0 Coupler This fits over the shaft in the center of the oven cavity floor This is to remain in the oven for all cooking q Glass cooking tray Made of special heat resistant glass The tray must always be in proper position before...

Page 10: ...wer level 7 AUTO DEFROST Press to select DEFROST feature by weight 8 TIME SET Pad Used to set the cooking time and the current time 9 EXPRESS COOK Used to set 1 6 minutes preset cooking time at 100 power level 0 KITCHEN TIMER Used as a minute timer delay cooking hold setting after cooking q CLOCK Used to set clock w STOP CLEAR Used to stop the oven operation or to delete the cooking data Also pres...

Page 11: ... is pressed and the oven does not operate check the area between the door and door seal for obstructions and make sure the door is closed securely The oven will not start cooking until the door is completely closed or the program has been reset 1 2 3 4 5 6 7 8 19 10 11 Make sure the oven is properly installed and plugged into the electrical outlet WATTAGE OUTPUT CHART The power level is set by pre...

Page 12: ...d 24 hour clock system this digital clock allows you to set from 0 00 to 23 59 NOTE If you attempt to enter an incorrect time the time will not be set and a error signal tone will sound Press the CLOCK pad and re enter the time NOTE This oven has multiple clock systems If you want 12 hour clock system omit this step KITCHEN TIMER MODE Timer operates as a minute timer Timer operates without microwa...

Page 13: ...blinking The display counts down the time remaining in M W mode When M W cook ends you will hear 3 beeps HOW TO USE TO SET A HOLDING TIME 1 Program the desired cooking time 2 Press KITCHEN TIMER pad 3 Press the amount of time you want the oven to hold 4 Press START pad The M W indicator lights and the selected time is displayed The TIMER indicator lights and 0 is displayed The display will show wh...

Page 14: ...he oven beeps during the defrosting cycle to signal that the food needs to be turned or rearranged When the defrosting time ends you will hear 3 beeps 1 Press POULTRY pad 2 Select the desired defrosting weight Refer to the auto defrost chart below 3 Press START pad The lb indicator light and 1 5 is displayed The display will show what you pressed POULTRY DEFROSTING begins 1 Press SEAFOOD pad 2 Sel...

Page 15: ...frosting cycle to signal that the food needs to be turned or rearranged When the defrosting time ends you will hear 3 beeps TIME COOK 1 Press TIME COOK pad 2 Press number pads for the cooking time 3 Press POWER LEVEL pad 4 Press number pads for power level 0 10 5 Press START pad The M W indicator lights The display will show what you pressed The display will show PL10 for 100 power The display wil...

Page 16: ...or redistribute the food At the end of DEFROST mode the oven will beep and start M W cook The Defrost indicator goes off and the M W indicator starts blinking The display counts down the time remaining in M W mode When M W cook ends you will hear 3 beeps 1 Press DEFROST pad 2 Press number pads for the defrosting time you want 3 Press TIME COOK pad 4 Press number pads for the cooking time 5 Press P...

Page 17: ... to set cooking time from 1 6 minutes at 100 full power 1 Press BEVERAGE pad once for 1 cup twice for 2 cups or three times for 3 cups When you press BEVERAGE pad once 1 is displayed After 1 5 seconds the display is changed into cooking time and the oven starts cooking ONE TOUCH COOK One touch cooking allows you to cook or reheat many of your favorite foods by pressing just one pad To increase qua...

Page 18: ...mes for an individual bag of Orville Redenbacher s Microwave Popcorn Single Serve size bag 1 16 oz C O N T R O L S 1 Press FROZEN PIZZA pad once for 7 oz pizza or twice for 14 oz pizza When you press FROZEN PIZZA pad once 7 is displayed After 1 5 seconds the display is changed into the cooking time and the oven starts cooking FROZEN PIZZA 7 oz Press FROZEN PIZZA once 14 oz Press FROZEN PIZZA twice...

Page 19: ...ged into cooking time and the oven starts cooking When you press FROZEN VEGETABLES pad once 4 is displayed After 1 5 seconds the display is changed into cooking time and the oven starts cooking POTATO 7 to 8 oz each 1ea 7 8 oz total weight Press POTATO pad once 2ea 14 16 oz total weight Press POTATO pad twice within 1 5 seconds 3ea 21 24 oz total weight Press POTATO pad three times within 1 5 seco...

Page 20: ...ock feature may lock the control panel to prevent the oven from being accidentally started or used by children To lock press and hold STOP CLEAR pad for 3 seconds A beep sounds and the Lock indicator lights and Loc will be displayed for 3 seconds To unlock press and hold STOP CLEAR pad for 3 seconds A beep sounds and the Lock indicator will be turned off C O N T R O L S NOTE 1 When the control pan...

Page 21: ... for cleaning Wash the tray in warm sudsy water or in a dishwasher The roller guide and oven cavity floor should be cleaned regularly to avoid excessive noise Simply wipe the bottom surface of the oven with mild detergent water or window cleaner and dry The roller guide may be washed in mild sudsy water 1 2 3 4 5 6 7 ROLLER GUIDE Glass Tray Roller Guide The ROLLER GUIDE and oven floor should be cl...

Page 22: ...oor bent ii Hinges and Hooks broken or loosened iii Door seals and sealing surfaces 4 The oven should not be adjusted or repaired by anyone except a properly competent service technician 5 The oven should be cleaned regularly and any food deposits removed 6 Failure to maintain the oven in a clean condition could lead to deterioration of the surface that could adversely affect the life of the appli...

Page 23: ...ables and cakes is to allow the inside to cook completely without overcooking the outside Q What does standing time mean A Standing time means that food should be removed from the oven and covered for additional time to allow it to finish cooking This frees the oven for other cooking Q Why does my oven not always cook as fast as the microwave cooking guide says A Check your cooking guide again to ...

Page 24: ...s Some frozen foods are packaged in these dishes Fast food packaging Polystyrene cups containers Paper bags or newspaper Recycled paper or metal trims Can be used to warm food Overheating may cause the polystyrene to melt May catch fire May cause arcing Glassware Oven to table ware Fine glassware Glass jars Can be used unless decorated with a metal trim Can be used to warm foods or liquids Delicat...

Page 25: ...for proper home canning Improperly canned food may spoil and be dangerous to consume Always use the minimum recipe cooking time It is better to undercook rather than overcook foods Undercooked foods can be returned to the oven for more cooking If food is overcooked nothing can be done Heat small quantities of food or foods with low moisture carefully These can quickly dry out burn or catch on fire...

Page 26: ...all the time both naturally and manmade sources Manmade sources include radar radio television telecommunication links and car phones CONVERSION CHARTS HOW MICROWAVES COOK FOOD In a microwave oven electricity is converted into microwave by the MAGNETRON The microwaves bounce off the metal walls and the metal door screen Oven Cavity Magnetron Waveguide Turntable REFLECTION TRANSMISSION ABSORPTION M...

Page 27: ...y microwave when in a round container rather than square SPACING Foods cook more quickly and evenly if spaced apart NEVER pile foods on top of each other STARTING TEMPERATURE The colder the food the longer it takes to heat up Food from a fridge takes longer to reheat than food at room temperature LIQUIDS All liquids must be stirred before and during heating Water especially must be stirred before ...

Page 28: ...unevenly shaped foods such as chicken wings To prevent arcing do not allow foil to come within 1 inch of oven walls or door Remove To prevent cooking thawed portions should be removed from the oven at this point This may shorten defrost time for food weighing less than 3 lbs 1350g C O O K I N G I N S T R U C T I O N S DEFROSTING CHART by Time Defrost I T E M W E I G H T D E F R O S T I N G T I M E...

Page 29: ...ast boned PL10 PL 8 PL 8 4 9 min 5 7 min 6 8 min FISH Fish Fillets Whole Mackerel Cleaned and prepared Whole Trout Cleaned Prepared Salmon steaks PL10 PL10 PL10 PL10 3 5 min 3 5 min 4 6 min 4 6 min Brush a little oil or melted butter over the fish or add 15 30ml 1 2 tbsp lemon juice wine stock milk or water Always let the fish stand covered after cooking NOTE Theabovetimesshouldberegardedonlyasagu...

Page 30: ... N S T R U C T I O N S Baby food 128g jar 20 sec Empty into a small serving bowl Stir well once or twice during heating Before serving check the temperature carefully Baby milk 100ml 4fl oz 225ml 8fl oz 20 30 sec 40 50 sec Stir or shake well and pour into a sterilized bottle Before serving shake well and check the temperature carefully Sandwich roll or bun 1 roll 20 30 sec Wrap in paper towel and ...

Page 31: ...water or a knob of butter Cook until just tender Aubergine eggplant lb 250g 2 3 min Cut aubergine into small slices and sprinkle with 1 table spoon lemon juice Leeks lb 250g 2 3 min Cut leeks into thick slices Mushrooms 0 3 lb 125g lb 250g 1 2 min 2 4 min Prepare small whole or sliced mushrooms Do not add any water Sprinkle with lemon juice Spice with salt and pepper Drain before serving Onions lb...

Page 32: ...with cheese 5 Cook on PL 7 for 2 minutes until the cheese has melted STIR FRIED VEGETABLES 1 tbsp 15ml sunflower oil 2 tbsp 30ml soy sauce 1 tbsp 15ml sherry 1 2 5cm root ginger peeled and finely grated 2 medium carrots cut into fine strips 4 oz 100g button mushrooms chopped 2 oz 50g beansprouts 4 oz 100g mange tout 1 red pepper seeded and thinly sliced 4 spring onions chopped 4 oz 100g canned wat...

Page 33: ...ened Add sugar mix well 2 Cook on PL 7 for 20 25 minutes until setting point is reached stir every 4 5 minutes 3 Pour into hot clean jars Cover seal and label setting point To determine setting point place 1 tsp 5ml jam onto chilled saucer Allow to stand for 1 minute Move surface of jam gently with your finger if the surface wrinkles setting point has been reached PLAIN MICROWAVE CAKE 4 oz 100g ma...

Page 34: ...mall onion diced 1 clove garlic crushed 1 tsp 5ml oil 7 oz 200g can chopped tomatoes 1 tbsp 15ml tomato puree 1 tsp 5ml mixed herbs 8 oz 225g minced beef salt and pepper 1 Place onion garlic and oil in casserole and cook on PL10 for 2 minutes or until soft 2 Place all other ingredients in casserole Stir well 3 Cover and cook on PL10 for 5 minutes then PL 5 for 8 13 minutes or until the meat is coo...

Page 35: ......

Page 36: ...APR 2020 SHARP ELECTRONICS CORPORATION 100 Paragon Drive Montvale NJ 07645 ...

Reviews: