
■
Installation method
Make a hole with a diameter of 200 mm
in the ceiling, install the hook of the
accessory safety wire (A) into the
hooking hole (B) of the bracket, and
then install the other end of the safety
wire (A) to a point inside the ceiling.
Install the bracket to the ceiling, and
then use a screwdriver to fully
tighten both of the screws (C).
Secure the ceiling surface with the bracket
(D)
.
(B)
(A)
200 mm
(Y)
(C)
(C)
(D)
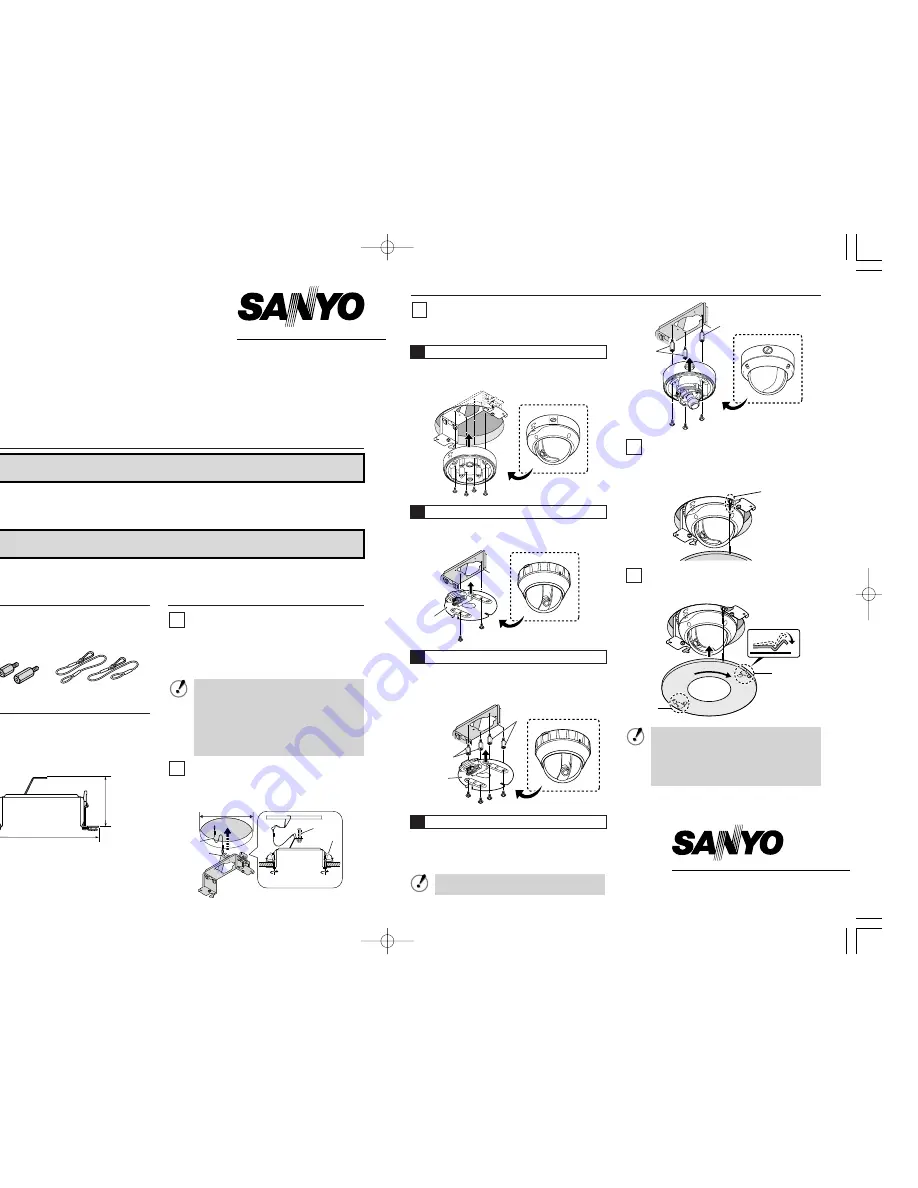
2
1
Remove the basement
(Z)
from the camera
bottom, secure it by tightening the two supplied
screws and then install the mini dome camera to it.
Remove the basement
(Z)
from the camera
bottom, install the accessory spacer
(E:
12mm
)
to
it, secure it by tightening the four supplied screws
and then install the mini dome camera to it.
Install the three spacers
(F:
22 mm
)
which are
supplied with the In-ceiling bracket, install the
camera into the In-ceiling bracket, and then secure
it by tightening the three supplied screws.
(Z)
(E)
(E)
M4
×
10 mm
M4
×
10 mm
(Z)
Insert the hook of the safety wire
which is attached to the cover into the
hooking hole (G) of the In-ceiling
bracket.
Push both hooks (H) of the cover, and
then align the cover with the ceiling
and turn it clockwise to secure it.
(H)
(H)
5
(G)
4
M4
×
10 mm
(F)
(F)
Install the camera.
Four types of camera can be installed to this
bracket.
Place the camera into the In-ceiling bracket, and
then secure it by tightening the four supplied
screws.
M4
×
10 mm
3
■
Accessories
①
Screws: 4 (M4
×
10 mm)
②
Spacers: 4 (12 mm), 3 (22 mm)
③
Safety wires: 2
■
Specifications
¡
Weight: 550 g
¡
Dimensions (Unit: mm):
φ
230
×
105 (H)
¡
Mounting board thickness range: 5 - 30 mm
Features and specifications are subject to change without
prior notice or obligations.
H
ø
③
②
①
1AC6P1P3175--
L9BHL/WA (1107KR-TT)b
VA-DK02
In-ceiling bracket
INSTRUCTION MANUAL
Before starting the installation procedure, please read these instructions carefully. Make sure to
keep these instructions handy for future reference.
■
Safety Precautions
•
When installing the bracket and camera, select a surface which is flat and durable and which can support
the full weight of the bracket and camera, and make sure that they are installed securely.
•
If the installation location is plasterboard or a similar material, use a reinforcement plate to reinforce it.
If the bracket and camera are not securely installed, they may fall down.
•
After installing the bracket and camera, always be sure to check that they are fully secure. If the bracket
and camera falls down, serious injury may result.
¡
If the safety wire is too short, use the
other safety wire which is also included
as an accessory. The safety wire is
used to prevent the bracket from falling
down once it has been installed.
¡
If the installation location is not strong
enough, reinforce the ceiling, or install
the anchor bolt
(Y)
.
A
Installing the vandal resistant dome camera
B
Installing the pan-focus indoor mini dome camera
C
Installing the vari-focal indoor mini dome camera
Be sure to remove the rubber cushion
on the base of the mini dome camera.
SANYO Electric Co., Ltd.
Printed in Taiwan
When installing the cover to the ceiling,
the hook of the safety wire may become
clamped between the hooks
(H)
and the
hooks
(H)
may open. If the hooks
(H)
are open when the cover is installed, the
cover may fall down.
WARNING
This indicates a point that if not respected may cause death
or serious injuries.
CAUTION
This indicates a point that if not respected may cause
injuries and/or extensive material damage.
D
Installing the vandal resistant mini dome camera
00̲VA̲DK02̲L9BHL̲WA̲E 07.11.16 3:18 PM ページ 1


