background image

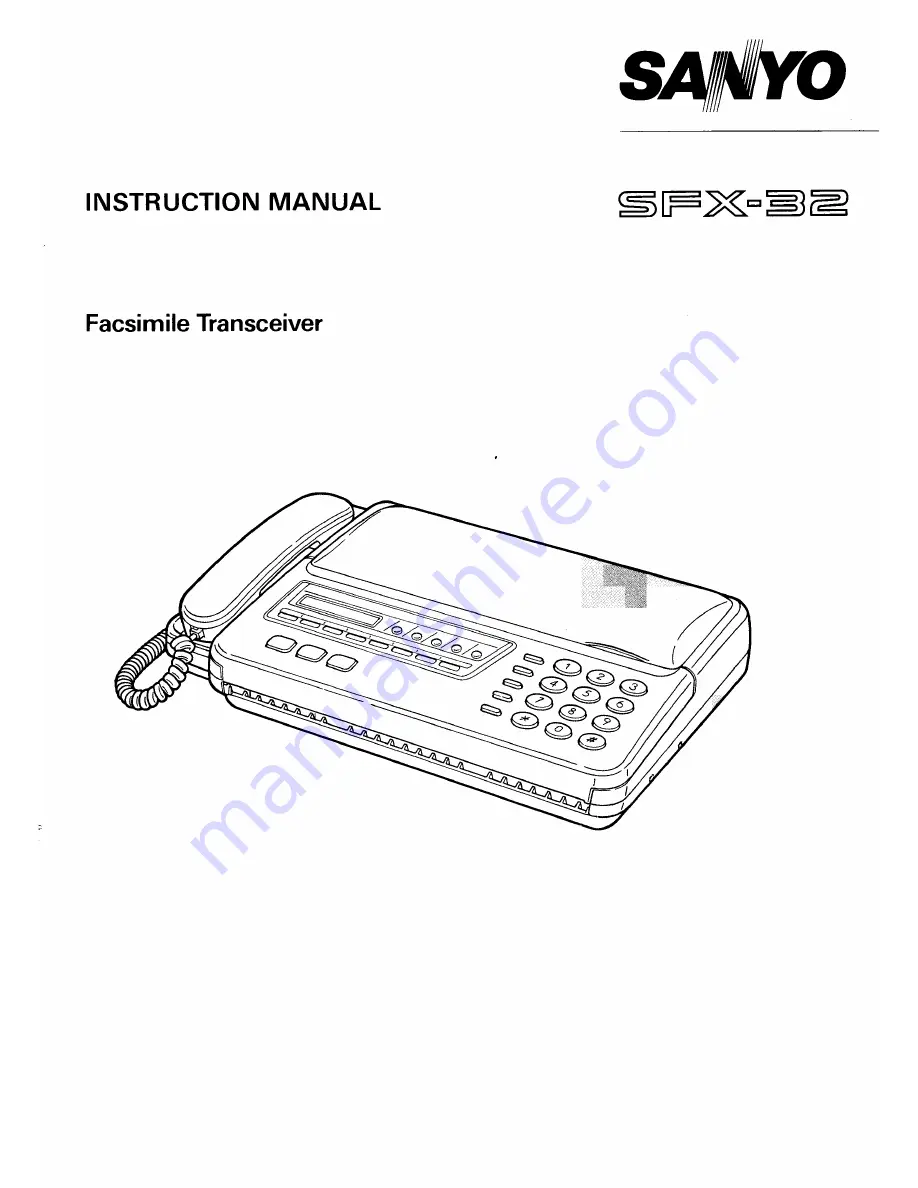
Summary of Contents for SFX-32

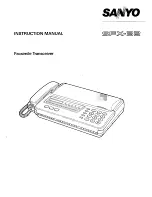
Page 1: ...INSTRUCTION MANUAL Facsimile Transceiver ...

Page 2: ...ine Built in telepho e handse and answering system Voice response with auto reception b 28 number automatic dialing memory Automatic paper CIAW Paper save mode reception with reform copy Enlargement reduction copy capability Compatible with new plain paper quality thermal Superfine resolution ITU T compatible paper high grade thermal paper Halfione Built in anti curl system In order to use the SFX...

Page 3: ...M playing OO O O O 40 ICM erasing OOOC O O 41 Your own OGM recording 42 MEMO recording 44 MEMO playing 45 MEMO erasing 46 Remote operation 47 Basic operation 47 ICM playing erasing recording by remote operation 48 ICM recording by remote operation s ss s 50 MEMO playing erasing by remote operation 51 Personal ID programming 52 Recording method selection for ICM 53 Selecting the recording method 54...

Page 4: ...ounts of interference heaters with thermostats appliances with motors etc It is best to use a completely separate electrical outlet Keep the SFX 32 away from water If water accidentally enters the unit unplug the AC power cord immediately DO NOT PLUG THE UNIT IN AGAIN Contact an authorized Sanyo service center or dealer Handling precautions Do no emove any parts that are held in place with screws ...

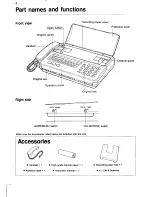
Page 5: ...guide Original exit Operation panel Oliginal slot AUTOMANU PULSETONE m J I AUTO MANU switch PULSE TONE Make sure the accessories listed below are included with the unit switch Accessories Q Handset x 1 High grade thermal paper x 1 Recording paper tray x 1 Adhesive label x 1 Instruction manual x 1 4 x IJM 4 Batteries ...

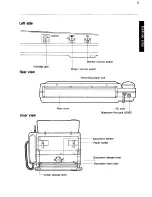
Page 6: ...Monitor volume switch jack Ringer volume switch Recording paper exit I Rear cover Inner view tY 0 r I II 11 la II 111I 1 II 1111 I i l I u J 1 AC cord I Telephone line jack LINE Document sensor Paper holder Document Document release lever feed roller I 1 Green release lever ...

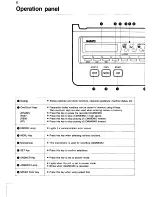
Page 7: ...touch keys are also used when entering names in memory Press this key to erase the recorded lCM MEMO Press this key to play Press this key to skip Press this key to skip lCM MEMO in high speed playing of lCM MEMO reverse playing of lCM MEMO forward Lights if a communication error occurs Press this key when selecting various functions This microphone is used for recording lCM MEMO press this key to...

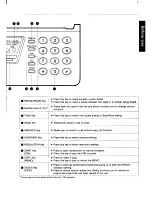
Page 8: ...ER Key Allows you to monitor a call without using the handset I CONTRAST Key I Press this key to select contrast settings I RESOLUTION Key I Press this key to select resolution settings START Key Press to start transmission or manual reception lCM Press this key to play the ICM recorded l COPY Key Press to make a copy MEMO Press this key to play or record the MEMO press to interrupt transmission r...

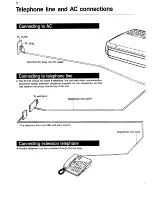
Page 9: ...telephone line cord with other communication equipment except extension telephone prepared for the connection as this may obstruct the proper functioning of the unit To wall jack D 0 The telephone line cord differ with each country Another telephone can be connected through the line plug Y Telephone line cord ...

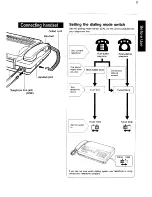
Page 10: ...o the correct position for your telephone line u Push button Rotary dialing telephone telephone B The sound heard when Short audible tones you dial Continuous sounds PULSETONE PULSETONE Q Set the switch to IllHl IWl you are not sure which dialing system your telephone is using intact your telephone company ...

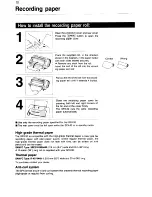
Page 11: ...automatically Use only the recording paper specified for the SFX 32 The rear cover must be left open while the SFX 32 is in standby mode High grade thermal paper The SFX 32 is compatible with the high grade thermal paper a new type fax recording paper with plain paper quality Unlike regular thermal paper the high grade thermal paper does not fade with time can be written on with pencil and can be ...

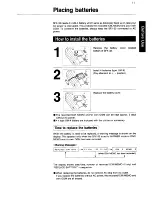
Page 12: ...an be kept approx 5 days without AC power 4 x type UM 4 battery are included with the unit as an accessory Time to replace the batteries I When the battery is need to be replaced a warning message is shown on the display This appears only when the SFX 32 is set to ANSWER mode or lCM MEMO and or own OGM has been recorded Warning Messages REPLACE BATTERY 23 Ott 93 12 00 MEMO O 1 I when lCM MEMO has ...

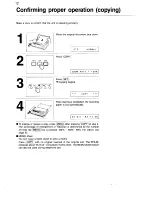
Page 13: ...utomatically 26 Ott 93 12 00 To enlarge or reduce a copy press ml after pressing OPY at step 2 The percentage of enlargement or reduction is determined by the number of times the ml key is pressed 125 0 1000 o 800 0 For reform see page 35 MEMO sheet You can issue a blank sheet to write a memo Press 1 with no original inserted in the original slot The SFX 32 produces about 10 cm 4 long blank memo s...

Page 14: ...Telephone Use Phone calls 14 Hold 15 Redial 15 One touch dial 16 Speed dial 17 Extension telephone answering machine 18 ...

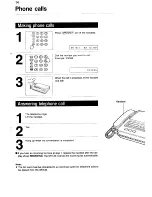
Page 15: ... telephone rings Lift the handset 2 Talk 3 Hang up when the conversation is completed H If you hear an incoming fax tone at step 1 replace the handset after the dis play shows RECEIVING The SFX 32 receives the incoming fax automatically Note The AC cord must be connected to an electrical outlet for telephone Cdk tO be placed from the SFX 32 ...

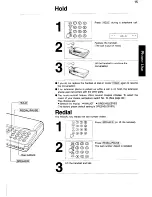
Page 16: ...le a call is on hold the extension phone user cannot talk with the other party The music on hold feature offers several musical choices To select the music of your choice set feature switch No 10 See page 82 The choices are Silence no music MINUET GREENSLEEVES The factory preset default setting is GREENSLEEVES Redial The REDIAL key redials the last number dialed a m zlc l 1 Fl Press S l or lift th...

Page 17: ...8 one touch dialing numbers can be stored in memory See page 70 for programming instructions 98 0 Press e or lift the handset 26 Ott 93 12 00 I PWY W m 13 I I 3040 I I 607 Press the one touch key l 8 for the party you want to call The phone num ber programmed in the one touch dialing memory is dialed out DEALER A El andtalk When the call is answered lift the handset 26 Ott 93 12 00 1 I I One touch...

Page 18: ...mmed into memory A maximum of 20 speed dialing numbers can be stored in memory See page 72 for programming instructions 1 L I y5 CD Press or lift the handset s G 26 Ott 93 12 00 2 Press T L1 I SD B 1 3 r I Enter the speed dialing number 01 20 l WAL PA S for the number you want to call l _ l DEALER A r When the call is answered lift the handset 4 andta k o j 26 Ott 93 12 00 I I I ...

Page 19: ...aler Remote reception You can switch the SFX 32 to fax reception mode from the connected extension phone if a caller wants to transmit a fax after a telephone conversation See Remote reception on page 32 You can use the connected extension phone to place a phone call when original documents are placed in the original slot for timer transmission page 61 ...

Page 20: ...n 23 Automatic dialing transmission One touch dialing transmission 25 Speed dialing transmission 26 Radial 27 Reception 28 Reception modes 28 Automatic reception mode 29 Manual reception mode 30 Answering reception mode 31 Remote reception 32 Phone reservation 34 Copying enlargement reduction reform 35 Diagnostic reports 36 ...

Page 21: ...riginal sheet multiple sheets I thickness 0 05 0 15 mm 0 08 0 13 mm per sheet 0 002 0 006 0 003 0 005 Notes on the suitability of documents Allow ink and or glue to dry completely before inserting a document Do not transmit curled or folded documents Make sure that any paper clips staples or pins have been removed from documents When an original is carbon paper waxed paper or vinyl coated paper us...

Page 22: ...urn home modes See page 83 The initial factory setting is Not return position I CONTRAST I NORMAL 4 LIGHT 4 HALFTONE I RESOLUTION I STD 4 FINE 4 SUPER FINE For normal contrast documents For low contrast documents which need to be trans mitted or copied darker For transmitting or copying halftone documents photographs for example When HALFTONE is selected the resolution mode is automatically set to...

Page 23: ...ument advances slightly 9 When transmitting multiplepage document Stack the sheets with the front edges staggered backward The first page must be lowest See below L 2 Correct insertion direction Wrong insertion direction Note Up to 10 sheets can be placed in the original slot at one time When transmitting more than 10 sheets place the first 10 and then add more during transmission CONTRAST1 I RESO...

Page 24: ...s connected transmission begins automatically ID EALER A I I I 1 1 5 Replace the handset Press m to interrupt a transmission or to remove a document set for transmission If you make a mistake when entering a phone number press then enter the correct number The feature switch No 54 must be set to the ON 01 position for automatic transmission to take place at step 4 Default position of factory setti...

Page 25: ...rast resolution mode if neces sary See Page 21 STD NORMAL Dial the number Example 0123456 Press 0123456 One touch dial buttons STA When the line is connected transmission begins automatically DEALER A press to interrupt a transmission or to remove a document set for transmission m If fii I maka a mictak when enterina the number press STO then Ai w C4 w enter the correct number ...

Page 26: ...or the party you want to send a fax to ID EALER A I When the line is connected transmission begins automatically DEALER A Press TOP C I to interrupt a transmission or to remove a document set for transmission If you make a mistake when pressing one touch key press OP Cl then enter the correct number Note For detailed instructions on programming one touch dial numbers see page 70 ...

Page 27: ...ss the speed dial number 01 20 for the party you want to send a fax to When the line is connected trans mission begins automatically I SPEED DIALl DEALER A F 9 For detailed instructions on programming speed dial numbers see page 72 l Press to transmission If you make a mistake then enter the correct interrupt a transmission or to remove a docu when entering a speed dial number pres number I REDIAI...

Page 28: ...Dial_j BUSY Auto redia L 1 Start transmission L about 3 min Busy_ Auto redial I Busy press R ED lAL PAUSE to continue rediaiing 1 The SFX 32 is set to redial a number twice three times for a number dialed using the timer transmission feature These settings can be changed using the feature switches See page 82 Display shows Automatic redial Redial Normal transmission WAITING RE DIAL Timer transmiss...

Page 29: ...one calls are received by the built in phone The telephone rings MANUAL Use this mode if you use the SFX 32 mainly for phone calls You can receive an incoming fax message after completing a phone conversation Incoming telephone calls are received by the built in phone and connected extension phone if any The telephone and the SFX 32 both rings ANSWER Use this mode if you expect both phone calls an...

Page 30: ...f the caller does not start fax transmission or the telephone is not picked up the SFX 32 continues to ring 7 more times Voice response 2 is heard See note 2 L QEzKWti No one is here now however if you wish to send a fax please transmit at the tone The SFX 32 automatically switches to the fax receiving mode and fax reception starts 1 Notes RECEIVING 1 Using the feature switch No 16 you can switch ...

Page 31: ...he feature switch No 09 is set to any auto switching positions 01 02 03 04 or 05 See page 82 Replace the hands t after initiating the reception When the conversation is complete press START Your caller can start fax transmission after hearing a fax tone I 3 Replace the handset Handset I RECEIVING I 1 I BI When reception is complete a beep sounds 7 g F 26 Ott 93 12 00 I I I Note If the SFX 32 is lo...

Page 32: ...and then takes messages The SFX 32 can receive a fax after the built in telephone answering SyStem plays the announcement if the caller is trying to send a fax manually If there is no incoming voice signal for 6 seconds the SFX 32 automatically switches over to the fax receiving mode and sends a fax signal to the caller Be sure to advise callers in your announcement that fax reception takes place ...

Page 33: ...nsion I r Extension J I rIhone I PhOne L The remote reception features are initially set to the OFF position Reset the feature switches No 08 and No 57 See page 82 and 84 The feature switch No 08 must be set to ON 1 When an incoming call is received lift the handset of the extension phone 2 Talk 3 Enter twice on the extension phone to activate a fax reception 4 Replace the handset Remote reception...

Page 34: ...phone while the SFX 32 is issuing the second set of rings in the auto reception mode you can turn off the ringing by entering and then from the extension phone Then the SFX 32 will not switch to fax receiving mode Notes Remote reception cannot be used from a parallel connectect pulse diallng extension phone Remote reception does not work when the reception mode is set to ANSWER use AUTO or MANUAL ...

Page 35: ...on is completed a beep sounds at the other side for 14 seconds Handset 2 When the other party picks up the handset you hear a beep Talk to the other party If you lift the handset and replace it phone reservation is canceled If the other party does not pick up the handset while the beep sounds the phone line will be disconnected If the other unit does not have phone reservation function the phone l...

Page 36: ...TD NORMAL Select a contrast resolution mode if neces sary See page 21 or copying the SFX 32 uses FINE or SUPERFINE resolution only If the RESOLUTION key is set to STD FINE setting is automatically used I STD NORMAL I I IzOOM RATE 100 1 Press MEN to select the desired mode 4 h GF 000 The display changes each time the key is pressed 125 VO 800 0 REFORM I v I ZOOM RATE 125 I I I J 5 Press 1 c Copying...

Page 37: ... reception Replace recording paper 24 Recording paper jams during reception Check the recording paper 25 Cutter did not work during reception Contact your dealer 27 Timer transmission canceled or no original inserted for timer transmission Printing quality poor due to poor telephone line connection If this code appears 30 frequently contact an authorized Sanyo service center Other party s fax mach...

Page 38: ...MO erasing OOO OO 46 Remote operation 47 Basic operation 47 ICM playing erasing recording by remote operation 48 ICM recording by remote operation 50 MEMO playing erasing by remote operation 51 Personal ID programming 52 Recording method selection for lCM O 53 Selecting the recording method 54 Recording end detection 55 Setting the recording end detection 56 TAS initial 4 4 57 iii ...

Page 39: ...pared for the built in TAS operation Both ICM recording and Fax receiving are available Sorry but no one is here at this moment please leave your message after the tone If you want to send a fax message please press the ml key ICM recording is not available memory full or maximum number but Fax receiving is available Sorry but no one is here at this moment If you want to send a fax message please ...

Page 40: ...ng Messages lCM up to 3 minute as a default of factory preset The recording time of ICM can be changed See page 53 54 4 After the SFX 32 records a incoming messages the answer lamp blinks and the display shows total number of the incoming message EFCCIEI Z F 0 3 2001 Once ICM and or MEMO is recorded the display shows Date Time and the number of lCM MEMO alternately The maximum number of ICM record...

Page 41: ...ed you hear the short beep 3 times m The numberof ICM playing This number includesplayedICMpreviously 2 1 r STOP C COPY START BBE 1 Press H for more than 1 second for playing all of the ICM recorded SFX 32 starts to play ICM from begin ing When ICM playing is finished you can hear the short beep 3 times ALL ICM accumulation t of ICM The numberof ICM playing 3 ml Press to finish ICM playing w lCM M...

Page 42: ... 3 while ICM is playing SFX 32 plays the current playing ICM from begining Skip to reverse as many as you press ICM erasing 2 03040 L 2 1 Press m while the ICM is playing or within 3 seconds after the ICM playing is finished ERASE Press 1 again The ICM is erased After the beep next ICM starts to play If you need erasing continuously re peat steps 1 to 2 ERASED ALL ICM 2 3 3 1 ressmlt s 1 Press ml ...

Page 43: ...PERATION LIT T 0GMREc0R07 I 3 Cl Press ml again Built in OGM is heard EP oTf SE T REC ST OP END 4 n Press to start recording your own OGM K crophone Record your OGM to speak to the mi A maximum 18 minute can be recorded REC ON SE T END ...

Page 44: ...AS OPERATION I Press ml to return to STAND BY mode When you want to change your own OGM recorded press SET while your OGM is released at step 5 then record your OGM to speak to the microphone In case you make a mistake when your OGM is recording at step 4 press STOP and then press SET speak to the microphone again from begining After recording your own OGM follow the steps 5 to 7 ...

Page 45: ...to the microphone MEMO RECORDING 1 3 STOP C COPY START P Fmim Press ml to finish recording The memo recorded is released from the speaker I MEMO 1 1 4 SFX 32 returns to TAS operation mode TAS OPERATION Press ml to return to stand by mode Maximum 18 minute or 10 memos can be recorded Once you recorded 18 minute no other recording ICM OGM is performed To revise the memo recorded erase the memo see p...

Page 46: ...mulation of MEMO The number f MEMOplaying 3 Press ml to finish playing TAS OPERATION Press ml again to return to STAND BY High Speed Playing SFX 32 can play the MEMO 1 25 times as fast as normal playing speed 1 Press ml while MEMO is playing To cancel press I FASTI again Forward Sldp Press One touch 4 while MEMO is playing SFX 32 skips to the next MEMO Skip to forward as many as you press Reverse ...

Page 47: ... I ERASE 4 2 03040 1 Press I ERASE I again The memp is erased and you can hear a beep then next memo is started to play ERASED When you need to erase the next memo continuously repeat the steps 1 to 2 3 Press ml to finish playing TAS OPERATION Press ml again to return to STAND BY To erase all of MEMO see page 57 ...

Page 48: ... see remote code table YOU hear a beep for an acceptance A touch tone telephone which gen erates DTMF signal is required for entering the remote code 4 Hang up the handset when you finish the operation 9 When you make a mistake in entering the 4 digit I D four times of short beep can be heard Enter the correct number again within 10 seconds after the beep When you make a mistake in entering the re...

Page 49: ... after entering the first digit After playing or erasing a beep is heard if you need continuous operation enter the next remote code within 10 seconds after the beep High Speed Playing Press PI 1 while ICM is playing The SFX 32 plays ICM 1 25 times as fast as normal playing speed I Skip Playing Forward Skip Press while ICM is playing SFX 32 skips the current playing ICM and plays next ICM If there...

Page 50: ...ted If you need to operate other function press desired code within 10 seconds if not the line is disconnected When other remote operation is required while the ICM is playing enter the first digit of the remote code and confirm that the ICM playing is stopped If not repeat entering the first digit until it is stopped After the confirmation enter the second digit of the remote code ...

Page 51: ...essage after you hear a beep 5 Press to finish recording You hear a beep If you need to operate other function press desired code within 10 seconds 6 Hang up the handset when you finish the operation When the memory is full while ICM is recording you hear a short beep 4 times and the line is disconnected When the recording method is selected to ANSWER ONLY no recording is performed ...

Page 52: ...r a beep three times If you need other remote operation continuously enter the desired code within 10 seconds after the beep i 4 Hang up the handset when you finish the operation If there is no memo when you enter 2 you hear a short beep 3 times and after that 10 seconds silent is presented If you need to operate other remote function press desired code within 10 seconds If not the line is disconn...

Page 53: ...ECORD 7 I I I 1 1 3 Press ml ITAS ID SET I 4 1 Press ml The display shows factory preset num ber 1234 TAS I D 123 5 Enter your desired 4 digit personal l D number Example 9876 TAS ID 9871 If you make a mistake in entering your I D re enter your number 6 Press ISET 1 l D program is complete TAS OPERATION Press ml to return to STAND BY Remote operation of built in TAS see page 47 ...

Page 54: ...ection method see page 55 56 FIX 30 Sec Once this is selected the recorded time of ICM is fixed at 30 seconds When the ICM recording reaches 30 seconds the SFX 32 stops recording and disconnects the line Even if the caller hang up the handset within 30 seconds the SFX 32 keeps on recording till 30 seconds ANSWER Only The SFX 32 does not record ICM just answers the OGM to the caller The SFX 32 rele...

Page 55: ...ING OGM RECORO 7 3 Cl Press rm twice F ro olar 6 REC METHOD SET 4 Cl Press I The display shows initial factory set i k 777 method VOX MAX 3 MIN Press ml to select desired method The display shows FIX 30 sec ANSERONLY VOX Example ANSWER ONLY 6 F ressHITASOPERATIO I Pressmto return to STAND BY ...

Page 56: ...hes over to the FAX receiving mode When the SFX 32 detects busy tone while recording the SFX 32 stops recording and disconnects the line SILENT If there is no voice SILENT for 6 seconds continuously while ICM is recording the SFX 32 stops recording and automatically switches over to the FAX receiving mode BUSY TONE When the SFX 32 detects busy tone while recording the SFX 32 stops recording and di...

Page 57: ...X recording method J TAS OPERATION 3 El Press 1 three times P or20PF 6 END DET METHOD 4 Press The display shows present setting SILENT BUSY TONE 5 Cl Press ml to select desired method r P7TPG i 2 E LENT Example s I I_E NT 6 EI ressHITASOPERATIO I Press ml to return to STAND BY ...

Page 58: ... TO erase all of ICM recorded To erase all of MEMO recorded To erase your own OGM Initialize personal ID Initialize recording method Initialize end detection method of ICM All initial of the above items at once 1 ressm LY J TAS OPERATION 2 3 Press ml TAS SETTING OGM RECORD e ressm Lv TAS INITIAL ALL CLEAR ...

Page 59: ...AS OPERATION 230c I 93 12 00 OR Press ml to select the item you need to initialize ICM ERASE ICM ERASE Press FSH The selected item is initialized and the next item is displayed IMEMO ERASE I If you need to initialize continuously press Press STOP to finish TAS OPERATION Press ISTOP I again to return to STAND BY ...

Page 60: ...eport 66 Set mode selection 67 0 Entering names 68 One touch dial memory programming 70 Speed dial memory programming 72 Printing a number list 75 Header print setting your station name and fax number 76 Calender and clock 78 Feature switches 80 Closed network communication feature switch No 26 85 Remote reception activation number 86 ...

Page 61: ...ion TIMER Tx Press 3 times 4 I 1 1 I To set polling reception IPOLLING Rx I 1 1 Press 4 times 4 To set paper save mode PAPER SAVE SLCT Press 5 times 4 I 1 I To print activity report IACTIVITY REPoRT l I I Press 6 times 4 To enter set mode SET MODE I see Various programming modes for the SFX 32 features and functions can be selected using N l and r l keys For detail see page 67 4 Return to stand by...

Page 62: ...grammed for timer transmission to one destination Place the original document face down STD NORMAL 2 Select a contrast resolution mode if neces sary See page 21 STD NORMAL 3 h ressmt ce PA TIMER Tx I 4 L Press SETJ START TIME 1 6 1 Enter a delayed start time using the number keys The start time must be entered using the 24 hour system Example 12 30 START TIME 12 3E I PARTY I ...

Page 63: ...ges can still be received auto and manual reception after a timer transmission is set It is also possible to transmit fax messa es and make copies after timer transmission is set To do this press STOP C and remove the document inserted for timer transmission When transmission or copying are completed simply replace the document intended for timer transmission I ...

Page 64: ...on is completed a timer transmission report is printed out automatically 1 e o x x x TIMER TRNS REpORT x x x 26 Oct 9312 31 B SET TIME 12 30 No START PARTNER PAGE RESULT ERROR CODE 1 12 30 DEALER A 1 OK I If a fax number is busy when a timer transmission is attempted the number is automatically redialed three times The number of redials can be changed using the feature switch No 05 See page 82 ...

Page 65: ...number The other party s fax machine must be set to polling transmission mode The cost of the call if any is billed to the receiving party 1Press ME Ul 3 times I lpOLLING RX I J I I l J L_i PARTY 2 3 Dial the other party s fax number Es Example 123456789 q g E I 1234567891 I v I 1 123456789 El Eml 1 1 Note D The other fax must be using ITU T compatible polling ...

Page 66: ...0 I A I I v I PAPER SAVE SLCT I I 1 I 4 v 1 2 3 Press ISET I PAPER SAVE OFF Press ml Each time the ml key is pressed the display shows ON OFF Press ml at your desired selection PAPER SAVE oN Press I SET 1 A beep sounds 26 Ott 93 12 00 To turn off the paper save function This feature is effective only when select OFF at step 3 the original document is transmitted in the STD standard resolution mode...

Page 67: ...TAL PAGE 000003 RECV TOTAL PAGE 000002 TRNS No DATE START TIME PARTNER PAGE RESULT ERROR CODE 1 26 Oct 9 00 1 23 AAA 2 OK 2 26 Oct 10 00 0 45 BBB 1 OK RECV No DATE START TIME PARTNER PAGE RESULT ERROR CODE 1 26 Oct 9 30 1 02 ccc 1 OK 2 26 Oct 10 30 0 38 DOD 1 OK You can set the SFX 32 to issue a transmission report after each transmission However the SFX 32 is initially factory set to the OFF non ...

Page 68: ...he set mode that you want to program or change Press once r Speed dialing memory SPEED DIAL SET programming mode 1 Press twice Program z Header print Press 3 times r Calendar clock setting mode Press 4 times ATU ES S T 1 Feature switch setting mode Press 5 times 4 i I Remote 1 number I reception activation programming mode REMOTE hJo SET i b J This display appears only when the feature switch No 0...

Page 69: ...h alphabetical letter and symbol are assigned to a 2 digit code as shown on the next page Exmaple To enter SFX 1 ress E E 0 nter SI 2 Press to enter F SF1 ml 3 Press 4 1 to enter X 4 ressEl m nter pace Exmaple To enter 67 1 2 n Press 6 to enter 6 and then press key to move the cursor to the right H Press 7 to enter 7 SFX 67E 1 1 e ...

Page 70: ...number and press to move cursor right 7 9 Enter the number The cursor moves to the right automatically If you make a mistake in entering a letter or a number simply press to move right or to move left to the appropriate space and then enter the correct letter or number To clear a name or a number press STOP Cl and re enter Placing the adhesive number sheet An adhesive label for one touch dialing n...

Page 71: ...ional 20 numbers fax or telephone can be stored using the speed dialing numbers 01 20 Press ml 6 times ISET MODE I L L I I T 7 75 O T DIAL SET 1 Press again Press one touch dialing key l 8 Example To program a number in the one touch _key 2 press one touch key 2 O T No 5 11 Press 1S_E Ef F z m Cl 6 0f16characters Enter the party s name to a maximum See page 68 for detailed instructions 12 13 4 1 1...

Page 72: ...START Q an Press STOp C to finish one tou h number programming I I 26 Ott 93 12 00 For instructions on printing out a numerical list of programmed names and numbers see page 75 To interrupt programming press STOP CJ To enter a hyphen press ISPEED DIAL To enter a three second pause between two digits of a number press I REDIAL PAUSE in the appropriate place A semicolon indicates a pause I 1 RED AUP...

Page 73: ...L SET 1 Press MENU SPEED DIAL SET I S D io Ofl 5 Enter a speed dial number using the number keys Example Tostore afaxnumber in the speed dial number 10 press then S D No Im Enter the party s name to a maximum of16characters See page 68 for detailed instructions E EI Eml 1 7 I I 1 I ...

Page 74: ...r numbers SD hlo 111 STOP C COPY START Da Press 1 to finish speed dial number programming 26 Ott 93 12 00 For instructions on printing out a list of programmed names and numbers see page 75 To interrupt programming press ISTOP C 1 To enter a hyphen press I SPEED DIAL 1 To enter a three second pause between two I REDIAL PAUSE I in the appropriate place A a pause digits of a semicolon number press i...

Page 75: ... 3 6 to cancel other one touch key Press ml to finish canceling Example One touch 2 O T No g l EALER A I I O T No g I 1 2 3 4 5 6 7 8 9 Press I MENU I 6 times Press T Press m Press ISET 1 Press the number to be canceled Press Press ISTOP C 1 Press JS Repeat steps 5 8 to cancel other speed dial numbers Press STOP C Example Speed dial number 10 S D No 11 I S DNO In ...

Page 76: ...dial list 26 Oct 9312 00 No PARTY S NAME 1 AAA 2 BBB 3 ccc O T DIAL SET O T DIAL LIST ONETOUCH DIAL LIST NUMBER 000222333 444555666 777888999 o 0 0 0 1 Press I MENU I 6 times SET MODE 2 Press SET I 1 O T DIAL SET Press EN SPEED DIAL SET k 9 J I w 3 1 4 Press Sample of speed dial Ilst o 26 Oct 9312 00 I S D DIAL LIST No PARTY S NAME 01 DDD 02 EEE 03 FFF NUMBER 111444666 333222111 555777999 ...

Page 77: ... and fax number into the SFX 32 this information is printed at the top of all faxes you send Press ml 6 times ISET MODE I Press O T DIAL SET Press U l twice STATION CODE SET 5 I Enter your station name A maximum of 24 characters can be entered See page 68 for detailed instructions ABCDEI 6 1 ress I I ...

Page 78: ...9 Print an activity report See page 66 to make sure that your station name and fax number have been programmed correctly TO interrupt programming press i If you make a mistake in entering a character enter the letter or number press STO and then re To enter a hyphen between two digits press d To enter a plus sign preceding your fax number press 0 L m ...

Page 79: ...DIAL SET Press I MENU 13 times TIME SET 4 DI Press 1 EF 72Z 10 06 93 10 00 5 Enter the day month year and time using the number keys The time must be entered using 24 hour system The day month and year should be entered in 2 digits each ExamDl to enter 26 October 1993 12 00 lsE1 1 ml 6 10 93 12 00 ...

Page 80: ... Press FSE J 126 OC 93 12 001 N If you make a mistake move the cursor to the appropriate enter the correct number Press to move the cursor right Press to move the cursor left place then ...

Page 81: ...s you to change these feature switch settings The feature switches and their functions are listed on page 82 83 and 84 1 1 Press 6times I v I I v SET MODE I I 1 Press 10 T DIAL SET I Press m 4 times FEATURE SW SET I Sw m CODE m Change Enter the number of the switch you want Example To change the remote reception capability press and M to select feature switch 08 Sw OS CODE BEml 1 rE6m I I ...

Page 82: ...g procedure press IST I Samde of feature switch list FEATURE SW LIST 26 Oct 9312 00 SWITCH NAME SW No SET CODE INITIAL SET PAUSE TIME 01 03 03 REPEAT CALL TIMER 05 03 03 REPEAT CALL REDIAL 06 02 02 REMOTE RECEIVE 08 00 00 FAX PHONE CHANGE 09 03 03 HOLD BUTTON MELODY 10 02 02 VOICE RESPONSE 16 01 01 PRINT DENSITY 23 00 00 CLOSED NETWORK RX 26 00 00 INITIAL RESOLUTION 27 03 03 INITIAL CONTRAST 28 03...

Page 83: ...ed 02 2 times 02 dialing 2 3 minute intervals 03 3 times 08 Remote receiving capability 00 OFF No remote reception 00 possible 01 PULSE For pulse dialing extension telephone 02 TONE For touch tone dialing extension phone 09 The simulated rings that the SFX 32 00 OFF No rings No auto switching issues after connecting to the line 01 3 rings Auto switching during the AUTO reception mode 02 5 rings Au...

Page 84: ...sion 00 01 00 01 00 01 02 03 00 01 02 03 00 01 00 01 02 03 00 01 00 01 Description Normal Darker OFF ON Checks numbers of incon ing calls STD FINE SUPERFINE No return NORMAL LIGHT HALFTONE Not return Faster transmission Better halftone quality at SIOW speed To enhance character edge S higher number OFF No enlargement reduction reform possible ON Enlargement reduction reform possible OFF need to pr...

Page 85: ... Switch No 55 57 Setting items The compression paper save percentage FAX lEL parallel connection of jetting No 00 01 00 01 Description 5oyo 759 0 OFF ON actory Setti 00 00 ...

Page 86: ...is stored in the one touch and speed dialing memory of your SFX 32 Be sure to enter the other party s telephone number correctly Closed network communication can be turned ON or OFF using feature switch No 26 Notes IJnregistered numbers cannot be received Even a registered number cannot be received if the other fax machine does not have a station identification feature or the station number has no...

Page 87: ...eception from the Press ml 6 times SET MODE 2 3 4 v O T DIAL SET I I I I I ressMw times Press ml REMOTE No SET 6 Enter your desired remote number 00 99 Example 55 I REMOTE NO SRI Press 26 Ott 93 12 00 To use the remote reception feature the feature switch No 08 must be set to the 01 ON position The factory set position is 00 OFF See page 82 to change the setting This feature may not function with ...

Page 88: ...oloring or erasure may occur if oil or other chemicals are allowed to come into contact with the paper Be careful in the following cases When gluing use only water soluble glue commercially available When some adhesive tapes are used coloring may result The use of double sided tapes on the back of the paper is recommended When storing the paper in plastic cases use ones that are made of polyethyle...

Page 89: ...ROR lamp lights when the original jams press m before operating below Lift the operation Danel forward Raise the document release lever 3 Remove the jammed original while press ing the green release lever 4 B Reposition the release I the operation panel e __ e g g rmn __ _e en J lever and close ...

Page 90: ...r and rear cover Press ml button to open the recording paper cover Remove the jammed recording paper Cut off the jammed section of the record ing paper and reinstall the roll Close the recording paper cover securely by pressing on the left and right front corners of the far end of the cover The recording paper is cut automa tically ...

Page 91: ...copy the document feed roller 2 with a soft clean amount of neutral detergent or a fax you have sent clean cloth dampened operation panel with a small I Open the Operation panel 2 I 3 In order to rotate the document feed roller 2 press the document sensor as shown in the figure Clean the document feed roller 2 then dry it thoroughly to prevent the document from jamming Document feed roller 2d Docu...

Page 92: ...mount of a neutral detergent 1 I I 2 3 Document feed roller l Open the operation panel then pull the document release lever as shown in the figure In order to rotate the document feed roller 1 press the document sensor as shown in the figure Clean the document feed roller 1 then dry them thoroughly to prevent the document from jamming ...

Page 93: ...et for manual reception 30 Reception is not possible Unit may be set for manual reception Just lift the handset Bell rings Incoming fax transmission can be received without pressing 30 ml key AC cord may not be connected 8 Recording paper may have run out 10 Reception is not possible Closed network communication may be on Check feature 85 c switch No 26 0 a Recording paper may have run out 10 I a ...

Page 94: ... be set The memory may be full Erase ICM that already played Recording method may be set to answer only Set the recording method to VOX or Fix 30 sec The telephone you use may be DP Dial Pulse telephone Touch tone telephone generate DTMF must be used Personal ID number may be wrong Enter the correct ID number Fax possibly being transmitted or received Too many phones may have been connected to the...

Page 95: ...nes mm Super fine mode Compression mode MH Modified Huffman and Sanyo original Reading method CIS Contact image sensor Recording method Thermal printing s o Recording method lc 6 c Recording time z Maximum 18 minute in total lCM memo and own OGM E Number of recording ICM maximum 60 MEMO maximum 9 Power supply AC 220 240V 50 60Hz Power consumption Stand by 5 W Transmission 15 W Reception 150 W Copy...

Page 96: ...ing 4 MEMO Playing 2 High Speed Quick Playing 5 Forward Skip 9 Reverse Skip 71 lCM MEMO Re playing 8 lCM MEMO Erasing I 01 ICM Recording I 11 3 I I I Dial to the SFX 32 Enter the 4 digit personal ID number while OGM is released Enter the first digit and confirm OGM is stoppted then enter the following three digits Enter your desired remote code You hear a beep for an acceptance I I I I ...

Page 97: ...S Y o 3RE6P1 1007660 SANYO Electric Co Ltd Printed in Japan 2 ...

Reviews: