background image

Chapter 1 Preparation

Chapter 2 Installation

Chapter 3 Basic Setting & Operation

Chapter 4 Controlling the Projector

Chapter 5

Controlling the Multi-Projectors

Chapter 6 Use of Serial Port

Chapter 7 Appendix

Network Board

POA-MD13NET2

OWNER’S MANUAL

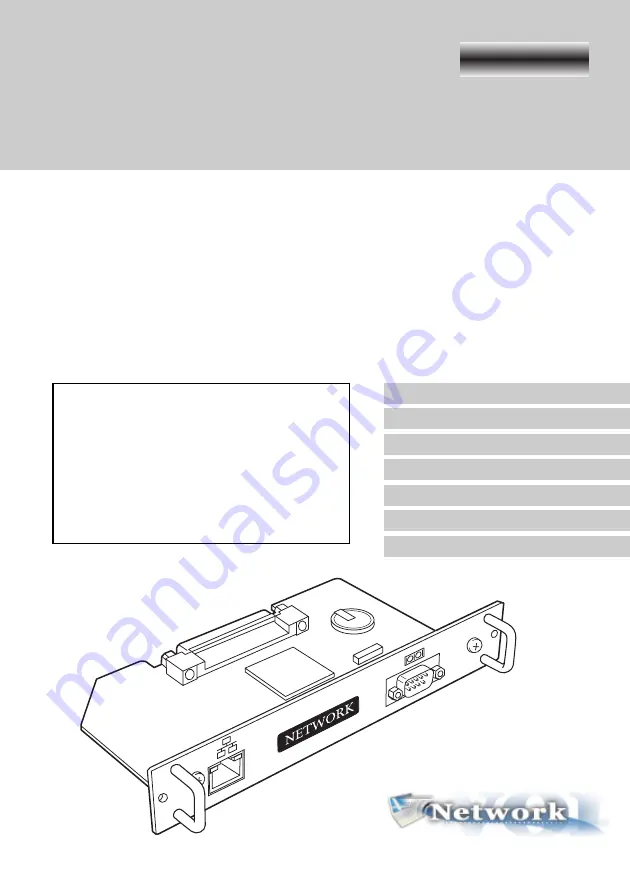
INSTALLATION and OPERATION of the Network Board

This Network Board is an optional product to control and set up a projector via a network.
Mount this product to the projector and connect a network cable. By accessing the con-
nected projector using the web browser on your computer, the projector can be con-
trolled and set up remotely.
This product is only used for our projectors that have a terminal for the Network Board.
This manual explains the installation of the Network Board and its operation.

This network board is an optional product for the
LCD projectors. The control pages and instruc-
tions differ with each projector. This side of the
owner's manual is for the projector HD series.
See back of this manual for others. Check the
projector's model No. and use proper side of this
owner's manual.

This side is for HD series

For HD Series

Summary of Contents for POA-MD13NET2

Page 1: ...k cable By accessing the con nected projector using the web browser on your computer the projector can be con trolled and set up remotely This product is only used for our projectors that have a terminal for the Network Board This manual explains the installation of the Network Board and its operation This network board is an optional product for the LCD projectors The control pages and instruc ti...

Page 2: ...s otherwise speci fied in the instructions If such changes or modifications should be made you could be required to stop operation of the equipment Warning This is a Class A product In a domestic environment this product may cause radio interference in which cause the user may be required to take adequate measures Compliance CAUTION ON USE IN NETWORK When you receive an alert e mail from the proje...

Page 3: ...ector 22 1 Enter the IP address 22 2 Select a display mode and login 22 3 Display of main setting page 23 Initial Settings 25 1 Language Setting 25 2 Password Setting 26 3 Temperature unit setting 26 4 Date Time Setting 27 Network Configuration 28 1 Configure the network 28 2 Name the projector 28 E mail Setting 29 Examples Type and contents of alert mail 31 Chapter 4 Controlling the Projector 33 ...

Page 4: ...ddress and projector name 57 Check IP address and projector name 57 Exclude Add Delete a projector 58 Status 58 Control 59 Load and apply the setting value 59 Chapter 6 Use of Serial Port 61 Serial Port setting 62 Control Examples 64 Use of Telnet 66 Control the projector with Telnet 68 Chapter 7 Appendix A 69 Examples of Connection 70 Web browser setting 72 Windows XP Professional 73 Product spec...

Page 5: ...5 ENGLISH Chapter 1 Preparation 1 Network Board OWNER S MANUAL HD Series ...

Page 6: ...rowser installed on your computer E Mail Alert function The projector Network Board sends messages to the registered e mail addresses when a lamp abnormality or power failure occurs with the projector This message describes how to solve the cause of the problems You can take efficient action for quick recovery Internet Intranet PC2 PC4 PC3 PC5 PC1 You ve got Mail PJ2 PJ1 Internet Intranet PC2 PC4 ...

Page 7: ...pment via network This product provides a serial port RS 232C for controlling external equipment By connecting the equipment which has a serial port it can be controlled by a computer via the network This product does not provide the interface driver software to control exter nal equipment Internet Intranet PC2 PC4 PC3 PC5 PJ2 PJ1 PC1 Turn on the DVD player and start playing DVD Player Now it s 11...

Page 8: ...em you use Macromedia Flash Player ver sion 6 0 or later Network must handle Ethernet correctly and accept TCP IP The computer must provide a 10Base T or 100Base TX network card Microsoft Outlook Microsoft OutlookExpress Netscape Mail Required the internet e mail application software to receive an e mail alert sent from this product If you do not use the func tion E mail Alert this application is ...

Page 9: ...aight Cable with category 3 or 5 2 100m Network Board Computer UTP Cross Cable with category 3 or 5 2 100m 1 There may be other limitations depending on your network environment or LAN specifica tion Please consult your network administrator for further details 2 Category of LAN cable indicates the cable quality Normally a cable with category 3 or 5 is used for 10Base T network and a cable with ca...

Page 10: ...tive owners Unauthorized use of a part or whole of the contents in this manual is prohibited The contents of this manual are subject to change without notice Notice Expression Abbreviation The word projector found in this manual means projector provided with Network Board unless otherwise noted The OS of the computer and the Web browser described in this manual is Windows XP Professional and Inter...

Page 11: ...11 ENGLISH Chapter 2 Installation 2 Network Board OWNER S MANUAL HD Series ...

Page 12: ... contains a network board owner s manuals 2 books a ferrite core and 2 screws Also check the name and function of each part 1 Mount this product onto the projector 2 Connect the LAN cable and join it to the network 3 Configure the network of the Network Board 4 Set the password Flow of installation The preparation to control the projector connected to the network is completed At the next step set ...

Page 13: ...olling the external equipment via the net work p 61 LAN port Connecting the LAN cable p 15 LINK indicator Orange This lights up orange when the net work board is connected to the net work correctly ACT indicator Green This turns on and off when sending or receiving data Serial port switch socket This is to switch the polarity of the serial port p 65 ...

Page 14: ...he guide Mount the board connector into the socket in the slot firmly 4 Secure the board with two screws supplied Mains switch must be turned off when mounting or removing this product otherwise it may damage the product Do not install multiple network boards into a projector otherwise it may damage the product Do not connect the AC cord until after connecting the LAN cable and computer Caution WA...

Page 15: ...the computer and projector directly not using the hub When you connect the projector into the 10Base T network use cable with category 3 or 5 When you connect the projector into the 100Base TX network use cable with category 5 The length of cable between hub and projector should be less than 100m 1 Turn the Mains switch off 2 Wind the UTP straight cable once around the ferrite core supplied as the...

Page 16: ...ns how to set the following configuration The default network configuration is set as follows 1 Selection of network menu Turn on the projector and display the menu on the screen Select the Network setting icon from the main menu using the point buttons d e 7 8 From the submenu select Network setting sub icon then press SELECT button once Check that the mode is On If not change mode to On using th...

Page 17: ...the num bers can be entered directory For further information see next page 3 Restart the Network Board Select Set with 7 8 keys and press SELECT button again The network configu ration display disappears and the Network Board begins restarting It takes about 40 seconds Do not turn off the mains switch during this period Completing of installation Now the installation is completed The IP address o...

Page 18: ...s to the setting pages of the projector using the web browser The default password is set 0000 as no password 1 Use the projector s menu and select the Network setting icon on the menu 2 Select the Network setting sub icon from the submenu and then press SELECT button once Check that the mode is On 3 Select the Password sub icon and then press SELECT button once The setting window appears The numb...

Page 19: ...ber in the column and then enter the number again 4 After entering the number in the col umn select a move key 7 8 e d located on the lower part of the pallet by using the point buttons and press SELECT button repeatedly to move the red frame 5 Repeat steps 3 to 4 for entering all the network address 6 After finishing select Exit and press SELECT button The 10 key pallet disap pears on the screen ...

Page 20: ...e network setting menu on the projector Please see item Network Configuration for further information p 16 2 Make sure that there is no network equipment set with the same IP address in the network before connecting to the network 3 When installing other projectors follow the above steps to change the IP address and connect to the network In case of installing the projector with Network Board into...

Page 21: ...21 ENGLISH 3 Chapter 3 Basic Setting and Operation Network Board OWNER S MANUAL HD Series ...

Page 22: ...the User Name text area and the login password onto the Password text area and then click OK button The entering User Name must be user and it cannot be changed Note When accessing the projector at first time or setting the no password 0000 the auto login will be performed and the next main setting page is displayed This chapter describes basic operations and settings for controlling the projector...

Page 23: ...ng to the selected menu Page numbers Switches the pages by clicking the numbers Sub menu tab Switches the sub menu tab Returns to Display Mode selection page p 22 Main menu For selection of control and setting items of the projector p 36 Login the setting page of the projector z Main setting page in the Graphic Mode display The Macromedia Flash Player version 6 or later is required when you contro...

Page 24: ...Text Mode display Main menu For selection of con trol and setting items of the projector Displays sub menu and status of selected items when clicking the linked text Setting page number Browses pages by clicking the linked number Setting page Displays the control and setting items according to the selected menu ...

Page 25: ...Date Time Password and Temperature unit can be set in this page The model name of the projector on which this product is mounted is displayed on the page 1 Language Setting This setting is to select the display language of the web page Select your lan guage with the pull down menu button and then click Set button The selectable language is English or Japanese You may find the unrecognized characte...

Page 26: ... connect the projec tor with this product to the network it is recommended that you set a new pass word Only a four digit numeric number is valid for the password If you forget the password to the projector you can check it by selecting Password sub menu from Network setting menu on the projector For further information please see item Password Setting p 18 3 Temperature unit setting Change the te...

Page 27: ...d confirm that the data and time are set correctly The displayed date and time are not updated automatically click the Refresh button to get the present date and time Initial Settings Use of Battery This product provides a lithium battery When the battery runs down the clock and timer func tions do not operate properly Contact your local dealer for the replacement of battery The replacement must b...

Page 28: ...ccess to the login page again in 40 seconds You must use the number specified by your administrator The address must be entered as a group with four numbers split by a dot like 192 168 1 101 2 Name the projector You can name 3 the projector By setting this name properly for the DNS server the projector can be accessed by using this name instead of the IP address For further information please cons...

Page 29: ...ends an alert message due to the abnormality on the projector but the SMTP server is down in some other reason the message does not be sent In this case the message Unable to connect to server will be displayed on the setting page Click Set button to remove the message To use the E Mail function it must be set the DNS address on the Network setting page correctly You cannot use this E mail functio...

Page 30: ...xamples Type and contents of alert messages described on the next page 2 Registering and deleting E mail addresses Type the E mail address onto the Mail Address text area and click Set but ton To check the registered address es click Mail Address Check Delete sub menu tab The addresses are list ed as the figure on the right To delete the registered addresses check the address you want to delete an...

Page 31: ...his is very useful to maintain and service the projector The following are examples of received messages When the internal temperature is too high The Network Board let users know the information which thermal sensor A or B inside the projector detected the abnormal temperature risen and so the projector was turned off Please refer to item Check the status of projector for the location of the sens...

Page 32: ... qualified service personnel Information FFFEFFFF TITLE Message from projector 07 10 2003 00 59 Projector Model Name PLV HD10 TCP IP 192 168 1 201 Projector Name myProjector It sends you following message The life span of lamp is reached The Projector lamp was turned off because the projector power circuit failed Unplug the projector from AC outlet and ask servicing to a qualified service personne...

Page 33: ...33 ENGLISH Chapter 4 Controlling the Projector 4 Network Board OWNER S MANUAL HD Series ...

Page 34: ...every 20 seconds automatically Power on off the projector Click Power Status on the main menu The control page will be displayed By clicking On or Standby button on the page the power of the projector can be controlled When you click Standby button another confirmation popup win dow 1 will appear and then click OK button if it is set to standby This chapter describes controlling the projector via ...

Page 35: ... projector as follows To change the page click on the page number z x Items Description Input Status Displays the selected input mode Selection Displays the source mode of selected input mode Signal Status Displays the signal status of the selected input mode Internal temperature 2 Displays the temperature at internal thermal sensors in centigrade fahrenheit degrees 1 When occurring the internal p...

Page 36: ...change pages and select desired setting items Please see the owner s manual of the projector to have the further information of each control item The control page displays valid control items depending on the selected input mode signal or functions of the projector you use therefore there may be different controls between the described items and actual control items on the page display When the pr...

Page 37: ...ding on the board function Select a input with radio buttons Select a source mode with pull down menu How to adjust and select the item Item selection Select your desired mode with pull down menu button and click the Set button Setting value change To change the value take one of 2 ways below 1 Change the value step by step by clicking the or button 2 Type the value directly onto the text box and ...

Page 38: ... the input signal are listed Available selection when the VIDEO S VIDEO input AUTO It automatically switches to the proper color system of the input signal The selectable color systems are PAL SECAM NTSC NTSC4 43 PAL M and PAL N Available selection when the Y Cb Pb Cr Pr input AUTO It automatically switches to the proper scanning system of the input signal The selectable scanning systems are 480i ...

Page 39: ...h H Position Adjusts the horizontal position of the screen V Scale Adjusts the screen height V Position Adjusts the vertical position of the screen Auto PC Adj Performs automatic adjust ment Item Description Total Dots Adjust the number of total dots in the horizontal period Horizontal Adjusts horizontal picture posi tion Vertical Adjusts vertical picture posi tion Display Area H Adjusts the image...

Page 40: ...deo input or computer digital input Mode16 to Mode20 are for the computer analog input ExMode21 to ExMode50 can be stored for any input mode Up to 23 characters can be used for the Memo 3 Register by clicking Set button To restore the adjustments click Reset button The stored custom setting will be available at the System sub menu p 38 c Select a mode by clicking the button Type a memo for the sel...

Page 41: ...ith pull down but ton menu Image1 to 10 are user preset mode Adjustment items Contrast Brightness Color Tint 1 This item is only available in the computer input mode 2 This item is only available in the video input mode Item Description White Balance Color Temp Sets a color temperature mode Red green Blue Adjusts a white balance respectively Sharpness Adjusts picture sharpness Detail Enhance Adjus...

Page 42: ...e Adjustment 3 Register by clicking Set button To restore the adjustments click Reset button The Image1 to Image10 are for the user preset modes to store the image adjust ment The Original Mode represents the mode that user preset mode Image1 to Image10 is created from the predefined image modes Standard Real or Cinema Load an image mode Display the page 1 and select a set to load with the pull do...

Page 43: ...text box represent the current control value or status Item Description Volume Adjusts the sound volume from the built in speakers Treble Adjusts the high frequency sound band Bass Adjusts the low frequency sound band Built in SP Switches the sound output from the built in speaker Mute Suppresses the sound Control the projector ...

Page 44: ...Switches on or off the on screen menu display on the screen Logo Sets on or off the logo display on the screen during the startup Ceiling Sets the image top bottom and left right reversed Rear Sets the image left right reversed Item Description Management Sets into the selected power management mode OFF Ready or Shut Down if the input signal is interrupted and no control key is pressed for the spe...

Page 45: ...items to the factory shipping set The lamp counter is not reset by this function Keylock Sets the prohibition of the pro jector control by the remote control or the keys on the pro jector About Lamp Counter Reset The confirmation window will appear when the button of Lamp Counter Reset is clicked Select the lamp which you want to reset with the radio button and then click OK button to execute the ...

Page 46: ... date and time Follow the below steps for setting 1 Set a day or date To set the timer event at same time everyday select day entry with radio button and then select desired day with the pull down menu button The selectable days are as follows Same time everyday Every week a day from Monday to Sunday Every week Monday to Friday Every week Monday to Saturday To set the timer event on specified date...

Page 47: ...n to turn on or off the projector 4 Register an event Click Set button to register the set timer event Repeat steps 1 to 4 for another timer event setting Check the Timer events To check the set timer events click on the Timer Check button Getting the current time The displayed time is the value set when the setting page was displayed This time value is not updated automatically To update the disp...

Page 48: ...use the projector is already turned on Similarly when the projector is turned off by event 5 event 6 OFF will not be effective in turning it off again But these secondary events event 4 and event 6 will become effective if a person turns off the projector after event 3 and before event 4 or turns on the projector after event 5 and before event 6 When the timer events are set at the same time the l...

Page 49: ...ies ENGLISH Service This function sets the cooling fan speed of the projector Set proper fan speed depending on the installation environment Select Normal or Maximum with the pull down menu button and click Set button Control the projector ...

Page 50: ...es are automatically switched and the status of each con trol are displayed For further informa tion please see the next page 3 Name the current setting Select a set number Totalsave1 to Totalsave10 you intend to store current set tings with the pull down menu button of the Save Setting No Save to Name this set number onto the Memo text area Up to 18 characters can be used for the Memo 4 Save the ...

Page 51: ...etting items and val ues of the controls automatically by clicking Check button Control the projector To start the Auto display Click Check button to start browsing pages The pages are automatically switched and displayed from the control sub menu Input to Save items sequently To stop the Auto display Click STOP button to stop browsing ...

Page 52: ...o the current settings Example of setting If the contents of the saved set are not match for the slot equipped on the projector the invalid alert message may be displayed For example the message Invalid setting for INPUT1 will be displayed in the following case Example In case of after setting the DVI computer input for INPUT1 and then it was changed to video input board The loaded set can be sele...

Page 53: ...n Display Menu To switch the on screen display menu on or off by clicking ON or OFF button The same operation with the MENU button on the projector and remote control Cursor Used to select an item or adjust value in on screen menu by clicking 7 8 e and d button The same operation with the point buttons on the projector and remote con trol Used to execute the item selected by clicking button The sa...

Page 54: ... on the main menu The following setting page is displayed It is convenient to use as a memo for the simple description where the projector is placed in This note will be displayed on the login page The saved memo is displayed on the login page The data of the memo is stored into the Network Board ...

Page 55: ...55 ENGLISH Chapter 5 Controlling the Multi Projectors 5 Network Board OWNER S MANUAL HD Series ...

Page 56: ...at are connected to the network Click Multi Control on the main menu to display the control page Note To control the multiple projectors each projector must has the same password Example of multi control Display the main menu following to the login procedure described on page 22 Internet Intranet PC4 PC3 PC5 PJ2 PJ1 PJ4 PJ3 Select INPUT2 for PJ1 to PJ4 ...

Page 57: ...please consult your network administrator Register IP address and projector name Check IP address and projector name To check the registered information click Confirmation Change sub menu tab The registered information of the projec tor is listed as the below The word None is displayed if the projec tor name is not registered Register IP address and projector name Click Projector Registration sub ...

Page 58: ...rol Delete Deleting from the multi control Status Description blank The projector is connected to the network correctly No connection The projector may not connect to the network Please check the connection and net work configuration of this projector Password error The login password is incorrect The password for the multi controlled projectors must be the same Change password of this projector t...

Page 59: ...values will not be applied to all of the projectors under the multi control Control Display the control page by clicking Multi Control sub menu tab The setting pages are constructed from 1 to 7 page and each item is indicated on the next page Control z If loading a set to the multiple projectors the contents of the set must be effective to current accessed projector If not the multi control can no...

Page 60: ...se refer to chapter 4 Controlling the Projector p 33 for further control and description When the control button or setting button is clicked the registered projectors for the multi control are controlled at the same time These control items differ from each selected input mode and functions of the projector you use x c v b n m ...

Page 61: ...61 ENGLISH Chapter 6 Use of Serial Port 6 Network Board OWNER S MANUAL HD Series ...

Page 62: ...on 1 Item Description Baud Rate Communication speed for serial port select with the pull down menu Parity Parity check the ways for error detecting of the transferred data Stop Stop bit indicates the end of communication Flow Control Ways for communication flow Data Indicates the length of data Serial Control Selects equipment to control External Used to select when the external equipment connecte...

Page 63: ...his product does not provide any driver software Please consult your local dealer Setting for controlling the equipment connected to the serial port from the computer Serial Control Selects External Port Sets according to the computer specified port no Do not use port no 10000 2 Other Settings Sets according to the communi cation condition of the equip ment Setting for controlling the projector fr...

Page 64: ...tion through the network Control Examples Example 1 Controlling AV equipment through the network Internet Intranet PC2 PC4 PC3 PC5 PJ2 PJ1 PC1 Turn on the DVD player and start playing DVD Player RS 232C serial cable Internet Intranet PC2 PC4 PC5 PJ2 Turn on the projector PJ1 PJ1 RS 232C serial cable ...

Page 65: ...ard is set to the reverse cross type When connecting the peripheral equip ment please use an optimum serial cable according to the polarity of the port on the equipment And this product provides a socket to switch the polarity of the serial port By switching the socket on the board as shown below it is possible to switch the polarity of the port either the normal straight type or the reverse cross...

Page 66: ...n the main menu with the web browser p 62 4 Change the serial port setting to be the same communication condition as the con nected external equipment and then click Set button The following example setting is for our projector communication condition When controlling our pro jector set as follows Control For example in case of using the Telnet application of the Windows XP Professional 1 Select R...

Page 67: ...and enter Enter key The extra projector will be turned on C00 is a command to turn the projector on To disconnect the communication type Ctrl key and key at the same time For example entering pass word 1234 1 Further instructions about the telnet application please see the on line guide on your com puter 2 The commands are defined by each product independently so please consult the manufac turer o...

Page 68: ... address no open 192 168 1 201 10000 return Use the IP address assigned to the pro jector After the communication is established type the password and the command for controlling the projector and then enter Enter key The right table shows the typical command lists for controlling the our projector and please consult your local dealer for further information of another commands Command Function C0...

Page 69: ...69 ENGLISH Chapter 7 Appendix A 7 Connection examples Web browser setting Technical data Network Board OWNER S MANUAL HD Series ...

Page 70: ...55 255 0 Default Gateway DNS Computer Name PC05 IP Address 192 168 0 5 Subnet Mask 255 255 255 0 Default Gateway DNS Hub Projector Name PJ01 IP Address 192 168 0 2 Subnet Mask 255 255 255 0 Default Gateway 0 0 0 0 DNS 0 0 0 0 Computer Name PC05 IP Address 192 168 0 5 Subnet Mask 255 255 255 0 Default Gateway DNS UTP cross cable Connecting the projector PJ01 to the control computer PC05 via the hub...

Page 71: ...255 255 255 0 Default Gateway 192 168 200 1 DNS 192 168 201 1 IP Address 192 168 200 1 IP Address 192 168 10 1 IP Address 192 168 100 1 Computer Name PC05 IP Address 192 168 10 5 Subnet Mask 255 255 255 0 Default Gateway 192 168 10 1 DNS 192 168 201 1 Computer Name PC10 IP Address 192 168 10 10 Subnet Mask 255 255 255 0 Default Gateway 192 168 10 1 DNS 192 168 201 1 Computer Name PC51 IP Address 1...

Page 72: ...age To enable the JavaScript please see further instructions on the next page Proxy setting In some cases your web browser is set up to use the proxy server for the internet or intranet connection In this case when you install this product into the local network you should set up the proxy setting of web browser preference correctly Especially when connecting the projector and computer with a UTP ...

Page 73: ...r v 6 0 ActiveScript setting Select the Internet Options menu from the Tool menu on the web browser and then select Security tab and click Customize Level button On the security setting win dow scroll down and find the Scripting item make sure that Enable is selected in item Active Scripting Web browser setting ...

Page 74: ...ternet connection from the local area network check the item Use a proxy server and enter the proxy server address and port correctly in the proxy settings window For further instruction please consult your network administrator Not using proxy server Uncheck the item Use a proxy server If you connect the projector to the computer directly with UTP cross cable this must be unchecked To designate p...

Page 75: ...pe Navigator v 7 0 JavaScript Setting Select the Preference menu from the Edit menu on the web browser and then select the item Advanced Scripts Plugins in the Category column Make sure that the Enable JavaScript for Navigator is checked Web browser setting ...

Page 76: ...m the local area network select the item Manual proxy configuration Enter the proxy server address and port number correctly on the HTTP Proxy item For further instruction please consult your network administrator Not using proxy server Select the item Direct connection to the Internet in the proxy setting window If you connect the projector to the computer directly with UTP cross cable this must ...

Page 77: ...aud rate 0 3 1 2 2 4 4 8 9 6 19 2 28 8 57 6 115 2 Kbps Flow control Hardware flow control RTS CTS Xon Xoff Parity check Odd Even Terminal D sub 9 pin Male Power source Supplied from the projector Power consumption 3 0 watts Dimensions W x H x D 5 39 x 1 18 x 4 33 137 x 30 x 110mm Weight 0 34 lbs 155 g Built in battery Lithium battery Type CR2032 3 0V Operating temperature 41 F 95 F 5 C 35 C Storag...

Page 78: ...ket Side A Side B 1 CD 2 RXD TXD 3 TXD RXD 4 DTR 5 Ground Ground 6 DSR 7 RTS 8 CTS 9 It is possible to switch the polarity of the serial port as shown in table below by switching the socket on the network board For further information see item Serial Port Switching p 65 At the factory shipped setting the socket is set to side A Function CD Carrier detection RXD Receive data TXD Transfer data DTR D...

Page 79: ...79 ENGLISH Appendix B Q A Network Board OWNER S MANUAL HD Series ...

Page 80: ...he computer Check the network configuration of the computer 5 The Network Board is used with the default setting p 16 6 The proxy setting of the web browser is not set correctly p 72 7 The computer does not provide TCP IP protocol No setting page in my web browser Is the problem in the network or in the projector I would like to find out the problem whether it is in the network or in the projector...

Page 81: ... gateway router to restrict the accessing from the computer For further information please con sult your network administrator Can I access the projector installed on the company s local area net work from a remote location There are some ways to access to the projector in the LAN but you must con sult your network administrator Use of modem Connect to the company s network from your home or some ...

Page 82: ...p to 100 sets but it depends on the network environment What should I do when I forget the password Select the Password icon from the Network setting menu by using the point buttons on the projector and then press SELECT button The current password will appear on the screen p 18 Can I register the setting page as a web browser Favorites or Bookmarks Please add Login page to your Favorites or Bookm...

Page 83: ...twork traffic is heavy Please consult your network admin istrator By changing the preference of your web browser to not show pic tures you may have page display more quickly at the heavy network traffic Please see the browser s on line help for further information Also you can select the Text mode for displaying pages quickly p 22 I use many of the projectors in the network How can I use names of ...

Page 84: ...cation depending on the SMTP server This product does not support this kind of SMTP server Can I develop a driver to control external serial equipment This product does not provide any driver software To control the external equipment connected to the extra serial port it should be required to clarify the commands and communication condition defined by each equipment If they are clarified it can b...

Page 85: ...Network Board It is possible to update the firmware through the network It is required to have a special tool for the updating For further information please consult your local dealer The version number of the firmware is indicated on the lower part of the Initial Setting page A Q Q A ...

Page 86: ...is set 192 168 x x the Subnet Mask should be set 255 255 255 0 for example Rule2 The start address xxx xxx xxx 0 and the last address xxx xxx xxx 255 of the IP address must not be assigned to any other equipment These address numbers are reserved Rule3 The IP address must correlate to a network number If network numbers are different between the equipment they cannot estab lish communications each...

Page 87: ...87 Network Board OWNER S MANUAL HD Series ENGLISH Q A ...

Page 88: ...Printed in Japan Network Board Owner s Manual IDRM 165 Manufactured by SANYO Electric Co Ltd ...

Page 89: ... projectors that have a terminal for the Network Board This manual explains the installation of the Network Board and its operation Chapter 1 Preparation Chapter 2 Installation Chapter 3 Basic Setting Operation Chapter 4 Controlling the Projector Chapter 5 Controlling the Multi Projectors Chapter 6 Use of Serial Port Chapter 7 Appendix This network board is an optional product for the LCD projecto...

Page 90: ...pment unless otherwise speci fied in the instructions If such changes or modifications should be made you could be required to stop operation of the equipment Warning This is a Class A product In a domestic environment this product may cause radio interference in which cause the user may be required to take adequate measures CAUTION ON USE IN NETWORK When you receive an alert e mail from the proje...

Page 91: ...ss 22 2 Select a display mode and login 22 3 Display of main setting page 23 Initial Settings 25 1 Language Setting 25 2 Password Setting 26 3 Date Time Setting 26 Network Configuration 27 1 Configure the network 27 2 Name the projector 27 E mail Setting 28 Examples Type and contents of alert mail 30 Chapter 4 Controlling the Projector 31 Power on off the projector 32 Check the status of projector...

Page 92: ...ude Add Delete a projector 54 Status 54 Control 55 Load and apply the setting value 55 Chapter 6 Use of Serial Port 57 Serial Port setting 58 Control Examples 60 Use of Telnet 62 Control the projector with Telnet 64 Chapter 7 Appendix 65 Examples of Connection 66 Peer To Peer connection 66 The gateway Router installed in the network 67 Web browser setting 68 Active Script JavaScript enable 68 Prox...

Page 93: ...5 Network Board OWNER S MANUAL ENGLISH Chapter 1 Preparation 1 ...

Page 94: ...owser installed on your computer E Mail Alert function Projector Network Board sends messages to the registered e mail addresses when a lamp abnormality or power failure occurs with the projector In this message it describes how to solve the cause of the problems You can take efficient action for quick recovery Internet Intranet PC2 PC4 PC3 PC5 PC1 You ve got Mail PJ2 PJ1 Internet Intranet PC2 PC4...

Page 95: ... equipment via network This product provides a serial port RS 232C for controlling external equipment By connecting the equipment which has a serial port it can be controlled by a computer via the network This product does not provide the interface driver software to control exter nal equipment Internet Intranet PC2 PC4 PC3 PC5 PJ2 PJ1 PC1 Turn on the DVD player and start playing DVD Player Now it...

Page 96: ...provide a 10Base T or 100Base TX network card Web browser application Microsoft Internet Explorer version 5 0 or later Netscape Navigator version 4 7 or later Use to control and set up the projector The layout of pages in the browser may slightly differ from each type of application or operating system you use Internet mail application Microsoft Outlook Microsoft OutlookExpress Netscape Mail Requi...

Page 97: ...ht Cable with category 3 or 5 2 100m Network Board Computer UTP Cross Cable with category 3 or 5 2 100m 1 There may be other limitations depending on your network environment or LAN specifica tion Please consult your network administrator for further details 2 Category of LAN cable indicates the cable quality Normally cable with category 3 or 5 is used for 10Base T network and cable with category ...

Page 98: ...ftware please refer to the respective booklet Trademark Ethernet is a registered trademark of Xerox Corporation Microsoft Windows Windows NT are registered trademarks of Microsoft Corporation Macintosh Mac OS are registered trademarks of Apple Computer Inc Internet Explorer is a registered trademark of Microsoft Corporation Netscape Navigator and Netscape Communicator are trademarks or registered ...

Page 99: ...11 Network Board OWNER S MANUAL ENGLISH Chapter 2 Installation 2 ...

Page 100: ...contains a network board owner s manuals 2 books a ferrite core and 2 screws Also check the name and function of each part Flow of installation The preparation to control the projector connected to the network is completed At the next step set up and control the projector via the network by using the web browser installed on your computer Please see chapter 3 Basic setting and operation p 21 1 Mou...

Page 101: ...t This is used when controlling the external equipment via the net work p 57 LAN port Connecting the LAN cable p 15 LINK indicator Orange This lights up orange when the net work board is connected to the net work correctly ACT indicator Green This turns on and off when sending or receiving data Serial port switch socket This is to switch the polarity of the serial port p 61 ...

Page 102: ...connector into the socket in the slot firmly 4 Secure the board with two screws supplied Mains switch must be turned off when mounting or removing this product otherwise it may damage the product Do not install multiple network boards into a projector otherwise it may damage the product Do not connect the AC cord until after connecting the LAN cable and computer Caution WARNING TEMP READY LAMP REP...

Page 103: ...rectly not using the hub When you connect the projector into the 10Base T network use cable with category 3 or 5 When you connect the projector into the 100Base TX network use cable with category 5 The length of cable between hub and projector should be less than 100m 1 Turn the Mains switch off 2 Wind the UTP straight cable once around the ferrite core supplied as the illustrated below 3 Connect ...

Page 104: ...plains how to set the following configuration The default network configuration is set as follows IP Address 192 168 1 201 Subnet Mask 255 255 255 0 Default Gateway 192 168 1 1 DNS 0 0 0 0 IP Address 192 168 0 2 Subnet Mask 255 255 255 0 Default Gateway 0 0 0 0 DNS 0 0 0 0 1 Selection of network menu Network Turn on the projector and display the menu on the screen Select the Network icon from the ...

Page 105: ...ector or on the remote control The point buttons 7 8 are used to select the column The point buttons d e are used to change the numbers up and down 3 Restart the Network board Select the SET with the point buttons 7 8 and press the SELECT button again The network configuration display disappears and the network board begins restarting 1 It takes about 40 seconds Do not turn off the mains switch du...

Page 106: ...Display A password can be set to restrict access to the setting pages of the projector using the web browser The default password is set 0000 as no password 1 Use the projector s menu and select the Setting icon on the menu 2 Select the Display sub icon from the submenu and then press the SELECT button once Check that the mode is On 3 Then press the SELECT button once again The setting window appe...

Page 107: ...IP address use the network setting menu on the projector Please see chapter Network Configuration for further information p 16 2 Make sure that there is no network equipment set with the same IP address in the network and then connect to the network 3 When installing other projectors follow the above steps to change the IP address and connect to the network In case of installing the projector with...

Page 108: ...20 Chapter 2 Installation ...

Page 109: ...21 Network Board OWNER S MANUAL ENGLISH Chapter 3 Basic Setting and Operation 3 ...

Page 110: ...er Name text area and the login password onto the Password text area and then press the OK button The entering User Name must be user and it cannot be changed Note When accessing projector for the first time or setting the no password 0000 the auto login will be performed and the next main setting page is displayed This chapter describes basic operations and settings for controlling the projector ...

Page 111: ...etting pages Setting page Displays the control and setting items according to the selected menu The Power Status page is displayed as the default Main menu For selection of control and set ting items of the projector p 31 Control sub menu For selection of sub menu to con trol and set the projector Setting page num ber browses pages by clicking the linked number z Main setting page in the Graphic M...

Page 112: ...Text Mode display Main menu For selection of control and setting items of the projector Displays sub menu and status of selected items when clicking the linked text Setting page number browses pages by click ing the linked number Setting page Displays the control and setting items according to the selected menu ...

Page 113: ...menu button and then press the Set button The selec table language is English or Japanese You may find the unrecognized character text in the menu if the computer does not provide Japanese fonts Note This language selection is realized by using the JavaScript function of the web browser If the preference of the browser is set not to use the JavaScript the Set linked text appears on the page as the...

Page 114: ...forget the password to the projector you can check it by selecting the Display sub menu from the Setting menu on the projector For further information please see item Password Setting p 18 3 Date Time Setting Click on the page number 2 to display the Time Setting page Type present date onto the date text area with Year Month Date format and type present time onto the time text area with Hour Minut...

Page 115: ... Quit the web browser and access to the login page again in 40 seconds You must use the number specified by your administrator The address must be entered as a group with four numbers split by dots like 192 168 1 101 2 Name the projector You can name 3 the projector By setting this name properly for the DNS server the projector can be accessed by using this name instead of the IP address For furth...

Page 116: ... Server 1 Type the E mail address of SMTP server and administrator and press the Set but ton The administrator address is set to Reply To address sent from the projector 2 Registering and deleting E mail addresses Type the E mail address onto the Mail Address text area and press the Set button To check the registered addresses click on the Mail Address Check Delete linked text The addresses are li...

Page 117: ...P server is located in your LAN Local Area network the address set to SMTP server should be specified in the SMTP server located in your LAN The server located outside of your LAN may not be available for security reason For further information please contact your network administrator Up to 10 e mail addresses can be registered 3 Condition selection for sending alert message Click on the Option l...

Page 118: ...ecking the mail sending condition When the life span of lamp is reached TITLE Message from projector 01 01 2001 00 59 Projector Model Name XF30 TCP IP 192 168 0 2 Projector Name myProjector It sends you following massage The Projector lamp is turned off because internal projector temperature is too high Wait Temperature Warning Indicator turned off turn the Projector on again If the Indicator cont...

Page 119: ...4 31 Network Board OWNER S MANUAL ENGLISH Chapter 4 Controlling the Projector ...

Page 120: ... page will be displayed By Pressing the On or Standby button on the page the power of the projector can be controlled When you press the Standby button another confirmation popup win dow 1 will appear and then press the OK button if it is set to standby Note 1 This popup window is realized by using the JavaScript function of web browser If the preference of the browser is set not to use JavaScript...

Page 121: ...on code such as FFFEFFFF are displayed Unplug the projector from AC outlet and ask servicing to a qualified service personnel with this infor mation code Input Status Displays the selected slot Selection Displays the selected input mode Signal Status Displays the signal status of the selected input mode Internal temperature Displays the temperature at internal thermal sensors in degrees The icons ...

Page 122: ...u select ed The setting method differs depending on the contents of the page Click on the page number linked texts to change pages and select desired setting items Please see the owner s manual of the projector to have the further information of each control item The control page displays valid control items depending on the selected input mode signal or functions of the projector you use therefor...

Page 123: ...m Description Current Mode Displays current mode of the computer Auto PC Adj Performs automatic adjust ment Fine Sync Performs Fine Sync adjust ment Total Dots Adjust the number of total dots in the horizontal period Horizontal Adjusts horizontal picture posi tion Vertical Adjusts vertical picture posi tion Item Description Clamp Adjusts clamp position of the picture Display Area H Adjusts the ima...

Page 124: ...ve to Type a memo into the Memo text area for simple description of your selected number 3 Register by pressing the Set button To restore the adjustments press the Reset button Select a mode by clicking the button Type a memo for the selected mode Select a load mode by clocking the but ton It is displayed with Stored or Free for the memo of Mode1 to Mode5 The memo of ExMode6 to ExMode50 can be sto...

Page 125: ...tched accord ing to the input mode These selections will not appear when the source mode is set to the computer mode Available selection when the VIDEO S VIDEO input Available selection when the Y Cb Pb Cr Pr input Item Description Color System Selects a color system of the input video signal AUTO It automatically switches to the color system of the input sig nal Item Description System Selects a ...

Page 126: ...ou use Item Description Image Adjustment Selects image mode among the Standard Real Cinema Image1 to Image4 with pull down button menu Image1 to 4 are user preset mode Original Mode Displays which predefined image adjustment mode is based upon Adjustment items Contrast Brightness Color Tint Item Description White Balance Color Temp Sets a color temperature mode Red green Blue Adjusts a white balan...

Page 127: ...by pressing the Set button To restore the adjustments press the Reset button The Image1 to Image4 are for the user preset modes to store the image adjustment The Original Mode is represented the mode that user preset mode Image1 to Image4 is created from the predefined image modes Standard Real or Cinema Load a image mode Display the page 1 and select a set to load with the pull down menu button o...

Page 128: ...according to selected input mode com puter or video input Item Description Aspect Changes the screen mode True Switches the projected image mode Digital Zoom Adjusts the image zooming or compressing These items are only available in the computer input mode Item Description Volume Adjusts the sound volume from the built in speakers Treble Adjusts the high frequency sound band Bass Adjusts the low f...

Page 129: ... on screen menu display on the screen Logo Sets on or off the logo display on the screen during the startup Ceiling Sets the image top bottom and left right reversed Rear Sets the image left right reversed Item Description No Show Sets the image black out mode Freeze Sets the image frozen mode Power Management Sets the automatic lamp turn off mode if the input signal is interrupted and no control ...

Page 130: ...n or off the projector at the programmed date and time Please see chapter How to set the Timer for further instructions About Lamp Counter reset The confirmation window as the left will appear when the Reset button of the Lamp Counter Reset is pressed Select which lamp counter is to be reset with the radio button and then press the OK button Set JavaScript On Set JavaScript Off There are various k...

Page 131: ...Saturday To set the timer event on specified date select date entry with radio button and then type the date with Year Month Date format Ex Type 2004 08 20 if you specify August 20 2004 2 Set a time Type the time with Hour Minute and 24 hours format Ex Type 18 25 if you specify PM 6 o clock and 25 minutes 3 Select an event ON or OFF Select an event ON or OFF with the pull down menu button to turn ...

Page 132: ...ent 3 turns on the projector so next event 4 also turning on projector will not be effective because the projector is already turned on Similarly when the projector is turned off by event 5 event 6 OFF will not be effective in turning it off again But these secondary events event 4 and event 6 will become effective if a person turns off the projector after event 3 and before event 4 or turns on th...

Page 133: ...IDEO Y Cb Pb Cr Pr 480P NTSC Y Cb Pb Cr Pr 575I PAL VIDEO S VIDEO Y Cb Pb Cr Pr 575P PAL Y Cb Pb Cr Pr 720P Y Pb Pr 1035I Y Pb Pr 1080I60 Y Pb Pr 1080I50 Y Pb Pr Item Description Fan Control Speed Sets fun control speed with Maximum or Normal Prohibition Sets the prohibition of the pro jector control by the remote control or the keys on the pro jector Item Description Video System Displays the cur...

Page 134: ...age is displayed as the right Change pages by clicking on the page numbers 1 to 7 linked text and check the current settings For further information please see the next page 3 Name the current setting Select a set number Set1 to set10 you intend to store current settings with the pull down menu button of the Save Setting No Save to Name this set number onto the Memo text area 4 Save the current se...

Page 135: ...pages by clicking on the page numbers and check each setting status The pages for the save items are constructed by 7 pages The contents of the pages may differ from the actual depending on the selected input mode and the function of the projector Control the Projector ...

Page 136: ...lected set number are applied to the current settings Example of setting If the contents of the saved set are not match for the slot equipped on the projector the invalid alert message may be displayed For example the message Invalid setting for SLOT1 will be displayed in the following case Example In case of after setting the DVI computer input for SLOT1 and then it was changed to video input boa...

Page 137: ...ch the on screen display menu on or off by pressing the ON or OFF button The same operation with the MENU button on the projector and remote control hand set Cursor Used to select an item or adjust value in on screen menu by pressing the Up Down Left and Right button The same operation with the pointers on the projector and remote control handset Used to execute the item selected by pressing the S...

Page 138: ...e by clicking on the Memo linked text on the main menu The following setting page is displayed It is convenient to use as a memo for the simple description where the projector is placed in This note will be displayed on the login page The saved memo is displayed on the login page ...

Page 139: ...51 Network Board OWNER S MANUAL ENGLISH Chapter 5 Controlling the Multi Projectors 5 ...

Page 140: ... with the Network Boards that are connected to the network Click on the Multi Control linked text on the main menu to display the control page Note To control the multiple projectors each projector must has the same password Internet Intranet PC4 PC3 PC5 PJ2 PJ1 PJ4 PJ3 Select SLOT2 for PJ1 to PJ4 Example of multi control ...

Page 141: ...ets for the multi control Register IP address and projector name Click on the Registration of Projector linked text to display the registration page Type the IP address and projector name 1 if required and the press the Register button Check IP address and projector name To check the registered information click on the Check Change linked text The registered information of the projector is listed ...

Page 142: ... control Delete Delete from the multi control Status Description blank The projector is connected to the network correctly No connection The projector may not be connected to the network Please check the connection and network configuration of this projector Password error The login password is incorrect The password for the multi controlled projectors must be the same Change password of this proj...

Page 143: ...be applied to all of the projectors under the multi control Control Display the control page by clicking on the Control linked text on the multi con trol page The setting pages are con structed from 1 to 6 page and each items are indicated on the next page If loading a set to the multiple projectors the contents of the set must be effective to current accessed projector If not the multi control ca...

Page 144: ...w Please refer to chapter 4 Controlling the Projector p 31 for further control and description When the control button or setting button is pressed the registered projectors for the multi control are controlled at the same time These control items differ from each selected input mode and functions of the projector you use ...

Page 145: ...57 Network Board OWNER S MANUAL ENGLISH Chapter 6 Use of Serial Port 6 ...

Page 146: ...ing After fixing the setting press the Set button 1 Item Description Baud Rate Communication speed for serial port select with the pull down menu Parity Parity check the ways for error detecting of the transferred data Stop Stop bit indicates the end of communication Flow Control Ways for communication flow Data Indicates the length of data Serial Control Selects equipment to control External Used...

Page 147: ...This product does not provide any driver software Please consult your local dealer Setting to control the equipment connected to the serial port from the computer Serial Control Selects External Port Sets according to the com puter specified port no Do not use port no 10000 2 Other Settings Sets according to the com munication condition of the equipment Setting to control the projector from the se...

Page 148: ...1 RS 232C serial cable Internet Intranet PC2 PC4 PC3 PC5 PJ2 PJ1 PC1 Turn on the DVD player and start playing DVD Player RS 232C serial cable Example 2 Controlling a projector which is not on the network function through network Control Examples Example 1 Controlling AV equipment through network ...

Page 149: ...s set to the reverse cross type When connecting the peripheral equip ment please use an optimum serial cable according to the polarity of the port on the equipment And this product provides a socket to switch the polarity of the serial port By switching the socket on the board as shown below it is possible to switch the polarity of the port either the normal straight type or the reverse cross type...

Page 150: ... as the con nected external equipment and then press the Set button The following example setting is for our projector communication condition When controlling our pro jector set as follows Control For example in case of using the Telnet application in the Windows 98 1 Select the Run submenu from the Start menu on the computer Type telnet onto the Open text area on the displayed window and press t...

Page 151: ...s been successful 5 Type the commands from the key board to control the external equipment and then enter the Enter key for termination For example type C00 and enter the Enter key The projector will be turned on The C00 is a command to turn the projector on To disconnect the communication select the Disconnect sub menu from the Connect pulldown menu To quit the telnet application select the Quit ...

Page 152: ... example page as the below Host name 192 168 0 2 type a projector IP address Port 10000 Terminal type vt100 After established the communication type the password and the command for controlling the projector and then enter the Enter key The right table shows the typical command lists for controlling our projectors and please consult your local dealer for further information of anoth er commands Co...

Page 153: ...65 Network Board OWNER S MANUAL ENGLISH Chapter 7 Appendix A 7 Connection examples Web browser setting Technical data ...

Page 154: ...55 255 0 Default Gateway DNS Computer Name PC05 IP Address 192 168 0 5 Subnet Mask 255 255 255 0 Default Gateway DNS Hub Projector Name PJ01 IP Address 192 168 0 2 Subnet Mask 255 255 255 0 Default Gateway 0 0 0 0 DNS 0 0 0 0 Computer Name PC05 IP Address 192 168 0 5 Subnet Mask 255 255 255 0 Default Gateway DNS UTP cross cable Connect the projector PJ01 to the control computer PC05 via the hub Wh...

Page 155: ...5 255 0 Default Gateway 192 168 200 1 DNS 192 168 201 1 IP Address 192 168 200 1 IP Address 192 168 10 1 IP Address 192 168 100 1 Computer Name PC05 IP Address 192 168 10 5 Subnet Mask 255 255 255 0 Default Gateway 192 168 10 1 DNS 192 168 201 1 Computer Name PC10 IP Address 192 168 10 10 Subnet Mask 255 255 255 0 Default Gateway 192 168 10 1 DNS 192 168 201 1 Computer Name PC51 IP Address 192 168...

Page 156: ...le the JavaScript please see further instructions on the next page Proxy setting In some cases your web browser is set up to use the proxy server for the internet or intranet connection In this case when you install this product into the local network you should set up the proxy setting of web browser preference correctly Especially when connecting the projector and computer with a UTP cross cable...

Page 157: ...ctiveScript setting Select the Internet Options menu from the Tool menu on the web browser and then select Security tab and press the Customize Level button On the security setting window scroll down and find the Scripting item make sure that the Enable is selected in item Active Scripting Web Browser Setting ...

Page 158: ...internet connection from the local area network check the item Use a proxy server and enter the proxy server address and port correctly in the proxy settings window For further instruction please consult your network administrator Not using proxy server Uncheck the item Use a proxy server If you connect the projector to the computer directly with UTP cross cable this must be unchecked To designate...

Page 159: ...ISH Netscape Navigator v 4 7 JavaScript Setting Select the Preference menu from the Edit menu on the web browser and then select the item Advanced in the Category column Make sure that the Enable JavaScript is checked Web Browser Setting ...

Page 160: ...ual proxy configuration and press the View button The proxy setting win dow will appear Enter the proxy server address and port number correctly on the HTTP item in the proxy settings window For further instruction please consult your network administrator Not using proxy server Select the item Direct connection to the Internet in the proxy setting window If you connect the projector to the comput...

Page 161: ... 0 ActiveScript setting Select the Preference menu from the Edit menu on the web browser and then select Web Content under the Web Browser heading the preference settings window Make sure that the Enable scripting is checked in the Active Content column Web Browser Setting ...

Page 162: ...nection from the local area network check the item Web Proxy and enter the proxy server address correctly To make advanced set tings press the Settings button to display the Web proxy settings window For fur ther instruction please consult your network administrator Not using proxy server Uncheck the item Web Proxy If you connect the projector to the computer directly with UTP cross cable this mus...

Page 163: ...GLISH Netscape Navigator v 4 7 JavaScript Setting Select the Preference menu from the Edit menu on the web browser and then select the item Advanced in the Category column Make sure that Enable JavaScript is checked Web Browser Setting ...

Page 164: ...ual proxy configuration and press the Configure button The proxy setting window will appear Enter the proxy server address and port number correctly on the HTTP proxy item in the proxy settings window For further instruction please consult your network administrator Not using proxy server Select item Direct connection to the Internet in the proxy setting window If you connect the projector to the ...

Page 165: ...P IP Serial interface RS 232C Baud rate 0 3 1 2 2 4 4 8 9 6 19 2 28 8 57 6 115 2 Kbps Flow control Hardware flow control RTS CTS Xon Xoff Parity check Odd Even Terminal D sub 9 pin Male Power source Supplied from the projector Power consumption 3 0 watts Dimensions W x H x D 5 39 x 1 18 x 4 33 137 x 30 x 110mm Weight 0 34 lbs 155 g Built in battery Lithium battery Type CR2032 3 0V Operating temper...

Page 166: ...XD 3 TXD RXD 4 DTR 5 Ground Ground 6 DSR 7 RTS 8 CTS 9 1 2 3 4 9 8 7 6 5 D sub 9 pin connector RS 232C It is possible to switch the polarity of the serial port as shown in table below by switching the socket on the network board For further information see item Serial Port Switching p 61 At the factory shipped setting the socket is set to side A Function CD Carrier detection RXD Receive data TXD T...

Page 167: ...79 Network Board OWNER S MANUAL ENGLISH Appendix B Q A ...

Page 168: ...the computer Check the network configuration of the computer 5 The Network Board is used with the default setting p 16 6 The proxy setting of the web browser is not set correctly p 68 7 The computer does not provide TCP IP protocol No setting page in my web browser Is the problem in the network or in the projector I would like to find out the problem whether it is in the network or in the projecto...

Page 169: ... gateway router to restrict the accessing from the computer For further information please con sult your network administrator Can I access the projector installed on the company s local area net work from a remote location There are some ways to access to the projector in the LAN but you must con sult your network administrator Use of modem Connect to the company s network from your home or some ...

Page 170: ...ol up to 100 sets but it depends on the network environment What should I do when I forget the password Select the Display icon from the Setting menu by using control keys on the pro jector and then press the SELECT button The current password will appear on the screen p 18 Can I register the setting page as a web browser Favorites or Bookmarks Please add the Login page to your Favorites or Bookma...

Page 171: ...k traffic is heavy Please consult your network admin istrator By changing the preference of your web browser to not show pic tures you may have page display more quickly at the heavy network traffic Please see the browser s on line help for further information Also you can select the Text mode for displaying pages quickly p 22 I use many of the projectors in the network How can I use names of the ...

Page 172: ...ntication depending on the SMTP server This product does not support this kind of SMTP server Can I develop a driver to control external serial equipment This product does not provide any driver software To control the external equipment connected to the extra serial port it should be required to clarify the commands and communication condition defined by each equipment If they are clarified it ca...

Page 173: ... Board It is possible to update the firmware through the network It is required to have a special tool for the updat ing For further information please consult your local dealer The ver sion number of the firmware is indi cated on the lower part of the Initial Setting page A Q Q A ...

Page 174: ... set 192 168 x x the Subnet Mask should be set 255 255 255 0 for example Rule2 The start address xxx xxx xxx 0 and the last address xxx xxx xxx 255 of the IP address must not be assigned to any other equipment These address numbers are reserved Rule3 The IP address must correlate to a network number If network numbers are different between the equipment they cannot establish communica tions each o...

Page 175: ...87 Network Board OWNER S MANUAL ENGLISH Q A ...

Page 176: ...Printed in Japan Network Board Owner s Manual IDRM 180 Manufactured by SANYO Electric Co Ltd ...

Reviews: