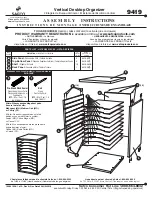
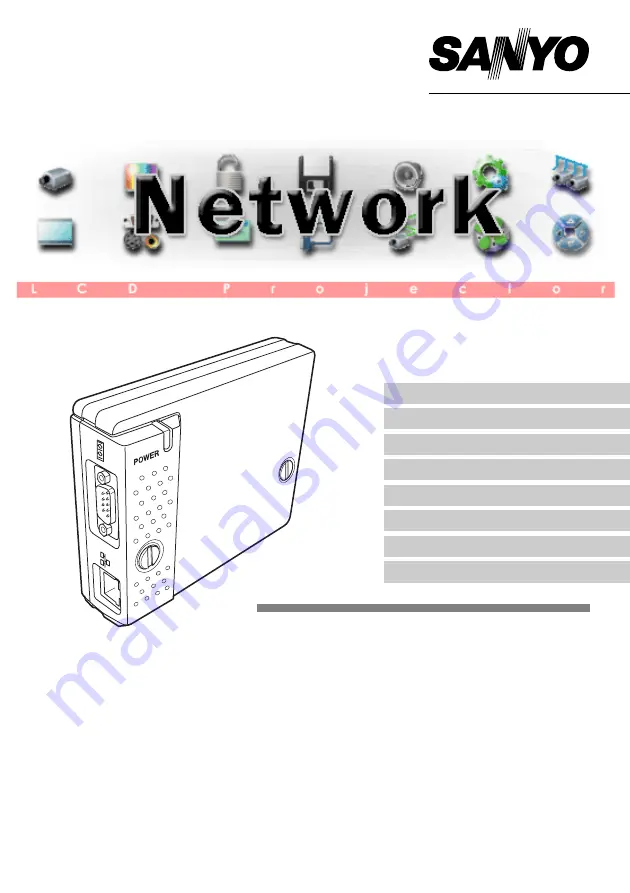
background image

OWNER’S MANUAL

This PJ-Net Organizer is an optional network product
for the projector. Mount this product to the projector
and connect a network cable. It enables a projector to
display the image data stored in the file server and the
screen image of the computer via the network. In addi-
tion, you can control and set up the projector remotely
by using the web browser.
This product is only used for SANYO projectors that
have a terminal for the PJ-Net Organizer.
This manual explains the installation of the PJ-Net
Organizer and its operation.

Chapter 1 Preparation

Chapter 2 Installation

Chapter 3 Basic Setting & Operation

Chapter 4 Controlling the Projector

Chapter 5 Network Capture & Viewer

Chapter 6 Controlling the Multi-Projectors

Chapter 7 Use of Serial Port

Chapter 9 Appendix

PJ-Net Organizer

®

ÑÄâá

Model No. POA-PN02

Summary of Contents for PJ-Net

Page 1: ...nd set up the projector remotely by using the web browser This product is only used for SANYO projectors that have a terminal for the PJ Net Organizer This manual explains the installation of the PJ Net Organizer and its operation Chapter 1 Preparation Chapter 2 Installation Chapter 3 Basic Setting Operation Chapter 4 Controlling the Projector Chapter 5 Network Capture Viewer Chapter 6 Controlling...

Page 2: ... an experienced radio TV technician for help Use of shielded cable is required to comply with class B limits in Subpart B of Part 15 of FCC Rules Do not make any changes or modifications to the equipment unless otherwise speci fied in the manual If such changes or modifications should be made you could be required to stop operation of the equipment Model Numbers POA PN02 Trade Name Sanyo Responsib...

Page 3: ...ftware and places 24 Chapter 3 Basic Setting and Operation 25 Login the setting page of the projector 26 1 Enter the IP address 26 2 Select a display mode and login 26 3 Display of main setting page 27 Initial Settings 29 1 Language Setting 29 2 Password Setting 30 3 Temperature unit setting 30 4 Date Time Setting 31 Network Configuration 32 1 Configure the network 32 2 Name the projector 32 E mai...

Page 4: ... 1 65 Converting procedure 66 2 How to use the Network Viewer File Converter 2 68 Conversion procedure 68 Making a program file Program Editor 69 Procedure of making program 69 Using the Network Viewer function 72 Chapter 6 Controlling the Multi Projectors 79 Multi Control 80 Register IP address and projector name 81 Check IP address and projector name 81 Exclude Add Delete a projector 82 Control ...

Page 5: ...Chapter 1 Preparation 5 Network Unit OWNER S MANUAL ENGLISH 1 ...

Page 6: ...sive utility software Internet Intranet PC2 PC4 PC3 PC5 PJ2 PJ1 PC1 Capture Project a screen image of PC1 with PJ2 Network Viewer function The projector receives the image data stored in the file severs in the network and dis plays images automatically Internet Intranet PC2 PC4 PC3 PC5 PJ2 PJ1 PC1 JPEG Prog JPEG Project JPEG images stored in PC3 with PJ2 ftp file servers ...

Page 7: ...wser installed on your computer E Mail Alert function The projector Network Unit sends messages to the registered e mail addresses when a lamp abnormality or power failure occurs with the projector This message describes how to solve the cause of the problems You can take efficient action for quick recovery Internet Intranet PC2 PC4 PC3 PC5 PJ2 PJ1 PC1 You ve got Mail Internet Intranet PC2 PC4 PC3...

Page 8: ... network This product provides a serial port RS 232C for controlling external equipment By connecting the equipment which has a serial port it can be controlled by a computer via the network This product does not provide the interface driver software to con trol external equipment Internet Intranet PC2 PC4 PC3 PC5 PJ2 PJ1 PC1 DVD Player Turn on the DVD player and start playing I am ready to turn O...

Page 9: ...er resolution video adapter and monitor CD ROM drive 10Base T or 100Base TX network card Web browser application Microsoft Internet Explorer version 5 0 5 5 or 6 0 Netscape Navigator version 6 1 6 2 or 7 0 Used to control and set up the projector The layout of pages in the browser may slightly differ from each type of application or operating system you use Internet mail application Microsoft Outl...

Page 10: ...tations depending on your network environment or LAN specifica tion Please consult your network administrator for further details 2 Category of LAN cable indicates the cable quality Normally a cable with category 3 or 5 is used for 10Base T network and a cable with category 5 is used for 100Base TX network Package contains The package contains following items Check each item as you unpack the pack...

Page 11: ...ve owners Unauthorized use of a part or whole of the contents in this manual is prohibited The contents of this manual are subject to change without notice Expression Abbreviation The word projector found in this manual means projector provided with Network Unit unless otherwise noted The OS of the computer and the Web browser described in this manual is Windows XP Professional and Internet Explor...

Page 12: ... the program code of the software Article 5 Proprietary right and copyright All of the copyright and proprietary right of the software and its copies belong to our company Article 6 Prohibition of regrant and transfer of the license to any third party The user may not transfer the program or its copy to any third party without the express written permission from our company or may not transfer or ...

Page 13: ...Chapter 2 Installation 13 Network Unit OWNER S MANUAL ENGLISH 2 ...

Page 14: ... name and functions of each part of the network unit 1 Mount this product onto the projector 2 Connect the LAN cable and join it to the network 3 Configure the network of the network unit 4 Set the password Explains how to install the software Network Viewer Capture into your com puter Flow of installation The preparation is completed to control the projector connected to the network At next step ...

Page 15: ...his lights up red when the net work function is set ON in the projector menu LAN port Connecting the LAN cable p 17 Connector plug Connecting to the terminal on the projector p 16 Mounting screws Mount by using a coin etc p 16 LINK indicator Orange This lights up orange when the Network Unit is connected to the network correctly ACT indicator Green This turns on and off when send ing or receiving ...

Page 16: ...erwise it may damage the product Do not connect the AC cord until after connecting the LAN cable and computer Caution 1 Disconnect the AC plug from the projector 2 Remove the connector cover and screw covers from the pro jector and insert plug on this product to the option connector 3 Tighten two screws by using a coin etc Connector cover Screw cover ...

Page 17: ... network cable if required 1 Disconnect the AC plug from the projec tor 2 Connect the UTP strait cable to the LAN port on the Network Unit 3 Connect the UTP strait cable to the hub Use the UTP cross cable when you connect the computer and projector directly not using the hub When you connect the projector into the 10Base T network use cable with category 3 or 5 When you connect the projector into ...

Page 18: ...ow to set the following configuration The default network configuration is set as follows 1 Selection of network menu Network Turn on the projector and display the menu on the screen Select the Network setting icon from the main menu using the point buttons d e 7 8 From the submenu select Network setting sub icon then press SELECT button once Check that the mode is On If not change mode to On usin...

Page 19: ...the numbers can be entered directory For further information see next page 3 Restart the Network Unit Select Set with 7 8 keys and press SELECT button again The network configu ration display disappears and the network unit begins restarting It takes about 40 seconds Do not turn off the mains switch during this period Completing of installation Now the installation is completed The IP address of t...

Page 20: ...t the Network setting icon on the menu 2 Select the Network setting sub icon from the submenu and then press SELECT button once Check that the mode is On 3 Select the Password sub icon and then press SELECT button once The setting window appears The numbers on the display indicates the current password 4 Enter your desired number by using the point buttons on the projector or remote control handse...

Page 21: ...ork Units that have their default network settings to the same network The use of the Network Units which have the default IP address set to the same network settings will cause IP addresses to collide and create a malfunction When you install multiple projectors into the same network configure the network with the following steps 1 Change the IP address from the default IP address To change the I...

Page 22: ...ther applications are closed otherwise proper installation cannot be made Network Viewer Capture installation 1 Set the supplied Network Viewer Capture CD ROM into the CD ROM drive of your computer Double click SetupTool exe icon in the Tool folder in the CD ROM 2 Select English United States from the pull down menu on the Choose Setup Language window and click OK button to start installing and th...

Page 23: ...om the JPEG and BMP files Network Viewer Program Editor This is a tool to make the programs which has a function to specify and order the projecting JPEG image data stored in the file servers To uninstall these software use Add Remove Program from the control panel 1 The data which can be projected by the projector is the JPEG format based on the ISO IEC 10918 ITU T recommendation T 81 There are s...

Page 24: ...c tion window and then click Install button to start installing Installed software and places Network Viewer File Converter 2 is installed in the Printers and Faxes folder in the Control Panel Network Viewer File Converter 2 This is a kind of the printer driver to convert to the JPEG data optimized to project by the projector from any of the documents created by the application software To uninsta...

Page 25: ...3 25 Network Unit OWNER S MANUAL ENGLISH Chapter 3 Basic Setting and Operation ...

Page 26: ...ol mode Graphic Mode and Text Mode as the below Select a proper mode to match your PC and network environment by clicking on the text link Graphic Mode Displays with 600 x 400 dots and the menus and settings with graphic icons This mode is rec ommended for standard use Text Mode Displays with 200 x 300 dots This mode is optimized for use of the handheld computer PDA etc It is also convenient if th...

Page 27: ... menus to display the control and setting pages Setting page Displays the control and setting items according to the selected menu The Power Status page is displayed as the default Main menu For selection of control and set ting items of the projector p 37 Setting page num ber Browses pages by clicking the linked number z Main setting page in the Graphic Mode display This graphic mode display is m...

Page 28: ...b menu and status of selected items when clicking the linked text Setting page number Browses pages by click ing the linked number Setting page Displays the control and setting items according to the selected menu The network viewer function in the text mode has following limitation Cannot select the program or folder for the display p 73 Cannot perform the registration check or change of the prog...

Page 29: ...guage with the pull down menu button and then click Set button The selectable language is English or Japanese You may find the unrecognized character text in the menu if the computer does not provide Japanese fonts Note This language selection is realized by using the JavaScript function of the web browser If the preference of the browser is set not to use the JavaScript Set linked text appears on...

Page 30: ...is valid for the password If you forget the password to the projector you can check it by selecting Password sub menu from Network setting menu on the projector For further information please see item Password Setting p 20 3 Temperature unit setting Change the temperature unit displayed on the Power Status page by using the pull down menu Centigrade indicated with ºC Fahrenheit indicated with ºK T...

Page 31: ...the date text area with Year Month Date format and type present time onto the time text area with Hour Minute format in 24 hours indication Click Set but ton and confirm that the data and time are set correctly The displayed date and time are not updated automatically click the Refresh button to get the present date and time Initial Settings ...

Page 32: ...ccess to the login page again in 40 seconds You must use the number specified by your administrator The address must be entered as a group with four numbers split by a dot like 192 168 1 101 2 Name the projector You can name 3 the projector By setting this name properly for the DNS server the projector can be accessed by using this name instead of the IP address For further information please cons...

Page 33: ... alert message due to the abnormality on the projector but the SMTP server is down in some other reason the message does not be sent In this case the message Unable to connect to server will be displayed on the setting page Click Set button to remove the message To use the E Mail function it must be set the DNS address on the Network setting page correctly You cannot use this E mail function if th...

Page 34: ... Examples Type and contents of alert messages described on the next page 2 Registering and deleting E mail addresses Type the E mail address onto the Mail Address text area and click Set button To check the registered addresses click on the Mail Address Check Delete linked text The addresses are listed as the fig ure on the right To delete the registered addresses check the address you want to del...

Page 35: ...red E mail address according to your selected condition Administrator or user can take an efficient action quickly by receiving this message This is very useful to maintain and service the projector The following are examples of received messages When the internal temperature is too high The Network Unit let users know the information which thermal sensor A B or C inside the projector detected the...

Page 36: ...C outlet and ask servicing to qualified service personnel TITLE Message from projector 01 03 2003 00 59 Projector Model Name XP50 55 TCP IP 192 168 1 201 Projector Name myProjector It sends you following message The life span of lamp is reached The Projector lamp was turned off because the projector power circuit failed Unplug the projector from AC outlet and ask servicing to a qualified service p...

Page 37: ...Chapter 4 Controlling the Projector 4 37 Network Unit OWNER S MANUAL ENGLISH ...

Page 38: ...or can be controlled When you click Standby button another confirmation popup win dow 1 will appear and then click OK button if it is set to standby Note 1 This popup window is realized by using the JavaScript function of web browser If the preference of the browser is set not to use JavaScript the popup window will not appear on the screen There are various kind of ways to change this preference ...

Page 39: ...nput Status Displays the selected input mode Selection Displays the source mode of selected input mode Signal Status Displays the signal status of the selected input mode Internal temperature Displays the temperature at internal thermal sensors in centigrade fahren heit degrees The icons A B and C on the page represent the thermal sensors located in the projector If the temperature at one of those...

Page 40: ... the page number linked texts to change pages and select desired setting items Please see the owner s manual of the projector to have the further information of each control item The control page displays valid control items depending on the selected input mode signal or functions of the projector you use therefore there may be different controls between the described items and actual control item...

Page 41: ...the radio button and input source mode with the pull down menu button Then set the selected input mode and source mode by clicking Set button Item Description Input1 Available RGB Analog RGB Scart RGB PC Digital RGB AV HDCP Monitor out source mode Input2 Available VIDEO Y Cb Pb Cr Pr RGB source mode Input3 Available VIDEO S VIDEO Y Cb Pb Cr Pr source mode Network Using the Network Capture Viewer f...

Page 42: ... selected Item Description Current Mode Displays current mode of the computer Auto PC Adj Performs automatic adjust ment Fine Sync Performs Fine Sync adjust ment Total Dots Adjust the number of total dots in the horizontal period Horizontal Adjusts horizontal picture posi tion Vertical Adjusts vertical picture posi tion Item Description Clamp Adjusts clamp position of the picture Display Area H Ad...

Page 43: ...set to load with the pull down menu button of the Load Set No and click Set but ton The stored setting values will be applied to the each PC adjustment item Select a mode by clicking the button Type a memo for the selected mode Select a load mode by clocking the but ton The memos for Mode1 to Mode 5 are dis played with Stored or Free The memos for ExMode6 to ExMode50 are can be stored with the inp...

Page 44: ...are switched according to the input mode These selections will not appear when the source mode is selected to the computer mode Available selection when the VIDEO S VIDEO input Available selection when the Y Cb Pb Cr Pr input Item Description Color System Selects a color system of the input video signal AUTO It automatically switches to the color system of the input sig nal Item Description System...

Page 45: ...with Item Description Image Selects image mode among the Standard Real Cinema Image1 to Image4 with pull down button menu Image1 to 4 are user preset mode Original Mode Displays which predefined image adjustment mode is based upon Adjustment items Contrast Brightness Color Tint This item is only available in the computer input mode This item is only available in the video input mode Item Descripti...

Page 46: ...ave Adjustment 3 Register by clicking Set button To restore the adjustments click Reset button The Image1 to Image4 are for the user preset modes to store the image adjustment The Original Mode represents the mode that user preset mode Image1 to Image4 is created from the predefined image modes Standard Real or Cinema Load an image mode Display the page 1 and select a set to load with the pull dow...

Page 47: ... to adjust the sound of the projector The values in the text box represent the current control value or status Item Description Aspect Changes the screen mode True Switches the projected image mode Digital Zoom Adjusts the image zooming or compressing These items are only available in the computer input mode Item Description Volume Adjusts the sound volume from the built in speakers Mute Suppresse...

Page 48: ...enu display on the screen Logo Sets on or off the logo display on the screen during the startup Ceiling Sets the image top bottom and left right reversed Rear Sets the image left right reversed Item Description No Show Sets the image black out mode Freeze Sets the image frozen mode Power Management Sets into the selected power management mode OFF Ready or Shut Down if the input signal is interrupt...

Page 49: ...he keys on the pro jector Item Description Aspect Adjusts each control vertical scale vertical position horizon tal scale and horizontal position independently Anamorphic When set to On the screen format is set to 4 3 format forcedly The confirmation window The confirmation window will appear when the button of Lamp Counter Reset or Factory Default is clicked Click OK button to execute the setting...

Page 50: ...ate and time Follow the below steps for setting 1 Set a day or date To set the timer event at same time everyday select day entry with radio button and then select desired day with the pull down menu button The selectable days are as follows Same time everyday Every week a day from Monday to Sunday Every week Monday to Friday Every week Monday to Saturday To set the timer event on specified date s...

Page 51: ...urn on or off the projector 4 Register an event Click Set button to register the set timer event Repeat steps 1 to 4 for another timer event setting Check the Timer events To check the set timer events click on the Timer Check linked text Getting the current time The displayed time is the value set when the setting page was displayed This time value is not updated automatically To update the displ...

Page 52: ...ause the projector is already turned on Similarly when the projector is turned off by event 5 event 6 OFF will not be effective in turning it off again But these secondary events event 4 and event 6 will become effective if a person turns off the projector after event 3 and before event 4 or turns on the projector after event 5 and before event 6 When the timer events are set at the same time the ...

Page 53: ...NGLISH Service This function sets the cooling fan speed of the projector Set proper fan speed depending on the installation environment Select Normal or Maximum with the pull down menu button and click Set button Control the projector ...

Page 54: ...on the Save icon from the control menu The setting page is displayed as the right Change pages by clicking on the page numbers 1 to 8 linked text and check the current settings For further information please see the next page 3 Name the current setting Select a set number Set1 to set10 you intend to store current settings with the pull down menu button of the Save Setting No Save to Name this set ...

Page 55: ...ages by clicking on the page numbers and check each setting status The pages for the saving items are constructed by 8 pages The contents of the pages may differ from the actual depending on the selected input mode and the function of the projector Control the projector ...

Page 56: ...ctor Load a control set Select your desired set number with the pull down menu button of the Load Setting No and then click Set button The setting values of the selected set number are applied to the current settings Example of setting ...

Page 57: ...the on screen display menu on or off by clicking ON or OFF button The same operation with the MENU button on the projector and remote control handset Cursor Used to select an item or adjust value in on screen menu by clicking Up Down Left and Right button The same operation with the point buttons on the projector and remote control handset Used to execute the item selected by clicking Set button T...

Page 58: ...o on the main menu The following setting page is displayed It is convenient to use as a memo for the simple description where the projector is placed in This note will be displayed on the login page The saved memo is displayed on the login page The data of the memo is stored into the network unit ...

Page 59: ...Chapter 5 Network Viewer Capture 5 59 Network Unit OWNER S MANUAL ENGLISH ...

Page 60: ...from Start All the Programs Network Viewer Capture menu to launch it manually The status which the Network Capture icon stays on the task bar is just preparing the screen capturing Parameter Determination 1 Click Network Capture icon on the task bar 2 Click Parameter Determination on the popup menu The setting window will appear 3 Set Capture Port and Mouse Port to match to the projector s port nu...

Page 61: ...en image with PJ2 PC privided with the Network Capture In the standby In capturing Icon on the task bar 4 Click Search button to list up the available IP address assign to the projector and select desired IP address you use or you can enter the IP address manually if you know that IP address 5 Set the quality of the image Quality Selects from High Mid Low Image Magnification If checked the screen ...

Page 62: ...e IP address of the connecting PC should be registered previously p 63 Set the Capture Port and Mouse Port to match to the com puter s port number you intend to connect p 61 Set On on the Mouse Display when you want to display the mouse cursor on the screen 3 Click Stop button to stop capturing Internet Intranet PC2 PC4 PC3 PC5 PJ2 PJ1 PC1 Capture Project a screen image of PC1 with PJ2 PC privided...

Page 63: ...ontrol handset 2 Select Network setting icon by using the point buttons 7 8 and press SELECT button once Check the mode is On 3 Select Network Capture icon by using the point buttons e d and then press SELECT button The setting window will appear 4 Select the PC number to connect by using the point buttons 7 8 5 Select Connect and then press SELECT button to start capturing To stop cap turing sele...

Page 64: ... created starts and the projector projects the presentation picture on the screen 4 Start the presentation By using wireless mouse function control the page browsing and some another opera tions for the PC1 For further instructions of the wireless mouse please refer to the projector s owners manual On the projected screen using with the network viewer the shape of the mouse pointer dif fers from t...

Page 65: ... use the Network Viewer File Converter 1 The File Converter 1 is a software to convert from the JPEG data or bitmap data to the optimized JPEG data for the projector Launch and quit the File Converter 1 To launch the File Converter 1 click Network Viewer File Converter 1 menu from Start All Programs Network Viewer Capture menu To quit the File Converter 1 click on the close box on the upper right ...

Page 66: ... or image quality perform to convert them again 2 Click Convert a folder when converting all the files in a selected folder When converting each file select a preview image first and then click Convert each file To select two or more files at once press and hold Shift key or Ctrl key and then click the preview images 3 As the confirmation window appears check the conversion object and conversion t...

Page 67: ...age sets to be the maximum screen width Justify top and bottom Convert as height of the image sets to be the maximum screen height Cut Cuts image with the screen size not depending on the image size This type has following mode Select this mode when you want to have the images with the original size Select each mode by clicking on the button Image Quality Select an image conversion quality with Hi...

Page 68: ...en the printing dialog On the window select Network Viewer File Converter 2 icon on Select Printer item and click Print button Set the option setting for the page lay out or paper setting by clicking Preferences button if required 3 Select a folder and click Save button The file name is named with Image001 as the default If the converted image has 2 or more pages the file names are num bered from ...

Page 69: ...dure of making program 1 To launch the Program Editor click Network Viewer Program Editor menu from Start All Programs Network Viewer Capture menu 2 Click Connect button 3 If the connection setting window appears enter the each item and then click OK button Host name Enter the ftp server name Root Folder Specify the root directory of the ftp server Normally use User ID Enter your login account of ...

Page 70: ...window Delete Deletes the folder path from the folder list UP Moves up the selected folder path DOWN Moves down the selected folder path The order of the display is listed in the folder list window To change the order of the dis play change the list order of the folder list by using UP or DOWN button The programs are stored into the DispParam folder at the login root directory and this DispParam f...

Page 71: ...please see Using the Network Viewer function p 72 The limitation of the Program file There are several limitations for the program file as follows Number of programs in a root folder is less than 1000 Number of folders in a program is less than 100 Total characters of folder name is less than 255 Total characters of program file name is less than 63 Do not make a program name started with Do not m...

Page 72: ... You can set the display period and repeating times and also you can register those folders as the program The network viewer function cannot be used when using the network capture function Condition to use the Network Viewer function Enables to use the ftp service with Windows 2000 Professional or XP Professional User must have a full access account to the ftp server or the ftp server allows any ...

Page 73: ... control described on chapter 6 Controlling the multi projectors p 79 82 4 Setup the setting page 2 of the Selection Display Display Object Select either Folder Selection or Program selection Up to 1000 images can be displayed Program is described on item 6 Program New Registration p 75 Display Form Select either filename list or Thumbnail When clicking Check button the images or file names in the...

Page 74: ...tion for sending alert message p 35 Error type File Error It is displayed when the network unit cannot acquire the correct file images from the ftp server or when the master projector is turned off during the multi control Click Error button to check the details Connection Error It may be displayed when the slave projector is using the Network Viewer or capture function during the multi control Fo...

Page 75: ... To delete the folder path select the folder path first and then click Delete button The folder paths are ordered by creation date and the images are displayed with this order and it cannot be changed To change the order use the Program Editor software p 75 Up to 100 folder paths can be added per program 5 Click Register button to register a program Up to 1000 programs can be registered at the sam...

Page 76: ...as new images into selected pro gram click Add button and then add new folders in the folder selection window To delete the folder from the pro gram select the folder path and then click Delete button 4 After editing the program con tents click Register button to update the program Click Return linked text to return to the previous control page The folder paths are ordered by creation date and the...

Page 77: ...he automatic displaying mode Auto when the left click button on the remote control is pressed projector stops automatic displaying and sets into the manual displaying mode When pressing the right click button it starts automatic displaying again During the displaying you can browse images backward or forward by using point buttons e d on the remote control or on the projector 6 To disconnect from ...

Page 78: ...78 Chapter 5 Network Viewer Capture ...

Page 79: ...Chapter 6 Controlling the Multi Projectors 79 Network Unit OWNER S MANUAL ENGLISH 6 ...

Page 80: ...nnected to the network at the same time Click Multi Control on the main menu to display the control page Note To control the multiple projectors each projector must has the same password Internet Intranet PC4 PC3 PC5 PJ2 PJ1 PJ4 PJ3 Select Input2 for PJ1 to PJ4 Example of multi control Display the main menu following to the login procedure described on page 26 ...

Page 81: ...0 sets for the multi control Register IP address and projector name Click on Projector Registration to display the registration page Type the IP address and projector name 1 if required and the click Register button Check IP address and projector name To check the registered information click on Confirmation Change The regis tered information of the projector is listed as the right The word None i...

Page 82: ...ulti control Status Description blank The projector is connected to the network correctly No connection The projector may not connect to the network Please check the connection and net work configuration of this projector Password error The login password is incorrect The password for the multi controlled projectors must be the same Change password of this projector to the common password File Err...

Page 83: ...l down menu button and then click Set button The control values stored with selected set number for each projector will be applied to the indi vidual projector assigned to that set The control values will not be applied to all of the projectors under the multi control Control Display the control page by clicking on Multi Control on the multi control page The setting pages are construct ed from 1 t...

Page 84: ...below Please refer to item Control the Projector p 40 for further control and description When the control button or setting button is clicked the registered projectors for the multi control are controlled at the same time These control items differ from each selected input mode and functions of the projector you use ...

Page 85: ...Chapter 7 Use of Serial Port 85 Network Unit OWNER S MANUAL ENGLISH 7 ...

Page 86: ...fter fixing the setting click Set button 1 Item Description Baud Rate Communication speed for serial port select with the pull down menu Parity Parity check the ways for error detecting of the transferred data Stop Stop bit indicates the end of communication Flow Control Ways for communication flow Data Indicates the length of data Serial Control Selects equipment to control External Used to selec...

Page 87: ...serial cable When connecting DVD player etc use Normal type Setting for controlling the equipment connected to the serial port from the computer Serial Control Selects External Port Sets according to the com puter specified port no Do not use port no 10000 2 Other Settings Sets according to the com munication condition of the equipment Setting for controlling the projector from the serial controll...

Page 88: ...function through network Control Examples Example 1 Controlling AV equipment through network Internet Intranet PC2 PC4 PC3 PC5 PJ2 PJ1 PC1 DVD Player Turn on the DVD player and start playing RS 232C serial cable Internet Intranet PC2 PC4 PC5 PJ2 PJ1 Turn on the projector PJ1 RS 232C serial cable ...

Page 89: ... serial controller through the serial port RS 232C Use proper serial cable depending on the connected equipment port specification Please refer to Port Specification of the serial port specification of this product p 102 Internet Intranet PC2 PC4 PC3 PC5 PJ2 PJ1 Serial controller RS 232C serial cable ...

Page 90: ... the main menu with the web browser p 86 4 Change the serial port setting to be the same communication condition as the con nected external equipment and then click Set button The following example setting is for our projector communication condition When controlling our pro jector set as follows Control For example in case of using the Telnet application of the Windows XP Professional 1 Select Ru...

Page 91: ...projector will be turned on C00 is a command to turn the projector on To disconnect the communication type Ctrl key and key at the same time For example entering pass word 1234 1 Further instructions about the telnet application please see the on line guide on your com puter Macintosh does not provide the telnet application 2 The commands are defined by each product independently so please consult...

Page 92: ... address no open 192 168 1 201 10000 return Use the IP address assigned to the pro jector After the communication is established type the password and the command for controlling the projector and then enter Enter key The right table shows the typical command lists for controlling the our projector and please consult your local dealer for further information of another commands Command Function C0...

Page 93: ...Chapter 8 Appendix A 93 Network Unit OWNER S MANUAL ENGLISH 8 Connection examples Web browser setting Technical data ...

Page 94: ...55 255 0 Default Gateway DNS Computer Name PC05 IP Address 192 168 0 5 Subnet Mask 255 255 255 0 Default Gateway DNS Hub Projector Name PJ01 IP Address 192 168 0 2 Subnet Mask 255 255 255 0 Default Gateway 0 0 0 0 DNS 0 0 0 0 Computer Name PC05 IP Address 192 168 0 5 Subnet Mask 255 255 255 0 Default Gateway DNS UTP cross cable Connecting the projector PJ01 to the control computer PC05 via the hub...

Page 95: ...255 255 0 Default Gateway 192 168 200 1 DNS 192 201 1 5 IP Address 192 168 200 1 IP Address 192 168 10 1 IP Address 192 168 100 1 Computer Name PC05 IP Address 192 168 10 5 Subnet Mask 255 255 255 0 Default Gateway 192 168 10 1 DNS 192 201 1 5 Computer Name PC10 IP Address 192 168 10 10 Subnet Mask 255 255 255 0 Default Gateway 192 168 10 1 DNS 192 201 1 5 Computer Name PC51 IP Address 192 168 10 ...

Page 96: ...age To enable the JavaScript please see further instructions on the next page Proxy setting In some cases your web browser is set up to use the proxy server for the internet or intranet connection In this case when you install this product into the local network you should set up the proxy setting of web browser preference correctly Especially when connecting the projector and computer with a UTP ...

Page 97: ... 0 ActiveScript setting Select the Internet Options menu from the Tool menu on the web browser and then select Security tab and click Customize Level button On the security setting win dow scroll down and find the Scripting item make sure that Enable is selected in item Active Scripting Web browser setting ...

Page 98: ...ternet connection from the local area network check the item Use a proxy server and enter the proxy server address and port correctly in the proxy settings window For further instruction please consult your network administrator Not using proxy server Uncheck the item Use a proxy server If you connect the projector to the computer directly with UTP cross cable this must be unchecked To designate p...

Page 99: ... the Preference menu from the Edit menu on the web browser and then select the item Advanced Scripts Plugins in the Category column Make sure that the Enable JavaScript for Navigator is checked 99 Network Unit OWNER S MANUAL ENGLISH Web browser setting ...

Page 100: ...m the local area network select the item Manual proxy configuration Enter the proxy server address and port number correctly on the HTTP Proxy item For further instruction please consult your network administrator Not using proxy server Select the item Direct connection to the Internet in the proxy setting window If you connect the projector to the computer directly with UTP cross cable this must ...

Page 101: ...C Baud rate 0 3 1 2 2 4 4 8 9 6 19 2 28 8 57 6 115 2 Kbps Flow control Hardware flow control RTS CTS Xon Xoff Parity check Odd Even Terminal D sub 9 pin Male Power source Supplied from the projector Power consumption 3 0 watts Dimensions W x H x D 5 39 x 1 18 x 4 33 137 x 30 x 110mm Weight 0 34 lbs 155 g Built in battery Lithium battery Type CR2032 3 0V Operating temperature 41 F 95 F 5 C 35 C Sto...

Page 102: ...ve data 4 not used 5 not used 6 RD Receive data 7 not used 8 not used 1 2 3 4 5 6 7 8 8 pin modular connector RJ 45 Pin No Signal Function 1 CD Carrier detection 2 RXD Receive data 3 TXD Transfer data 4 DTR Data terminal ready 5 Ground Ground 6 DSR Data set ready 7 RTS Request to send 8 CTS Clear to send 9 not used 1 2 3 4 9 8 7 6 5 D sub 9 pin connector RS 232C ...

Page 103: ...Appendix B FAQ 103 Network Unit OWNER S MANUAL ENGLISH ...

Page 104: ...the computer Check the network configuration of the computer 5 The Network Unit is used with the default setting p 18 6 The proxy setting of the web browser is not set correctly p 96 7 The computer does not provide TCP IP protocol No setting page in my web browser Is the problem in the network or in the projector I would like to find out the problem whether it is in the network or in the projector...

Page 105: ...way router to restrict the accessing from the computer For further information please con sult your network administrator Can I access the projector installed on the company s local area net work from a remote location There are some ways to access to the projector in the LAN but you must con sult your network administrator Use of modem Connect to the company s network from your home or some other...

Page 106: ...ture slow the response speed of the mouse pointer Moving the slider of Hardware Acceleration to None may improve the above symptom What should I do when I forget the password Select the Password icon from the Network setting menu by using the point buttons on the projector and then press SELECT button The current password will appear on the screen p 20 Can I register the setting page as a web brow...

Page 107: ... traffic is heavy Please consult your network admin istrator By changing the preference of your web browser to not show pic tures you may have page display more quickly at the heavy network traffic Please see the browser s on line help for further information Also you can select the Text mode for displaying pages quickly p 26 I use many of the projectors in the network How can I use names of the p...

Page 108: ...cation depending on the SMTP server This product does not support this kind of SMTP server Can I develop a driver to control external serial equipment This product does not provide any driver software To control the external equipment connected to the extra serial port it should be required to clarify the commands and communication condition defined by each equipment If they are clarified it can b...

Page 109: ...k Unit It is possible to update the firmware through the network It is required to have a special tool for the updat ing For further information please consult your local dealer The ver sion number of the firmware is indi cated on the lower part of the Initial Setting page A Q FAQ ...

Page 110: ...t 192 168 x x the Subnet Mask should be set 255 255 255 0 for example Rule2 The start address xxx xxx xxx 0 and the last address xxx xxx xxx 255 of the IP address must not be assigned to any other equipment These address numbers are reserved Rule3 The IP address must correlate to a network number If network numbers are different between the equipment they cannot establish communica tions each othe...

Page 111: ...u must have a mode Write enable for its account A Q A Q Network Capture Network Viewer FAQ Why doesn t the computer screen appear on the projected screen 1 Make sure that the input mode of the projector is Network 2 Make sure that the Network Capture icon on the task bar of the computer is active p 60 3 Check the parameter determination p 61 Make sure that the numbers of the capture port and mouse...

Page 112: ...the JPEG format from the following image format Bitmap format bmp JPEG format jpeg jpg A Q File Converter 1 Sometime I have the white frame images converted by the File Converter 2 It may have images with white frame due to the paper margin of the print driver depending on the image data A Q File Converter 2 ...

Page 113: ...113 Network Unit OWNER S MANUAL ENGLISH FAQ ...

Page 114: ...Printed in Japan 1AA6P1P3994 IDJW SANYO Electric Co Ltd ...

Reviews: