background image

INSTRUCTION MANUAL

Labo Autoclave MLS-3020U

MLS-2420U

Thank you for purchasing a Sanyo Autoclave.
• Do not operate the unit until you have become familiar with this information.
• After reading this instruction manual, store it in a safe place for future reference.

CONTENTS

Page

( LIMITATION OF LIABILITY AND INDEMNITY ) 1

( INTRODUCTION OF THIS STERILIZER^) 2

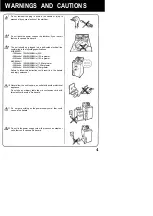
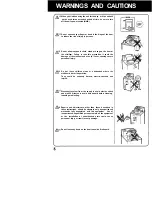
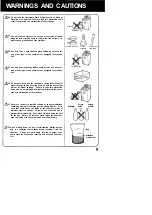
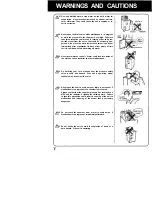
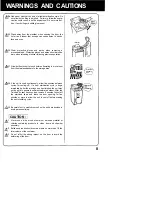
( WARNINGS AND CAUTIONS ) 3-8

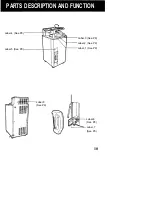
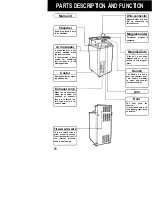
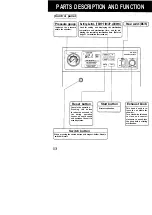
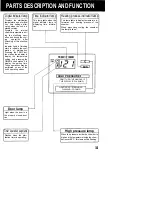
( PARTS DESCRIPTION AND FUNCTOR) 9-14

(PREPARATION FOR USE") 15-16

( ITEMS TO BE STERILIZED ) 17-18

( OPERATING INSTRUCTIONS ) 19-25

(TROUBLE SHOOTING GUIDE ) 26-27

( IN CASE OF POWER FAILURE ) 27

( MAINTENANCE AND CARET) 28

( SPECIFICATIONS ) 29-30

Summary of Contents for MLS-2420U

Page 1: ...truction manual store it in a safe place for future reference CONTENTS Page LIMITATION OF LIABILITY AND INDEMNITY 1 INTRODUCTION OF THIS STERILIZER 2 WARNINGS AND CAUTIONS 3 8 PARTS DESCRIPTION AND FUNCTOR 9 14 PREPARATION FOR USE 15 16 ITEMS TO BE STERILIZED 17 18 OPERATING INSTRUCTIONS 19 25 TROUBLE SHOOTING GUIDE 26 27 IN CASE OF POWER FAILURE 27 MAINTENANCE AND CARET 28 SPECIFICATIONS 29 30 ...

Page 2: ...cts the negligence of or the strict li ability of that party SANYO agrees to defend indemnity and hold customer harmless from any and all claims liability damages or expenses due to personnel injuries including death to em ployees of SANYO and customer and to third parties and for property damage to the extent of the willful acts or the negligence of SANYO or the strict liability of SANYO caused b...

Page 3: ...iliar with the warnings cautions and instructions contained herein Because high pressured and high temperature steam will issue from the chamber in the operation if they do not review and not familiar with the warnings cautions and instruc tions contained herein they are not permit to operate this sterilizer Any alteration of the sterilizer which affects its design could void the warranty and may ...

Page 4: ...below otherwise the unit would be tipped over and personnel injury can occur Be sure to ground the unit Never connect the unit s ground line to a gaspipe telephone ground line lightning rod or water pipe If this sterilizer are not grounded properly that could cause electric shock to personnel 4 Do not use dusty or dirty plug wipe out dust on the blade of the plag and on its connections to prevent ...

Page 5: ...30VAC 50 60Hz 10Aor greater MLS 2420U 120Vunits 120VAC 50 60Hz 12 5A or greater 208Vunits 208VAC 50 60Hz 7 5Aor greater 230Vunits 230VAC 50 60Hz 7Aor greater Failure to follow this instruction could result in a fire hazard and injury personnel 10 Never allow the unit to share an outlet with another electrical appliance Do not use an ordinary table tap or an extension cord with this sterilizer to a...

Page 6: ...njury 16 Do not leave children alone or unattended where the sterilizer is hot or in operation They could be seriously burned electric shocked and injured Disconnect system from the supply to avoid electric shock and wait 20 minutes to avoid burn hazard before cleaning repairing or adjusting J 8 Repairs and adjustments other than those described in these instructions should be attemped only by exp...

Page 7: ... steam through Failure to take this precaution items may be not sterilized and that could result in the explo sion and malfunction of the sterilizer 25 Never use the unit to sterilize cultures or chemical solutions containing elements salt strong acids strong alkalis If it is used that could cause the inside of the chamber made of stainless steel to corrode Corrosion can cause the unit to malfunct...

Page 8: ...ur water on the unit Water could leak into inside of the uint and cause electrical shock or malfunctions 30 Do not bring your face or hands near the pressure safety valve to avoid burn hazard If the unit is operating steam suddenly may issue from the valve K31 Never open the door to avoid burns or injury to personnel if sterilization is in progress or the chamber is pressured Always confirm that t...

Page 9: ...e unit is used continuously allow five minutes between cycles for cooling off If a new sterilization cycle is begin immediately after the previous one has finished the unit may not be able to generate sufficient saturated steam After the finished buzzer has sounded remove 5 minutes to cool off the sterilized items and leave the door opening for five minutes or more to allow the unit to cool off be...

Page 10: ...e unit in accordance with chamber corrosion this label explains the ban of contents use which is able to corrode stainless steel and explains maintenance after use Label 4 This label explains caution for installation of the unit and maintenance Label 5 This label explains usage of Drain tank and its caution Label 6 This label explains cautions of water draining from the drain valve v This symbol m...

Page 11: ...PARTS DESCRIPTION AND FUNCTION Label 4 See P9 Label 5 See P9 Label 3 See P9 Label 2 See P9 Label 1 See P9 Label 8 See P9 Label 6 See P9 Label 7 See P9 10 ...

Page 12: ...ed into this tank where it re verts to water Pressure safety valve This is a safety valve to allow steam to escape from the chamber that if the internal pressure should rise too high Wire connector Magnet holder and han dle are connected by this connector Magnet holder Permanent magnet is equipped Magnet plate If the unit is not used Magnet holder is at tached to this Magnet plate Handle The handl...

Page 13: ...ose is connected to the exhaust tank to keep airtight connection Exhaust hose Conveys steam and air from the chamber to the exhaust tank Exhaust tank Drain valve This manual valve is used to drain sterilizing water from the chamber Drain opening For draining sterilizing water from the chamber Drain opening cover 12 ...

Page 14: ...R DOOR m L A M P L_J D I MIN I I HIGH PRESSURE RESETS START Reset button Cancels the operation Pressing this button for about one second in the during operation causes a beep to sound and switches the unit to standby status SAflYO Labo Autoclave Start button Starts sterilization Switch button When pressing the switch button with magnet holder Handle switch will start EXHAUST Exhaust knob This knob...

Page 15: ...hese operations may be performed on any of the unit s operating modes Door lamp Light when the door is in the properly closed posi tion Timer operation segments Flashes when the steri lization timer is operating Time indicator lamp This lamp lights when the digital indicator lamp is displaying time informa tion Heating process indicator lamp This lamp lights to display temperature in formation and...

Page 16: ...ficient clearance from impediments walls posts etc when positioning the unit Allow at least 5 cm of free space between the back and left sides of the unit and the nearest wall Placing the unit too close to the wall will cause heat to build up inside the unit and that could cause the unit to malfunction At least 5 cm Statement of the range of environmental conditions indoor use altitude up to 2000m...

Page 17: ...e size Type Plug MLS 3020U AWG12 MLS 2420U AWG16 SJT 250VAC 10A or greater 250VAC 7 5A or greater For 230 V units The 230V version models are shipped without a plug on the power cord Use the power plug which is applied IEC320 when the products is set The protective grounding conductor of a power supply cord must be connected to the con tacting member of an attachmentplug rating Power cord Wire siz...

Page 18: ...tion performance can vary depending on the type of items being sterilized their quantity how they are loaded into the autoclave and the containers used to hold them Therefore be sure to use a sterilization indicator such as an OK card to con firm sterilization performance Sterilizing of glass containers Only use Type 1 borosilicate glass containers and do not over load the stainless baskets Do not...

Page 19: ...d to process flammable liquids nor liquids in con tainers that are not designed for sterilization e g containers hav ing screw caps nonvented stoppers etc therfore doing so may be dangerous Any alteration of the sterilizer which affects its design could void the warranty and may violate state and local regulations or jeopardize insurance coverage Remove any caps from empty jars canisters and nonpo...

Page 20: ...t tank increases in every op eration of sterilizer If the water reaches the m f l j level mark discard this water and pour new water up to the iMMffi mark Do not try to pull the tank out from the main unit if the exhaust hose is still attached 2 If media spills are discovered in the bottom of chamber proceed as follows Chamber should be cleaned daily when processing media See Page 28 Maintenance a...

Page 21: ...asket to facilitate sterilization Place hard goods i e metallic instruments on the bottom when pro cessing mixed loads combining fabrics and hard goods This prevents wetting of wrapped packs from condensed water dripping from the hard goods load Note Be careful not to block openings inside the chamber or inflict the impact on sensors when placing the items to be sterilized into the chamber Doing s...

Page 22: ...ot be started unless Q IE693 is lit 8 Set the sterilization temperature and steri lization time Sterilization temperature setting Follow the steps below to change the initial sterilization temperature to a new setting The allowable setting range is 105 126 C 221 258 8 F 1 Press the temperature setting j g g H button The cur rent sterilization temperature setting appears on the digi tal indicator l...

Page 23: ...eDM13button The steri lization time setting can be raised or lowered in 1 minute increments between 1 and 30 minutes and in 5 second increments between 30 and 180 minutes Holding down the ffllia or JMWWiSI button for more than one second causes the setting to change faster The setting of the sterilization temperature and steriliza tion time are remained in memory as long as the unit is used contin...

Page 24: ... sterilization timer When the temperature inside the chamber reaches the sterilization temperature setting the timer operation seg ments flash and the timer begins to operate l f the temperature inside the chamber reaches the steri lization temperature setting and then drops 0 5 C 0 9 F or more below the setting the timer operation segments will light continuously and the timer will stop If the te...

Page 25: ...er Opening the EXHAUST knob or turning off the power switch could cause the contents of the containers to splatter on the walls of the chamber possibly leading to malfunctions because of clogged pipes and valves 12 Returning to atmospheric pressure A short beep sounds followed by a longer one to indicate that the pressure inside the chamber is the same as the pressure outside The items of the cham...

Page 26: ...hamber is hot so be careful not to burn yourself If the handle is stopped turning counterclockwise before it become tight the door may be not opened 14 Remove Remove the stainless baskets containing the sterilized items from the chamber remember protective gloves are necessary when removing items exclude liquid items but protective gloves and a face mask are necessary when removing liquid items fr...

Page 27: ...ve beakers or other glass containers been placed inside the chamber upright when sterilizing glass containers only For 120V 208V units Did you set temperature set ting 2 C 3 6 F ormuch lower than initial setting after the chamber had heated up For 230V units Did you set temperature set ting 4 C 7 2p F or much lower than initial setting after the chamber had heated up Remedy Connect the power suppl...

Page 28: ...from the chamber S e e page 27 Check items to be sterilized in acordance with IN CASE OF POWER FAILURE IN CASE OF POWER FAILURE AII indicators go out if the power supply is stopped or if the unit power switch is turned off Also the sterilization temperature and time settings are erased Reset the sterilization time and the strilization temperature Refer to section 8 on page 21 22 When power is rest...

Page 29: ...ater and shake well to remove the dirt Then rinse out the tank thoroughly If the main unit or the chamber interior become dirty To remove dirt from the main unit wipe it with a soft cloth mois tened with water or neutral detergent and wrung out Never use solvents such as paint thinner or benzine as they may mar the paint s finish Wipe the interior of the chamber to clean using a soft cloth mois te...

Page 30: ...A circuit required CSA Approved 208Vunits 208VAC 50 60Hz 9 6A CSA Approved 230Vunits 230VAC 50 60Hz 8 7A CE Marked 2kW 440 X 550 X 1050mm 17 8 25 X 21 13 20 X 41 17 50 67kg 147 7lbs 300 X 670mm 11 4 5 X 26 19 50 Stainless steel SA 240Type304 105 126 C 221 258 8 F Digital display 80 141 C 176 286 F 177kPa 25psig 0 0 3MPa 42 7psi 1 180minutes 3L polyethylene tank Pressure safety valve Anti dry scorc...

Page 31: ...z 12 5A Dedicated 20A circuit required 208Vunits 208VAC 50 60Hz 7 2A 230Vunits 230VAC 50 60Hz 6 5A CE Marked 1 5kW 380 X 490 X 840mm 14 15 16 X 19 1 5 X 33 3 8 47kg 103 6lbs 240 X 450mm 9 7 16 X17 3 4 Stainless steel JIS SUS304 105 126 C 221 258 8 F Digital display 80 141 C 176 286 F 177kPa 25psig 0 0 3MPa 42 7psi 1 180minutes 3L polyethylene tank Pressure safety valve Anti dry scorch thermo limit...

Page 32: ...o SANYO Electric Co Ltd 3RJ6P10101602 Printed in Japan ...

Reviews: