background image

PD-Net Organizer

INSTALLATION and OPERATION of the PD-
Net Organizer

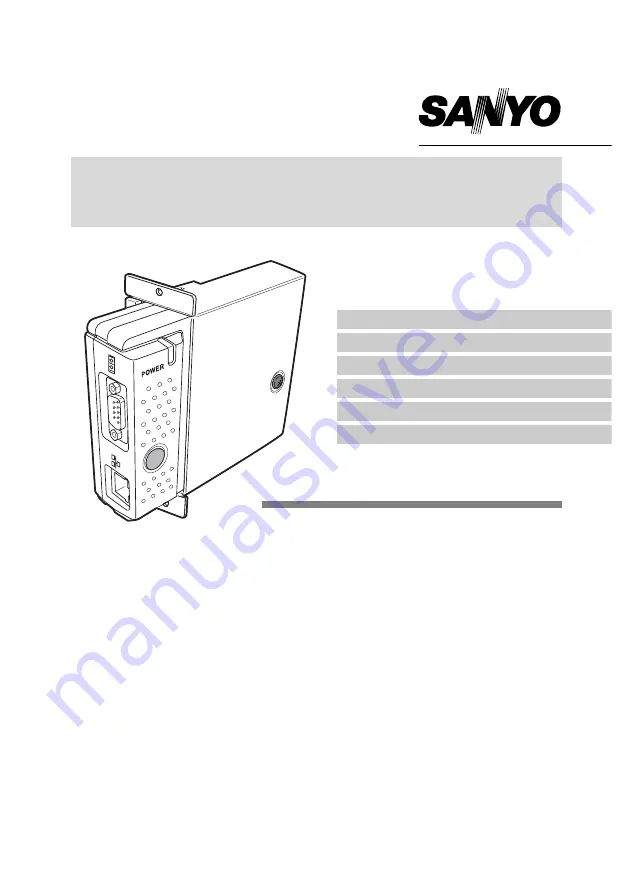
This PD-Net Organizer is an optional product to control
and set up a monitor via a network. Attach this product
to the monitor and connect a network cable. By
accessing the connected monitor using the web brows-
er on your computer, the monitor can be controlled and
set up remotely.
This product is only used for Plasma Monitors that
have a terminal for the PD-Net Organizer.
This manual explains the installation of the PD-Net
Organizer and its operation.

OWNER’S MANUAL

Preparation

Installation

Basic Setting and Operation

Controlling the Monitor

Serial Port Use

Appendix

PD-Net Organizer

Model No. KA-PN04

Summary of Contents for KA-PN04

Page 1: ... the connected monitor using the web brows er on your computer the monitor can be controlled and set up remotely This product is only used for Plasma Monitors that have a terminal for the PD Net Organizer This manual explains the installation of the PD Net Organizer and its operation OWNER S MANUAL Preparation Installation Basic Setting and Operation Controlling the Monitor Serial Port Use Appendi...

Page 2: ...p Use of shielded cable is required to comply with class B limits in Subpart B of Part 15 of FCC Rules Do not make any changes or modifications to the equipment unless otherwise specified in the manual If such changes or modifications should be made you could be required to stop operation of the equipment Model Numbers KA PN04 Trade Name Sanyo Responsible party SANYO FISHER COMPANY Address 21605 P...

Page 3: ...t each piece of equipment or application software please refer to the respective booklet Preparation CAUTION ON USE IN NETWORK When you receive an alert e mail from the monitor you must check the monitor immediately Fire or accident may result if the monitor is used in an abnormal con dition When you install the monitor at remote location and use it through the network you must perform the safety ...

Page 4: ...ation 13 Configure the network with the computer 14 Completing of installation 15 Flash Player 16 Configure the network of computer 17 Windows 98 Me 17 Windows 2000 NT4 0 18 Windows XP 19 Notice about system construction 20 2 Basic Setting and Operation 21 Login the setting page of the monitor 22 1 Enter the IP address 22 2 Login 22 3 Display of main setting page 23 Initial Settings 24 Password Se...

Page 5: ...ime etc through the network by using the web browser installed on your computer E Mail Alert function Monitor PD Net Organizer sends messages to the registered e mail addresses when a power failure occurs with the monitor In this message it describes how to solve the cause of the problems You can take efficient action for quick recovery Power ON You ve got mail ...

Page 6: ...twork environment or LAN specification Please consult your network administrator for further details Operating System Web Browser Plug Ins Computer Environment Network Environment Internet Mailer Windows 98 Windows Me Windows NT4 0 Windows 2000 Windows XP Internet Explorer version 5 0 5 5 or 6 0 Netscape Navigator version6 1 6 2 7 0 or 7 1 Used to control and set up the monitor The layout of pages...

Page 7: ...Installation 7 1 ...

Page 8: ...nual this manual Also please check the name and function of each part 1 Mount this product onto the monitor and connect the interface cable between this product and the monitor 2 Set the option switch on the monitor to the top Net Organizer mode 3 Connect the LAN cable and join it to the network Configure the network with the computer Flow of installation The preparation is completed to control th...

Page 9: ...cable from the network board LINK indicator Orange This illuminates orange when the network board is connected to the network correctly ACT indicator Green This turns on and off when sending or receiving of data Do not touch the connector It may damage the product Plasma Monitor Network Board Monitor Side Terminal of Monitor Option Switch Set to the Top posi tion for the network board use Set back...

Page 10: ...ove the terminal cover 3 Insert the network board into the monitor and fix it with 2 screws removed at step 2 The AC cord must be disconnected from AC power outlet when mounting or removing this product It may damage the product Do not connect the AC cord until after connecting the LAN cable and computer Caution Terminal Cover ...

Page 11: ... input port Mounting 5 Set the Option Switch from the Center position to the Top position Cannot use the serial port of the monitor in this position Set back to the Center position when the network board is not used Top Position Center Position ...

Page 12: ...straight cable to the LAN port on the network board 3 Connect the UTP straight cable to the hub 12 Installation The AC cord must be disconnected from AC power outlet when connecting the cable It may dam age the product Use the UTP cross cable when you connect the computer and monitor directly not using the hub When you connect the monitor into the 10Base T network use cable with category 3 or 5 Wh...

Page 13: ... the existing network through the setting menu on the browser Restart the PD Net Organizer Reset to the computer s original network configuration Completing the network configuration Perform the basic setting and operation of the monitor by using the web browser Please see chapter 2 Basic Setting and Operation on page 21 for further information Please see further informatin on pages 14 20 Please s...

Page 14: ...mputer differs depending on each network environment or your computer For further information please see the chapter Configure the network of computer on page 17 14 Installation IP Address 172 021 095 224 Subnet Mask 255 255 255 0 Default Gateway 172 021 095 001 DNS 172 021 001 053 IP Address 192 168 0 2 Subnet Mask 255 255 255 0 Default Gateway 0 0 0 0 DNS 0 0 0 0 IP Address 192 168 0 5 Subnet Ma...

Page 15: ...tting and Operation on page 21 It describes how to operate and set up the monitor Network configuration If you use a cable to connect the monitor and computer directly without using a hub you must use a UTP cross cable In this case you cannot access the login page if the setting of web browser is set to Use proxy server It must be changed to the Not use proxy server For further information please ...

Page 16: ...on 6 or later is required when you control the monitor If your computer does not have follow to the message on the control page to install the Macromedia Flash Player For further product information or installing see the Macromedia homepage http www macromedia com ...

Page 17: ...Panel menu from Start Setting menu 2 Double click the Network icon on the control panel window 3 Select the TCP IP 1 item on the Current Network Component column on the Network configuration tab on the Network dialog window and then press the Properties button 4 Click IP Address tab and then select the Specified IP address Enter the IP Address 2 and Subnet Mask 5 Click the Gateway tab and enter th...

Page 18: ...ess button and then enter the IP Address 2 and Subnet mask 5 Enter the Default gateway address This setting is not needed if the network does not pro vide the gateway router 6 Click the OK button the setting window will be closed To change the configuration you may need administrator privileges IP Address 192 168 0 5 Subnet Mask 255 255 255 0 Gateway Address 192 168 100 1 1 Select the TCP IP item ...

Page 19: ...P Properties dia log window select the Use the following IP address button and then enter the IP address 2 and Subnet mask 5 Enter the Default gateway address This setting is not needed if the network does not pro vide the gateway router 6 Click the OK button the setting window will be closed IP Address 192 168 0 5 Subnet Mask 255 255 255 0 Gateway Address 192 168 100 1 1 Select the TCP IP item of...

Page 20: ...anizer does not support the DHCP BOOTP server The static IP address must be configured by the manual To use this product in this network environment set it up so that the DHCP BOOTP server does not assign the IP address configured to this product for another device on the network Please consult your network administrator for further information 20 Installation ...

Page 21: ...Basic Setting and Operation 2 21 ...

Page 22: ...ng and Operation 2 Login If the setting page has set the password the authentication window will appear In this case type user onto the User Name text area and the login password onto the Password text area and then click OK button If you check the item Remember my password you can login without entering the password for the next login The entering User Name must be user and it cannot be changed I...

Page 23: ...n menu which can be set up and control the monitor appears on the lower side of the page On the setting page the control and status items for selected menu are displayed The Status page is displayed as the default This page indicates the current status of the monitor For further information please see chapter Controlling the monitor on page 31 Login the setting page of the monitor Setting Page Mai...

Page 24: ...The PD Net Organizer begins restarting and it takes about 40 seconds The web browser is automatically closed Quit after 40 seconds Access to the login page again This is to perform the login authentication firmly The default password 0000 means no password You should change password from the default in normal use When you connect the monitor with this product to the net work you should set a passw...

Page 25: ... seconds Access to the login page again You must use the number specified by your administrator The address must be entered as a group with four numbers split by a dot like 192 168 1 101 2 Setting the model ID You can name 3 the monitor for Model ID By setting this name properly for the DNS server the monitor can be accessed by using this name instead of the IP address For further information plea...

Page 26: ... monitor 1 3 Registering and deleting E mail addresses Type the E mail address to which an alert message is sent 26 Basic Setting and Operation 1 The SMTP server is a server for sending E Mail Please contact your network administrator to have this SMTP server address To use the E Mail function it must be set the DNS address on the Network Setting page correctly You cannot use this E mail function ...

Page 27: ...r which alert messages will be sent and press the Set button Please refer to chapter Examples Type and contents of alert messages described on next page E mail Setting 2 Mail Check and Delete Select Mail Check and Delete of sub menu The registered address is displayed as the Mail To address To delete the registered address check the box and press the Delete button ...

Page 28: ...2 PDP Name MYPDP 1 It sends you following message Error Internal temperature is too high please check unit TITLE Message from PDP PDP Model Name 42H2A TCP IP 172 21 95 222 PDP Name MYPDP 1 It sends you following message Error Power circuit has failed please check unit TITLE Message from PDP PDP Model Name 42H2A TCP IP 172 21 95 222 PDP Name MYPDP 1 It sends you following message Information Panel ...

Page 29: ...ation Setting SNMP Agent Select PDP Info of sub menu type the MIB of SNMP agent A contact name and a place of this product or a community name reference or setting and press the Set but ton for setting MIB Management Information Base 2 Trap Send Setting Trap Select Trap Send of sub menu type the host name IP address of SNMP manager PC and a community name and press the Set button for setting ...

Page 30: ... sub menu Type the panel usage time that you want to set and check the condition items under which alert messages will be sent and press the Set button 3 Trap Check and Delete Select Trap Check and Delete of sub menu The registered trap is displayed To delete it check the box and press the Delete button ...

Page 31: ...Controlling the Monitor 3 31 ...

Page 32: ...vailability of Input Signal Yes None Panel Usage Accumulated Panel use Time Example 163H hours Wide Wide Mode Full Natural Zoom Zoom Caption IN Normal Picture Condition of Picture Dynamic Natural Cinema Memory Graphics Standard Text The Monitor was turned off in Power Error because the monitor power circuit failed Unplug the monitor from AC outlet and ask servicing to a qualified service personnel...

Page 33: ...Normal Lock Volume Mute Volume Mute On Off OFF ON DPMS Setting of DPMS OFF ON Screen Saver Condition of Screen Saver Side Bar Side Bar 1 Side Bar 2 Pic Rotation ON OFF White Pattern OFF ON Also refer the owner s manual of the monitor for further details The items of Front Key Lock and Remote Control are not mentioned in the owner s manual of the monitor ...

Page 34: ...ntrol item 34 Controlling the Monitor The control page displays valid control items depending on the selected input mode signal or func tions of the monitor you use therefore there may be different controls between the described items and actual control items on the page display When the monitor is turned off only the power control is effective others are inactive 1 Power Click the Power on the su...

Page 35: ...nput source with radio button and press the Set button to change the input source Controlling the monitor 3 Sound Click the Sound on the sub menu The control page will be displayed Select the volume mute on or off with radio button and press the Set button to set the vol ume mute on or off ...

Page 36: ... further information 5 Screen Saver Click the Screen Saver on the sub menu The control page will be displayed Select items with radio button and press the Set button to set the screen saver function Please see the owner s manual of the monitor to have the further information The Side Bar Picture Rotation or White Pattern can be selected independently White Pattern will be turned off when other com...

Page 37: ... Remote Control Lock functions cannot be set on The Front Key Lock Remote Control Lock or DPMS can be selected independently Please see the owner s manual of the monitor to have the further information about DPMS function 7 Other 2 Click the Other 2 on the sub menu The control page will be displayed Press the Set button to set Auto PC function or return to factory setting condition Please see the ...

Page 38: ... command This function can be used to send other command which does not have in the menu of this board Press the Other button on the main menu The following setting page will be dis played Type the command and press the Send button to control the monitor Please see the chapter 4 Serial Port Use on page 41 or the owner s manual of the monitor for other command Configurations of RS232C Terminal The ...

Page 39: ...Serial Port Use 4 39 ...

Page 40: ...Pin Configuration Interface Fixed Protocol Stop bit Baud rate Parity Data length Flow control RS 232C 1 bit 19200 bps 8 bits RS232C serial cable with reverse type Not supplied Connection Exclusive driver software for control of this Network board is required This product does not pro vide any driver software Please consult your local dealer Further instructions about the application of the exclusi...

Page 41: ...e mode Normal Input Component COMPONENT1 2 Wide Wide mode select Input PC DVI Wide mode Natural wide Wide mode Zoom Wide mode Zoom Caption IN Wide mode Full Screen Saver White pattern On Picture Screen Saver Rotation Off Screen Saver Rotation On Screen Saver White pattern Off COMMAND ASCII HEX ASCII 43h 30h 30h 0Dh 0Ah C 0 0 CR LF EXAMPLE POWER ON C00 FUNCTION CODE END CODE COMMAND OPERATION AV1 s...

Page 42: ...ress the Status but ton on the remote control unit to appear the Dealer Mode Menu 4 VOLUME INPUT MENU OK Position Up e Button Status Button Front key lock 0 0 0 0 0 0 0 Input Max volume On Screen Display MENU Initial setup Remote control Dealer Mode Menu Dealer Mode Menu 3 Disconnect and connect the output cable of the Network Board The Network Board begins entering the service mode and it takes a...

Page 43: ...s page 2 Send a command ASCII of table2 to the Network Board 3 The Network Board sends a return of table2 to your computer 4 Exit the service mode _ Space XXXX New Password Must be typed 4 digits XXXXXXXXXXXX New Address Must be typed 12 digits Item to write Command to Network Board Return to Computer Password W_PXXXX CR XXXX CR IP Address W_IXXXXXXXXXXXX CR XXXXXXXXXXXX CR Subnet Mask W_NXXXXXXXX...

Page 44: ...44 Serial Port Use ...

Page 45: ...Appendix 5 45 ...

Page 46: ...lt Gateway DNS Computer Name PC05 IP Address 192 168 0 5 Subnet Mask 255 255 255 0 Default Gateway DNS Hub Monitor Name PD01 IP Address 192 168 0 2 Subnet Mask 255 255 255 0 Default Gateway 0 0 0 0 DNS 0 0 0 0 Computer Name PC05 IP Address 192 168 0 5 Subnet Mask 255 255 255 0 Default Gateway DNS Connect the monitor PD01 to the control computer PC05 via the hub When the monitor is connected to the...

Page 47: ...eway 192 168 200 1 DNS 192 201 1 5 IP Address 192 168 200 1 IP Address 192 168 10 1 IP Address 192 168 100 1 Computer Name PC05 IP Address 192 168 10 5 Subnet Mask 255 255 255 0 Default Gateway 192 168 10 1 DNS 192 201 1 5 Computer Name PC10 IP Address 192 168 10 10 Subnet Mask 255 255 255 0 Default Gateway 192 168 10 1 DNS 192 201 1 5 Computer Name PC51 IP Address 192 168 10 51 Subnet Mask 255 25...

Page 48: ...enable the JavaScript please see further instructions on the next page Proxy setting In some cases your web browser is set up to use the proxy server for the internet or intranet connection In this case when you install this product into the local network you should set up the proxy setting of web browser preference correctly Especially when con necting the monitor and computer with a UTP cross ca...

Page 49: ... 6 0 ActiveScript setting Select the Internet Options menu from the Tool menu on the web browser and then select Security tab and click Customize Level button On the security setting window scroll down and find the Scripting item make sure that Enable is selected in item Active Scripting ...

Page 50: ...et connection from the local area network check the item Use a proxy server and enter the proxy server address and port correctly in the proxy settings window For further instruction please consult your network administrator Not using proxy server Uncheck the item Use a proxy server If you connect the monitor to the computer directly with UTP cross cable this must be unchecked To designate proxy s...

Page 51: ...Navigator v 7 0 JavaScript Setting Select the Preference menu from the Edit menu on the web browser and then select the item Advanced Scripts Plugins in the Category column Make sure that the Enable JavaScript for Navigator is checked ...

Page 52: ...e local area network select the item Manual proxy configuration Enter the proxy server address and port number correctly on the HTTP Proxy item For further instruction please consult your network administrator Not using proxy server Select the item Direct connection to the Internet in the proxy setting window If you connect the monitor to the computer directly with UTP cross cable this must be sel...

Page 53: ... 19 2Kbps Fixed Terminal D sub 9 pin Power source Supplied from the PDP monitor Power consumption 3 0 watts Dimensions W x H x D 4 2 x 1 4 x 5 3 107 x 34 9 x 135mm Weight 0 92 lbs 420 g Operating temperature 41 F 95 F 5 C 35 C Storage temperature 14 F 140 F 10 C 60 C Accessories Owner s Manual The specifications are subject to change without notice Applicable monitor model PDP 42H2A series The abo...

Page 54: ... not used 5 not used 6 RD Receive data 7 not used 8 not used 1 2 3 4 5 6 7 8 8 pin modular connector RJ 45 Input port specification 1 2 3 4 5 6 7 8 9 Port of PDP Monitor pin No Signal Function 1 not used 2 T x D Transfer data 3 R x D Receive data 4 not used 5 Ground 6 not used 7 not used 8 not used 9 Vcc 5V Power Source of PDP Monitor ...

Page 55: ...55 MAC Address The MAC address is indicated on the rating label at the top of the cabinet case MAC Address MAC Address ...

Page 56: ...Printed in Japan Part No 610 317 5157 1AA6P1P4656 IDYJB ...

Reviews: