background image


ECD-T1545 

SIRIUS SATELLITE RADIO OPERATING MANUAL 
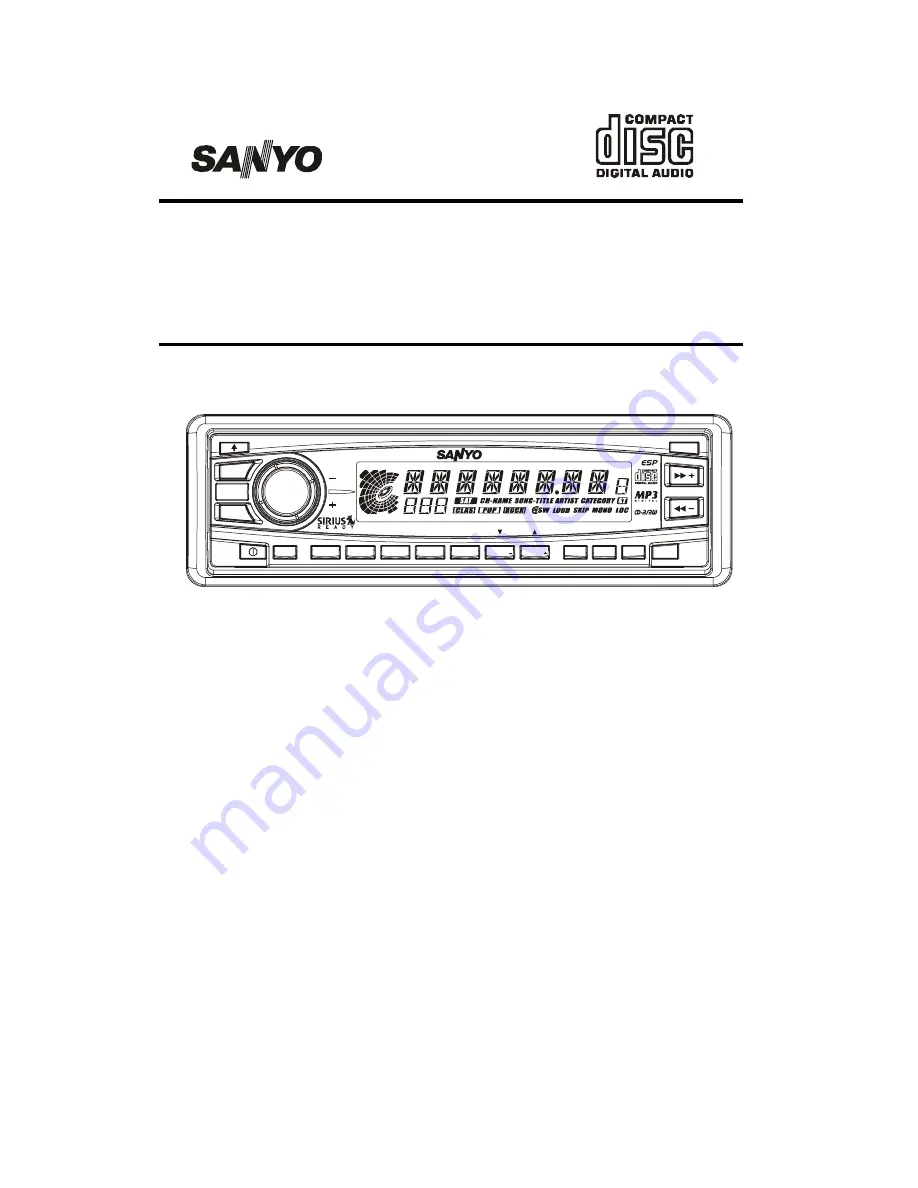


VOLUME

OPEN

SEL

IR

EQ

DSP

AS/PS

MON

MUT

LOC

MODE

MANU/SKIP/CH

BAND

LOU/ENT/ENT

A-Z/0-9

ECD-T1545

50W x 4

P.SCN

MP 3

1


PAU

3


RPT

2


SCN

4


SHF

6


DISC

S-MODE

CAT-DIR

5


DISC

SW


Fold Down Panel Detachable 
High Power FM/AM Stereo Receiver 
Compact Disc Player/MP3 Player/With ESP 
ISO Mounting with Removable Trim Ring 
Sirius Function 
Remote Control   
CD-R/RW Compatibility 


(English) 

SIRIUS OPERATION……………. 2~3 


1

Summary of Contents for ECD-T1545

Page 1: ...ENT ENT A Z 0 9 ECD T1545 50W x 4 P SCN MP 3 1 PAU 3 RPT 2 SCN 4 SHF 6 DISC S MODE CAT DIR 5 DISC SW Fold Down Panel Detachable High Power FM AM Stereo Receiver Compact Disc Player MP3 Player With ESP ISO Mounting with Removable Trim Ring Sirius Function Remote Control CD R RW Compatibility English SIRIUS OPERATION 2 3 1 ...

Page 2: ...up or down SEARCHING STATION 4 When the AS PS P SCAN MP3 button 4 is pressed the channel searches for each user preset station from SR1 to SR2 to SR3 When an available channel is detected the station will be held at that preset number and play for 5 seconds After that it will mute and search for another available station STORING PRESET STATIONS 8 The preset buttons 8 can be used to store 6 station...

Page 3: ...tton 3 to select the channel up or down The operation of skip channel function In Skip mode pressing LOC S MODE button 5 for more than 3 seconds sets the SKIP channel mode Details for set or release skip channel as follows Use MANU SKIP CH or button 3 to be switched SKIP channel set or release mode sequentially Press BAND LOU ENT button 2 to select skip or release the following channel If the chan...

Page 4: ...PAU 3 RPT 2 SCN 4 SHF 6 DISC S MODE CAT DIR 5 DISC SW Fold Down Panel Detachable High Power FM AM Stereo Receiver Compact Disc Player MP3 Player With ESP ISO Mounting with Removable Trim Ring Sirius Function see separate booklet on Sirius Radio operation Remote Control CD R RW Compatibility English OPERATING INSTRUCTIONS 2 28 1 ...

Page 5: ...ted fuse If the fuse blows often carefully check all electrical connections for any short circuits and have your car s voltage regulator checked also Do not install the unit where it will be exposed to direct sunlight or hot air discharged from the car heater Do not expose the unit to water or moisture To avoid damaging the unit never insert anything other than a compact disc into the disc slot Th...

Page 6: ... such as record cleaning sprays antistatic sprays or fluids benzene or thinner to clean compact discs These chemicals will permanently damage the plastic surface of the disc When not using the disc player for extended periods of time remove the compact disc and return it to the plastic storage case This will protect the disc from dust and exposure to the sun To prevent warping the disc do not expo...

Page 7: ...PLAY SAT Channel name indicator Category Stereo Local Radio Frequency Time CD Track Number Audio Control Selected Mode CLASSIC Mono Skip SAT POP Loud Song title ROCK Channel name Artist Subwoofer CD IN indicator 4 ...

Page 8: ...unit The left side Front Panel The right side RETURNING TO THE INITIAL SETTINGS Reset Button When the front panel is detached you can find the RESET button on the front side of the unit Press the button the Microcomputer of the unit returns to the initial settings If the display window is not properly shown or the unit malfunctions press the RESET button Note The unit will not operate if panel is ...

Page 9: ...1 Each time you press the SEL button 3 shortly the item changes as follows VOL BAS TRB BAL FAD Volume Bass Treble Balance Fader 2 Rotate the VOLUME dial 2 to adjust the selected item Make the adjustment within 5 seconds after selecting After 5 seconds the display window will revert to display priority Adjustment Range BASS BAS 00 BAS 10 BAS 10 TREBLE TRB 00 TRB 10 TRB 10 BALANCE BAL L R 10L 10R FA...

Page 10: ...ode CDC or AUX CLOCK Each display time is 5 seconds the display will return to the first position after 5 seconds SET THE CLOCK 5 8 9 Press the DSP button 5 to show the clock on the LCD display Then hold the button until the clock flashes During this mode press the MANU SKIP CH button 8 to change hours or MANU SKIP CH button 9 to change minutes LOUDNESS EFFECT 6 Press BAND LOU ENT button 6 for sev...

Page 11: ... seconds they will return to seek tuning mode and AUTO appears on the display AUTOMATIC MEMORY STORING PROGRAM SCANNING 4 Automatic memory storing Press AS PS P SCAN MP3 button 4 for several seconds the radio searches for the six strongest stations and stores them into the presets of the currently selected band While searching LOC appears on the display Program scanning Press AS PS P SCAN MP3 butt...

Page 12: ... display for reception of strong station and distant position DX appears on the display for reception of weaker stations This function is effective during AUTO SEEK operation MONO STEREO 7 Press MON button 7 to select mono or stereo mode You can sometimes improve reception of distant stations by selecting mono operation 9 ...

Page 13: ...ode When the entire disc has played the unit returns to the first track and play resumes SKIPPING TRACKS 3 Press the MANU SKIP CH button to skip to the beginning of the next track Press the MANU SKIP CH button to skip to the beginning of the previous track Press and hold the MANU SKIP CH or MANU SKIP CH button 3 for several seconds to search quickly with sound in the forward or reverse direction W...

Page 14: ...THE BEGINNING OF EACH TRACK 5 This function plays the first several seconds of each track sequentially Press the SCN button 5 to begin the scan mode To cancel this mode press the SCN button 5 again REPEAT MODE 6 Press the RPT button 6 to play the current track repeatedly To cancel this mode press the RPT button 6 again SHUFFLE MODE 7 This function plays the tracks on a CD in random order Press the...

Page 15: ... reverse direction When the button is released the CD resumes normal play PLACING THE CD IN PAUSE MODE 3 While playing a CD press the PAU button 3 To resume playing press the PAU button 3 again SCAN MODE PLAYING THE BEGINNING OF TRACKS OR DISCS 4 This function plays the first several seconds of each track or disc sequentially Playing the beginning of tracks Track Scan Press the SCN button 4 to pla...

Page 16: ...SHF button 6 for several seconds The system selects a disc at random and plays all tracks on that disc When all tracks have been played the next disc is selected and Shuffle playing is repeated To cancel the track shuffle or disc shuffle mode press the SHF button 6 again SELECTING A DISC 7 8 Press the CD button 7 to select the preceding disc Press the CD button 8 to select the next disc Note Use w...

Page 17: ... or AUX mode to CD MP3 mode When the CD MP3 mode is switched on while a disc is loaded play resumes from the point at which play was stopped When the entire disc has played the unit returns to the first track and play resumes SELECTING SONG 3 4 5 6 7 10 15 Single step selection Press MANU SKIP CH or MANU SKIP CH button 10 to advance or reverse the previous song in single step Select by directory u...

Page 18: ... PS MP3 button 3 three times the unit searches file or directory from root directory by VOLUME A Z 0 9 dial 4 D DIR icon turns on if the name is a directory Display will list all available directories and songs Select the desired directory songs by using rotary encoder VOLUME A Z 0 9 dial 4 and BAND LOU ENT button 5 to confirm If the selected title is a song it starts to play If the selected title...

Page 19: ...the song Press SCN button 12 to activate deactivate scan function PLAY SONGS IN RANDOM ORDER 14 During MP3 operation press SHF button 14 to play songs in random order Press again to cancel the function DISPLAY INFORMATION 9 Press DSP button 9 to show the following information such as the clock the ID3 TAG if available song title directory name artist name other contents and other information 16 ...

Page 20: ...D operation described in page 12 If you want to switch to play MP3 files press CAT DIR button 1 or CAT DIR button 2 it will search the disc and start to play the MP3 files And the operation is the same as the MP3 operation described in page 16 If you want to revert to play CD audio tracks press CAT DIR button 1 or CAT DIR button 2 repeatedly until it reaches to the end i e when it selects the firs...

Page 21: ...2 SCN 4 SHF 6 DISC S MODE CAT DIR 5 DISC SW 1 SWITCHING TO AUX MODE 1 The unit has a pair of auxiliary input terminals see WIRING figure on page 27 This allows you to listen to an auxiliary audio source MP3 portable cassette player etc Press the MODE button 1 with the power on to switch from radio mode or Sirius mode or CD MP3 mode to AUX mode 18 ...

Page 22: ...ould occur while operating the CD CHANGER player one of the following error signs may be displayed Refer to the table below to identify the problem DISPLAY DESCRIPTION ERROR 1 MAGAZINE or MECHANISM ERROR ERROR 2 EJECT ERROR ERROR 3 LOADING ERROR ERROR 4 UNLOADING ERROR ERROR 5 ELEVATOR ERROR ERROR 6 SLED or SLED SWITCH ERROR ERROR 7 FOCUSING or DISC DATA READ ERROR ERROR 8 CLV or DATA READ ERROR E...

Page 23: ... 8 AS PS P CAN MP3 9 BAND LOU ENT ENT 10 PAU 11 SCN 12 RPT 13 SHF 14 LOC S MODE 15 DISC CAT DIR 16 DISC CAT DIR 17 1 6 Preset buttons REMOTE SENSOR IR Point the remote control handset to the remote sensor IR Press the function keys on the handset to control the system VOLUME OPEN SEL IR EQ DSP AS PS MON MUT LOC MODE MANU SKIP CH BAND LOU ENT ENT A Z 0 9 ECD T1545 50W x 4 P SCN MP 3 1 PAU 3 RPT 2 S...

Page 24: ...the player If this occurs wait for the road surface to improve before using the CD player Safety For safer driving keep the volume at a moderate level to enable you to hear outside sounds such as emergency vehicle sirens Cleaning the unit Clean the unit with a soft dry cloth Stains should be removed by wiping the surfaces with a soft cloth immersed in lukewarm water and wrung dry Never use strong ...

Page 25: ...work properly Eject Load Play The microcomputer has been affected by electrical noise Press RESET button The road surface is rough Wait for the road surface to improve before playing a disc The unit is not mounted securely Install the unit securely Be sure to use the rear strap if the vehicle does not provide support for the rear of the unit See page 26 The sound from the CD player skips The disc ...

Page 26: ...Mounting Strap and Screw X4 INSTALLATION Mounting Bracket Half Sleeve X1 INSTALLATION 1 BEFORE INSTALLATION When mounting the unit in a car keep the unit as level as possible If the unit must be mounted at an angle due to the design of the vehicle make sure the unit does not tilt by more than 300 23 ...

Page 27: ...opper outward until the bracket fits snugly in the cutout 3 Attaching the Mounting Strap to the underside of the dashboard using screw Attach the back of the unit to the Mounting Strap using support stem bolt and hardware UNIT REMOVAL 1 Insert the unlock levers into the slots on each side of the unit until they click into place 2 Pull the levers to remove the unit Notes Handle the unlock levers ca...

Page 28: ...ER BLACK Rch AUX IN CABLE BLACK WHITE Lch RED CAUTION DO NOT connect any speaker wires to the metal body or chassis of the vehicle DO NOT connect the speaker common wires to each other Connect each speaker wire directly to each speaker terminal All speaker common wires must remain floating 1 Antenna Socket Insert the plug from the antenna installed in your vehicle into this socket If your vehicle ...

Page 29: ...r and Sirius Receiving Connector Socket Connect a CD changer to the CD changer and Sirius Receiving Connector socket Connect a Sirius module to the CD changer and Sirius Receiving Connector socket see separate instruction booklet on Sirius Radio operation Connect a Sirius module and a CD changer to the CD changer and Sirius Receiving Connector socket see separate instruction booklet on Sirius Radi...

Page 30: ...onnect a patch cable not supplied from the White left channel and Red right channel RCA line output jacks to the line input terminals of the external amplifier AUXILIARY INPUT CONNECTIONS The unit has a pair of auxiliary input terminals You can connect a portable audio player through the terminals of the AUX IN cable see WIRING figure above SANYO Electric Co Ltd Printed in China Issue date 12 26 2...

Page 31: ...routine maintenance This warranty does not apply to uncrating setup installation removal of the product for repair or reinstallation of the product after repair This warranty does not apply to the elimination of car static or motor noise correction of antenna problems or damage to compact discs speakers accessories or vehicle electrical systems This warranty does not apply to repairs or replacemen...

Page 32: ...21605 Plummer Street Chatsworth CA91311 ECD T1545 Issue Number 1 Printed in Hong Kong 4 ...

Reviews: