background image

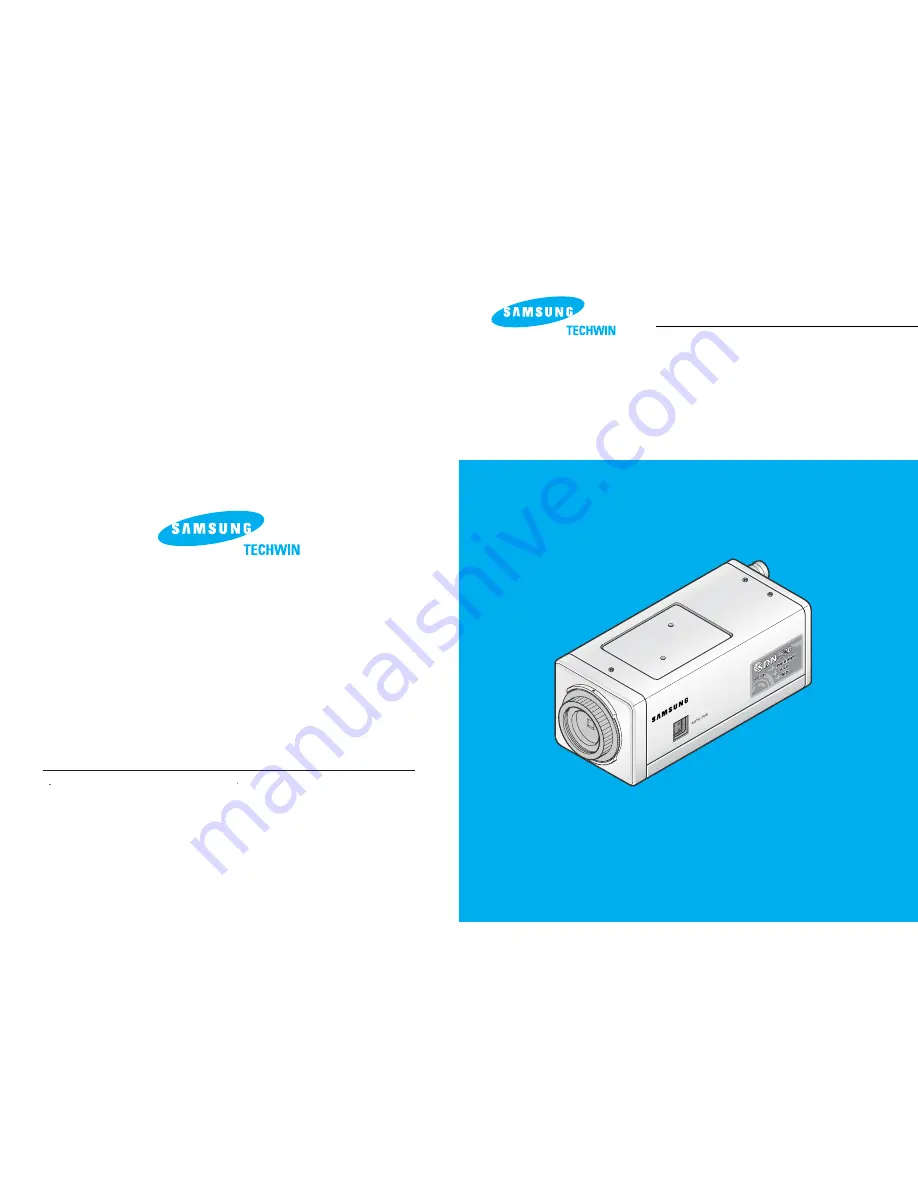
DAY & NIGHT COLOR CCD CAMERA

INSTRUCTION MANUAL

ww

w.s

am

su

ng

cc

tv.c

om

SAMSUNG CCD CAMERA

SDN-520N/P
SDN-510N/P

SAMSUNG TECHWIN CO., LTD

Optics & Digital Imaging Division
145 -3, Sangdaewon 1-Dong, Jungwon-Gu,
Sungnam, Kyungki-Do, Korea
462-121

TEL : 82 - 31- 740 - 8137~41
FAX : 82 - 31- 740 - 8145

SALES NETWORK

SAMSUNG OPTO-ELECTRONICS AMERICA, INC.

Closed Circuit Division
40 Seaview Drive, Secaucus N.J
07094,  U.S.A.

TEL : (201) 902 - 0347
FAX : (201) 902 - 9342

P/ NO. : 6806 - 0366- 01A

Printed in Korea

Summary of Contents for SDN-520N

Page 1: ...D Optics Digital Imaging Division 145 3 Sangdaewon 1 Dong Jungwon Gu Sungnam Kyungki Do Korea 462 121 TEL 82 31 740 8137 41 FAX 82 31 740 8145 SALES NETWORK SAMSUNG OPTO ELECTRONICS AMERICA INC Closed Circuit Division 40 Seaview Drive Secaucus N J 07094 U S A TEL 201 902 0347 FAX 201 902 9342 P NO 6806 0366 01A Printed in Korea ...

Page 2: ...ONNEL CAUTION CAUTION INFORMATION This equipment has been tested and found to comply with limits for a Class A digital device pursuant to part 15 of the FCC Rules These limits are designed to provide reasonable protection against harmful interference when the equipment is operated in a commercial environment This equipment generates uses and can radiate radio frequency energy and if not installed ...

Page 3: ...on mode or L L Linelock Synchronization mode Day Night The camera provides automatic mode changeover by sensing day or night conditions It can change color mode in the day condition for optimal color and BW mode in night condition for clear identification ControlledbyOSDmenuandRS 232C You can control the camera using OSD menu and RS 232C jack at a remote place High Resolution The horizontal resolu...

Page 4: ... Connecting To Monitor 18 Connecting To Power 19 Configuration of Menu 20 Setup Menu 22 Camera ID 23 Backlight 26 Motion Detection 27 Lens Selection 31 Shutter Speed Control 32 Gain Control 34 White Balance Control 35 Color Day Night 36 Synchronization Mode 37 Reset 38 Using Remote Jack 39 Troubleshooting 40 Specifications 42 7 COLOR CCD CAMERA 6 COLOR CCD CAMERA ...

Page 5: ...osed to spotlight or object reflecting strong light smear or blooming may occur Please check that the power satisfies the normal specification before connecting the camera Notes Do not install the camera in extreme temperature conditions Do not install or use the camera in an environment where the humidity is high Severe lighting change or flicker can cause the camera to work improperly Only use t...

Page 6: ...OU UR R C CA AM ME ER RA A You can remove and install this bracket on the top of the camera You must use the supplied screw or the equivalent within 4mm If not the bracket may not be fixed properly www samsungcctv com Front C Mount Adapter Attach the C Mount Adapter when using the C Mount Lens Tripod Mounting Bracket Screw Hole Used to fix the Tripod mounting bracket on the top of the camera Auto ...

Page 7: ... down in the menu screen LEFT RIGHT Button Used to change the parameter of the selected menu item It also moves the cursor to the left or right in the menu screen REMOTE Jack Used to connect a remote plug This jack also provides the motion detect signal DC VIDEO Selection Switch Used to choose DC or VIDEO according to the type of your auto iris lens Power LED The LED turns on when power is supplie...

Page 8: ...over approx 8 mm approx 2 mm 3 Remove the cover from the iris lens plug supplied and solder the lens cable to the plug as shown below Video type No 1 Pin Red Power source No 2 Pin N C No 3 Pin White Video signal No 4 Pin Black GND No 3 Pin Cover No 1 Pin connector Lens cable No 4 Pin No 2 Pin C CO ON NN NE EC CT TI IO ON N 4 Remove the protective cap and attach the lens to the camera by turning cl...

Page 9: ...r than 450g It is recommended to set the lens ALC mode to Av mode Average Pk mode can be occurred hunting Use the lens under the specification as shown Otherwise the lens can damage the camera or abnormal fixing may result C mount lens 10 mm or less CS mount lens 5 mm or less NOTE Notes Before mounting a lens please check whether it is a C mount or CS mount lens The back focus is set for the CS mo...

Page 10: ...75Ω Hi Z selection switch as shown below if you have an intermediate device Monitor CCD Camera Intermediate End monitor Connect the power plug to a normal grounded AC DC outlet Use AC 24V 300mA or DC 12V 500mA power source Be sure to connect power only after all the installation is complete Note that AC adaptor is not supplied with camera Use the UL listed class 2 power transformer of AC 24V adapt...

Page 11: ...see page 34 AGC Auto Gain Control Activates AGC feature OFF Deactivate AGC feature White Balance Control see page 35 ATW Auto Tracing White balance Automatically controls white balance AWC Auto White balance Control Automatically controls white balance Manual Manually controls white balance Color Day Night see page 36 AUTO 1 Automatic changeover by sensing day or night condition Under sunlight or ...

Page 12: ...U U 2 Select the desired feature using the UP or DOWN button Each time you press the UP or DOWN button the arrow indicator moves up or down Move the arrow indicator to the desired feature item 3 Change the status of the selected feature using the LEFT or RIGHT button 4 When completed move the arrow indicator to End and press the SET button Camera ID If you enter a camera ID the name will be displa...

Page 13: ... erase the ID name To Edit existing Camera ID Move the cursor to or in the ID generation screen and press SET button After you choose or each time you press the SET button the cursor moves to the left or right in the string of characters When the cursor moves to the wrong character correct the character by using the 4 directional buttons 5 Select the position at which the camera ID will be located...

Page 14: ...u and move the arrow indicator to Backlight using the UP or DOWN button 2 Set Backlight to ON OFF using the LEFT or RIGHT button ON Backlight Compensation The activating zone of BLC is focused on the center of monitor occupying 20 of the full screen BLC area can be focused on more by increasing the weight number OFF Deactivate 3 Press the SET button When ON is choosen you can adjust the weight You...

Page 15: ...he value If you decrease the sensitivity the camera will detect only motion that is clearly noticeable If you want to set the camera to detect minor motion increase the sensitivity You can select the sensitivity from 0 to 10 Higher sensitivity detects smaller motions at the risk of false detection Therefore zone adjustment is recommended rather than sensitivity adjustment How to Assign the Zone If...

Page 16: ...responsible for any accident or damage You can use the REMOTE jack on the rear of the camera to connect an external alarm device For details see page 39 Lens Selection You can set the type of the lens and control the brightness of the screen 1 Press the SET button to display the setup menu and move the arrow indicator to Lens using the UP or DOWN button 2 Select the lens type using the LEFT or RIG...

Page 17: ...ed You can select speed from 1 60 to 1 10 000 sec NTSC Models 1 50 to 1 10 000 sec PAL Models When the shutter speed is increased or decreased using the LEFT or RIGHT button you can find the difference by monitoring the brightness of the screen 4 When completed press the SET button Set Shutter Shutter 1 50 Set Shutter Shutter 1 60 If the camera directly faces strong fluorescent light in ESC mode t...

Page 18: ...sing the LEFT or RIGHT button The three white balance control modes are as follows ATW Auto Tracing white balance The camera automatically controls the white balance in any environment AWC Auto White balance Control The white balance is automatically adjusted in a specific environment In order to obtain the best result press the SET button while the camera focuses on white paper If the environment...

Page 19: ...o1 Select this mode under a normal light source sunlight or fluorescent lamp When changing between color and B W the OSD key does not act for 3 seconds Auto2 Select this mode under light source that have a wavelength range mostly above 800nm incandescent lamp When changing between color and B W the OSD key does not act for 3 seconds 3 L L mode Press the SET button 3 Press the SET button Setup Came...

Page 20: ...era to the default settings pre set at the factory All modes are initialized and return to the default status Reset Tx Transmit Data GND Rx Receive Data MD Motion Detection Signal Setup Camera ID OFF Backlight OFF Motion Detect OFF Lens DC Shutter ESC Gain AGC White Balance ATW Color Auto1 Sync INT Reset End Line Lock Phase 225 Press SET to Return 38 39 COLOR CCD CAMERA COLOR CCD CAMERA S SE ET TU...

Page 21: ... darker Check if the lens is stained If dirty clean the lens with soft clean cloth Check that you have properly connected the camera to an appropriate power source Refer to page 17 T TR RO OU UB BL LE ES SH HO OO OT TI IN NG G Problem Auto mode does not activate The color of the picture is not matched The image on the screen flickers Solution Have you set the Gain feature under the setup menu to O...

Page 22: ...hutter White Balance Lens Mount Min Illumination S N Ratio Power Consumption Synchronizing System Environmental conditions Dimension Weight Accessory 811 H 508 V 768 H 494 V 795 H 596 V 752 H 582 V 1 3 SONY EX VIEW HAD IT CCD 1 3 SONY EX VIEW HAD IT CCD 1 3 Solid State Image Device CCD SONY 1 3 Solid State Image Device CCD SONY 480 Color 520 BW TV Lines Horizontally 1 0 Vp p NTSC composite 1 0 Vp ...

Reviews: