background image


S3C6410-TFA Android development started 


Summary of Contents for s3c6410-TFA

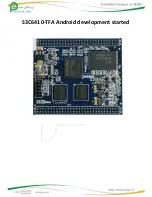
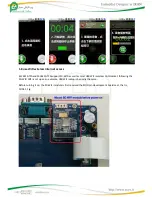
Page 1: ...S3C6410 TFA Android development started ...

Page 2: ......

Page 3: ......

Page 4: ...s 36 1 14 Serial Assistant 37 1 15 LED test 38 1 16 PWM buzzer test 39 1 17 ADC testing 40 1 18 I2C EEPROM test 41 2 Create Android build environment 42 2 1 on the development platform and cross compiler 42 2 2 Extracting installer source code 42 2 3 Configure and compile U boot 43 2 3 1 Configuring the Compile NAND boot support for the U boot 43 2 3 2 SD card support is compiled in the configurat...

Page 5: ...led production kernel compilation production production and so the firmware Android BootLoader used with traditional Linux system kernel and the difference is not great compilation methods and procedures basically no difference but slightly different configuration file Android s main secret is that it s part of the file system we are referring to the Android system will be it so in this section re...

Page 6: ...the Android system the first time there will be a calibration interface as shown the calibration process automatically detects the device you are using the touch screen touch the line if adopted will show dev touchscreen 1wire If you are using ARM itself with the touch screen controller is displayed dev touchsreen Fig Follow the prompts then click the center of the cross calibration until into the...

Page 7: ...is K2 can portrait and landscape screen display as shown below 1 4 Android shortcut icon on the status bar shows Operation We Android2 2 the status bar added four shortcut icons easy to use touch screen to be able to complete all 1 5 mp3 player Android system can automatically recognize the SD card in the mp3 file find the program group in the Android music player ...

Page 8: ...he board selection and OK Cacel keys and other open or close the program the following is the playback interface 1 6 adjust the volume Any time you can click the status bar on the two small speakers for volume control as shown below ...

Page 9: ...n use it for recording and playback the program icon as shown in the picture below on the left click on it to start the recording process recording the program starts the interface as shown Please refer to the following steps to start the recording and the recovery record ...

Page 10: ...TFAsupport SD WiFi as well as most USB WiFi wireless LAN market following the SD WiFi WiFi is set up as an example USB WiFi setup is basically the same Before turning it on the SD WiFi module is first received the SDIO pin development board seat that is CON11 Fig ...

Page 11: ...oints Enter the System Setup main menu Interface appears as shown in Figure menu point wireless network settings option Wireless network can also use the arrow keys to select and point the OK button K8 to enter Click on Wi Fi or press OK to confirm K8 will open the SD WiFi ...

Page 12: ...the OK key K8 to enter This can be seen already in search of wireless access point select the connection you want set a password window enter the password click Connect to connect the beginning Connection is successful will appear in the top task bar icon for WiFi ...

Page 13: ...d 1 9 graphical interface cable network settings Development board pre installed Android system the desktop has an Ethernet Setup as shown Click to enter it will automatically connect to the network by default to use DHCP wait a moment will be connected to complete a successful connection to click the green ICON you can view the network information as shown below ...

Page 14: ... network parameters You can see the first line Ethernet Network is checked indicating that Ethernet is enabled The second line Use static IP is set to check the status which means you need to manually set the IP address Point of the third line of the IP address set the window appears depending on your network environment is set the corresponding IP address in OK to return ...

Page 15: ...rface it will automatically reconnect to the network 2 Automatically set the IP address using DHCP Parameter settings in the network interface if the Use static IP option is checked then click on it a bit it will cancel the check while the following prompt text will become Using DHCP as shown Development board by key K1 Back to return to the previous interface automatically reconnect to the networ...

Page 16: ...0 TD SCDMA and other standard network Here we use the WCDMA Unicom customized version of the card for example on the use of steps to explain it other models or your own network authentication standard Step1 first SIM card installed as shown in Figure Step2 the card into the development board and open the 3G Dialer Step3 Dial up procedures will be based on the card chip model detection use the chip...

Page 17: ...connected points dialer button below Connect start the connection A window will pop up in this choose your 3G wireless network standard used for some models we ve tested such as HUAEI E1750 etc the dialer will automatically identify and select the appropriate network standard click Continue Step5 This is the process of connection wait a moment ...

Page 18: ...ile there will be a system status bar at the top of 3G icon will appear as shown in Figure Step7 tap the green icon to view the current network connection information as shown in Figure Step8 After networking in order to meet other network applications you can point Hide button to dial up program in the background ...

Page 19: ...ough the top status bar to return to the dialer interface you can dial interface in the mid point of Disconnect button to disconnect from the network Step10 on Youku look at it speed is good Here are S3C6410 TFAand S3C6410 TFAsupport USB 3G card model list ...

Page 20: ...CDMA Stick from BNSL HuaXing E600 NXP Semiconductors Dragonfly Huawei E1612 Huawei E1690 Huawei E180 Huawei E270 HSPA modem Huawei E630 Huawei EC168C from Zantel Huawei K3765 Huawei K4505 Huawei R201 Huawei U7510 U7517 Huawei U8110 Android smartphone Onda MW833UP A Link 3GU AT T USBConnect Quicksilver made by Option HSO driver AVM Fritz Wlan USB Stick N Alcatel One Touch X020 aka OT X020 aka MBD 1...

Page 21: ...0D EV DO Rev A LG LUU 2100TI aka AT T USBConnect Turbo Motorola 802 11 bg WLAN TER GUSB3 E MyWave SW006 Sport Phone Modem Combination Nokia CS 10 Nokia CS 15 Novatel MC990D Novatel U727 USB modem Novatel U760 USB modem Novatel Wireless Ovation MC950D HSUPA ONDA MT505UP most likely a ZTE model Olivetti Olicard 100 and others Olivetti Olicard 145 Option GlobeSurfer Icon 7 2 Option GlobeSurfer Icon 7...

Page 22: ...s 100 Series Vodafone Huawei K4605 Vodafone ZTE K3805 Z Vodafone MD950 Wisue Technology Zydas ZD1211RW WLAN USB Sphairon HomeLink 1202 Variant 1 Zydas ZD1211RW WLAN USB Sphairon HomeLink 1202 Variant 2 1 11 using a USB Bluetooth Because the Linux kernel support for the Bluetooth module driver more complete so in the Android system can support more types of USB Bluetooth adapter like WinCE supports...

Page 23: ...l not have any reaction according to the development board of the K2 buttons appear Settings click on the main interface to enter the system settings Point Wireless networks to enter the wireless network settings screen as shown ...

Page 24: ...tomatically to the equipment listed in the search the two devices shown in the figure 1 11 1 to pair with Bluetooth devices To share files via Bluetooth phone for example the first of your phone s Bluetooth feature is turned on and turn to find property and then enter the Bluetooth settings on the Android screen click Scan for devices to search for Bluetooth settings the search is completed will b...

Page 25: ...k OK to continue Confirm At this time please refer to your mobile phone a password input window will pop up in your phone can also enter 1234 and Done in the Bluetooth settings screen under the name of your phone display Paired but not connected indicates that the pairing is successful as shown below I successfully paired the device is A760 BT ...

Page 26: ...ction to your mobile phone to pair with the development board pairing is complete Android applications into the list as shown in the list click on Bluetooth File Transfer icon upper right corner of the icon Will start the Bluetooth File Transfer application the interface is as follows ...

Page 27: ...he SD card files in the file list you will be transferred to the phone s files on the tick on the right as shown below I selected the 1 png file Development board by K2 key Menu Key the following menu in the menu click More will start the next level menu ...

Page 28: ... a Bluetooth device the interface lists all Bluetooth devices to search including matching or paired the paired right of the icon is a blue tick will state as shown in A760 BT device Click on the screen of your mobile devices Please Wait will pop up the following dialog box do not ignore it and click OK immediately after ...

Page 29: ...After clicking OK the following window will pop up and display the file being sent to the mobile phone of your choice ...

Page 30: ...e file from S3C6410 TFA click Yes or receiver will begin receiving receiving process the interface shows as follows File transfer is complete it will display the following screen now the file transmission is complete 1 11 3 transfer files via Bluetooth to the development board ...

Page 31: ... to pair with the development board pairing is complete Android applications into the list as shown in the list click on Bluetooth File Transfer icon upper right corner of the icon Will start the Bluetooth File Transfer application the interface is as follows ...

Page 32: ...wing menu in the menu click More will start the next level menu In the menu click Discoverable will pop up the following screen prompting you to S3C6410 TFABluetooth will open can be to find function to 300 seconds click Yes to enter the next step ...

Page 33: ...Now pick up your phone you can send files to the board and send the completed interface display as shown below prompts you to receive a file and save it to mnt sdcard directory ...

Page 34: ...lug and Play USB can support up to 32G note the need for FAT32 USB format can only be Insert the USB development board s USB Host port note the status bar message wait a moment a flash drive will appear in the upper left corner of the picture as shown Sliding down the top task bar as shown ...

Page 35: ...atus information click on it to enter as shown In this interface the point Umount USB mass storage USB flash drives can be safely unloaded point Open folder brower Open File Manager can browse through the contents of flash drive click Open as shown ...

Page 36: ...t display is the sdcard under the file click the left most icon to switch to the root directory click the icon to the right to switch the view to List view on the list to find udisk folder open it there is U disk s contents ...

Page 37: ...not click on the screen the backlight will gradually turn off the system main interface the point of Sound display Find the Display settings settings section point Brightness turn on the backlight settings window where you can set the backlight brightness point Screen timeout in this window you can set the backlight off time delay ...

Page 38: ...use the serial assistant can be on the home page click the icon to start iTest iTest program Then click the Serial Port Assistant start serial assistant started on the left to set the serial port baud rate and other parameters ...

Page 39: ...ent from the serial port such as Shown below To send data to the serial port can be left in the Send text box for input then send Pause point is to suspend the message scroll point Clean the received message is clear 1 15 LED test To use the test LED available on the home page click on the icon to start iTest iTest program ...

Page 40: ...LED Testing LED test screen will appear as shown below just click the button to switch the LED corresponding to 1 16 PWM buzzer test To test the PWM can be on the home page click the icon to start iTest iTest program ...

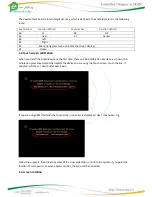
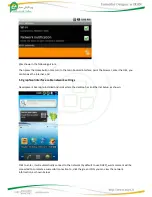
Page 41: ...Then click PWM PWM Testing testing interface will appear as shown below ...
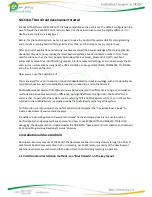
Page 42: ...op to stop the sound 1 17 ADC test ADC to be tested that is see A D conversion results click on the Home icon iTest iTest program start Then click the A D Convert the ADC conversion results will appear display interface as shown below 1 18 I2C EEPROM test To conduct I2C EEPROM read and write tests you can click on Home icon iTest iTest program start ...

Page 43: ...nt This section describes how to compile from source Android system and can be programmed to generate the Images as the establishment of Android application development environment refer to Android Programming Guide the document is located under the CD ROM A development documentation and tutorials 02 Android Programming Guide directory 2 1 on the development platform and cross compiler Android and...

Page 44: ...FA android perform Cd opt Pardazesh Sabz S3C6410 TFA android Tar xvzf tmp android u boot S3C6410 TFA 20101106 tar gz Will create the build u boot S3C6410 TFAdirectory which contains a complete description of the kernel source code 20101106 Release Date is the logo to the actual date of the CD suffix shall prevail 3 extract the Android kernel source code installed in the working directory opt Parda...

Page 45: ...e for 128M memory U boot follow these steps U boot code into the source directory run Cd opt Pardazesh Sabz S3C6410 TFA linux u boot S3C6410 TFA Make S3C6410 TFA_nand_config ram128 make Configuration and in the current directory will be compiled to support Nand start U boot bin use the SD card or USB download to Nand Flash can be used see Chapter III CD ROM images linux directory has been compiled...

Page 46: ...pile the Linux kernel Android s Linux kernel and used the standard Linux kernel is different but the methods used and steps are similar if you are not familiar with the Linux kernel configuration I suggest you use our default kernel configuration To compile the LCD for N43 model kernel so use the default kernel configuration Cd opt Pardazesh Sabz S3C6410 TFA android linux 2 6 36 android Cp config_...

Page 47: ...s Bootloader kernel and file system 3 Fabrication and installation or run a file system image To install the Android system on the development board also need to generate the various parts of the above documents to the Nand Flash programming in the can Which Bootloader and kernel is a single file image format they can easily download programming via USB or copied to an SD card and is a part of the...

Page 48: ... approach via USB or SD to be programmed into the Nand Flash in it Note UBIFS file system format has some compression so the image will produce a smaller than yaffs2 format so the programming can also be faster Tip If you use a serial touch screen controller you need to use rootfs_android s target file system package 3 3 Production ext3 file system image Use mkext3image tool you can create the tar...

Page 49: ...file system places 64M as the basic capacity calculation that is the smallest image of ext3 file 64M x 1 3 83 2M Tip If you use a serial touch screen controller you need to use rootfs_android s target file system package ...

Reviews: